Chewy Sugar Cookies – The Ultimate Comfort Treat

There’s something undeniably comforting about a freshly baked cookie, especially one that’s perfectly chewy and sweet. These classic chewy sugar cookies are a testament to simple baking magic, bringing smiles and satisfied sighs with every bite. They are the kind of treat that evokes warm memories and creates new ones, perfect for sharing during special moments or simply enjoying as a delightful personal indulgence.
Imagine the aroma filling your kitchen as these delightful cookies bake, a sweet promise of the tender, melt-in-your-mouth texture that awaits. They are remarkably straightforward to prepare, making them an accessible project for bakers of all skill levels, and the outcome is consistently rewarding, delivering pure cookie bliss without any fuss.
Why You Will Love This Recipe
- Effortless Preparation: With a total time investment of just under 30 minutes, these cookies are ideal for spontaneous baking sessions or when you need a quick sweet fix.
- No-Chill Dough Advantage: Skip the waiting game; this dough is ready to be shaped and baked immediately, saving you precious time and allowing for instant gratification.
- Adaptable Sweetness: While delicious with vanilla alone, the option to add almond extract introduces a sophisticated layer of flavor that many find irresistible, enhancing the overall cookie experience.
- A Perfect Canvas for Decor: These cookies are wonderfully receptive to your favorite frostings, glazes, or sprinkles, transforming them into festive creations for any occasion.
- Generous Yield: Producing approximately three dozen cookies per batch ensures there are plenty to go around for family gatherings, bake sales, or thoughtful gifts for loved ones.
Ingredients You Need
The foundation of any exceptional cookie lies in the quality of its ingredients, and these chewy sugar cookies are no exception. Opting for fresh, high-quality staples will elevate the final product, ensuring a delightful taste and texture that will leave everyone wanting more. Remember that using room-temperature butter and eggs is crucial for achieving the perfect consistency in your cookie dough, allowing them to blend smoothly into a luscious mixture.
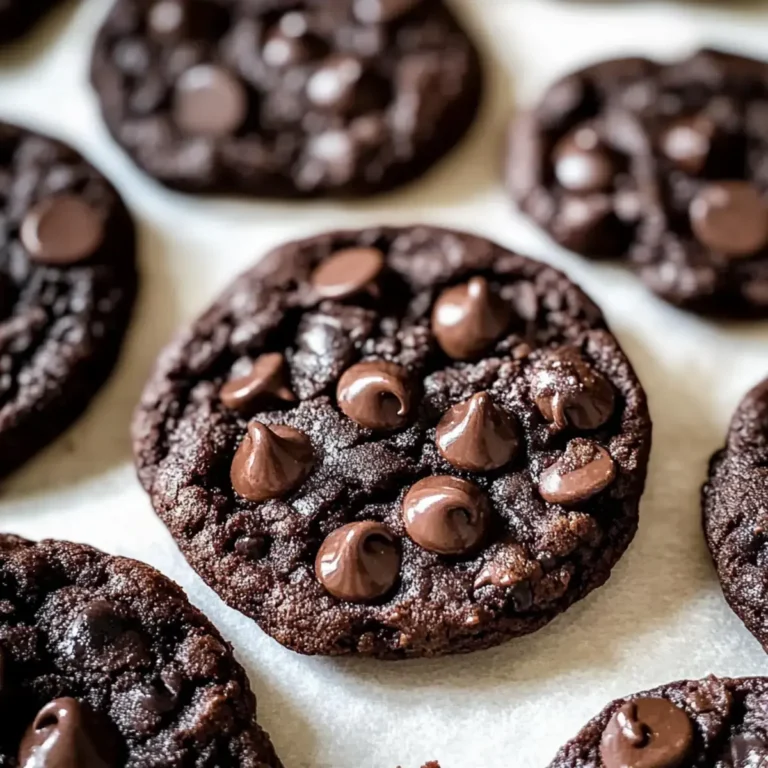
Chewy Sugar Cookies
Indulge in the delightful experience of homemade Chewy Sugar Cookies, a treat that perfectly balances softness and sweetness. These cookies are incredibly easy to prepare, making them perfect for both novice and seasoned bakers. With a melt-in-your-mouth texture and a hint of vanilla (plus optional almond extract for an extra flavor twist), each bite brings warmth and joy, whether you're enjoying them at holiday gatherings or as a simple snack any day of the week. Best of all, there's no chilling required—just mix, bake, and enjoy!
- 1 cup butter, softened
- 1 1/4 cups granulated sugar
- 1 egg
- 2 tsp vanilla extract
- 1/2 tsp almond extract (optional)
- 2 1/2 cups all-purpose flour
- 1/2 tsp baking soda
- 1/2 tsp baking powder
- 1/4 tsp salt
- 1/4 cup granulated sugar, for dipping
- 1Preheat your oven to 350 degrees Fahrenheit. Line a baking sheet with parchment paper or coat it with baking spray.
- 2In a large bowl, use a standing mixer or hand mixer to cream the softened butter and granulated sugar together until light and fluffy. This should take about 1 minute.
- 3Add the egg, vanilla extract, and optional almond extract into the creamed mixture. Beat until everything is well combined.
- 4Next, add the flour, baking soda, baking powder, and salt into the bowl. Mix until just combined to avoid overworking the dough. Remember to scrape down the sides of the bowl as needed.
- 5Roll the dough into 1-inch balls using your hands. Once formed, roll each ball in granulated sugar for added sweetness before placing them on the prepared baking sheet.
- 6Arrange the dough balls on the baking sheet about 2 inches apart. Bake in your preheated oven for 10-11 minutes or until the cookies have set but are still soft.
- 7Remove from oven and allow the cookies to cool on the baking sheet for a few minutes before transferring them to a wire rack to cool completely.
- 8Once cooled, enjoy your delicious chewy sugar cookies as they are! Feel free to frost them or cover them with a glaze if desired.
Keywords: sugar cookies, chewy cookies, easy cookies, holiday cookies, vanilla cookies, almond extract cookies, no-chill cookies, baking, dessert
- softened butter: ensures a creamy texture and helps in creaming with sugar for a light dough.
- granulated sugar: provides sweetness and contributes to the characteristic chewy texture.
- egg: binds the ingredients together and adds richness and moisture to the cookies.
- vanilla extract: imparts a classic sweet aroma and flavor essential for sugar cookies.
- almond extract (optional): offers a delightful, slightly nutty undertone that beautifully complements the vanilla.
- all-purpose flour: forms the structural base of the cookie dough.
- baking soda: acts as a leavening agent, promoting a slight spread and chewiness.
- baking powder: contributes to the lift and tender crumb of the cookies.
- salt: balances the sweetness and enhances the overall flavor profile.
- granulated sugar (for dipping): creates a lightly crunchy exterior and adds an extra touch of sweetness before baking.
Specific quantities for each ingredient can be found within the recipe card for precise measurements.
Variations
The beauty of a simple sugar cookie lies in its inherent versatility, allowing for countless delightful variations to suit different tastes and dietary needs. By making a few thoughtful adjustments, you can transform these classic treats into something uniquely special.
For those seeking a plant-based option, a vegan sugar cookie is easily achievable. Substitute the butter with a high-quality vegan butter alternative or solid coconut oil, ensuring it’s at room temperature. You can also replace the egg with a flax egg (one tablespoon of ground flaxseed mixed with three tablespoons of water, left to sit for five minutes) or a commercial egg replacer. The result will still be a wonderfully chewy and sweet cookie, perfect for a dairy-free celebration.
If you’re looking to reduce carbohydrates, a low-carb adaptation is possible. Swap the all-purpose flour for a blend of almond flour and a bit of coconut flour to achieve a similar texture, and use a sugar substitute like erythritol or xylitol in place of granulated sugar. Be mindful that these substitutions might slightly alter the texture, potentially making the cookies a bit more delicate, but the flavor can still be delightfully satisfying.
Another exciting variation involves incorporating seasonal flavors or festive add-ins. For a citrus twist, add the zest of one lemon or orange to the dough, creating a bright and refreshing cookie. During the holidays, consider adding a pinch of cinnamon or nutmeg for a warm, spiced flavor, or gently fold in colorful sprinkles for a festive sparkle. You could even experiment with a hint of peppermint extract for a wintery feel, making these cookies adaptable to any time of year or special occasion.
How to Prepare chewy sugar cookies
Step 1: Preparation is Key
Begin by preheating your oven to the optimal baking temperature of 350 degrees Fahrenheit (175 degrees Celsius). This ensures that the oven is at the correct heat when the cookie dough is ready to bake, promoting even cooking and the desired texture. Simultaneously, prepare your baking sheets by lining them with parchment paper or applying a light coat of baking spray.
Parchment paper creates a non-stick surface that prevents the cookies from adhering to the pan, which is crucial for maintaining their shape as they cool. It also significantly simplifies the cleanup process afterward. Having your baking sheets ready in advance streamlines the entire baking workflow, allowing you to move efficiently from mixing the dough to baking the cookies.
Gather all your measured ingredients and have them within easy reach on your countertop. This organized approach minimizes interruptions during the mixing process and helps prevent errors, ensuring that each component is added at the right time. A well-prepared workspace is the first step towards baking success, setting the stage for perfectly chewy sugar cookies.
Step 2: Creaming the Foundations
In a large mixing bowl, combine the softened butter and the granulated sugar. The butter should be at room temperature, meaning it’s pliable and easy to press with a finger, but not melted. This allows it to cream effectively with the sugar. Use a stand mixer fitted with the paddle attachment or a hand mixer to cream these two ingredients together until the mixture is exceptionally light and fluffy.
This creaming process is vital because it incorporates air into the butter and sugar mixture, which contributes significantly to the cookie’s tender and chewy texture. Continue mixing for approximately one to two minutes, until the color of the mixture lightens and it appears noticeably aerated. You should see a visible increase in volume and a smooth, creamy consistency.
Scrape down the sides of the bowl periodically with a spatula to ensure that all the butter and sugar are evenly incorporated and that no unmixed bits remain at the bottom or sides. This ensures a uniform batter and prevents pockets of unincorporated ingredients, leading to a more consistent cookie texture throughout.
Step 3: Incorporating the Wet Ingredients
Once the butter and sugar are perfectly creamed, it’s time to introduce the wet ingredients. Add the egg to the bowl, ensuring it’s at room temperature for better emulsification with the butter and sugar mixture. Next, add the pure vanilla extract, which provides the quintessential sweet flavor that defines sugar cookies. If you’re using the optional almond extract for an added layer of flavor, add it now as well.
Beat the mixture thoroughly using your mixer on medium speed. Continue to mix until all the wet ingredients are completely incorporated and the batter appears smooth and cohesive. This step ensures that the egg and extracts are evenly distributed throughout the base, contributing their flavors and moisture consistently to each cookie. Be sure to scrape down the sides of the bowl once more after adding these wet ingredients.
This thorough blending of wet ingredients is essential for creating a stable emulsion that will hold together during the baking process. A well-emulsified batter leads to cookies that are less likely to spread excessively or fall apart, maintaining their intended shape and chewiness. The aroma at this stage should already be wonderfully fragrant, a testament to the vanilla and almond extracts.
Step 4: Combining the Dry Elements
In a separate, medium-sized bowl, whisk together the all-purpose flour, baking soda, baking powder, and salt. Whisking these dry ingredients together before adding them to the wet mixture ensures that the leavening agents (baking soda and baking powder) and the salt are evenly distributed. This prevents any clumps or uneven distribution that could lead to some cookies rising more than others or having a salty taste in certain spots.
Gradually add this carefully combined dry ingredient mixture to the creamed butter and sugar mixture in the large bowl. Mix on low speed, or by hand using a spatula, until the ingredients are *just* combined. It is extremely important not to overmix the dough at this stage. Overmixing can develop the gluten in the flour too much, resulting in tough, rather than chewy, cookies.
You are looking for a dough that has just come together, with no visible streaks of dry flour remaining. It should still appear slightly soft. Again, use your spatula to scrape down the sides and bottom of the bowl to ensure all the flour is incorporated into the dough. The dough will be soft and slightly sticky, which is exactly what you want for chewy cookies.
Step 5: Shaping and Sugaring the Dough Balls
With the dough now ready, it’s time to form the cookies. Using your hands, take about one tablespoon of dough at a time and roll it between your palms to form smooth, uniform balls, approximately one inch in diameter. Consistency in size is important for ensuring that all the cookies bake evenly, so try to make them as close to the same size as possible.
Once you have rolled a dough ball, place it into the small bowl containing the extra 1/4 cup of granulated sugar designated for dipping. Gently roll each dough ball in the sugar until it is evenly coated. This sugary coating not only adds a delightful sparkle and an extra layer of sweetness but also contributes to a slightly crispier exterior, contrasting beautifully with the soft, chewy interior.
Arrange the sugar-coated dough balls on the prepared baking sheets, leaving about two inches of space between each one. This spacing allows the cookies room to spread slightly as they bake without merging into each other. Ensure the balls are packed gently but firmly to maintain their round shape as they bake.
Step 6: The Baking Transformation
Place the baking sheets into the preheated oven at 350 degrees Fahrenheit (175 degrees Celsius). Bake the cookies for approximately 10 to 11 minutes. The exact baking time may vary slightly depending on your oven and the size of your cookie balls, so it’s important to keep an eye on them.
You are looking for the cookies to appear set around the edges and slightly puffed in the center. They should not be deeply golden brown; a very pale golden hue is ideal. The center should still look soft and slightly underbaked, as the cookies will continue to firm up as they cool on the baking sheet. Overbaking is the primary culprit behind dry, hard cookies.
Use a timer to help you monitor the baking progress, and consider rotating your baking sheets halfway through the baking time if your oven tends to have hot spots, ensuring even cooking across the entire batch. Removing them at the perfect moment is key to achieving that desirable chewy texture.
Step 7: The Crucial Cooling Period
As soon as you remove the baking sheets from the oven, resist the urge to immediately transfer the cookies. Allow the cookies to cool directly on the hot baking sheets for about 3 to 5 minutes. During this initial cooling period, the cookies will continue to set up properly, firming their structure so they can be moved without losing their shape.
After this short rest on the baking sheet, carefully use a spatula to transfer the cookies to a wire cooling rack. Place them gently onto the rack, ensuring they are not touching each other. A wire rack allows air to circulate freely around all sides of the cookies, promoting even cooling and preventing the bottoms from becoming soggy.
Let the cookies cool completely on the wire rack. This process is essential not only for allowing them to reach their ideal texture but also for making them safe to handle and decorate if you choose to do so. Rushing this step can lead to cookies that are too soft to handle or decorate properly. Patience here is rewarded with perfect texture.
Step 8: Savor the Sweetness
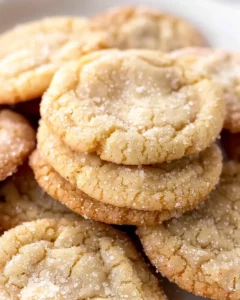
Once your chewy sugar cookies have reached room temperature and have completely cooled, they are ready to be enjoyed! Take a moment to appreciate their delightful appearance, the subtle shimmer from the sugar coating, and the promise of their tender, chewy interior.
These cookies are absolutely delicious enjoyed plain, showcasing the pure, sweet flavor of a classic sugar cookie. However, they also serve as a fantastic base for further creative expression. Feel free to frost them with your favorite buttercream, a simple glaze, or even a cream cheese frosting for an added layer of richness and flavor.
Whether enjoyed as is or dressed up, these homemade chewy sugar cookies are sure to be a hit. They represent the simple joy of baking and the pleasure of sharing a homemade treat with loved ones. Gather your friends and family, and prepare to be delighted by the wonderful taste and texture of these delightful cookies.
Pro Tips for chewy sugar cookies
To ensure your chewy sugar cookies turn out perfectly every time, a few expert insights can make all the difference. Pay close attention to the temperature of your ingredients; using butter that is softened but not melted is crucial for achieving that light and fluffy creamed mixture that forms the base of a tender cookie.
When mixing the dry ingredients into the wet, remember the golden rule: do not overmix. Mix only until the flour is just incorporated. Overworking the dough can develop gluten excessively, leading to cookies that are tough rather than wonderfully chewy. A gentle hand ensures the desired tender texture.
Accurate flour measurement is another key to success. Instead of scooping flour directly from the bag with your measuring cup, which can compact it and lead to using too much, spoon the flour into your measuring cup and then level it off with a straight edge. This technique ensures you have the correct flour-to-butter ratio for optimal chewiness and prevents dry, crumbly cookies. For even more consistent results, consider using a kitchen scale.
While this recipe boasts a no-chill dough, resting the dough in the refrigerator for about 30 minutes before baking can sometimes enhance the flavors and slightly improve the texture by allowing the ingredients to meld further. This step is optional but can be beneficial for an even richer taste. Similarly, watch your baking time closely. Cookies continue to cook slightly from residual heat after being removed from the oven, so take them out when the edges are just set and the centers still look a little soft.
Proper storage is vital for maintaining that coveted chewiness. Once completely cooled, store your chewy sugar cookies in an airtight container at room temperature. If you plan to layer them, placing a piece of parchment paper between layers can prevent them from sticking together. With these tips, you’re well on your way to baking consistently delightful chewy sugar cookies that will impress everyone.
Serving Suggestions for chewy sugar cookies
Decoration
Transform your chewy sugar cookies into edible works of art with a few simple decorating techniques. A classic choice is a simple yet elegant glaze made from powdered sugar mixed with a touch of milk or lemon juice until a smooth, drizzling consistency is achieved. You can also opt for a vibrant buttercream frosting, piped on in swirls or dollops for a festive touch. For added fun, especially for children’s parties or holidays, press colored sprinkles, nonpareils, or edible glitter onto the frosting before it sets.
Side Dishes
While these cookies are phenomenal on their own, they also pair beautifully with a variety of complementary treats. A refreshing fruit salad, bursting with seasonal berries and melons, provides a light and healthy contrast to the cookie’s sweetness. For a more decadent pairing, consider a small scoop of vanilla bean or cookie dough ice cream sandwiched between two cookies, creating an irresistible ice cream cookie sandwich. A small platter of assorted cheeses, like a mild cheddar or creamy brie, can also offer a delightful savory counterpoint for those who enjoy a sweet and salty combination.
Creative Serving Ideas
Elevate your cookie presentation beyond the ordinary by thinking outside the box. Arrange your decorated sugar cookies on a tiered cake stand for a visually appealing dessert buffet, interspersed with fresh flowers or seasonal garnishes. Create themed cookie bouquets for special occasions by attaching cookies to skewers and arranging them in a decorative vase. For a casual gathering, serve them alongside a steaming mug of hot chocolate or a chilled glass of milk, a timeless pairing that never disappoints. You could even offer them as part of a dessert bar, allowing guests to mix and match with other sweet treats for a personalized indulgence.
Preparation & Storage
Storing Leftovers
To maintain the delightful chewiness of your leftover chewy sugar cookies, proper storage is essential. Once the cookies have completely cooled to room temperature, place them in an airtight container. Ensure the container is sealed tightly to prevent air from entering, which can cause the cookies to dry out or become stale.
If you are storing a large batch, it can be helpful to layer the cookies with parchment paper or wax paper between rows. This prevents the cookies from sticking to each other, especially if they have any frosting or glaze on them. Stored correctly at room temperature, these cookies can stay wonderfully chewy and delicious for up to a week.
Avoid storing them in humid environments or directly in sunlight, as this can negatively affect their texture and shelf life. For optimal freshness, it’s best to consume them within the first few days, though they often remain enjoyable for longer with proper care.
Freezing
Chewy sugar cookies freeze exceptionally well, making them an excellent candidate for making ahead of time or preserving any excess from a large baking session. To freeze them, ensure the cookies are completely cooled. Arrange the cooled cookies in a single layer on a baking sheet and place them in the freezer for about 1 to 2 hours. This initial freezing step helps them firm up, preventing them from sticking together when you move them to a more permanent storage.
Once hardened, transfer the frozen cookies into a heavy-duty freezer bag or an airtight freezer-safe container. Remove as much air as possible from the bag before sealing it to prevent freezer burn. Properly stored, these chewy sugar cookies can maintain their quality in the freezer for up to three months.
When you’re ready to enjoy them, you can either let them thaw at room temperature for a couple of hours or gently reheat them. Freezing is a fantastic way to ensure you always have a batch of delicious homemade cookies ready for any occasion, saving you time and effort when a craving strikes.
Reheating
If your chewy sugar cookies have been stored for a while and have lost some of their initial softness, or if you’ve thawed frozen cookies, reheating can help restore their delightful texture. The oven is an excellent method for gently warming your cookies. Preheat your oven to a moderate temperature, around 350°F (175°C). Arrange the cookies on a baking sheet in a single layer and warm them for about 5 minutes, or until they feel slightly soft and warm to the touch.
For a quicker, single-serving option, the microwave can be used with caution. Place one cookie on a microwave-safe plate and heat it for 10 to 15 seconds intervals. Be very careful not to overheat, as this can make them tough. The goal is just to warm them through to restore some of their chewiness.
Another less common but effective method is using the stovetop. Place a few cookies in a dry skillet over very low heat and cover the skillet with a lid. Gently heat for about 2 minutes, checking frequently. This method requires careful attention to prevent burning. Whichever method you choose, reheating can bring your chewy sugar cookies back to their delicious, soft, and chewy glory.
Frequently Asked Questions
-
How do I ensure my chewy sugar cookies maintain their signature soft and chewy texture, rather than becoming crisp or cakey?
Achieving the perfect chewy texture primarily hinges on two key factors: baking time and ingredient ratios. Do not overbake your cookies; remove them from the oven when the edges are set but the centers still appear slightly soft and underbaked. They will continue to firm up as they cool on the baking sheet due to residual heat. Precisely measuring your flour is also critical; overusing flour can lead to dry, cakey cookies. Using the spoon-and-level method for measuring flour, or ideally weighing it, will ensure the correct ratio of dry to wet ingredients. Additionally, ensure your butter is softened but not melted, and consider using a mix of granulated and a small amount of brown sugar, as the molasses in brown sugar contributes to moisture and chewiness.
-
What are the best ingredient substitutions or adjustments I can make to cater to dietary restrictions, such as gluten-free or vegan preferences, while still achieving a similar texture?
For gluten-free chewy sugar cookies, a good starting point is a high-quality gluten-free all-purpose flour blend that already contains xanthan gum. You might need to slightly adjust the liquid content or baking time as gluten-free flours can absorb moisture differently. For vegan versions, replace the butter with a solid vegan butter substitute or refined coconut oil (which has a neutral flavor) at room temperature. The egg can be substituted with a flax egg (1 tbsp ground flaxseed + 3 tbsp water, rested for 5 minutes) or a commercial egg replacer. These substitutions may slightly alter the final texture, potentially making the cookies a bit more delicate or prone to spreading, so careful monitoring during baking is recommended.
-
If I want to decorate my chewy sugar cookies, what are the most effective frosting or glaze options that complement their flavor and texture without making them overly sweet or soggy?
When decorating, it’s best to choose frostings that complement the simple sweetness of the sugar cookie. A classic American buttercream, made with softened butter, powdered sugar, a splash of milk or cream, and vanilla extract, is a popular choice. For a less sweet option, a simple glaze made from powdered sugar and a liquid like milk, lemon juice, or even a liqueur (for adult cookies) can provide a delicate sheen and flavor. Ensure the cookies are completely cooled before frosting to prevent the frosting from melting or the cookies from becoming soggy. You can also use a thin royal icing, which hardens nicely, allowing for intricate designs and sprinkles without adding too much moisture or sweetness. The key is balance; you want the decoration to enhance, not overpower, the cookie’s natural charm.