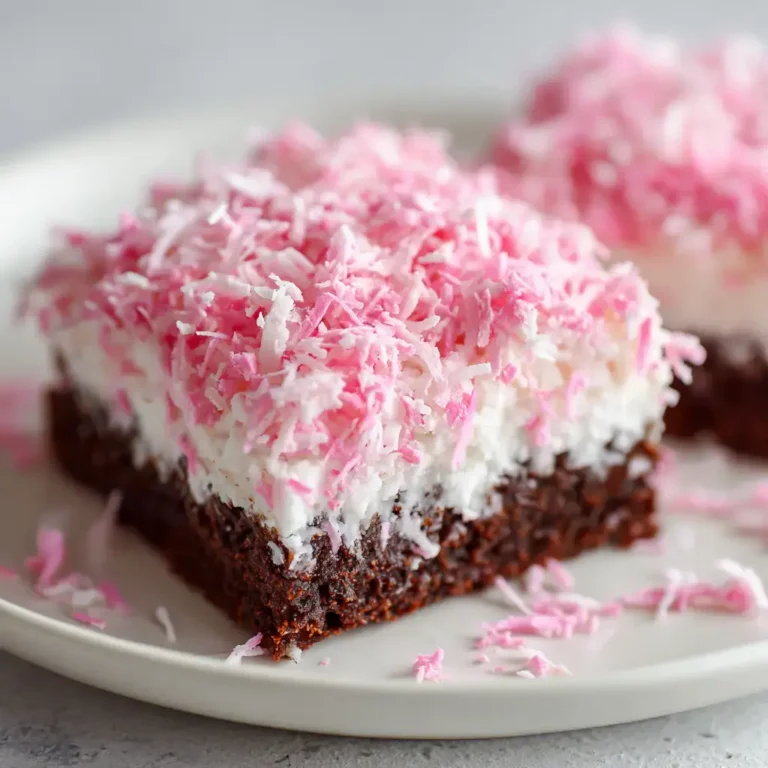
Strawberry Shortcake | An Easy Spring Dessert!

Spring has officially sprung, and what better way to celebrate the season’s bounty than with a timeless classic? This strawberry shortcake recipe is an absolute delight, bringing together the vibrant sweetness of fresh strawberries with the comforting embrace of tender, homemade biscuits and airy whipped cream. It’s a dessert that whispers of sunny afternoons and joyous gatherings, promising pure bliss with every single bite.
Forget those store-bought imitations; this recipe elevates the humble shortcake to an art form. The secret lies in the delicate balance of textures and flavors, creating a symphony in your mouth that is both elegant and incredibly satisfying. Prepare to be enchanted by the simplicity and sheer deliciousness of this truly exceptional treat.
Why You Will Love This Recipe
- Fluffy Homemade Biscuits: Unlike dense or dry versions, these biscuits are incredibly light and tender, thanks to a clever technique that ensures a melt-in-your-mouth experience.
- Vibrant Macerated Strawberries: By allowing the strawberries to macerate with sugar, they release their natural juices, creating a lusciously sweet and slightly tart filling that perfectly complements the biscuits.
- Effortless Whipped Cream: Achieve perfect, cloud-like whipped cream with minimal effort, providing a cool and creamy contrast that enhances every mouthful of the shortcake.
- Beginner-Friendly: Even if you’re new to baking, this recipe is designed for success, with clear instructions and a forgiving dough that makes creating homemade biscuits a breeze for everyone.
- Customizable Sweetness: The recipe offers a delightful sweetness that is not overwhelming, allowing you to easily adjust the sugar in the strawberries and whipped cream to suit your personal preference.
Ingredients You Need
The magic of this strawberry shortcake recipe truly lies in the quality and freshness of its ingredients. Opting for the freshest seasonal produce will undoubtedly elevate the final taste and texture, ensuring a dessert that is as beautiful to look at as it is delicious to eat. Each component plays a vital role in creating the harmonious balance that makes this dessert so beloved.
Strawberry Shortcake
This strawberry shortcake recipe with homemade buttery biscuits and fluffy whipped cream is the perfect spring dessert. It's beginner-friendly and can be customized with your favorite berries.
- For the Biscuits:
- 1 cup all-purpose flour
- 2 teaspoons sugar
- 2 teaspoons baking powder
- ½ teaspoon orange zest
- 4 ounces cream cheese, cut in cubes
- ⅓ cup milk
- 1 tablespoon milk, for brushing the tops
- For the Strawberries:
- 1½ pounds fresh strawberries, hulled and sliced
- ⅓ cup sugar
- For the Whipped Cream:
- 1 cup whipping cream
- ½ teaspoon pure vanilla extract
- 1 tablespoon sugar
- 1For the Biscuits: Preheat the oven to 425°F.
- 2Mix flour, sugar, baking powder, and orange zest in a large bowl.
- 3Add in the cream cheese and mash it with a fork until the mixture resembles coarse crumbs.
- 4Stir in ⅓ cup of milk and form a dough.
- 5Flour your hands and divide the dough into 8 balls. Place the dough balls 3 inches apart on a greased baking sheet or silpat.
- 6Using a drinking glass, flatten the dough balls to ½ inch thickness, brush the tops with milk, and sprinkle a bit of sugar on top.
- 7Bake for 12 to 15 minutes or until golden brown. Remove the biscuits from the oven and allow them to cool down to room temperature.
- 8For the Strawberries: Meanwhile, once you have cleaned and sliced the strawberries, take ⅓ of the strawberries and mash them with a potato masher. Add in the rest of the strawberries and pour in the sugar. Set aside for at least 20 minutes.
- 9For the Whipped Cream: In the meantime, prepare the whipped cream by combining together the whipping cream, vanilla, and sugar in a bowl. Cover and chill in the refrigerator for 30 minutes. When chilled, beat the mixture with an electric mixer until stiff peaks form.
- 10For the Shortcakes: Start assembling the shortcakes by cutting the biscuits in half, first.
- 11Place a tablespoon of the strawberry mixture on the bottom half of the biscuit and top with whipped cream.
- 12Cover with the top half of the biscuit, and top it with whipped cream and a few more strawberries.
- 13Serve immediately, or put the cakes in the refrigerator until ready to serve.
Keywords: Strawberry Shortcake, Dessert, Spring, Berries, Biscuits, Whipped Cream, Easy, Beginner-friendly
Please refer to the recipe card above for the exact quantities of each ingredient required to achieve perfect results every time.
Variations
Elevate your strawberry shortcake experience with a few inspired twists that cater to different tastes and dietary needs. These variations ensure that everyone can enjoy this classic dessert, no matter their preferences.
Vegan Delight: For a completely plant-based version, substitute the milk in the biscuits with your favorite non-dairy alternative like almond or oat milk. The cream cheese can be replaced with a dairy-free cream cheese alternative or a blend of soaked cashews and lemon juice for richness. For the whipped cream, opt for chilled coconut cream or a store-bought vegan whipping cream. This ensures the vibrant flavors and delightful textures are accessible to everyone.
Low-Carb Indulgence: To make this a low-carbohydrate treat, consider using almond flour or coconut flour for the biscuits, adjusting the liquid as needed. Sweeten the strawberries and whipped cream with a keto-friendly sweetener like erythritol or stevia. While the biscuit texture might change slightly, the burst of berry flavor and creamy topping will still offer a satisfying, guilt-free dessert experience.
Berry Medley Swap: While strawberries are the star, don’t hesitate to introduce other berries into the mix. A combination of raspberries, blueberries, and blackberries can add a wonderful depth of flavor and visual appeal. Simply macerate your chosen berry blend with sugar and a touch of lemon zest for an extra zing. This is a fantastic way to use up whatever fresh berries are available and create a unique shortcake each time.
How to Prepare strawberry shortcake recipe
Step 1: Crafting the Perfect Biscuits
Begin by preheating your oven to a welcoming 425°F (220°C). In a generously sized mixing bowl, you will combine your dry ingredients. This includes one cup of all-purpose flour, two teaspoons of granulated sugar for a hint of sweetness, two teaspoons of baking powder to ensure a beautiful lift, and half a teaspoon of fragrant orange zest to add a subtle citrus note that awakens the palate.
Whisk these dry components together thoroughly until they are completely integrated. This initial step is crucial for even distribution of leavening agents and flavor. Once whisked, add four ounces of cream cheese, cut into small cubes. The cream cheese is the secret to the biscuits’ tender and slightly rich crumb, offering a delightful counterpoint to the sweetness of the berries.
Using a pastry blender, a fork, or even your fingertips, cut the cream cheese into the dry ingredients until the mixture resembles coarse crumbs. This process should be done swiftly to prevent the cream cheese from becoming too soft. The goal is to have small, pea-sized pieces of cream cheese distributed throughout the flour mixture, which will melt and create pockets of tenderness during baking.
Now, gently stir in one-third cup of milk. Add the milk a little at a time, mixing until a cohesive, but still slightly shaggy, dough begins to form. Avoid overmixing, as this can lead to tough biscuits. The dough should just come together; a few dry spots are perfectly acceptable at this stage.
Lightly flour your hands, and gently divide the dough into eight equal portions. Resist the urge to knead the dough. Instead, gently roll each portion into a ball and then flatten it. Place these dough balls onto a greased baking sheet or a silpat-lined baking sheet, ensuring you leave at least three inches of space between each one to allow for expansion during baking.
Using the palm of your hand or the bottom of a drinking glass, gently flatten each dough ball until it is about half an inch thick. This uniform thickness ensures even baking. For a golden-brown finish and a touch of sweetness, brush the tops of the flattened biscuits with a tablespoon of milk and then sprinkle them with a little extra sugar. This creates a lovely, slightly crisp exterior.
Finally, carefully place the baking sheet into the preheated oven. Bake for approximately 12 to 15 minutes, or until the biscuits are beautifully golden brown on top and around the edges. Once baked to perfection, remove them from the oven and transfer them to a wire rack to cool completely. It is essential that they are fully cooled before assembling to prevent the whipped cream from melting prematurely.
Step 2: Macerating the Strawberries
While the biscuits are cooling, it’s time to prepare the vibrant strawberry filling. Start with one and a half pounds of fresh strawberries. Ensure they are thoroughly washed, hulled (meaning the green tops are removed), and then sliced. The size of your slices can be adjusted to your preference, but aim for pieces that are easy to scoop and enjoy.
Take approximately one-third of these prepared strawberries and place them in a separate bowl. Using a potato masher or a sturdy fork, gently mash these strawberries. The goal here is not to create a smooth puree, but rather to break them down slightly to release their juices and soften their texture. This maceration process is key to developing a rich, syrupy filling.
Once the first third of the strawberries have been mashed, add the remaining whole sliced strawberries into the same bowl. Pour in one-third cup of sugar over the mixture. The sugar will draw out the natural moisture from the strawberries, creating a delightful syrup as it mingles with their juices.
Gently stir everything together until the sugar is well distributed amongst the strawberries. Cover the bowl and set it aside to macerate for at least 20 minutes. This resting period allows the flavors to meld beautifully and the strawberries to soften, creating that irresistible, juicy filling that defines a perfect strawberry shortcake. During this time, the sugar will dissolve, and the berries will release their sweet, fragrant juices.
Step 3: Whipping Up the Cream
Now, let’s turn our attention to the cloud-like whipped cream that will crown your shortcakes. In a large, chilled mixing bowl, combine one cup of whipping cream (also known as heavy cream), half a teaspoon of pure vanilla extract for that classic flavor, and one tablespoon of sugar for a touch of sweetness.
Using a whisk or an electric mixer, begin to whip the cream mixture. It’s best to cover the bowl with plastic wrap and place it in the refrigerator for at least 30 minutes before you intend to whip it. This chilling process helps the cream whip up faster and achieve firmer peaks.
Once the cream mixture is thoroughly chilled, use a hand-held electric mixer or a stand mixer fitted with the whisk attachment. Beat the cream on high speed. Continue beating for about 4 to 5 minutes, or until stiff peaks form. Stiff peaks mean that when you lift the beaters out of the cream, the cream stands up straight without collapsing. Be careful not to overbeat, as this can turn the cream into butter.
The resulting whipped cream should be light, airy, and hold its shape beautifully. This provides the perfect creamy counterpoint to the tender biscuits and the sweet, juicy strawberries, creating a balanced and exquisite dessert experience.
Step 4: Assembling the Masterpieces
With all components ready – cooled biscuits, macerated strawberries, and fluffy whipped cream – it’s time for the most exciting part: assembly. Carefully take each cooled biscuit and, using a serrated knife, slice it horizontally in half. You want to create a distinct top and bottom half for each shortcake, similar to how you would prepare a sandwich.
Start with the bottom half of the biscuit. Generously spoon a tablespoon or more of the macerated strawberry mixture onto the cut side of the biscuit. Ensure you include plenty of the delicious syrupy juices released during the maceration process; this is where a lot of the flavor is concentrated.
Next, add a dollop of your freshly whipped cream on top of the strawberry layer. Don’t be shy; a good amount of cream is essential for that classic shortcake indulgence. You can use a spoon or a piping bag fitted with a star tip for a more decorative finish, which adds a professional touch to your homemade dessert.
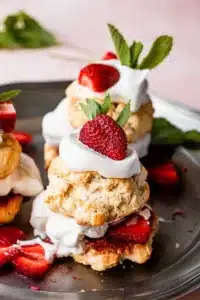
Now, gently place the top half of the biscuit over the whipped cream and strawberry layer. To complete the presentation and add even more flavor, top the assembled shortcake with another generous swirl of whipped cream. Add a few more of those luscious macerated strawberries on top of the whipped cream for a beautiful visual appeal and an extra burst of fruity goodness.
Serve these delightful strawberry shortcakes immediately to enjoy them at their absolute best. The combination of warm, tender biscuit, cool cream, and sweet berries is truly unparalleled when served fresh. The textures and temperatures are at their peak, offering a truly memorable dessert experience that is sure to impress.
Step 5: Enjoying Your Creation
The moment of truth has arrived! Your beautiful, homemade strawberry shortcakes are ready to be savored. Present them to your guests, or simply indulge yourself with this delightful spring treat. The aroma alone is enough to make anyone’s day brighter.
Take your first bite and experience the perfect harmony of flavors and textures. The slightly crisp exterior of the biscuit gives way to a tender, crumbly interior. This is immediately complemented by the juicy, slightly tart sweetness of the macerated strawberries, followed by the cool, airy lightness of the whipped cream. Each element plays its part perfectly.
This dessert is a celebration of simple, fresh ingredients coming together to create something truly special. It’s a testament to the fact that sometimes, the most delicious treats are the ones that require minimal fuss but deliver maximum flavor and enjoyment. So, sit back, relax, and relish every single bite of your handcrafted strawberry shortcake.
Step 6: Optional Cooling for Later Enjoyment
While serving immediately is highly recommended for the best texture, there might be instances where you need to prepare them slightly ahead of time or refrigerate them for later enjoyment. If you choose to refrigerate the assembled shortcakes, it’s important to do so carefully to maintain their integrity as much as possible.
Place the assembled shortcakes in an airtight container. Try to layer them with parchment paper between them if you are stacking them to prevent them from sticking together. This will help preserve the texture of the biscuits and the stability of the whipped cream for a short period. This method is best for shortcakes that will be consumed within a few hours.
When you are ready to serve them after refrigeration, you can let them sit at room temperature for about 10-15 minutes before eating. This allows the chill to slightly dissipate from the biscuits and cream, making them more palatable. The strawberries will continue to release their juices, which can actually enhance the flavor further.
However, it is important to note that over time, the whipped cream may lose some of its loft and the biscuit might soften more than desired due to moisture from the strawberries. For the ultimate shortcake experience, consuming them fresh is always the ideal choice. This step is more of a practical consideration for convenience rather than an enhancement of the dessert itself.
Pro Tips for strawberry shortcake recipe
- Don’t Overmix the Biscuit Dough: Overmixing develops the gluten in the flour, leading to tough, dense biscuits. Mix just until the dough comes together, and you’ll achieve that signature tender crumb.
- Chill Your Creaming Tools: For the fluffiest whipped cream, make sure your mixing bowl and whisk attachment (if using an electric mixer) are thoroughly chilled. This helps the cream whip up faster and achieve stiff peaks more easily.
- Adjust Strawberry Sweetness to Taste: The sweetness of strawberries can vary greatly depending on the season and variety. Taste your macerated strawberries and adjust the sugar accordingly to achieve your desired level of sweetness.
- Use Fresh, Ripe Berries: The quality of your strawberries is paramount. Opt for bright red, fragrant berries that are just ripe for the best flavor and texture in your shortcakes. Avoid any that are bruised or overripe.
- Cool Biscuits Completely: This is a critical step. Assembling shortcakes with warm biscuits will cause the whipped cream to melt instantly, creating a soupy mess. Patience is key here for a perfect final product.
- Consider Using a Food Processor: For an even quicker biscuit dough, you can pulse the dry ingredients and cream cheese in a food processor until crumbly, then add the milk and pulse briefly until just combined. This is a great time-saving hack for busy bakers.
Serving Suggestions for strawberry shortcake recipe
Decoration
Elevate the visual appeal of your strawberry shortcakes with thoughtful decorations. A final dusting of powdered sugar can add a touch of elegance, mimicking a light snowfall. Fresh mint leaves offer a vibrant green contrast and a hint of refreshing aroma, which pairs beautifully with the sweetness of the berries and cream. You can also add a few whole strawberries or even a strawberry fan as a garnish on top of the whipped cream for an extra special touch.
Side Dishes
While strawberry shortcake is a complete dessert on its own, it pairs wonderfully with certain beverages. A cold glass of fresh lemonade or iced tea provides a refreshing counterpoint to the sweetness. For a warm beverage, consider a light, floral tea like Earl Grey or a delicate herbal infusion. Coffee, especially a lighter roast or an iced coffee, also complements the flavors beautifully, especially if you’re serving it for brunch.
Creative Serving Ideas
For a more interactive experience, consider deconstructing the shortcake elements and allowing guests to build their own. Present the biscuits (sliced), macerated strawberries, and whipped cream in separate bowls. This is particularly fun for parties and allows everyone to customize their shortcake to their exact liking. Alternatively, for a whimsical touch, serve miniature shortcakes in individual ramekins or glasses for an elegant, single-serving dessert.
Preparation & Storage
Storing Leftovers
If you happen to have any leftover strawberry shortcakes, it’s best to store the components separately to maintain their optimal texture. Store the cooled, sliced biscuits in an airtight container at room temperature for up to two days. Keep the macerated strawberries in their original container, tightly covered, and refrigerate them for up to three days; they will continue to soften and release more juice, becoming even more delicious.
Freezing
Freezing assembled shortcakes is generally not recommended, as the texture of the whipped cream and biscuit can be compromised upon thawing. However, you can freeze the plain, baked biscuits. Once completely cooled, wrap them tightly in plastic wrap and then place them in a freezer-safe bag or container. They can be frozen for up to one month. Thaw them overnight in the refrigerator before using.
Reheating
If you have frozen biscuits, allow them to thaw completely in the refrigerator. Once thawed, you can gently warm the biscuits in a low oven (around 300°F or 150°C) for a few minutes until they are warmed through. Be careful not to overheat them, as this can dry them out. The strawberries and whipped cream should be prepared fresh when you are ready to assemble and serve.
Frequently Asked Questions
-
Can I make the biscuits ahead of time?
Yes, you can absolutely make the biscuit dough ahead of time and refrigerate it for up to 24 hours. Before baking, allow the dough to sit at room temperature for about 20-30 minutes to make it easier to handle. For best results, bake them just before you plan to assemble the shortcakes. Storing the baked biscuits is also an option, as they can be kept at room temperature for a couple of days in an airtight container.
-
What is the best way to ensure my whipped cream is perfectly stiff?
Achieving stiff peaks for whipped cream involves a few key factors. Ensure your heavy cream is very cold, ideally straight from the refrigerator. Chilling your mixing bowl and whisk attachment for at least 30 minutes beforehand also makes a significant difference. Start mixing on a low speed to break down the fat globules, then gradually increase to high speed. Watch closely; once stiff peaks form (they stand straight up without drooping), stop mixing immediately to prevent turning your cream into butter.
-
Can I use frozen strawberries instead of fresh?
While fresh strawberries are highly recommended for their superior flavor and texture, you can use frozen strawberries in a pinch. However, be aware that frozen strawberries will release significantly more liquid as they thaw, and their texture will be much softer, almost mushy. If using frozen, thaw them completely, drain off excess liquid (you can save this for a syrup!), and use them immediately in the maceration process. The final shortcake might be wetter than usual, but still enjoyable. For the best results, fresh is always the way to go.