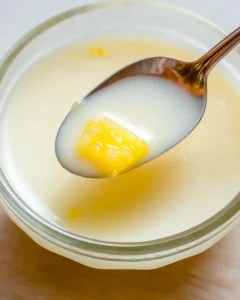
Pineapple Glaze for Cake
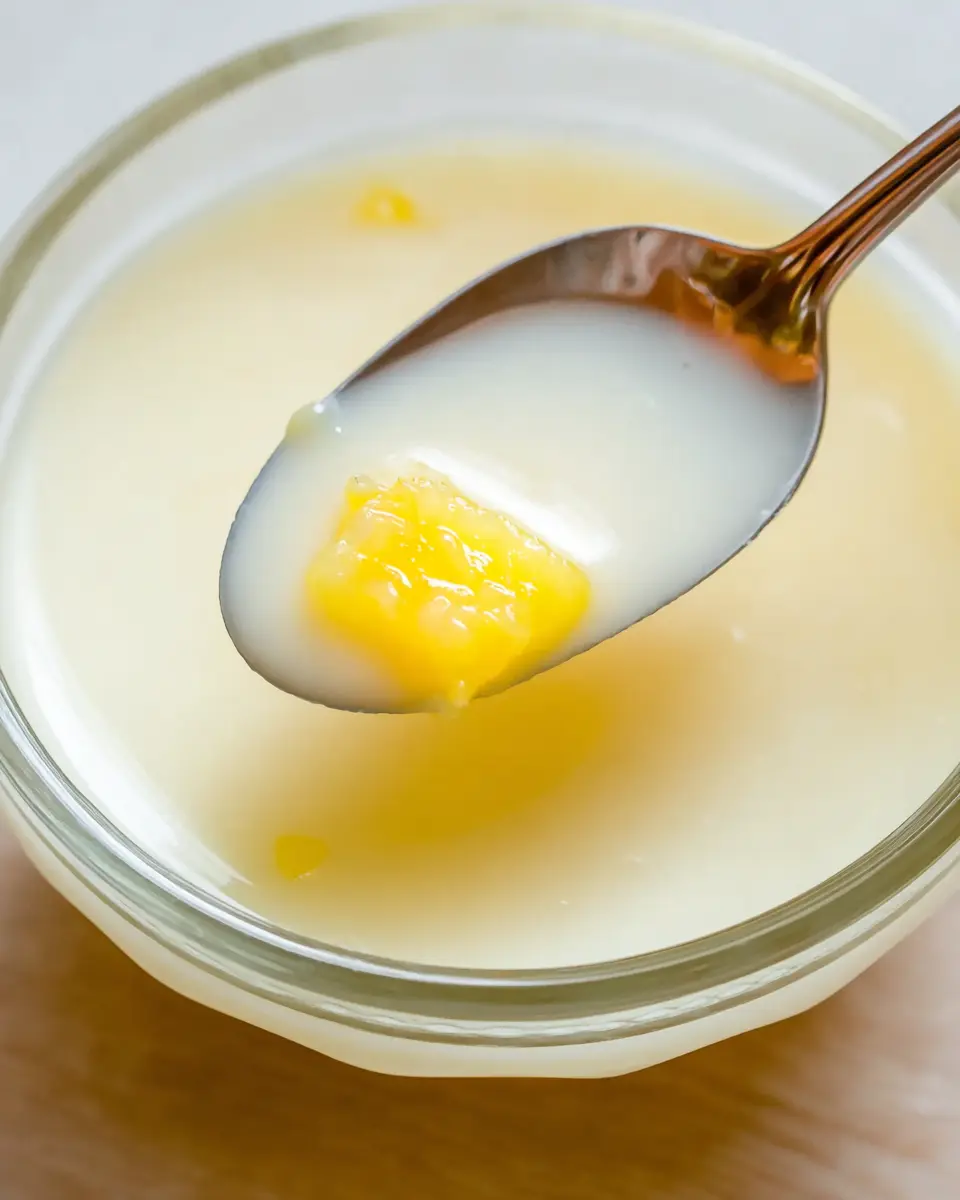
Share this Recipe if You liked it: Pinterest Facebook Messenger WhatsApp Quick, glossy, and bright, Pineapple Glaze for Cake is a simple finishing touch that adds a light tropical note without covering up the flavor of your cake. It comes together in minutes and is easy to adjust for drizzling, spreading, or creating a slightly thicker finish. Pin
This is the kind of glaze that works when you want something smoother and lighter than frosting. It gives your cake a polished look, adds a little sweetness, and lets the pineapple flavor stay fresh and clean instead of heavy. You also do not need special tools or advanced baking experience to make it well. A bowl, a whisk, and a careful hand with the liquid are enough to give you a smooth glaze that feels reliable every time.
Why You Will Love This Recipe
- Effortless Elegance: This glaze adds a beautiful, glossy finish to your cakes with minimal effort, making any dessert look professionally decorated. It elevates simple cakes into something truly special without requiring advanced decorating skills.
- Perfect Tropical Flavor: Infused with the bright, tangy sweetness of pineapple, this glaze provides a delightful tropical twist that complements a wide range of cake flavors. It’s a refreshing change from heavier frostings, offering a light and fruity counterpoint.
- Quick Preparation: Ready in just a few minutes, this glaze is perfect for those last-minute dessert needs or when you simply want a speedy way to enhance your baked goods. Its fast preparation time means less time in the kitchen and more time enjoying your delicious creation.
- Versatile Consistency: Easily adjustable to your desired thickness, this glaze can be made thin enough to drizzle in delicate patterns or thicker for a more substantial coating. This flexibility makes it suitable for various decorating styles and cake types.
- Minimal Ingredients: Featuring just a few pantry staples, this recipe proves that delicious and beautiful results don’t require an extensive shopping list. It’s a testament to how simple ingredients can create impressive outcomes.
Ingredients You Need
The beauty of this pineapple glaze lies in its simplicity and the quality of its core components. Using finely sifted powdered sugar ensures a silky-smooth texture, free from any grittiness. Similarly, opting for pure pineapple juice, ideally freshly squeezed or from a high-quality canned source, will deliver the most vibrant and authentic tropical flavor. The goal is a balance of sweetness and tartness that enhances rather than overpowers the cake itself.
Pineapple Glaze for Cake
A quick, glossy, and bright pineapple glaze for cake that adds a light tropical note without covering up the flavor of your cake. It comes together in minutes and is easy to adjust for drizzling, spreading, or creating a slightly thicker finish.
- 1/2 cup sifted powdered sugar (with any lumps removed for a smoother finish)
- 1 tablespoon pineapple juice
- Tiny additions of lemon juice (optional, for thinning)
- 1Place the sifted powdered sugar in a medium mixing bowl.
- 2Drizzle in the pineapple juice slowly while whisking continuously until the mixture looks smooth, glossy, and fully blended.
- 3Check the thickness. If you want it to spread more easily or drizzle in thin lines, add a very small amount of extra liquid and whisk again until smooth.
- 4Use tiny additions of lemon juice only if needed for thinning. Stir thoroughly after each addition.
- 5If the glaze becomes too thin, add a little more powdered sugar, one tablespoon at a time, whisking after each addition until it returns to the desired consistency.
- 6Spoon or drizzle the glaze over a fully cooled cake and let it settle.
Keywords: Pineapple Glaze, Cake Glaze, Tropical Glaze, Easy Glaze, Quick Glaze, Fruit Glaze
- powdered sugar: this provides the sweet base and structure for the glaze, ensuring a smooth, non-grainy texture when sifted.
- pineapple juice: this is the star ingredient, imparting a delicate tropical flavor and the necessary liquid to create a pourable or spreadable consistency.
- lemon juice (optional): a tiny amount can be used to adjust the consistency or add a little extra tang if desired, though it should be used sparingly.
The precise quantities for these ingredients are detailed within the recipe card above, ensuring perfect results every time.
Variations
For those following specific dietary paths, adapting this pineapple glaze is remarkably straightforward. A fantastic vegan option involves simply ensuring your powdered sugar is certified vegan, as some brands may use animal-derived agents. The pineapple juice is inherently vegan, making this a naturally plant-based friendly topping. This maintains the bright, fruity essence that makes the glaze so appealing.
If you’re aiming for a lower-carbohydrate approach, consider a sugar-free sweetener. Erythritol or a blend of monk fruit and erythritol can often substitute for powdered sugar with good results, though you might need to experiment with the liquid ratio. The key is to ensure the sweetener dissolves properly to avoid a gritty texture. This variation allows for guilt-free indulgence.
Another creative avenue involves infusing the glaze with other complementary flavors. A hint of finely grated lime zest could add an extra layer of citrus brightness, or a whisper of ginger could introduce a warming spice note. Even a touch of coconut extract could enhance the tropical theme, creating a more complex flavor profile. These additions can transform a simple glaze into something truly unique and personalized.
How to Prepare Pineapple Glaze for Cake
Step 1: Prepare the Dry Ingredients
Begin by gathering your powdered sugar, ensuring it is finely sifted. This crucial first step removes any hidden lumps, which guarantees a remarkably smooth final consistency for your glaze. Using a fine-mesh sieve over your mixing bowl is highly recommended to achieve this lump-free foundation. The smoother the sugar, the more elegant and refined your glaze will appear on the finished cake.
Place the meticulously sifted powdered sugar into a medium-sized mixing bowl. This careful preparation at the outset prevents the common issue of a grainy or uneven glaze. It sets the stage for an effortless process where the liquid can be incorporated without resistance, leading to a superior texture that truly shines.
This initial step might seem minor, but it is foundational to achieving a professional-quality glaze. A smooth base is paramount for a visually appealing and deliciously textured topping that will impress any cake lover. Taking this extra moment ensures that your efforts translate into a perfectly smooth and inviting finish.
Step 3: Gradually Incorporate the Liquid
Now, it’s time to introduce the pineapple juice, and the method here is key to achieving the perfect texture. Slowly drizzle the pineapple juice into the bowl containing the sifted powdered sugar. Avoid the temptation to pour it all in at once; gradual addition is essential for control. This slow incorporation allows the sugar to absorb the liquid evenly, preventing clumping and ensuring a homogeneous mixture.
As you drizzle in the juice, begin whisking continuously. Use a small whisk or a fork to gently but persistently combine the ingredients. The motion should be fluid and consistent, working from the center of the bowl outwards. This continuous whisking helps break down any nascent lumps and encourages the sugar to dissolve smoothly into the juice. You are looking for a seamless integration of both components.
This stage requires patience and attention. Watch the consistency of the mixture as you add more liquid. You are aiming for a smooth, glossy liquid that starts to form. The goal is to create a homogenous blend where no dry pockets of sugar remain, setting the stage for the final glaze. The gradual addition ensures you don’t over-liquefy the mixture prematurely.
Step 5: Assess and Adjust Consistency
Once you have a smooth mixture, it’s time to evaluate its thickness. Gently lift your whisk or spoon and observe how the glaze flows. A well-made glaze should fall from the whisk in a steady, unbroken ribbon. This indicates it has the perfect viscosity for drizzling or spreading without being too thin and runny, or too thick and difficult to work with. If it’s too thick, it might break or clump as it falls.
If the glaze appears too thick for your liking, it’s time for a very careful adjustment. For a thinner consistency, particularly for delicate drizzling, add a few drops of additional liquid. This could be more pineapple juice or, if you’re looking for a brighter tang, a tiny splash of lemon juice. Remember, it is much easier to thin a glaze than to thicken it, so proceed with extreme caution, adding only a minuscule amount at a time.
Whisk thoroughly after each tiny addition of liquid, allowing the ingredients to fully incorporate and the consistency to change. This iterative process ensures you don’t accidentally make the glaze too thin. The goal is to achieve a fluid, yet controlled, flow that coats the cake beautifully. The subtle difference in liquid can dramatically alter the final texture, so patience here is rewarded with a perfect finish.
Step 7: Refine the Texture if Necessary
Occasionally, despite careful mixing, a glaze might develop a slightly too-thick consistency, especially as it begins to set. If this happens, and you find it difficult to achieve the desired pour or drizzle, a small amount of additional liquid is the solution. This could be a touch more pineapple juice to maintain the flavor profile, or a bit of water if you want a more neutral thinning agent. The key is to add it incrementally.
Add just a drop or two of your chosen liquid at a time. Stir it in thoroughly with your whisk, paying close attention to how the texture changes. The goal is to loosen the glaze just enough to reach your preferred fluidity. Over-adding liquid can quickly turn a perfectly thick glaze into something far too runny, which is hard to correct without adding more sugar.
This meticulous adjustment process ensures that your glaze will behave exactly as you intend it to on your cake. Whether you’re creating intricate patterns or a smooth, even coating, having control over the glaze’s thickness is paramount. This final refinement guarantees a professional and appealing finish for your delicious baked creation, making it look as good as it tastes.
Pro Tips for Pineapple Glaze for Cake
The Importance of Sifting: Always sift your powdered sugar before you begin. This simple step is the most critical for achieving a perfectly smooth, lump-free glaze. It ensures that no small clumps of sugar will mar the glossy finish of your cake. A fine-mesh sieve is your best friend here for optimal results.
Slow and Steady Liquid Addition: When adding the pineapple juice (or any liquid), do so very slowly. Drizzle it in a thin stream while continuously whisking. This allows the sugar to absorb the liquid gradually, preventing pockets of undissolved sugar and ensuring an even consistency. Rushing this step is a common mistake that leads to a less-than-perfect glaze.
Test Consistency on a Plate: Before glazing your cake, test the glaze’s consistency on the rim of the bowl or on a small plate. It should flow smoothly but not too quickly. If it runs off too fast, it’s too thin; if it’s too stiff and breaks, it’s too thick. This quick test prevents costly mistakes on your actual cake.
Cool Cake is Crucial: Always apply the glaze to a completely cooled cake. Glazing a warm cake will cause the glaze to melt, become greasy, and absorb unevenly, ruining the polished look. Patience is key; let your cake cool to room temperature before you even think about glazing it.
Adjustments in Tiny Increments: Whether you’re thinning a thick glaze or thickening a runny one, make adjustments in very small increments. Add liquid a drop at a time or powdered sugar a teaspoon at a time, whisking thoroughly after each addition. It’s far easier to fix a slightly too-thick glaze than a completely runny one.
Serving Suggestions for Pineapple Glaze for Cake
Decoration
The inherent glossiness of this pineapple glaze makes it a fantastic choice for creating a simple yet elegant decorative finish. For a classic look, use a spoon to drizzle the glaze over the top of your cooled cake, allowing it to naturally cascade down the sides. You can create a more intricate pattern by placing the glaze in a piping bag with a fine tip and drawing delicate lines or swirls. The visual appeal is immediate, transforming a humble cake into a centerpiece.
For an added textural element, consider sprinkling fine desiccated coconut or toasted shredded coconut over the glaze while it’s still wet. This enhances the tropical theme and provides a delightful contrast in texture. Edible flowers or fresh mint leaves can also be strategically placed for a pop of color and freshness. Even a few thin slices of fresh pineapple arranged artfully on top can elevate the presentation significantly.
If you’ve opted for a slightly thicker glaze, you can use an offset spatula to spread it evenly across the top surface of the cake, creating a smooth, opaque layer. This technique is perfect for “naked” cakes or simple loaf cakes where you want a polished surface. The bright, inviting color of the glaze itself acts as a beautiful canvas for further adornment.
Side Dishes
While this pineapple glaze is primarily a cake topping, its bright flavor can also inspire complementary side dishes. Consider serving your glazed cake alongside a scoop of creamy vanilla bean ice cream or a refreshing scoop of coconut sorbet. These frozen delights offer a cool contrast and echo the tropical notes of the glaze. The melting ice cream will create a delightful sauce as it mingles with any excess glaze.
For a more fruit-forward pairing, a simple fruit salad featuring mango, kiwi, and perhaps a few fresh pineapple chunks would be a superb accompaniment. The natural sweetness and slight tartness of these fruits will harmonize beautifully with the glaze, creating a delightful symphony of flavors. Fresh berries, like raspberries or blueberries, can also add a vibrant color and a different kind of tartness to the plate.
If you’re serving this cake as part of a brunch or a lighter meal, a dollop of lightly sweetened whipped cream or Greek yogurt can provide a lovely counterpoint to the glaze’s sweetness. This offers a less intense richness than a traditional frosting and allows the pineapple flavor to remain the star. A sprinkle of toasted nuts, such as macadamia or slivered almonds, can add a welcome crunch to these accompanying elements.
Creative Serving Ideas
Beyond simply topping a cake, this pineapple glaze can be incorporated into other dessert concepts. Try drizzling it over pound cake slices or angel food cake for an instant flavor boost. It’s also a wonderful addition to fruit skewers; brush it onto pineapple, melon, and berry pieces before serving for a sweet, sticky coating that adds an extra layer of deliciousness.
For a fun party idea, set up a “decorate your own cupcake” station. Provide plain cupcakes and let guests adorn them with this pineapple glaze, along with various toppings like sprinkles, shredded coconut, or small fruit pieces. This interactive approach is always a hit, especially with children, and allows everyone to customize their sweet treat.
You can also use this glaze as a filling or a swirl within certain baked goods. For instance, gently folding it into muffin batter before baking can create pockets of sweet, fruity flavor. Or, when making a simple rolled cake or Swiss roll, a thin layer of this glaze spread over the cake before rolling can add a delightful surprise element. Its versatility extends far beyond a simple cake topping, making it a valuable addition to your baking repertoire.
Preparation & Storage
Storing Leftovers
If you happen to have any leftover pineapple glaze, proper storage is key to maintaining its quality. Transfer any unused glaze into an airtight container. A small glass jar with a tightly fitting lid works perfectly for this purpose. Seal it well to prevent air exposure, which can cause the glaze to dry out or absorb odors from the refrigerator.
Store the sealed container in the refrigerator. While this glaze is best enjoyed fresh, it can typically be stored for up to 2-3 days. Keep in mind that refrigeration will likely cause the glaze to thicken considerably, as the sugar content solidifies slightly in cooler temperatures. This is a normal reaction and can be easily remedied before its next use.
Before reusing, allow the stored glaze to come to room temperature for a short period. This will help it soften naturally. You may need to give it a good whisk to bring it back to a smooth, drizzly consistency. If it remains too thick, a tiny splash of pineapple juice can help loosen it up again.
Freezing
Freezing pineapple glaze on its own is generally not recommended, as it can significantly alter its texture upon thawing. The fine sugar crystals can become coarse, and the smooth, glossy finish might be compromised. This can lead to a gritty or separated result, which is undesirable for a delicate topping.
If you’ve already glazed a cake and have leftovers, it’s best to store the entire glazed cake in the refrigerator. While the glaze on the cake might lose some of its initial sheen over time, it will generally hold up better than glaze frozen independently. For the most appealing visual and textural outcome, it’s always preferable to make a fresh batch of glaze when you need it.
However, if you absolutely must freeze a small amount of leftover glaze, ensure it is stored in a truly airtight container or freezer bag. Press out as much air as possible. Upon thawing, be prepared to whisk it vigorously and potentially re-liquefy it with a tiny amount of liquid. Manage your expectations regarding the final texture, as it may not be as smooth as a freshly made batch.
Reheating
Reheating pineapple glaze, especially if it has thickened significantly in the refrigerator, is a simple process. The primary goal is to gently warm it enough to achieve a smooth, pourable consistency without overheating it, which could alter its flavor or texture. Start by letting the container sit at room temperature for about 15-20 minutes to allow it to soften naturally.
If, after coming to room temperature, the glaze is still too thick to drizzle or spread effectively, you can employ a gentle warming method. The most controlled way is to use a double boiler setup. Place the container with the glaze over a pan of barely simmering water, stirring constantly until it reaches your desired fluidity. Alternatively, you can microwave it in very short bursts (10-second intervals), stirring thoroughly between each burst, being extremely careful not to overheat it.
As you warm the glaze, you might find that a tiny addition of pineapple juice or even a teaspoon of warm water helps to restore its smooth, flowing texture. Whisk well after each addition until fully incorporated and the glaze has the right consistency. The aim is to achieve that beautiful, glossy sheen that makes your cake look so appealing. Avoid boiling the glaze, as this can cause it to become grainy or change its color.
Frequently Asked Questions
-
Can I use a different type of sugar instead of powdered sugar for this pineapple glaze?
While powdered sugar is ideal for its fine texture and ability to dissolve smoothly, you could experiment with other sugars, but with caution. Granulated sugar will likely result in a gritty glaze unless it is dissolved completely, which can be tricky. Brown sugar will introduce a caramel flavor and a darker color, significantly changing the glaze’s profile. For the intended light, glossy finish and subtle tropical taste, powdered sugar, also known as confectioners’ or icing sugar, remains the best choice. If you absolutely must substitute, consider using superfine granulated sugar, but be prepared for a different texture.
-
How can I make the pineapple glaze thicker if it turns out too thin?
If your pineapple glaze becomes too thin, don’t worry; it’s usually an easy fix. The most straightforward method is to gradually add more powdered sugar, one tablespoon at a time. Whisk thoroughly after each addition until you achieve the desired thickness. It’s crucial to add the sugar slowly to avoid making the glaze too thick or introducing lumps. Another option, if you don’t want to add more sugar, is to let the glaze sit uncovered for a short period; some of the liquid may evaporate, naturally thickening it, but this method is less controlled and might not always work effectively.
-
Can this pineapple glaze be used on cookies or other baked goods besides cake?
Absolutely! This versatile pineapple glaze is excellent for more than just cakes. Its smooth, glossy finish and delightful tropical flavor make it a wonderful topping for cookies, especially sugar cookies or shortbread. You can also use it to add a touch of sweetness and shine to muffins, scones, or even danishes. For a creative twist, it can be drizzled over fruit tarts or used as a dipping sauce for fresh fruit. Its adaptability means it can enhance a wide variety of baked treats, providing a burst of tropical flavor and an attractive sheen.