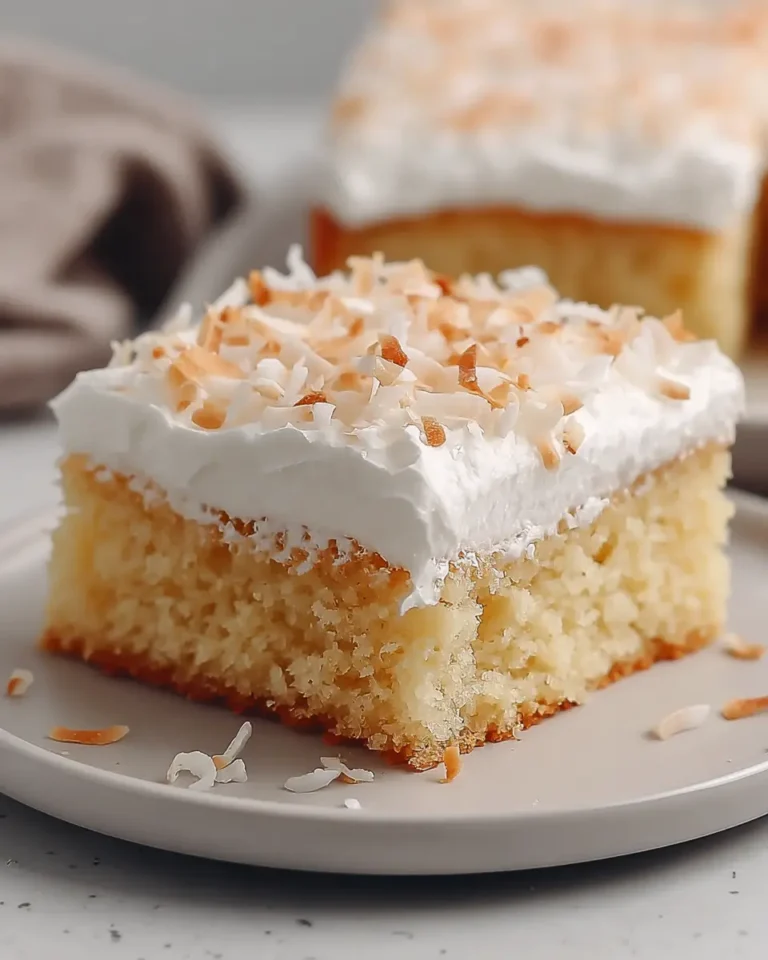
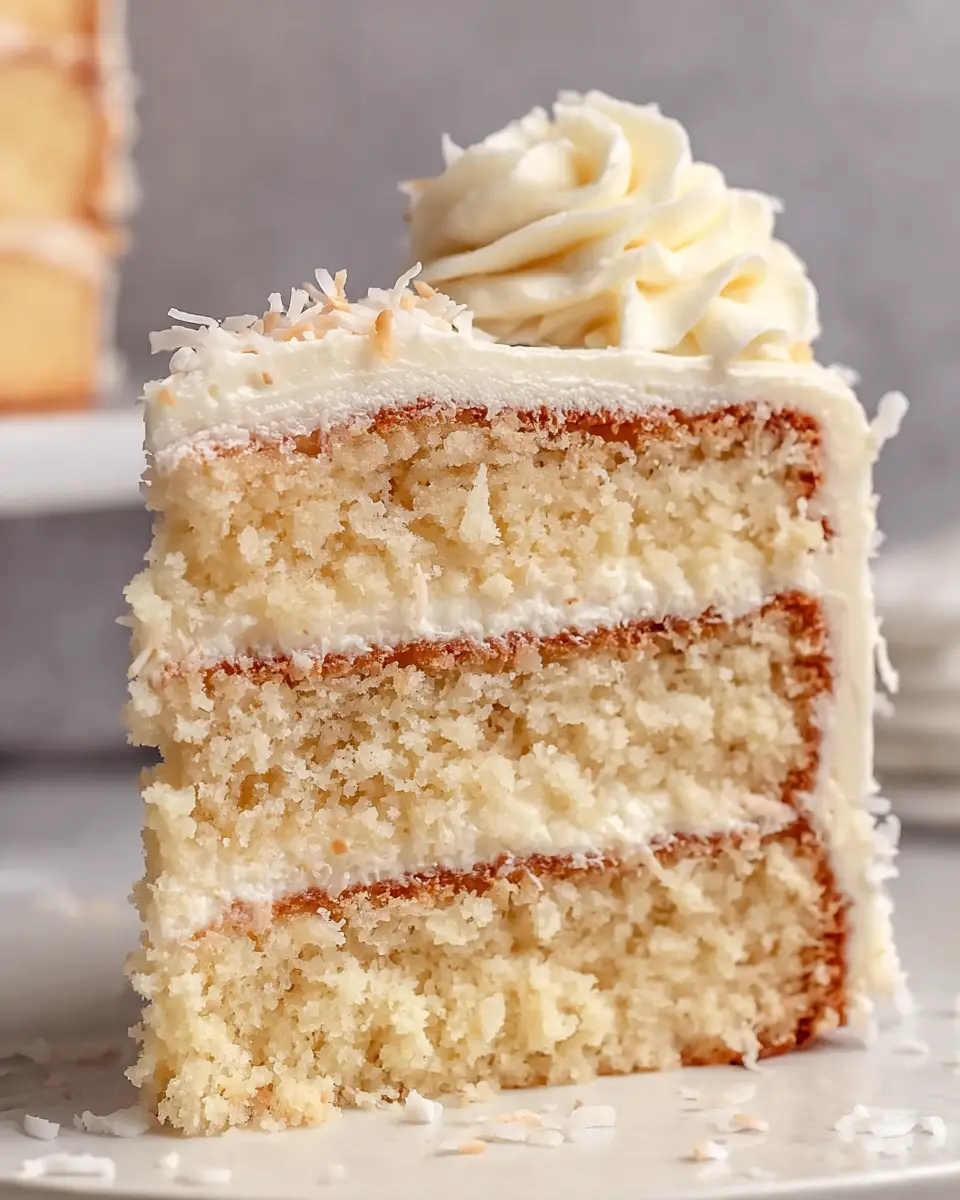
Coconut Cake with Cream Cheese Frosting
There are some desserts that simply embody comfort and celebration, and this Coconut Cake with Cream Cheese Frosting is undoubtedly one of them. Its delicate texture and rich, tropical flavor profile make it a perfect centerpiece for any special occasion or a delightful treat to brighten an ordinary day.
Imagine sinking your fork into a slice of this tender cake, the sweet aroma of coconut filling the air, followed by the creamy, slightly tangy embrace of the luscious cream cheese frosting. This recipe promises a truly memorable dessert experience, one that will have your guests raving and you reaching for another slice.
Why You Will Love This Recipe
- Incredible Texture: The combination of buttermilk, butter, and coconut oil, alongside perfectly whipped egg whites, results in an exceptionally moist and tender crumb that melts in your mouth.
- Perfect Flavor Balance: Rich coconut flavor is beautifully complemented by the subtle tang of the cream cheese frosting, creating a harmonious taste that is both sweet and sophisticated.
- Visually Stunning: With its toasted coconut coating and potential for decorative piping, this cake is as beautiful to behold as it is delicious to eat, making it ideal for celebrations.
- Make-Ahead Friendly: The layers can be baked and even frosted in advance, simplifying party planning and ensuring you have a showstopper ready when you need it.
- Customizable Delight: While wonderful as is, this cake serves as a fantastic base for creative variations, allowing you to tailor it to specific dietary needs or flavor preferences.
Ingredients You Need
The success of any exceptional cake begins with the quality of its ingredients. Using fresh, high-quality components ensures that every bite delivers the most vibrant and authentic flavors possible. From the richness of the butter to the delicate sweetness of the coconut, each element plays a crucial role in creating this masterpiece.
Coconut Cake with Cream Cheese Frosting

A tender, bakery-style layer cake with a soft crumb, rich coconut flavor, and a smooth tangy finish. It's a beautiful make-ahead dessert for birthdays, holidays, and any gathering where you want an impressive slice without fussy decorating.
- 11 ounces all-purpose flour
- 1/2 teaspoon fine salt
- 2 teaspoons coconut flavoring
- 4 ounces unsalted butter (softened)
- 4 large egg yolks
- 1 teaspoon baking powder
- 8 fluid ounces buttermilk (at room temperature)
- 1/2 teaspoon baking soda
- 2 cups granulated sugar
- 4 large egg whites (at room temperature)
- 4 ounces coconut oil (melted and cooled)
- 1/4 teaspoon cream of tartar
- 1 teaspoon vanilla extract
- 1 ounce sweetened shredded coconut
- 6 ounces sweetened shredded coconut (lightly toasted)
- 36 ounces powdered sugar (sifted)
- 1/2 teaspoon salt
- 16 ounces cream cheese (softened)
- 8 ounces unsalted butter (softened)
- 1 teaspoon coconut flavoring
- 1Preheat oven to 350°F (176°C) and prepare three 6-inch round cake pans.
- 2Broil 6 ounces of shredded coconut on a baking sheet for 2-3 minutes, stirring, then another 1-2 minutes until lightly golden. Let cool.
- 3Whisk together flour, baking powder, baking soda, and salt. Set aside.
- 4Warm coconut oil. Stir coconut flavoring and vanilla into buttermilk. Set aside.
- 5Beat softened butter and coconut oil in a stand mixer until smooth. Gradually add sugar and mix until pale and fluffy. Add egg yolks one at a time, mixing well after each.
- 6Reduce mixer speed to low. Add dry ingredients and buttermilk mixture in alternating additions, starting and ending with dry ingredients, mixing until just combined. Fold in cooled toasted coconut.
- 7In a clean bowl, whip egg whites until foamy. Add cream of tartar and whip to semi-stiff peaks.
- 8Gently fold whipped egg whites into the batter in stages. Divide batter evenly among prepared pans.
- 9Bake for 30-35 minutes, or until a skewer comes out clean. Let cakes rest in pans for 10 minutes, then cool completely on wire racks.
- 10For immediate assembly, freeze cooled layers for 30 minutes. For later use, wrap well and freeze.
- 11To make frosting, beat softened butter until smooth. Add softened cream cheese in pieces and mix until blended.
- 12Gradually add sifted powdered sugar, mixing until incorporated. Add coconut flavoring and salt, mix until smooth. Refrigerate until needed.
- 13Trim cake layer tops to be level. Stack layers with frosting between each. Apply a thin crumb coat over the entire cake and refrigerate for 15 minutes.
- 14Cover the cake with a final thicker layer of frosting. Press remaining shredded coconut onto the sides, if desired. Pipe swirls on top with a star tip.
Keywords: Coconut Cake, Cream Cheese Frosting, Layer Cake, Dessert, Baking, German Cuisine, Vegetarian
Quantities for each ingredient are detailed within the recipe card above, providing you with precise measurements for baking perfection.
Variations
This coconut cake is a delightful canvas for culinary creativity, offering numerous avenues for personalization. For those seeking a dessert that caters to specific dietary choices, several enticing modifications can be explored. Consider a vegan version by substituting the eggs with a flax egg or commercial egg replacer, and using a plant-based butter and milk. The cream cheese frosting can be cleverly adapted using a blend of vegan cream cheese and plant-based butter, ensuring a creamy, tangy finish without any dairy.
For those adhering to a low-carbohydrate lifestyle, transforming this cake becomes an exciting challenge. Opt for almond flour or a coconut flour blend as the base, drastically reducing the net carbs. Swapping granulated sugar for a keto-friendly sweetener like erythritol or stevia will maintain sweetness without the sugar impact. The frosting can be adjusted similarly, using a sugar substitute and potentially thickening agents like xanthan gum if needed to achieve the desired consistency.
Another delightful variation involves infusing additional tropical flavors. A hint of lime zest folded into the cake batter can add a bright, zesty counterpoint to the sweetness. Similarly, a touch of pineapple puree can lend an extra layer of moisture and fruity depth, making the cake even more reminiscent of a sun-drenched escape. These small tweaks can elevate the cake from simply delicious to uniquely yours.
How to Prepare Coconut Cake with Cream Cheese Frosting
Step 1: Prepare Pans and Toast Coconut
The first crucial step in creating this exquisite coconut cake involves meticulous preparation of your baking equipment and the toasting of the shredded coconut. Proper pan preparation ensures that your delicate cake layers release cleanly, preserving their beautiful structure and appearance. Grease and flour your cake pans thoroughly, or use a baking spray with flour, ensuring complete coverage of the bottoms and sides.
Simultaneously, begin the process of toasting the sweetened shredded coconut. Spread a generous portion of the coconut onto a baking sheet, creating an even layer. This allows for uniform browning and prevents any single clump from becoming burnt while others remain pale. The goal is a beautiful, light golden hue that enhances the nutty, toasted flavor and aroma of the coconut.
It is absolutely essential to keep a vigilant eye on the coconut as it toasts. Coconut can transition from perfectly golden to sadly burnt in a matter of moments, especially under a broiler. The intense heat can accelerate browning dramatically, so a few extra seconds of attention can save your entire batch from bitterness. Once toasted to perfection, remove the coconut from the baking sheet immediately to halt the cooking process and allow it to cool completely on a separate surface.
Step 2: Combine Dry and Wet Ingredients
With your pans ready and coconut cooling, it’s time to assemble the components for the cake batter itself. Begin by combining all the dry ingredients in a medium-sized bowl. This includes the all-purpose flour, baking powder, baking soda, and fine salt. Whisking these ingredients together thoroughly ensures that the leavening agents and salt are evenly distributed throughout the flour, which is fundamental for a consistent and well-risen cake.
In a separate, smaller container, prepare the liquid ingredients for the batter. Stir together the buttermilk with the coconut flavoring and vanilla extract. This simple step helps to meld the flavors before they are introduced to the other batter components, promoting a more uniform taste throughout the cake. Ensuring the buttermilk is at room temperature will also aid in creating a smoother, more emulsified batter.
This methodical approach to combining ingredients, separating the dry from the wet initially, sets the stage for a cake with a tender crumb and well-developed flavor. It’s a fundamental technique in baking that guarantees the leavening agents will react effectively during baking, leading to a light and airy texture.
Step 3: Cream Butter, Oil, Sugar, and Yolks
Now, let’s focus on building the rich, flavorful base of your cake batter. In the bowl of a stand mixer fitted with the paddle attachment, combine the softened unsalted butter and the softened coconut oil. Beat these together on medium-high speed for approximately 30 seconds, just until the mixture appears smooth and glossy. This initial creaming ensures that both fats are well incorporated and ready to aerate.
Gradually add the granulated sugar to the creamed butter and oil mixture. Continue mixing on medium-high speed for an extended period, typically between 3 to 5 minutes. This process, known as creaming, is vital for incorporating air into the batter, which contributes significantly to the cake’s light and fluffy texture. The mixture should become noticeably pale and fluffy, indicating sufficient aeration.
Next, introduce the egg yolks, one at a time, into the creamed mixture. Ensure that each yolk is fully incorporated and blended into the batter before adding the next. This gradual addition helps to emulsify the fats and eggs, creating a stable base that contributes to a soft, fine crumb in the finished cake. The richness from the yolks adds a lovely depth of flavor and a tender mouthfeel.
Step 4: Incorporate Dry and Wet Mixtures and Fold in Coconut
With the creamy base established, it’s time to integrate the remaining components of the cake batter. Reduce the mixer speed to low to prevent overmixing. Begin by adding about one-third of the dry ingredients (flour mixture) to the creamed mixture. Mix until just barely combined.
Following the dry ingredients, add about half of the buttermilk mixture. Mix again on low speed until just combined. Continue this alternating process: add another third of the dry ingredients, mix; add the remaining buttermilk, mix; and finally, add the last portion of the dry ingredients and mix only until the batter is uniform. Overmixing at this stage can develop the gluten in the flour too much, leading to a tough cake.
Once the batter is homogenous, gently fold in the cooled, toasted shredded coconut. Use a rubber spatula for this step, employing an under-and-over motion. This incorporates the coconut without disturbing the delicate aerated structure of the batter too much. The toasted coconut pieces will provide subtle pockets of texture and an intensified coconut flavor throughout the cake.
Step 5: Gently Fold in Whipped Egg Whites
This stage is pivotal for achieving the exceptionally light and airy texture that defines this coconut cake. In a separate, impeccably clean mixing bowl, fit a stand mixer with the whisk attachment. Add the room-temperature egg whites. Begin whipping them on medium-high speed until they become foamy and start to create soft peaks.
Once foamy, add the cream of tartar. The cream of tartar acts as a stabilizer, helping the egg whites achieve and maintain their volume. Continue whipping the egg whites until they reach semi-stiff peaks. This means that when you lift the whisk, the peaks will stand up but their tips might curl over slightly. Be careful not to overbeat, which can make the whites dry and difficult to fold.
Now, very gently fold the whipped egg whites into the cake batter. Do this in stages, adding about one-third of the whites at a time. Use a large rubber spatula and a light, lifting motion, turning the bowl as you go. The goal is to incorporate the air from the egg whites into the batter without deflating them. Stop folding as soon as the whites are evenly distributed and the batter appears uniform; a few streaks of white are acceptable.
Step 6: Bake and Cool the Cake Layers
With the batter perfectly prepared, it’s time to bake. Divide the batter evenly among your prepared cake pans. Using a kitchen scale can ensure each pan receives an equal amount, which promotes even baking. Smooth the tops of the batter gently with your spatula, ensuring an even surface for baking.
Bake the cake layers in the preheated oven at 350°F (176°C) for approximately 30 to 35 minutes. The exact baking time will depend on your oven and the size of your pans. To check for doneness, insert a wooden skewer or toothpick into the center of each cake; it should come out clean, with no wet batter attached. The cakes should also spring back lightly when gently pressed.
Once baked, allow the cake layers to rest in their pans on a wire rack for about 10 minutes. This brief cooling period allows the cakes to set slightly before being removed from the pans. Then, carefully invert the pans onto the wire rack to release the cakes, and let them cool completely. For easier frosting and cleaner slicing, it’s highly recommended to chill the cooled layers in the refrigerator for at least 30 minutes before assembling. This makes the cakes firmer and less prone to crumbling.
Step 7: Prepare and Assemble the Frosting
While the cake layers are chilling, prepare the luscious cream cheese frosting. Ensure your butter and cream cheese are both at room temperature for the smoothest, most blendable consistency. In a stand mixer fitted with the whisk attachment, beat the softened butter on low speed until it is smooth and creamy. Then, add the softened cream cheese in small pieces, continuing to mix on low speed until the butter and cream cheese are fully blended and there are no lumps.
Gradually add the sifted powdered sugar to the cream cheese and butter mixture, about one cup at a time. Mix on low speed until each addition is incorporated before adding more. This gradual addition helps prevent a cloud of powdered sugar from erupting from the bowl and ensures a smoother frosting. Once all the powdered sugar is added and incorporated, mix in the coconut flavoring and the salt. Continue to mix until the frosting is smooth, creamy, and has reached your desired consistency. If it seems too thick, a tiny splash of milk or cream can be added, but be cautious not to make it too thin.
To assemble the cake, begin by leveling the cake layers. Use a serrated knife to carefully slice off any domed tops, creating flat surfaces for stacking. Place the first cake layer on your serving stand or cake board. Spread an even, generous layer of the cream cheese frosting over the top. Repeat this process with the remaining layers, stacking them with frosting in between.
Apply a thin, even coating of frosting over the entire cake – this is known as a crumb coat. The crumb coat traps any loose crumbs and provides a smooth base for the final frosting layer. Refrigerate the cake for about 15-20 minutes to allow the crumb coat to set. Once chilled, apply a final, thicker layer of frosting, smoothing it over the top and sides. For added texture and visual appeal, press the remaining toasted shredded coconut onto the sides of the cake. If desired, pipe decorative swirls around the top edge using a star tip.
Pro Tips for Coconut Cake with Cream Cheese Frosting
- Room Temperature Ingredients Are Key: For both the cake batter and the frosting, ensuring your butter, cream cheese, eggs, and buttermilk are at room temperature is paramount. This allows ingredients to emulsify properly, leading to a smoother batter and a creamier frosting.
- Chill Layers for Easier Assembly: Refrigerating the cake layers for at least 30 minutes before frosting makes a significant difference. Cold cake is firmer, less fragile, and much easier to handle, leading to cleaner stacking and frosting for a professional finish.
- Don’t Overmix the Batter: Once the dry and wet ingredients are combined, mix only until just incorporated. Overmixing can develop gluten, resulting in a tougher cake texture, whereas gentle handling preserves the tender crumb.
- Toasting Coconut for Flavor: While optional, toasting the shredded coconut significantly enhances its flavor, adding a warm, nutty depth that complements the cake beautifully. Always toast it slowly and watch it carefully to prevent burning.
- Sift Powdered Sugar for Smooth Frosting: Always sift your powdered sugar before adding it to the frosting. This removes lumps and ensures a silky-smooth frosting consistency, free from any gritty texture.
Serving Suggestions for Coconut Cake with Cream Cheese Frosting
Decoration
The beauty of this coconut cake lies in its elegant yet approachable decoration. The simplest and most classic approach involves pressing the toasted shredded coconut onto the sides of the fully frosted cake. This provides a lovely texture contrast and a clear visual cue to the cake’s primary flavor. For a more refined look, consider piping decorative borders or swirls around the top edge using a star tip with the remaining cream cheese frosting. Edible flowers, such as violets or pansies, can add a touch of color and sophistication.
Side Dishes
While this cake is a star on its own, a few complementary accompaniments can elevate the dessert experience. Fresh berries, such as raspberries, strawberries, or blueberries, offer a burst of tartness and vibrant color that cuts through the richness of the cake and frosting. A small side of macerated strawberries or a simple mixed berry salad makes for a refreshing pairing.
For a more tropical feel, consider serving slices of fresh pineapple or mango alongside the cake. The natural sweetness and slight acidity of these fruits create a harmonious tropical symphony with the coconut. A dollop of lightly sweetened whipped cream can also be a delightful addition, offering an extra layer of creamy indulgence without overpowering the cake’s flavors.
Creative Serving Ideas
Beyond the traditional slice, this coconut cake can be presented in several creative ways. Individual servings can be achieved by cutting the cake into smaller squares or rectangles, making them perfect for a dessert buffet or a party where guests can easily mingle and enjoy their treats. These smaller portions can be artfully arranged on a platter with fresh fruit garnishes.
Another idea is to transform leftover cake into delightful cake pops or trifles. Crumble leftover cake layers and mix them with a bit of frosting, then roll into balls and dip in melted white chocolate or coconut flakes. Alternatively, layer crumbled cake with fresh fruit and more frosting in individual glasses or a large trifle bowl for a visually appealing and equally delicious dessert presentation.
Preparation & Storage
Storing Leftovers
Because this cake features a cream cheese frosting, it is essential to store any leftovers properly to maintain freshness and food safety. Always keep the finished cake covered tightly. This can be achieved using plastic wrap, a cake dome, or an airtight container. Refrigeration is crucial for any cake containing cream cheese frosting to prevent spoilage and maintain its texture.
Whole cakes or individual slices will typically keep well in the refrigerator for about 3 to 4 days. Ensure the cover is snug to prevent the cake from drying out or absorbing odors from other foods in the refrigerator. If the frosting begins to soften slightly during storage, it can be gently smoothed out before serving again.
Freezing
For longer-term storage, this coconut cake freezes beautifully. It’s best to freeze individual slices or the fully assembled and chilled cake. To do this, wrap the cake portions very well in several layers of plastic wrap, ensuring there are no air pockets. Follow this by an additional layer of aluminum foil or a freezer-safe container to provide an extra barrier against freezer burn.
When properly wrapped, frosted cake can be frozen for up to 1 month. Unfrosted cake layers, if you’ve baked them ahead and plan to assemble later, can often be frozen for a longer period, up to about 2 months, provided they are tightly sealed to prevent moisture loss.
Reheating
This type of cake, especially with its delicate crumb and cream cheese frosting, is not typically “reheated” in the traditional sense of baking or microwaving. The goal is to bring it back to a pleasant serving temperature and texture after refrigeration or freezing. For refrigerated slices, simply remove the cake from the refrigerator about 20 to 30 minutes before you plan to serve it.
This allows the frosting to soften slightly and the cake layers to reach a more tender and flavorful state. If serving from frozen, allow ample thawing time at room temperature, which might take 1 to 2 hours depending on the size of the piece. The cream cheese frosting can safely remain at room temperature for a few hours during serving time, which is ideal for parties and gatherings.
Frequently Asked Questions
- Can I make this cake ahead of time?
Absolutely! This Coconut Cake with Cream Cheese Frosting is an excellent choice for make-ahead preparations, simplifying event planning. You can bake the cake layers a day or two in advance, cool them completely, wrap them tightly in plastic wrap, and then refrigerate or freeze them. Chilling the layers before frosting makes them firmer and easier to handle, resulting in a neater appearance, especially when applying a crumb coat and the final frosting layer.
- Why are the egg whites whipped separately?
Whipping the egg whites separately and then gently folding them into the batter is a crucial technique for achieving the cake’s signature light, airy, and tender crumb. This process incorporates a significant amount of air into the batter, which expands during baking, providing lift and creating a delicate texture. Without this step, the cake would still be delicious but would likely be denser and less delicate, missing that characteristic bakery-style lightness.
- Does coconut cake with cream cheese frosting need to stay chilled?
Yes, due to the presence of cream cheese in the frosting, this cake must be refrigerated when it is not actively being served. Cream cheese is a perishable dairy product and requires cool temperatures to prevent spoilage. While it’s best to take the cake out of the refrigerator about 20-30 minutes before serving to allow the frosting to soften slightly for optimal texture and flavor, any leftovers should be promptly returned to the refrigerator.