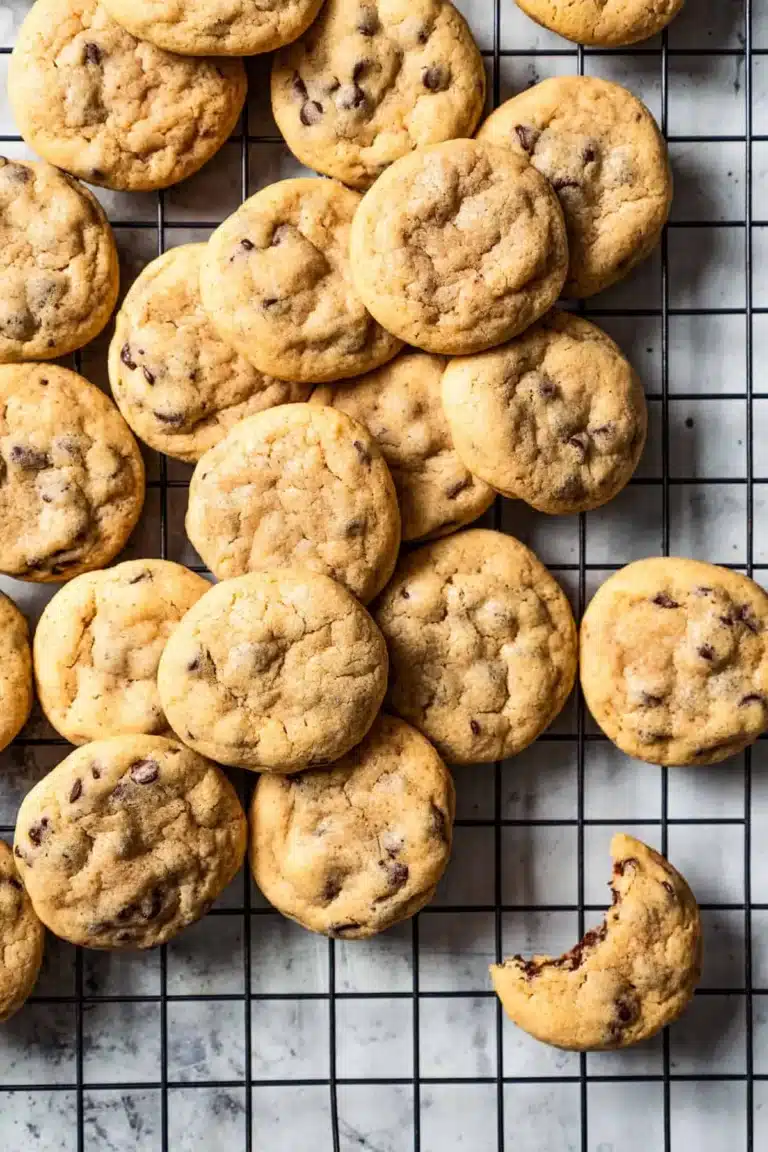
Irresistible Cadbury Egg Cookies: A Sweet Delight

There’s something truly magical about a warm, freshly baked cookie, especially when it’s bursting with delightful surprises. If you’ve ever dreamed of a treat that perfectly blends the creamy richness of chocolate with the satisfying crunch of candy, then Cadbury Egg Cookies are about to become your new obsession.
Imagine the most enchanting aroma filling your kitchen as these cookies bake to golden perfection, each bite offering a heavenly mix of soft, chewy dough and molten chocolatey goodness. These aren’t just any cookies; they are an experience, a celebration of flavor and texture that’s remarkably easy to bring to life. They bring a playful, seasonal twist to the classic cookie, making every moment sweeter.
Why You Will Love This Recipe
- Irresistible Flavor Combination: The rich, creamy Cadbury mini eggs meld beautifully with the sweet, buttery cookie dough, creating a truly decadent experience in every bite. This unique pairing offers a delightful surprise that is far more exciting than a standard chocolate chip cookie.
- Simple and Quick Preparation: Even if you’re new to baking, this recipe is incredibly straightforward. You’ll be amazed at how quickly you can go from gathering ingredients to pulling a fresh batch of these delightful cookies from the oven, making it perfect for last-minute cravings or planned sweet treats.
- Visually Appealing: The colorful specks of Cadbury mini eggs throughout the cookies make them incredibly eye-catching and festive. They are perfect for adding a touch of cheer to any table setting, making them a guaranteed hit at parties and gatherings.
- Highly Customizable: While the Cadbury mini eggs are stars, this recipe is a fantastic canvas for creativity. Feel free to experiment with different types of chocolate candies, add nuts for extra crunch, or even incorporate a hint of spice for a unique twist.
- Family-Friendly Fun: Baking these cookies is a wonderful activity to share with loved ones, especially children. The process is engaging, and the result is a delicious reward that everyone can enjoy together, creating lasting memories in the kitchen.
Ingredients You Need
The foundation of any great cookie is quality ingredients, and this Cadbury Egg Cookie recipe is no exception. Using fresh, high-quality butter, good vanilla extract, and, of course, the star of the show – genuine Cadbury mini eggs – will elevate your cookies from good to absolutely unforgettable. Taking a moment to ensure all your ingredients are at the right temperature, like softened butter and room-temperature eggs, will also significantly contribute to the perfect texture and consistency of your dough.
Cadbury Egg Cookies

Indulgent Cadbury Egg Cookies are a must-try for any cookie lover. Their delightful combination of flavors and textures makes for an irresistible treat that leaves everyone wanting more. Not only is the recipe straightforward and approachable for bakers of all skill levels, but it also allows for creativity and customization. Whether you bake them for a special occasion or just a cozy night in, these cookies are sure to steal the show. With their beautiful look and delicious taste, Cadbury Egg Cookies can bring happiness to any gathering.
- 1 cup butter, softened
- 3/4 cup white sugar
- 3/4 cup brown sugar
- 1 teaspoon vanilla extract
- 2 eggs
- 2 1/4 cups all-purpose flour
- 1 teaspoon baking soda
- 1/2 teaspoon salt
- 1 cup Cadbury mini eggs, crushed
- 1Gather all your ingredients and ensure the butter is softened by leaving it at room temperature.
- 2Preheat your oven to 350°F (175°C).
- 3In a large mixing bowl, cream together the softened butter, white sugar, brown sugar, and vanilla extract until smooth and fluffy.
- 4Add in the eggs one at a time, mixing well after each addition.
- 5In a separate bowl, mix together the flour, baking soda, and salt.
- 6Gradually add the dry ingredients into the wet mixture and mix until just combined.
- 7Fold in the crushed Cadbury mini eggs gently.
- 8Drop spoonfuls of dough onto ungreased cookie sheets, leaving space between each.
- 9Bake for 10 to 12 minutes or until the edges are golden brown.
- 10Allow cookies to cool on the sheet for a few minutes before transferring to a wire rack.
Keywords: Baking, Cadbury Egg Cookies, Chocolate Cookies, cookie recipe, Easter Treats
- butter, softened: essential for a tender and moist cookie crumb, its richness provides the perfect base.
- white sugar: contributes to the crisp edges and overall sweetness of the cookie.
- brown sugar: adds moisture, chewiness, and a lovely caramel note to the cookie dough.
- vanilla extract: a classic flavor enhancer that complements the chocolate and butter notes beautifully.
- eggs: bind the ingredients together and contribute to the cookie’s structure and richness.
- all-purpose flour: the backbone of the cookie, providing structure and body to the dough.
- baking soda: a leavening agent that helps the cookies spread and achieve a pleasing texture.
- salt: balances the sweetness and enhances the overall flavor profile of the cookies.
- Cadbury mini eggs, crushed: the unique and iconic ingredient that melts into pockets of creamy chocolate.
You’ll find the precise measurements for each ingredient within the included recipe card, ensuring perfect results every time.
Variations
For those seeking a delightful plant-based option, transforming these Cadbury Egg Cookies into a vegan treat is wonderfully straightforward. Simply swap out the butter for a high-quality vegan margarine and substitute the eggs with a flaxseed egg (one tablespoon of ground flaxseed mixed with three tablespoons of water, left to sit for five minutes) or unsweetened applesauce. The magic of the Cadbury eggs themselves can be preserved by seeking out vegan-friendly chocolate candies that mimic their delightful crunch and creamy center, ensuring no one misses out on this delicious experience.
Embracing a low-carb lifestyle doesn’t mean you have to forgo the joy of these festive cookies. For a keto-friendly rendition, consider using almond flour or coconut flour as the base, and opt for a sugar substitute like erythritol or xylitol to maintain that essential sweetness without the carbohydrates. You’ll want to choose sugar-free chocolate chips or finely chopped sugar-free chocolate bars instead of traditional Cadbury eggs to maintain the low-carb integrity of the treat.
Adding a subtle hint of warmth and spice can take these cookies to a whole new level. A pinch of cinnamon, nutmeg, or even a touch of cardamom folded into the dough alongside the Cadbury mini eggs can create a wonderfully comforting flavor profile. For an extra layer of indulgence, consider adding chopped toasted pecans or walnuts to the dough, providing a delightful textural contrast and nutty depth that pairs exceptionally well with the sweet chocolatey eggs.
How to Prepare Cadbury Egg Cookies
Step 1: The Foundation – Gathering and Preparing Your Ingredients
Before diving into the delightful process of creating these Cadbury Egg Cookies, the first crucial step is to meticulously gather all your necessary ingredients. Ensure your butter is at the perfect softened state; this usually means leaving it out at room temperature for about 30 to 60 minutes, depending on your kitchen’s climate, until it yields gently when pressed. Properly softened butter is key to achieving a smooth, creamy texture when combined with sugar, which is fundamental for light and airy cookies.
Simultaneously, it’s highly recommended to preheat your oven to the specified temperature, typically around 350°F (175°C). Having the oven at the correct temperature from the start ensures that your cookies bake evenly and consistently. An oven thermometer can be a valuable tool here, as oven thermostats can sometimes be inaccurate. This preparation also involves measuring out all your dry ingredients – flour, baking soda, and salt – and whisking them together in a separate bowl to ensure they are thoroughly combined and evenly distributed, preventing any concentrated pockets of leavening or salt in your final cookies.
The star of the show, the Cadbury mini eggs, should also be prepared at this stage. For the best distribution and melt within the cookie, it’s ideal to gently crush them. You can achieve this by placing them in a sturdy zip-top bag and using a rolling pin, a meat mallet, or even the bottom of a heavy pan to break them into smaller, irregular pieces. Aim for a mix of smaller fragments and some slightly larger chunks, as this variety will create wonderful pockets of melted chocolate and delightful crunchy bits throughout your cookies. This intentional preparation ensures that every element is ready to be combined efficiently, leading you smoothly towards delicious, freshly baked treats.
Step 2: Creaming the Sweetness – Building the Cookie Base
In a large mixing bowl, the magic truly begins with the creaming of the butter and sugars. Combine your perfectly softened butter with the white sugar and the brown sugar. Using an electric mixer on medium speed is ideal for this process, as it helps to incorporate air into the mixture, which is crucial for the cookies’ texture. Continue to cream these ingredients together for a good 3 to 5 minutes, or until the mixture becomes noticeably light, fluffy, and pale in color. This step aerates the dough, contributing significantly to the cookies’ final lift and tender crumb.
The addition of vanilla extract at this stage is essential for infusing a warm, aromatic depth into the cookie base. Ensure it is well incorporated into the creamed butter and sugar mixture. This blend of fats and sugars creates the foundational sweetness and texture that will hold all the other wonderful ingredients together. The consistency should be smooth and creamy, with no large lumps of butter or sugar remaining visible, indicating that the creaming process has been successful.
Don’t rush this creaming phase; it’s a critical step for achieving that perfect cookie texture. A well-creamed base will result in cookies that are less dense and more enjoyable to eat. The slight paleness and fluffy appearance are visual cues that you’ve successfully incorporated enough air, which will translate into lighter, chewier cookies after baking. This meticulous attention to the creaming process sets the stage for a truly superior cookie experience.
Step 3: Introducing the Eggs – Binding and Enriching
With your butter and sugar mixture beautifully creamed, it’s time to add the eggs. It is crucial to add them one at a time, ensuring that each egg is fully incorporated into the batter before adding the next. This gradual addition helps to emulsify the mixture, creating a more stable and cohesive dough. As you beat in each egg, you’ll notice the batter becoming even smoother and slightly lighter in color, indicating that the proteins in the eggs are beginning to bind the fat and sugar elements together.
Scraping down the sides of the bowl periodically is an important part of this process. This ensures that all the ingredients are evenly mixed and that no pockets of unmixed egg or butter remain. The goal is a uniform, glossy batter that signifies perfect emulsification. Using room temperature eggs, as mentioned earlier, aids significantly in this process, allowing them to blend more seamlessly into the creamed mixture without causing the fat to seize up.
Once both eggs have been thoroughly beaten into the mixture, you should have a rich, cohesive batter. This stage marks the transition from the sweet base to a more robust dough structure. The eggs not only contribute to binding but also add richness and moisture, which are vital for producing a cookie that is both tender and flavorful. The smooth, glossy appearance of the batter is a good indicator that you are on the right track for perfectly textured cookies.
Step 4: The Dry Ensemble – Flour, Leavening, and Salt
In a separate, medium-sized bowl, it’s time to bring together the dry ingredients that will give your cookies structure and texture. Carefully measure out your all-purpose flour, ensuring you don’t pack it too tightly into the measuring cup, as this can lead to dense cookies. Add the baking soda and salt to the flour.
Whisk these dry ingredients together thoroughly. This step is more important than it might seem; it ensures that the baking soda and salt are evenly distributed throughout the flour. This prevents pockets of intense saltiness or areas where the cookies don’t rise properly. A good whisking guarantees uniform leavening and flavor in every single cookie.
Having your dry ingredients pre-mixed in this way also helps to prevent overmixing when you combine them with the wet ingredients later. Overmixing can develop the gluten in the flour too much, leading to tough, chewy cookies rather than the desired tender texture. So, a good, gentle whisking here is the perfect preparation for the next stage of combining everything.
Step 5: Merging the Worlds – Wet Meets Dry
Now comes the crucial step of combining the wet and dry ingredients to form your cookie dough. You’ll want to gradually add the pre-mixed dry ingredients to the large bowl containing your creamed butter, sugar, and egg mixture. It’s best to add them in two or three additions, mixing on a low speed with your electric mixer, or by hand with a spatula, after each addition.
The key here is to mix only until the flour streaks just disappear. You should not overmix the dough at this stage. Overmixing will develop the gluten in the flour, resulting in tough, dense cookies instead of the soft, chewy ones you desire. The dough should still look slightly imperfect, with just a few faint traces of flour remaining, as this is the point where it’s perfectly combined.
As you mix, the dough will begin to thicken and come together. You might notice it becoming quite stiff. If you are mixing by hand, this can require a bit of effort. The resulting dough should be soft and slightly sticky, which is exactly what you want for cookies that spread beautifully and remain tender. This careful balance ensures optimal texture and flavor.
Step 6: The Chocolatey Embrace – Incorporating Cadbury Mini Eggs
This is arguably the most exciting part of the cookie-making process – folding in those glorious crushed Cadbury mini eggs! Once your dough is just combined, gently add the prepared crushed Cadbury mini eggs to the bowl. Using a spatula or a wooden spoon, carefully fold them into the dough.
The goal is to distribute the candy pieces evenly throughout the dough without overmixing. Overmixing at this stage can break down the candy pieces too much and also further develop the gluten in the flour, negatively impacting the cookie’s texture. You want to see those colorful speckles dotted throughout the cookie dough, promising a burst of chocolatey goodness in every bite.
Take your time with this step, ensuring that the egg pieces are nicely incorporated but not pulverized. The dough will now have a beautiful, speckled appearance, hinting at the deliciousness to come. This gentle folding technique ensures that the Cadbury eggs remain distinct and provide that signature melt-in-your-mouth experience during baking, creating delightful pockets of creamy chocolate within the tender cookie.
Step 7: Portioning Perfection – Scooping the Dough
With your luscious dough ready, it’s time to shape it into cookies. Using a cookie scoop or two spoons, drop rounded portions of dough onto ungreased baking sheets. A standard cookie scoop (about 1.5 to 2 tablespoons) works wonderfully for creating uniform cookies of a desirable size. This ensures that all your cookies bake at the same rate, leading to consistent results.
Crucially, leave adequate space between each dough ball. As the cookies bake, they will spread considerably. Aim for about 2 inches (5 cm) of space between each cookie to prevent them from merging into one giant cookie mass. This spacing allows for even heat circulation around each cookie, promoting uniform baking and browning.
For optimal baking, consider how many cookies fit comfortably on your baking sheet without overcrowding. Typically, 10 to 12 cookies can be placed on a standard-sized baking sheet. If you have too much dough, it’s better to use a second baking sheet or bake in batches rather than cramming them together. This thoughtful spacing and portioning are vital for achieving beautifully shaped, perfectly baked Cadbury Egg Cookies.
Step 8: The Golden Transformation – Baking the Cookies
Carefully place your prepared baking sheets into the preheated oven. Bake the cookies for approximately 10 to 12 minutes. The exact baking time will vary depending on your oven and the size of your cookies, so it’s important to keep an eye on them towards the end of the baking period. You’re looking for the edges of the cookies to turn a lovely golden brown color.
The centers of the cookies might still appear slightly soft and underbaked when you remove them from the oven. This is perfectly normal and, in fact, desirable. The residual heat from the baking sheet will continue to cook the cookies as they cool, ensuring a wonderfully chewy center. If the cookies look fully baked and firm when you take them out, they will likely be dry and crumbly after cooling.
For a truly classic chocolate chip cookie texture, aiming for cookies that are golden brown around the edges and slightly soft in the center is the ideal outcome. This balance will give you that irresistible chewiness that makes homemade cookies so beloved. Monitor them closely to avoid overbaking, as a minute or two too long can significantly alter the final texture.
Step 9: The Crucial Pause – Cooling on the Sheet
Once the cookies have reached that perfect golden-brown stage, carefully remove the baking sheets from the oven. It’s essential to let the cookies sit on the hot baking sheet for about 5 minutes. This initial cooling period on the sheet is critical for several reasons.
During this time, the cookies will continue to set up. The heat from the baking sheet will gently finish the baking process in the center, firming them up just enough so they can be moved without falling apart. If you try to transfer them immediately from the hot baking sheet to a cooling rack, they are likely to be too soft and fragile, potentially breaking apart.
This short resting period allows the structure of the cookies to stabilize. It helps them maintain their shape and prevents them from becoming overly spread out. Patience here is rewarded with perfectly formed cookies that are ready to be moved to the next stage of cooling, ensuring they retain their delightful texture and integrity.
Step 10: The Final Chill – Cooling to Perfection
After the brief cooling period on the baking sheet, it’s time to carefully transfer the cookies to a wire cooling rack. Use a thin spatula or a flipper to gently lift each cookie and place it onto the rack. Allow the cookies to cool completely on the wire rack. This step is vital for achieving the desired texture.
Cooling on a wire rack allows air to circulate around all sides of the cookie. This prevents the bottoms from becoming soggy and helps them achieve that perfect crisp edge and chewy interior. If you leave them on the hot baking sheet for too long, they can continue to bake and become overdone, drying out the cookie.
Once completely cooled, you can enjoy them immediately or store them. This final cooling phase allows the flavors to meld and the texture to fully develop, ensuring each cookie is a delightful combination of chewy and slightly crisp. The anticipation of a completely cooled cookie is often worth the wait, as it signifies the perfect moment to savor your homemade Cadbury Egg Cookies.
Pro Tips for Cadbury Egg Cookies
Tip: Use High-Quality Butter. The flavor of your butter plays a significant role in the overall taste of your cookies. Opt for a good quality, unsalted butter for the best results; it will impart a richer, more nuanced flavor that complements the Cadbury eggs beautifully. This simple choice can elevate your cookies from good to extraordinary.
Tip: Don’t Overmix the Dough. Once you add the flour, mix only until it’s just combined. Overmixing develops the gluten in the flour, which can lead to tough, chewy cookies rather than the desired soft and tender texture. Stop mixing as soon as you no longer see dry streaks of flour.
Tip: The Importance of Softened Butter. Ensure your butter is truly softened, not melted. Softened butter allows you to cream it properly with the sugar, incorporating air into the mixture, which is essential for light and fluffy cookies. Cold butter is difficult to cream, and melted butter will result in flatter, denser cookies.
Tip: Crush Eggs for Texture. While whole mini eggs can be used, crushing them into varied pieces before adding them to the dough creates more pockets of melted chocolate and delightful crunchy bits. This technique ensures that each bite offers a wonderful textural surprise and even distribution of the Cadbury goodness throughout the cookie.
Tip: Adjust Baking Time. Oven temperatures can vary significantly. Keep a close eye on your cookies during the last few minutes of baking. They should be golden brown around the edges but still slightly soft in the center when you remove them, as they will continue to set as they cool on the baking sheet.
Serving Suggestions for Cadbury Egg Cookies
Decoration
These cookies are delightful as they are, but a little extra flair can make them even more special. For an added touch of sweetness and visual appeal, you can gently press a few extra crushed Cadbury mini egg pieces onto the tops of the cookies immediately after they come out of the oven. The residual heat will help them adhere beautifully, creating a more intensely chocolatey and visually striking cookie. Alternatively, a light dusting of powdered sugar can add a delicate snowy effect, especially fitting for any season.
Side Dishes
The ultimate classic accompaniment to any cookie, especially one as rich as this, is a tall, cold glass of milk. The coolness of the milk provides a perfect contrast to the warm, sweet cookie, cleansing the palate with each sip. For a more sophisticated pairing, consider a cup of freshly brewed coffee or a comforting hot chocolate. The slight bitterness of coffee or the rich creaminess of hot chocolate can beautifully complement the sweet, chocolatey notes of the cookies, creating a truly indulgent treat experience.
Creative Serving Ideas
Elevate your cookie presentation by transforming them into a decadent dessert. Serve warm Cadbury Egg Cookies alongside a scoop of vanilla bean ice cream for an instant ice cream sandwich sensation. The contrast of the warm, chewy cookie with the cold, creamy ice cream is simply divine. You can also crumble a few cooled cookies over a bowl of fresh berries or a fruit salad, adding a delightful crunch and chocolatey twist to a lighter dessert option.
Preparation & Storage
Storing Leftovers
To ensure your delicious Cadbury Egg Cookies remain as fresh and delightful as possible, proper storage is key. Once completely cooled, transfer the cookies to an airtight container. This prevents them from drying out and losing their desirable chewy texture. Stored at room temperature, they should retain their wonderful quality for up to a week, though they are often at their absolute best within the first few days.
Freezing
For longer-term enjoyment, Cadbury Egg Cookies freeze exceptionally well. To freeze them, first place the completely cooled cookies in a single layer on a baking sheet and freeze until firm, which typically takes about 1 to 2 hours. This flash-freezing step prevents them from sticking together in a large clump. Once firm, transfer the frozen cookies to a freezer-safe airtight container or a heavy-duty freezer bag, separating layers with parchment paper if necessary.
Reheating
When you’re ready to enjoy your frozen Cadbury Egg Cookies, they can be thawed at room temperature for a few hours, or you can gently reheat them to recapture that freshly baked warmth. Place the frozen or thawed cookies on a baking sheet and warm them in a preheated oven at around 350°F (175°C) for about 5-10 minutes, or until they are just heated through and slightly softened. Be careful not to overbake them, as this can dry them out.
Frequently Asked Questions
-
How long do Cadbury Egg Cookies typically stay fresh, and what is the best way to store them to maintain their texture?
Cadbury Egg Cookies, when stored properly in an airtight container at room temperature, will generally stay fresh and delicious for about a week. The airtight container is crucial as it prevents moisture from escaping the cookies, thus maintaining their desired chewy texture and preventing them from becoming hard or stale too quickly. If you find they are starting to lose their ideal texture after a few days, a brief warming in a low oven can often revive them.
-
Can I substitute the Cadbury mini eggs with other candies or chocolate chips, and how might this affect the flavor and texture of the cookies?
Absolutely, you can certainly substitute the Cadbury mini eggs with other candies or chocolate chips, but be aware that it will alter the unique flavor profile and texture of the cookies. For instance, using standard chocolate chips will result in a more traditional chocolate chip cookie experience, lacking the specific creamy melt and candy shell crunch that Cadbury eggs provide. Other candies like M&M’s could offer a similar crunch but a different chocolate flavor. The key to the original recipe’s charm lies in the specific melting and texture of the Cadbury eggs, so while substitutions are possible and can lead to delicious variations, they won’t be exactly the same.
-
What are the most common mistakes made when baking Cadbury Egg Cookies, and how can I avoid them to ensure a perfect batch every time?
One of the most common mistakes is overmixing the dough after adding the flour, which can lead to tough cookies due to excessive gluten development. Another frequent error is not properly creaming the butter and sugar, resulting in denser cookies that lack the desired lightness. Additionally, overbaking the cookies is a frequent pitfall; they should look slightly underbaked in the center when removed from the oven, as they will continue to cook on the hot baking sheet. Always ensure your oven is preheated to the correct temperature, and use an oven thermometer if you suspect inaccuracy. Finally, giving the cookies adequate space on the baking sheet is vital to prevent them from spreading into each other.