This is the BEST oven roasted vegetables recipe!

Welcome to a culinary adventure where simple ingredients transform into a symphony of flavors and textures. We’re diving into the delightful world of oven-roasted vegetables, a dish that proves healthy eating can be incredibly delicious and satisfying. This recipe is a testament to how basic techniques can unlock the inherent sweetness and earthy notes of everyday produce, making it a star on any plate.
Whether you’re a seasoned home cook or just beginning your journey in the kitchen, this oven-roasted vegetable recipe is designed to be accessible and rewarding. It’s the perfect way to elevate a weeknight dinner or impress guests with minimal effort. Get ready to discover your new favorite side dish that’s vibrant, wholesome, and bursting with goodness.
Why You Will Love This Recipe
- Effortless Preparation: This recipe requires minimal hands-on time, allowing you to prepare other parts of your meal while the vegetables roast to perfection.
- Versatile Flavor Profile: The simple yet effective seasoning blend complements a wide variety of main dishes, making it an adaptable addition to any cuisine.
- Customizable Ingredients: Feel free to swap out vegetables based on seasonality or your personal preferences; this method works beautifully with a vast array of produce.
- Nutrient-Rich: Packed with vitamins, minerals, and fiber, these roasted vegetables offer a healthy and delicious way to boost your daily intake of essential nutrients.
- Visually Appealing: The caramelization and vibrant colors achieved through roasting make this dish a beautiful and appetizing addition to any table setting.
Ingredients You Need
The beauty of oven-roasted vegetables lies in its ability to highlight the natural flavors of fresh produce. By using quality ingredients and simple seasonings, we can create a dish that is both wholesome and incredibly tasty. This recipe focuses on a blend of textures and tastes that complement each other wonderfully.
Easy Oven Roasted Vegetables
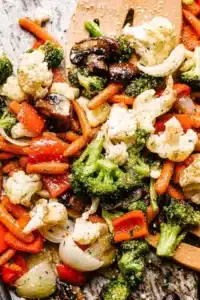
These easy Oven Roasted Vegetables are perfectly tender and packed with flavor! Plus, this method for roasting vegetables can be adapted to fit any veggies you've got on hand!
- 2 cups broccoli florets
- 2 cups cauliflower florets
- 2 cups sliced baby portobello mushrooms
- 1 cup thin baby carrots
- 1 red bell pepper, chopped
- 1 small yellow onion, cut into 6 wedges
- 2 tablespoons olive oil
- salt and fresh ground pepper, to taste
- 1½ teaspoons Italian Seasoning
- grated parmesan cheese, for garnish (optional)
- chopped fresh parsley, for garnish (optional)
- 1Preheat oven to 425°F. Line a large baking sheet with foil or parchment paper.
- 2Add all the vegetables to the baking sheet. Drizzle olive oil over the veggies and mix with either a wooden spoon or just use your hands.
- 3Season the vegetables with salt, black pepper, Italian Seasoning, and garlic powder; gently toss until thoroughly combined.
- 4Arrange all the veggies in a single layer and bake for 15 to 20 minutes, stirring halfway through cooking. You want to roast the vegetables until they are fork-tender and lightly browned.
- 5Remove the roasted vegetables from the oven. Garnish with parmesan cheese and parsley, and serve.
Keywords: roasted vegetables, side dish, vegetarian, easy recipe, oven roasted, healthy, quick
The specific quantities for each ingredient are detailed within the recipe card, ensuring you have everything you need for perfect results. These core components come together to create a truly memorable side dish that will have everyone asking for seconds.
Variations
Vegan Delight: To transform this dish into a fully vegan option, simply omit the optional grated Parmesan cheese. A drizzle of balsamic glaze or a sprinkle of nutritional yeast before serving can add an extra layer of umami and cheesy flavor that vegans will adore. This simple adjustment maintains the dish’s deliciousness while adhering to plant-based principles.
Low-Carb Option: For those mindful of carbohydrate intake, this recipe is already a fantastic choice. The vegetables themselves are naturally low in carbohydrates, and the healthy fats from olive oil contribute to satiety without adding significant carbs. If you wish to further enhance it for a low-carb diet, consider adding some protein like roasted chickpeas or chunks of firm tofu tossed with similar seasonings.
Spicy Kick: Inject some heat into your roasted vegetables by adding a pinch of red pepper flakes along with the other seasonings. Alternatively, a dash of your favorite hot sauce tossed with the vegetables before roasting can create a deliciously fiery side dish. This is perfect for those who enjoy a little zest with their meals.
How to Prepare oven roasted vegetables
Step 1: Preheat Your Oven and Prepare the Baking Sheet
The foundation of perfectly roasted vegetables begins with a hot oven. Preheat your oven to a consistent 425°F (220°C). This high temperature is crucial for achieving that desirable caramelization and tender-crisp texture without drying out the vegetables. Ensuring the oven is fully preheated before the vegetables go in is a key step for even cooking.
Simultaneously, prepare your baking sheet. Lining a large baking sheet with aluminum foil or parchment paper is highly recommended. This not only prevents the vegetables from sticking, which can be a common frustration, but it also makes the post-cooking cleanup significantly easier. A 12×16 inch baking sheet is ideal for this recipe, as it allows for a single layer of vegetables.
This initial step sets the stage for the entire roasting process. A properly prepared baking sheet and a perfectly preheated oven are your first allies in achieving culinary success. Don’t rush this part; its importance cannot be overstated for optimal results.
Step 2: Prepare and Season the Vegetables
Begin by washing and chopping all your chosen vegetables into bite-sized pieces. For broccoli and cauliflower, cut them into florets. Baby carrots can be left whole if they are small and thin, or sliced lengthwise if they are thicker. Bell peppers should be deseeded and cut into roughly 1-inch pieces. Onions can be quartered or cut into wedges. Mushrooms should be sliced, and if you’re using larger ones, halve or quarter them.
Place all these prepared vegetables into a large mixing bowl or directly onto the prepared baking sheet. Drizzle the olive oil generously over the vegetables. The oil is essential for coating each piece, allowing for even roasting and preventing them from drying out. It also helps the seasonings adhere beautifully to the vegetable surfaces.
Add your chosen seasonings. This recipe calls for salt, freshly ground black pepper, Italian seasoning, and garlic powder. Be sure to season to your personal taste preferences, as everyone has a slightly different palate. This step is where the magic of flavor truly begins to develop. Ensure every piece of vegetable is lightly coated with the oil and seasonings.
Step 3: Toss and Coat Thoroughly
Once the vegetables are coated with olive oil and the initial seasonings, it’s time to ensure every piece is evenly distributed. Use your hands or a large wooden spoon to gently toss and mix the vegetables. The goal is to ensure that each piece of broccoli, cauliflower, pepper, carrot, onion, and mushroom is lightly covered with the oil and seasoning mixture. This thorough coating is vital for developing those delicious roasted flavors and achieving a beautiful, even char.
Pay attention to getting into all the nooks and crannies of the florets and around the wedges. If you’re using your hands, this is a wonderfully tactile way to connect with your food. Ensure there are no dry spots left on any of the vegetables. This step directly impacts the final taste and texture, so don’t skimp on the mixing time.
A good coating means that when the vegetables roast, they will develop a rich, caramelized exterior and a tender interior. This is a simple yet critical step that guarantees a more flavorful and enjoyable outcome. You’re building the flavor base right here, layer by delicious layer.
Step 4: Arrange Vegetables in a Single Layer on the Baking Sheet
This is arguably the most critical step for achieving truly roasted vegetables rather than steamed ones. Spread the seasoned vegetables out onto the prepared baking sheet in a single, even layer. It is absolutely imperative that the vegetables are not overcrowded and that no pieces are overlapping. Overcrowding causes the vegetables to steam in their own moisture, resulting in a softer, less appealing texture and preventing them from developing those coveted crispy edges.
If your baking sheet is too small to accommodate all the vegetables in a single layer, do not hesitate to use a second baking sheet. It is far better to use two pans than to cram everything onto one. Give the vegetables a little breathing room; this space allows the hot air to circulate around each piece, promoting even cooking and optimal caramelization. This is where the “roasting” magic truly happens, transforming raw produce into tender, flavorful delights.
Take a moment to ensure everything is spread out evenly, with a little space between each vegetable piece. This attention to detail in the arrangement stage will pay significant dividends in the final taste and texture of your oven-roasted vegetables. It’s the key to unlocking their full potential for crispiness and flavor.
Step 5: Roast and Stir Midway
Place the baking sheet into the preheated 425°F (220°C) oven. Roast the vegetables for an initial 15 to 20 minutes. During this first roasting period, the vegetables will begin to soften and their natural sugars will start to caramelize. The high heat is essential for creating those delightful browned and slightly charred edges that are the hallmark of perfectly roasted vegetables.
After about 10-12 minutes of roasting, carefully remove the baking sheet from the oven. Using a spatula, gently stir the vegetables. This midway stir is crucial for ensuring that all sides of the vegetables get exposed to the hot oven air, promoting even browning and cooking. It prevents any one side from becoming overcooked while others remain underdone. This simple step ensures consistency across the entire batch.
Return the baking sheet to the oven to finish roasting. Continue to roast for another 5-10 minutes, or until the vegetables reach your desired level of tenderness and have achieved a nice, slightly crispy edge. They should be easily pierced with a fork, indicating they are tender but still have a slight bite, or “crisp-tender” as some prefer. The total roasting time will vary slightly depending on the size of your vegetable pieces and your oven’s performance.
Step 6: Finish and Serve
Once the vegetables have reached that perfect tender and slightly browned state, carefully remove the baking sheet from the oven. Take a moment to admire the beautiful colors and the appetizing aroma. The caramelization achieved through roasting will have intensified the natural sweetness of the vegetables, making them incredibly appealing.
If you are using the optional garnishes, this is the time to add them. Sprinkle the grated Parmesan cheese evenly over the hot roasted vegetables. The residual heat will melt the cheese slightly, infusing its salty, nutty flavor throughout the dish. Then, scatter the chopped fresh parsley over the top. The fresh herbs add a bright, herbaceous note and a lovely pop of color, enhancing the overall presentation.
Serve the oven-roasted vegetables immediately while they are hot and at their most delicious. They make a perfect side dish for almost any main course, from grilled meats and fish to pasta dishes and hearty grain bowls. Enjoy the wonderful flavors and textures you’ve created.
Pro Tips for oven roasted vegetables
Maximize Surface Area: Ensure your vegetables are cut into uniform, bite-sized pieces. This allows for even cooking and maximum surface area exposure to the hot oven, leading to better caramelization and crispiness. Avoid pieces that are too large, as they will take longer to cook and may not brown properly.
Don’t Overcrowd the Pan: This is a golden rule of roasting. Giving your vegetables enough space on the baking sheet is essential. Overcrowding leads to steaming rather than roasting, resulting in soggy vegetables. If necessary, use two baking sheets to ensure adequate spacing.
High Heat is Key: Roasting at a high temperature, such as 400-425°F (200-220°C), is crucial for achieving that desirable crispy exterior and tender interior. This high heat helps to caramelize the natural sugars in the vegetables, adding a depth of flavor that lower temperatures won’t achieve.
Embrace the Char: A little bit of browning and charring on the edges is not a sign of burnt vegetables but rather a testament to successful roasting. These caramelized bits add a wonderful depth of flavor and texture. Don’t be afraid if some pieces get a little darker around the edges.
Experiment with Seasonings: While Italian seasoning is a fantastic base, don’t hesitate to explore other herb and spice combinations. Smoked paprika, chili powder, cumin, or even a touch of curry powder can add exciting new dimensions to your roasted vegetables. Fresh herbs like rosemary or thyme can also be added during the last few minutes of roasting.
Serving Suggestions for oven roasted vegetables
Decoration
For an extra touch of visual appeal, consider a light garnish beyond the standard parsley. A few strategically placed sprigs of fresh rosemary or thyme can add both visual elegance and an aromatic boost. A final drizzle of high-quality olive oil or a sprinkle of flaky sea salt just before serving can also elevate the presentation. Consider a scattering of toasted pine nuts for a sophisticated crunch and nutty flavor. These small decorative elements can transform a simple side dish into a restaurant-worthy presentation.
Side Dishes
These oven-roasted vegetables are incredibly versatile and pair beautifully with a wide range of main courses. They are an excellent accompaniment to any protein, including grilled chicken, baked fish, pan-seared steak, or pork chops. For a vegetarian or vegan main, serve them alongside lentil shepherd’s pie or a hearty grain pilaf. They also complement pasta dishes wonderfully, adding color and nutritional balance to a plate of spaghetti or lasagna. Consider them as a vibrant partner for baked lemon chicken or a comforting easy lobster bisque.
Creative Serving Ideas
Elevate your roasted vegetables by incorporating them into other dishes. They can be stirred into a frittata or omelet for a flavorful breakfast or brunch. Toss them with cooked quinoa or couscous to create a substantial and healthy grain bowl. For a light lunch, serve them over a bed of fresh greens with a tangy vinaigrette, perhaps adding some crumbled feta or goat cheese. They can also be mashed or blended into soups for added depth and texture. Their versatility makes them a go-to ingredient for creative culinary endeavors, offering a chance to explore new flavor combinations and textures, much like you might with a vibrant easy berry tart or festive funfetti cookies.
Preparation & Storage
Storing Leftovers
To store leftover roasted vegetables, ensure they have cooled completely before transferring them to an airtight container. Refrigerate them promptly. Properly stored, these vegetables will maintain their quality and flavor for up to 3-4 days in the refrigerator. This makes them an excellent option for meal prepping, allowing you to enjoy a healthy side dish throughout the week without having to cook from scratch each time.
When storing, try to avoid containers that are too large, as excess air can sometimes contribute to a slight loss of texture over time. Ensuring the container is sealed tightly is the most crucial step to maintaining freshness. The goal is to minimize exposure to air and moisture, which can degrade the quality of the cooked vegetables.
It’s important to note that while leftovers can be very good, the texture may soften slightly compared to when they were freshly roasted. However, with proper storage, they remain a delicious and convenient option.
Freezing
While roasting vegetables at home is best enjoyed fresh, freezing is an option for longer-term storage, though it can alter the texture. For the best results when freezing, allow the roasted vegetables to cool completely. Spread them in a single layer on a baking sheet and freeze until solid, which typically takes about 1-2 hours. This pre-freezing step helps prevent the vegetables from clumping together in the freezer.
Once frozen, transfer the solid vegetables into freezer-safe bags or airtight containers. Remove as much air as possible from the packaging to prevent freezer burn. Properly frozen roasted vegetables can be stored for up to 2-3 months. Be aware that upon thawing, the texture may become softer and more mushy than fresh or refrigerated leftovers, as ice crystals can break down the cell structure of the vegetables.
This method is best suited if you plan to use the frozen vegetables in dishes where texture is less critical, such as soups, stews, or purees. For a crispier outcome, refrigeration is generally preferred.
Reheating
Reheating oven-roasted vegetables can be done in several ways, with the oven being the preferred method for best results. Preheat your oven to around 400-450°F (200-230°C). Spread the leftover vegetables in a single layer on a baking sheet, similar to how you would roast them initially. Reheat for about 5-10 minutes, or until they are heated through and have regained some of their crispness. This method helps to revive their texture and flavor.
Alternatively, you can reheat them in a skillet over medium-high heat. Add a tablespoon of olive oil or butter to the skillet and cook the vegetables, stirring occasionally, until they are heated through and slightly crispy. This method can be quicker than oven reheating but requires more attention to prevent burning. A microwave can be used for a very quick reheat, but this will likely result in a softer, less appealing texture.
Using the stovetop or oven will help to re-establish some of the roasted texture and flavor that might be lost in microwave reheating. The goal is to bring back some of that lovely crispness.
Frequently Asked Questions
-
What is the ideal temperature for roasting vegetables to achieve optimal caramelization?
The ideal temperature for roasting vegetables to achieve optimal caramelization is typically between 400°F and 425°F (200°C to 220°C). This high heat is essential for several reasons. Firstly, it allows the natural sugars present in the vegetables to caramelize, developing a sweet, rich, and slightly nutty flavor profile that is highly desirable in roasted dishes. Secondly, the intense heat helps to evaporate moisture from the surface of the vegetables rapidly, promoting the formation of a crispy, browned exterior while keeping the interior tender and moist. This contrast in textures is a hallmark of perfectly roasted vegetables. Lower temperatures, while suitable for other cooking methods, do not provide the necessary heat intensity to achieve this level of delicious browning and flavor development.
-
How can I prevent my roasted vegetables from becoming soggy or mushy?
Preventing sogginess in roasted vegetables hinges on a few key techniques, with the most critical being avoiding overcrowding the baking sheet. When vegetables are packed too tightly, they release moisture that gets trapped, leading to a steaming effect rather than true roasting, which results in a mushy texture. Ensure there’s ample space between each piece for hot air to circulate freely, promoting crisping and browning. Another crucial step is to ensure the vegetables are as dry as possible before seasoning and roasting; excess water on the surface will hinder caramelization. Using a hot oven, as mentioned previously, is also vital, as it quickly cooks the vegetables and drives off excess moisture. Finally, consider cutting vegetables into uniform sizes so they cook evenly and avoid having smaller pieces overcook while larger ones remain underdone and potentially mushy.
-
Can I roast virtually any vegetable, and are there any that are not suitable for roasting?
While a wide variety of vegetables are excellent candidates for roasting, some are more suited than others due to their starch content and moisture levels. Root vegetables like potatoes, sweet potatoes, carrots, and parsnips roast beautifully, becoming tender and sweet, though they may require a slightly longer cooking time or smaller cuts to ensure even cooking alongside other vegetables. Hearty vegetables such as Brussels sprouts, broccoli, cauliflower, bell peppers, onions, and zucchini also roast exceptionally well, developing lovely caramelization. Delicate vegetables like peas or corn might cook too quickly and lose their texture, although they can be added during the last few minutes of roasting. Vegetables with very high water content, like lettuce or cucumbers, are generally not suitable for roasting as they will wilt and become unpleasantly soggy rather than developing a desirable roasted texture. Additionally, very starchy vegetables that require long cooking times, like whole winter squashes, might be better suited for baking or other cooking methods unless cut into small enough pieces to ensure they cook through within a reasonable roasting timeframe.