Raspberry Zinger Sheet Cake – A Throwback Favorite!
Imagine a dessert that transports you back to cherished childhood memories, a taste of pure nostalgia perfectly recreated with a delightful homemade twist. This Raspberry Zinger Cake aims to do just that, capturing the essence of those iconic, foil-wrapped treats we all loved.
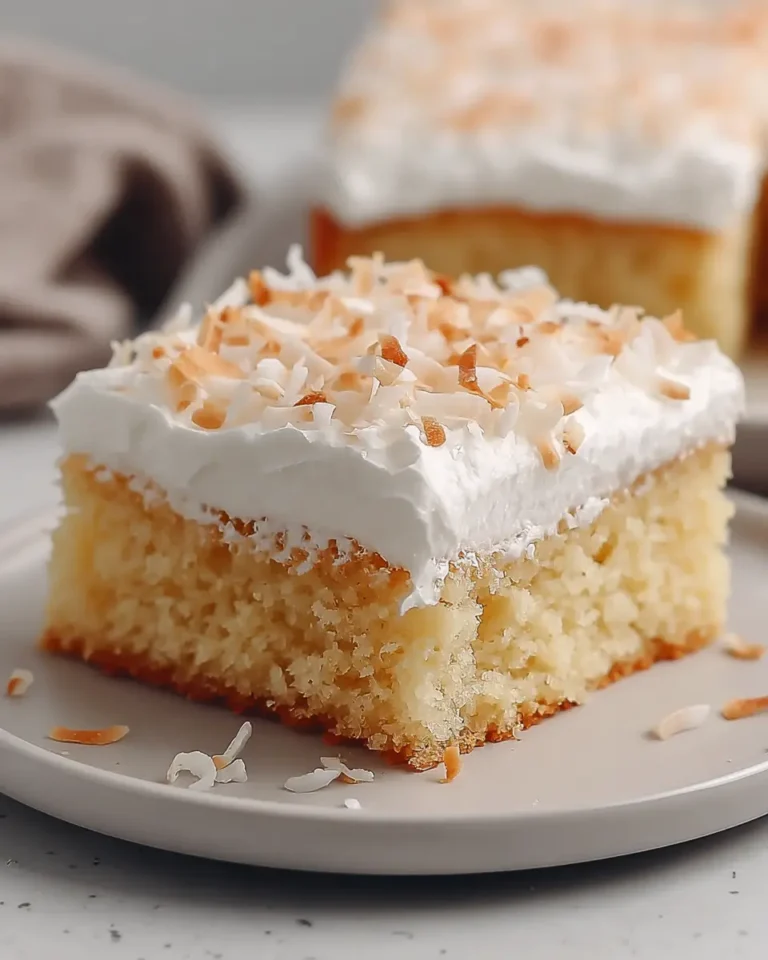
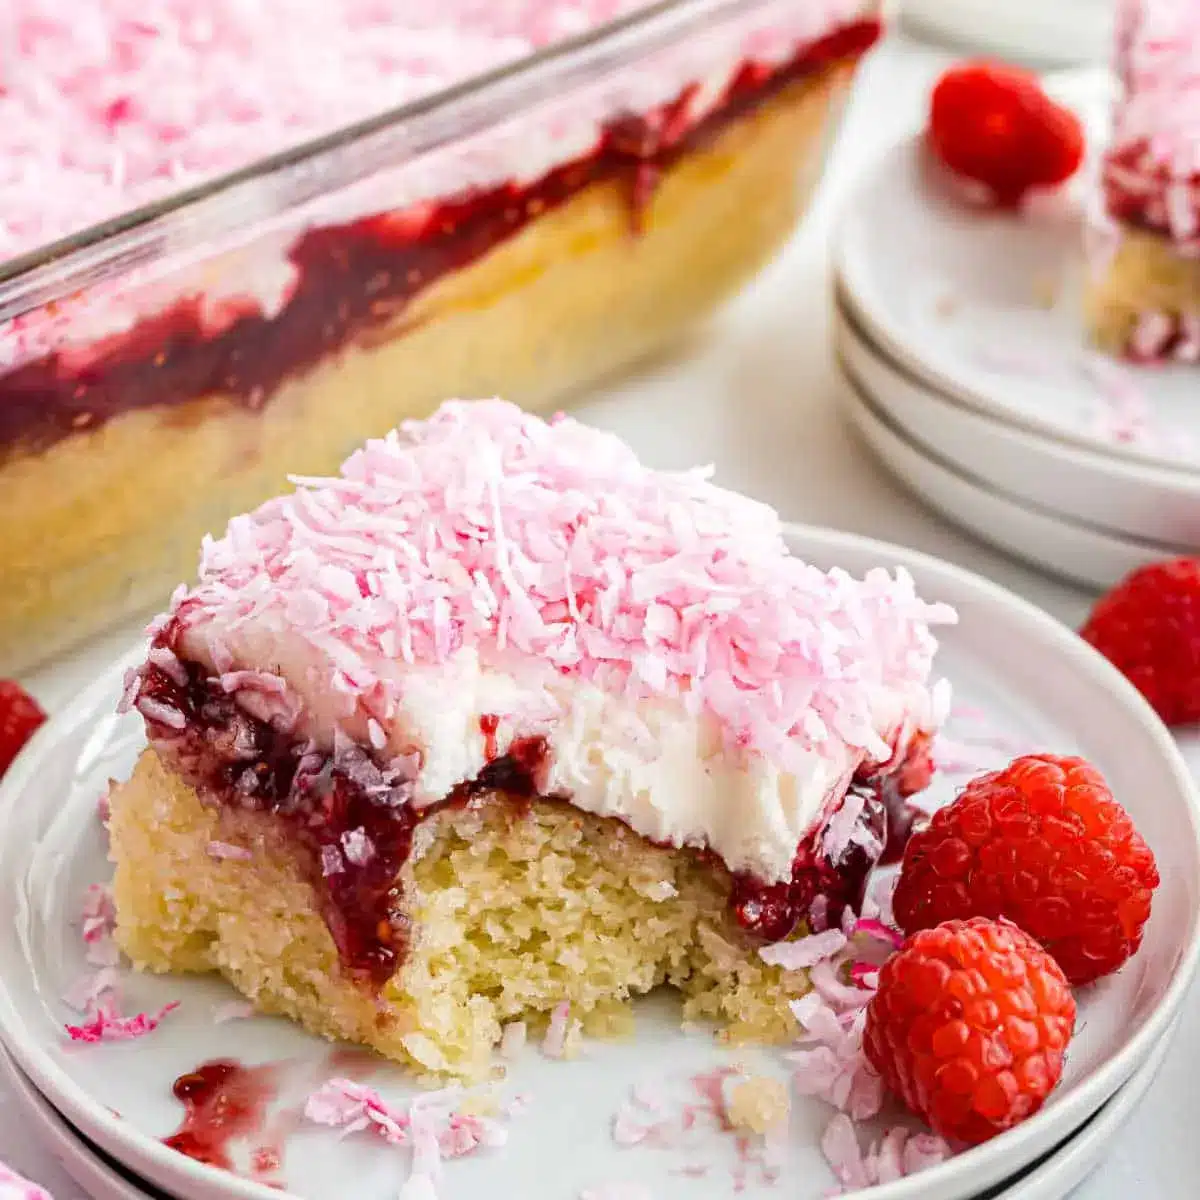
It’s a symphony of flavors and textures: a tender, moist vanilla cake forms the base, generously layered with a vibrant, slightly tart raspberry filling. This is all crowned with a cloud-like marshmallow frosting and a sweet, rosy pink coconut topping, creating a visually stunning and incredibly delicious cake experience that’s far superior to its store-bought inspiration.
Why You Will Love This Recipe
- Nostalgic Charm: Relive the joy of your favorite childhood snack cakes with this elevated homemade version, offering all the familiar flavors you adore.
- Perfect Texture Combination: Experience the delightful contrast between the light, airy vanilla cake, the luscious raspberry spread, and the fluffy marshmallow frosting.
- Vibrant Presentation: The bright pink coconut topping makes this cake a showstopper, perfect for parties, celebrations, or just a cheerful weekend treat.
- Customizable Delight: Easily adapt this recipe to suit your preferences, whether it’s by swapping the raspberry preserves or opting for store-bought cake mix to save time.
- Impressive Results: While it evokes simplicity, the final cake is sophisticated enough to impress guests, proving that homemade can truly be the best.
Ingredients You Need
Crafting this Raspberry Zinger Cake begins with selecting high-quality ingredients, as they form the foundation of its exceptional taste and texture. Using fresh dairy, premium extracts, and good quality preserves will elevate the final product significantly, ensuring a moist crumb and vibrant flavors that truly sing. The careful selection of each component contributes to the overall success of this beloved nostalgic dessert.
Raspberry Zinger Cake

A homemade vanilla sheet cake with a tart raspberry filling, creamy marshmallow frosting, and a sweet pink coconut topping. This cake is a nostalgic treat reminiscent of classic snack cakes, but with a fresh, homemade taste.
- 3/4 cup unsalted butter, softened
- 1 3/4 cups granulated sugar
- 3 large eggs
- 2 large egg whites
- 1 Tablespoon pure vanilla extract
- 2 1/2 cups cake flour
- 1/2 teaspoon kosher salt
- 1 Tablespoon baking powder
- 3/4 cup buttermilk
- 1 3/4 cups raspberry preserves
- 7 ounce Marshmallow Fluff
- 1/2 cup unsalted butter, softened
- 1 teaspoon pure vanilla extract
- 3 cups powdered sugar
- 3 cups shredded sweetened coconut
- 4 drops neon pink gel food coloring
- 1Make the Cake Batter: Cream softened butter with granulated sugar. Add eggs and egg whites one at a time, then stir in vanilla extract. In a separate bowl, whisk together cake flour, salt, and baking powder. Alternately add the dry ingredients and buttermilk to the butter mixture, beginning and ending with the dry ingredients. Mix until just combined.
- 2Spread the batter into a greased 13x9 inch baking dish.
- 3Bake as directed in the recipe card below until a toothpick inserted into the center comes out clean.
- 4Poke and Frost: While the cake is still warm, use the back handle of a wooden spoon to poke about 15-20 holes evenly over the top of the cake.
- 5Spread the raspberry preserves evenly over the warm cake, allowing it to melt slightly into the holes.
- 6Make the Frosting: In a bowl, cream together 1/2 cup softened butter with 1 teaspoon vanilla extract. Gradually beat in the powdered sugar until smooth. Stir in the Marshmallow Fluff until well combined and the frosting is thick.
- 7Spread the frosting evenly over the raspberry preserves.
- 8Add the Topping: In a separate bowl, mix the shredded coconut with the neon pink gel food coloring until evenly colored.
- 9Sprinkle the pink coconut evenly over the frosting.
- 10Chill the cake in the refrigerator before slicing and serving.
Budget Tip: Swap out the homemade cake for a yellow or butter cake mix instead. Bake as directed.
Top Tip: Spread the raspberry preserves while the cake is still warm. It will melt slightly into the holes and creates the signature “zing” effect!
Storage: Cover cake and keep in refrigerator for up to 5 days.
Ingredient Notes: For a lighter crumb, cake flour is recommended over all-purpose. If you don't have buttermilk, make your own by adding 1 tablespoon of white vinegar or lemon juice to 1 cup of milk and letting it sit for 5 minutes. Look for a seedless raspberry preserve variety if possible, or swap in strawberry preserves. Use neon gel food coloring for that classic snack cake look; only a few drops are needed.
Tips and Tricks: Save time by using a cake mix. For best flavor, refrigerate the cake and serve cold.
Keywords: Raspberry Zinger Cake, homemade snack cake, raspberry cake, marshmallow frosting, coconut cake, nostalgic dessert, easy cake recipe, German cake
The exact quantities for each ingredient are detailed within the recipe card provided for your convenience, ensuring you have everything you need for baking success.
Variations
For those seeking a dairy-free adaptation, simply substitute the buttermilk with a plant-based milk mixed with a teaspoon of lemon juice or vinegar, letting it sit for five minutes to curdle. The butter in both the cake and frosting can be replaced with a high-quality vegan butter alternative, ensuring the same creamy texture and rich flavor profile without any dairy. Use a vegan marshmallow fluff or create a simple aquafaba-based meringue frosting to achieve that signature fluffy topping.
A delightful low-carb option is achievable by using a keto-friendly cake mix or creating a base with almond flour, coconut flour, and a sugar substitute like erythritol or xylitol. For the raspberry layer, opt for a sugar-free raspberry jam or purée fresh raspberries with a touch of sweetener. The frosting can be made using a sugar-free marshmallow fluff alternative or a cream cheese-based frosting sweetened with a keto-friendly sweetener, and the coconut topping can be enjoyed as is, as shredded coconut is naturally low in carbohydrates.
To introduce a delightful citrusy zing, consider adding the zest of one lemon or orange to the cake batter before baking. This subtle addition will complement the tartness of the raspberries beautifully, creating a more complex and refreshing flavor profile. You could also experiment with different berry preserves, such as strawberry, blackberry, or a mixed berry blend, to put your own unique spin on this classic treat. The possibilities are endless for customizing this already delightful cake.
How to Prepare Raspberry Zinger Cake
Step 1: Crafting the Vanilla Cake Base
Begin by preheating your oven to the temperature specified in the recipe card and diligently greasing and flouring a 13×9 inch baking dish. This crucial step ensures that your cake will release cleanly after baking, maintaining its beautiful shape and structure. Taking the time to prepare your pan properly prevents any sticking and makes the entire process much smoother.
In a large mixing bowl, cream together the softened unsalted butter and granulated sugar until the mixture becomes light, fluffy, and pale yellow in color. This creaming process is vital as it incorporates air into the batter, contributing significantly to the cake’s tender and airy crumb. A stand mixer with a paddle attachment or a handheld electric mixer works best for achieving the perfect consistency here.
Next, gradually add the large eggs and egg whites one at a time, beating well after each addition to ensure they are fully incorporated. Follow this by mixing in the pure vanilla extract, which will infuse the cake with its warm, aromatic essence. The batter should start to look smooth and emulsified at this stage, a good sign of what’s to come.
In a separate bowl, whisk together the cake flour, kosher salt, and baking powder. This dry ingredient mixture ensures that the leavening agents are evenly distributed, promoting a consistent rise. Sifting these ingredients can further enhance the lightness of the cake, though thorough whisking is often sufficient.
Alternately add the dry ingredients and the buttermilk to the butter and sugar mixture, beginning and ending with the dry ingredients. Mix on low speed just until combined after each addition, being careful not to overmix. Overmixing can develop the gluten in the flour too much, resulting in a tougher cake texture.
The final batter should be smooth and pourable, with no visible lumps of flour. Gently spread this beautiful batter evenly into your prepared 13×9 inch baking dish, ensuring an even layer for uniform baking. Smooth the top with a spatula to create a flat surface, which will help in the even distribution of the subsequent layers.
Place the baking dish in the preheated oven and bake for the time indicated in the recipe, or until a wooden skewer or toothpick inserted into the center comes out clean. Baking time can vary slightly depending on your oven, so it’s always best to check for doneness a few minutes before the suggested time. Allow the cake to cool in the pan on a wire rack for a short period before proceeding to the next crucial step.
Step 2: Creating the Signature “Zinger” Holes and Raspberry Layer
As soon as the cake has finished baking and is still warm but not piping hot, it’s time to create those iconic holes that will absorb the delicious raspberry filling. Using the blunt end of a wooden spoon handle or a similar thick, round utensil, gently but firmly poke holes all over the surface of the cake. Aim for a consistent pattern, spacing the holes about 1 to 1.5 inches apart, creating approximately 15 to 20 holes across the entire cake.
The warmth of the cake is key here; it allows the holes to be created easily without collapsing the cake structure, and it helps the raspberry preserves to melt slightly and seep into the crevices. This technique is what gives the cake its characteristic “zing” and ensures that every bite is infused with that delightful fruity flavor. Don’t press too hard, just enough to create indentations that will hold the filling.
Once the holes are made, it’s time to generously spread the raspberry preserves over the warm cake. Use an offset spatula or the back of a spoon to spread an even layer of preserves across the entire surface, allowing it to settle into the poked holes. If you’re using preserves with seeds, a fine-mesh sieve can be used beforehand to strain them out for a smoother texture, though the seeds add a rustic charm.
If your raspberry preserves are particularly thick, you can gently warm them in a small saucepan or microwave-safe bowl for a few seconds to make them more spreadable. This also helps them to meld into the cake’s texture beautifully. The goal is an even coating that provides a delightful tart contrast to the sweet cake and the upcoming frosting.
The slight warmth of the cake will encourage the preserves to meld and slightly soak into the cake layers beneath the holes. This is where the magic of the “Zinger” truly begins to happen, creating a cohesive flavor profile that is both familiar and uniquely satisfying. Ensure you get close to the edges to maximize the raspberry flavor in every slice. It’s important to perform this step while the cake is still warm, as this is when the preserves will best adhere and absorb.
Step 3: Preparing the Fluffy Marshmallow Frosting
While the cake is still warm and you’ve applied the raspberry preserves, it’s time to turn your attention to the heavenly marshmallow frosting. In a medium-sized mixing bowl, combine the softened butter with the marshmallow fluff. Ensure the butter is truly at room temperature, which is soft but not melted, to achieve the smoothest consistency.
Using an electric mixer (handheld or stand mixer), beat the butter and marshmallow fluff together until they are well combined and the mixture starts to become lighter and fluffier. This initial creaming is crucial for developing the airy texture that makes this frosting so delightful. Scrape down the sides of the bowl frequently to ensure everything is incorporated evenly.
Next, gradually add the pure vanilla extract to the mixture, blending it in thoroughly. The vanilla adds a classic, comforting aroma and flavor that perfectly complements the sweetness of the marshmallow. Continue to mix until the vanilla is fully integrated and the frosting is beginning to look smooth and creamy.
Begin to add the powdered sugar, about a cup at a time, mixing on low speed until each addition is incorporated before adding more. As you add the powdered sugar, the frosting will start to thicken considerably. It’s important to add the sugar gradually to prevent a cloud of powder from erupting from the bowl and to ensure a smooth, lump-free frosting.
Continue this process until all the powdered sugar has been added and the frosting reaches a thick, spreadable, yet pipeable consistency. It should be noticeably thick, almost taffy-like, which is characteristic of this classic frosting. If the frosting seems too thick to spread, you can add a teaspoon of milk or buttermilk at a time until it reaches your desired consistency. Conversely, if it’s too thin, add a bit more powdered sugar.
Once the frosting has achieved the perfect texture, use an offset spatula to generously spread it over the raspberry preserves layer on the warm cake. Work quickly but carefully, ensuring an even layer covers the entire cake surface. The warmth from the cake and preserves will help this thick frosting spread smoothly, creating a beautiful, seamless blanket of sweetness.
Step 4: Creating the Iconic Pink Coconut Topping
With the marshmallow frosting beautifully spread across the cake, it’s time to add the final, signature touch: the vibrant pink coconut topping. In a clean bowl, combine the shredded sweetened coconut with the neon pink gel food coloring. Gel food coloring is highly recommended over liquid as it provides a more intense color with just a few drops, and it doesn’t add unnecessary moisture that could affect the texture of the coconut.
Using your hands or a spoon, toss the coconut with the food coloring until it is evenly coated and has achieved that classic, eye-catching pink hue. It’s often easier to use your hands for this step, as you can ensure every strand of coconut is tinted. Wear gloves if you wish to avoid staining your fingers, although the color from gel food coloring usually washes off easily.
Once the coconut is uniformly colored, sprinkle it generously and evenly over the top of the marshmallow frosting. You can create a dense layer or a lighter dusting, depending on your preference. Gently press the coconut down into the frosting with your fingertips or the back of a spoon to help it adhere, ensuring it won’t easily fall off when the cake is sliced and served. This decorative topping not only adds visual appeal but also a delightful sweet crunch and texture to every bite.
Ensure that the coconut covers the frosting entirely, creating that distinct look reminiscent of the original snack cakes. The contrast between the fluffy white frosting and the bright pink coconut is visually striking and highly appealing. This step is straightforward but essential for achieving the authentic Raspberry Zinger Cake appearance.
Allow the cake to sit at room temperature for a short while, or transfer it to the refrigerator. This chilling period helps the frosting to set up slightly, making it easier to slice cleanly. It also allows the flavors to meld together beautifully, creating a more cohesive and delicious final product. The cold also firms up the frosting, making the coconut topping adhere even better.
Step 5: Chilling and Slicing for Perfect Enjoyment
Once all the layers have been assembled – the cake, the raspberry preserves, the marshmallow frosting, and the pink coconut topping – it’s crucial to let the cake chill. This chilling period is not just for aesthetic purposes; it allows the frosting to firm up considerably, which is essential for clean slicing and for the flavors to fully meld together. A cold cake is a stable cake, making it much easier to serve attractively.
Cover the 13×9 inch baking dish loosely with plastic wrap or aluminum foil, being careful not to let the wrap touch the coconut topping if possible. Then, place the cake in the refrigerator for at least 2-3 hours. For the best flavor and texture, many recommend chilling it overnight. This extended period allows the moisture from the preserves and frosting to slightly permeate the cake, making it even more tender and flavorful.
When you are ready to serve, remove the cake from the refrigerator. For the cleanest slices, use a sharp, thin-bladed knife that has been dipped in hot water and wiped dry between each cut. This technique prevents the knife from sticking to the frosting and pulling the coconut topping off, ensuring each slice looks as perfect as the last.
Carefully slice the cake into desired portions. Traditional Raspberry Zinger cakes were often cut into smaller, snack-sized portions, but you can also cut it into larger squares for a more substantial dessert. The goal is to showcase the distinct layers and the beautiful contrast of colors.
Serve chilled. This cake is best enjoyed cold, as the flavors are more pronounced, and the texture is delightfully refreshing. The cold also enhances the moistness of the cake and the stability of the frosting, making for a superior eating experience. It’s a delightful treat that’s perfect for any occasion, bringing a smile with every bite.
Pro Tips for Raspberry Zinger Cake
- Embrace the Shortcut: For a significant time saver, don’t hesitate to substitute the homemade vanilla cake with a good quality yellow or butter cake mix. Bake it according to the package directions in a 13×9 inch pan, and it will still provide a delicious base for the raspberry and marshmallow layers.
- Color Intensity: When coloring the coconut, opt for gel food coloring over liquid. You’ll achieve a much more vibrant pink hue with just a few drops, and it won’t dilute the coconut’s texture or flavor.
- Warmth is Key for Raspberry: Spread the raspberry preserves while the cake is still warm. The residual heat will help the preserves melt slightly, allowing them to seep into the poked holes more effectively and create that signature “zing” effect.
- Chill for the Best Experience: While tempting to dig in immediately, refrigerating the cake for at least a few hours, or ideally overnight, truly enhances the flavors and texture. This allows everything to set beautifully and meld together.
- Serve Cold for Peak Flavor: This cake is undeniably best served chilled. The cool temperature intensifies the raspberry’s tartness against the sweet frosting and cake, making it incredibly refreshing and delicious.
Serving Suggestions for Raspberry Zinger Cake
Decoration
The classic decoration is the vibrant pink shredded coconut generously sprinkled over the marshmallow frosting, creating that iconic look. You can achieve varying shades of pink by adjusting the amount of gel food coloring used, from a soft pastel to a vivid fuchsia. For an extra touch, consider adding a few fresh raspberries on top of each slice just before serving, or perhaps a delicate dusting of powdered sugar around the edges of the serving plate.
Side Dishes
This cake is quite rich and flavorful on its own, so often it doesn’t require much in the way of side dishes. However, a simple scoop of vanilla bean ice cream or a dollop of lightly sweetened whipped cream can provide a lovely contrast. A small glass of cold milk is a classic pairing that enhances the nostalgic appeal of this dessert.
Creative Serving Ideas
For a party or gathering, consider cutting the cake into smaller, snack-sized squares, similar to the original Hostess cakes, making them easy for guests to handle. You could also use cookie cutters to create fun shapes from the larger cake slices, especially for children’s parties. Presenting individual slices on small doily-lined plates adds an elegant touch to this otherwise playful dessert.
Preparation & Storage
Storing Leftovers
Leftover Raspberry Zinger Cake should be stored in an airtight container or tightly covered with plastic wrap or aluminum foil. It’s best to keep it in the refrigerator to maintain the freshness of the frosting and cake, especially given the dairy components. Properly stored, the cake can remain delicious for up to 5 days.
Freezing
Freezing this cake is possible, though it may slightly alter the texture of the frosting. It’s advisable to freeze the cake before the coconut topping is added, if possible, or ensure it’s well-covered to prevent freezer burn. Wrap the unfrosted or fully assembled cake tightly in several layers of plastic wrap, followed by a layer of aluminum foil or a freezer-safe container. Freeze for up to 1-2 months for best quality.
Reheating
If you’ve frozen the cake, allow it to thaw in the refrigerator overnight before serving. Reheating is generally not recommended for this type of cake, as the frosting and cake are best served cold or at room temperature. The heat can cause the frosting to become overly soft and melt, and the coconut topping may not hold its texture as well.
Frequently Asked Questions
-
Can I use a different type of berry preserve in place of raspberry?
Absolutely! While raspberry is traditional and provides a lovely tartness, feel free to experiment with other berry preserves. Strawberry, blackberry, or even a mixed berry jam would work wonderfully. Ensure the preserves are of good quality for the best flavor. If using preserves with seeds, you can strain them out for a smoother filling, though leaving them in adds a nice texture.
-
My marshmallow frosting seems too thick/thin. How can I adjust it?
The consistency of marshmallow frosting can vary. If it seems too thick to spread easily, you can warm it very gently for a few seconds in the microwave or add a teaspoon of milk or buttermilk at a time, mixing until it reaches a workable, spreadable consistency. Conversely, if your frosting is too thin, gradually add more powdered sugar, a tablespoon at a time, until it thickens to the desired taffy-like texture.
-
How do I ensure the pink coconut sticks properly to the frosting?
The key to getting the pink coconut to stick is to apply it to the marshmallow frosting while the frosting is still slightly soft and pliable. Gently pressing the colored coconut into the frosting with your fingertips or the back of a spoon helps it adhere securely. Chilling the cake thoroughly after assembly will also help the frosting firm up, further securing the coconut topping.