Phyllo Raspberry Pop Tarts with Vanilla Glaze | Homemade Pop Tarts
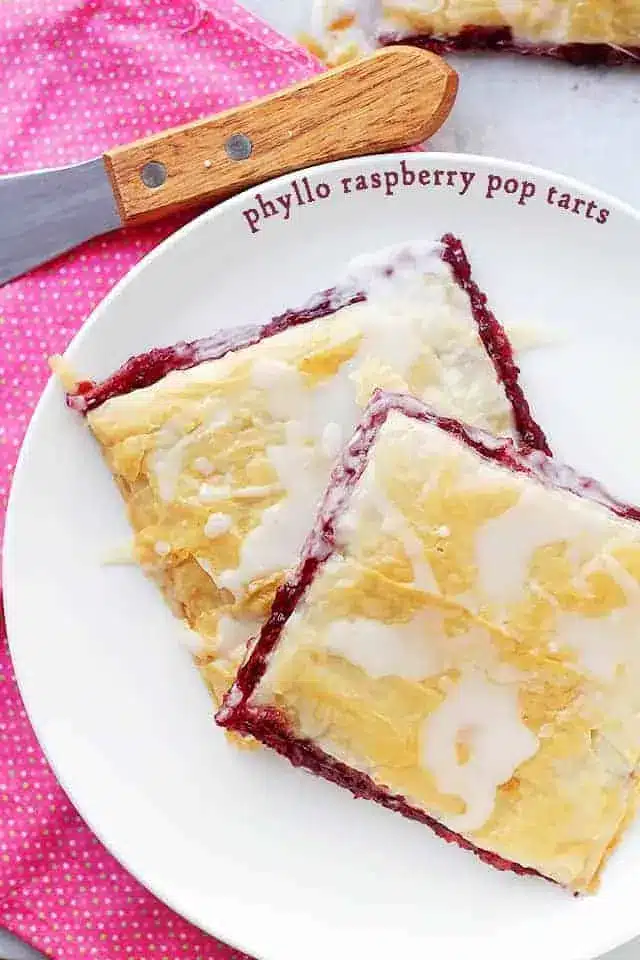
Get ready to experience a delightful twist on a classic treat with these incredibly easy Phyllo Pop Tarts. Forget the hassle of traditional dough; this recipe utilizes delicate layers of phyllo to create a crisp, golden crust that’s simply irresistible.
Filled with sweet raspberry jam and finished with a luscious vanilla glaze, these homemade pop tarts are perfect for a special breakfast, a delightful dessert, or a sweet afternoon snack. They’re so simple to make, you’ll wonder why you haven’t tried them sooner.
Why You Will Love This Recipe
- Effortless Assembly: Using pre-made phyllo dough makes assembling these pop tarts incredibly quick and easy, significantly reducing prep time compared to traditional pastry.
- Incredible Flakiness: The multiple thin layers of phyllo dough bake up to an unparalleled crispness and flakiness, offering a satisfying textural contrast to the soft jam filling.
- Customizable Flavors: While raspberry jam is a classic choice, this recipe is a fantastic base for experimenting with various fruit jams, spreads, or even a chocolate-hazelnut filling.
- Quick Baking Time: Phyllo bakes remarkably fast, meaning these delicious pop tarts go from oven to table in a matter of minutes, perfect for when you need a sweet treat in a hurry.
- Visually Appealing: The beautiful golden-brown layers of phyllo, topped with a delicate glaze, make these pop tarts look as stunning as they taste, perfect for impressing guests or simply treating yourself.
Ingredients You Need
The beauty of these phyllo pop tarts lies in their simplicity, using just a few pantry staples to create a sensational treat. Opting for high-quality ingredients, especially a flavorful jam and pure vanilla extract, will elevate the final taste experience significantly. Ensure your phyllo dough is fresh for the best texture and ease of handling.
Phyllo Raspberry Pop Tarts
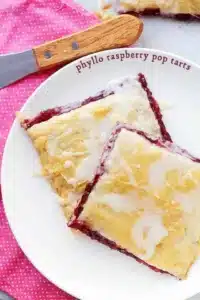
These phyllo Pop Tarts are the easiest homemade pop tart recipe ever! Layers of phyllo sheets filled with raspberry jam and topped with a sweet vanilla glaze.
- 4 tablespoons butter, melted
- 10 phyllo sheets, divided
- 1 cup powdered sugar
- 1 teaspoon pure vanilla extract
- 2 to 3 tablespoons water
- 1Preheat oven to 400°F. Line a baking sheet with foil.
- 2Layer 5 pieces of Phyllo sheets on the prepared baking sheet, brushing each sheet with the melted butter before adding the next.
- 3Brush the 5th sheet with butter and spread the raspberry jam, leaving a 1-inch empty border around the edges.
- 4Layer the remaining 5 Phyllo sheets, brushing each sheet with butter before adding the next.
- 5Brush the top layer with butter and cut the pastry into 8 rectangles. A pizza-cutter works best.
- 6DO NOT remove or separate the pastries, yet.
- 7Bake for 12 to 15 minutes, or until golden brown.
- 8Remove from oven and let slightly cool.
- 9Make the glaze. Meanwhile, in a small mixing bowl whisk together powdered sugar, vanilla and 2 tablespoons water; whisk until smooth and thoroughly combined. If the glaze is too thick for your liking, add 1 more tablespoon water and whisk until smooth.
- 10Drizzle each pop tart with vanilla glaze. Glaze will harden as it stands.
- 11Serve.
Keywords: phyllo, pop tarts, raspberry, jam, dessert, easy, homemade
The specific quantities for each ingredient can be found within the detailed recipe card, ensuring you have the perfect balance for these delightful pastries.
Variations
While the classic raspberry jam filling is a crowd-pleaser, these phyllo pop tarts offer a fantastic canvas for endless creative variations. Imagine a tart bursting with the vibrant tang of a mixed berry medley or the comforting warmth of spiced apple filling. You can even explore savory avenues for a unique brunch or appetizer offering.
For a decadent dessert option, consider a rich chocolate-hazelnut filling, reminiscent of a Nutella pop tart, but with the added elegance of phyllo. A dusting of powdered sugar or a simple chocolate drizzle would be the perfect complement to this indulgence. This versatility makes the recipe adaptable for any craving or occasion.
If you’re aiming for a healthier twist, consider using a sugar-free fruit spread or even a puréed fruit filling enhanced with a touch of natural sweetener like a drizzle of honey or maple syrup. For those following a low-carb lifestyle, a carefully chosen low-carb fruit filling, perhaps made with berries and a sugar substitute, could be explored. The possibilities are truly as vast as your imagination.
How to Prepare phyllo pop tarts
Step 1: Prepare the Baking Sheet and Phyllo Layers
Begin by preheating your oven to a relatively high temperature, around 400°F (200°C). This intense heat is crucial for achieving that signature crispiness in the phyllo dough, ensuring each layer bakes to a perfect golden-brown hue. Simultaneously, prepare a standard baking sheet by lining it with parchment paper or aluminum foil; this prevents any sticking and makes cleanup a breeze.
Carefully unroll your phyllo dough sheets and have them ready for assembly. It’s important to work relatively quickly with phyllo, as it can dry out. Have a pastry brush and your melted butter at the ready. Lay down the first sheet of phyllo onto the prepared baking sheet, ensuring it lies flat and covers a good portion of the surface.
Gently brush this first layer with a thin coating of melted butter. The butter is essential for creating separation between the delicate layers, allowing them to puff up and crisp beautifully as they bake. Immediately place the second sheet of phyllo directly on top of the first, aligning it as best as possible. Repeat the process of brushing with melted butter for this second sheet.
Continue this layering and buttering process for a total of five sheets of phyllo dough. Each application of butter builds upon the previous one, creating a substantial, yet still delicate, base for your tart filling. Ensure that the butter is distributed evenly across the entire surface of each sheet to guarantee consistent crisping. The fifth sheet, once buttered, will form the bottom of your jam-filled pocket.
Step 2: Add the Luscious Jam Filling
Once you have assembled the base layer of five buttered phyllo sheets, it’s time to introduce the star of the show: the filling. Take your chosen fruit jam, whether it’s the classic raspberry, a vibrant strawberry, or another favorite, and spread it evenly over the top surface of the fifth phyllo sheet. It is important to leave a small border, approximately one inch, clear around all the edges of the phyllo.
This border is crucial because it acts as a seal, preventing the jam from leaking out during the baking process. If the jam seeps over the edges, it can caramelize and burn onto the baking sheet, making the tarts difficult to remove and potentially burning the precious phyllo layers. Use the back of a spoon or a small spatula to spread the jam smoothly and consistently, ensuring a good layer without making it too thick, which could lead to undercooked phyllo.
The amount of jam can be adjusted slightly based on your preference, but remember the importance of that border. Too little jam might result in a dry tart, while too much could compromise the structural integrity of the pastry. Ensure the jam is spread in a single, even layer so that it bakes uniformly and offers a delightful burst of fruitiness in every bite. This step sets the stage for the sweet, fruity center of your phyllo pop tarts.
Step 3: Create the Top Layer and Shape the Tarts
Now, it’s time to cap off your delicious creation. Take the remaining five sheets of phyllo dough and begin layering them on top of the jam-filled base, just as you did for the bottom layers. Brush each of these five sheets lightly with melted butter before placing the next one on top. This ensures that the entire structure of the pop tart is encased in flaky, buttery layers, promising a delightful crunch.
After you have placed and buttered the tenth and final sheet of phyllo dough, give the entire top surface a final, generous brush of melted butter. This final layer of butter is key to achieving that beautiful golden-brown finish that makes these tarts so visually appealing. It also contributes to the overall crispness and luxurious texture of the finished product.
Once the top layer is thoroughly buttered, it’s time to shape your pop tarts. Using a pizza cutter or a sharp knife, carefully cut the layered phyllo pastry into eight equal rectangular shapes. Do not separate the rectangles at this stage; they should remain connected within the larger sheet. This makes it easier to transfer them to the baking sheet and ensures they bake evenly. The defined lines will allow you to easily break them apart once baked and cooled.
Step 4: Bake to Golden Perfection
With your phyllo pop tarts now shaped and ready, it’s time to introduce them to the heat. Carefully transfer the entire layered phyllo sheet, with its scored rectangles, onto your prepared baking sheet. Ensure there is a little space between where the individual tarts will be, allowing hot air to circulate for even baking.
Place the baking sheet into the preheated 400°F (200°C) oven. Bake for approximately 12 to 15 minutes. The exact baking time can vary depending on your oven and how thick your phyllo layers are. Keep a close eye on them during the final few minutes of baking; you’re looking for the phyllo to achieve a beautiful, rich golden-brown color all over.
The edges should be visibly crisp and slightly puffed. If some areas seem to be browning faster than others, you can gently rotate the baking sheet halfway through the baking time. Once they have reached the desired golden-brown perfection, carefully remove the baking sheet from the oven. The aroma filling your kitchen at this point will be absolutely divine, a testament to the flakiness you’ve achieved.
Step 5: Cool and Prepare the Glaze
After their time in the hot oven, the phyllo pop tarts will be incredibly delicate and hot. It’s crucial to let them cool slightly on the baking sheet for a few minutes. This allows them to firm up just enough so that they don’t fall apart when you handle them. While they are still warm, but not scalding, you can gently press along the scored lines if needed to ensure they can be separated easily later.
Once they have cooled sufficiently to handle without immediate burning, you can carefully transfer them to a wire rack to cool completely. This allows air to circulate around all sides of the tarts, preventing any sogginess from residual steam. A wire rack is essential for maintaining that crisp texture you’ve worked so hard to achieve.
While the tarts are cooling, prepare the simple yet essential vanilla glaze. In a small mixing bowl, combine the powdered sugar with the pure vanilla extract. Begin by adding about 2 tablespoons of water. Whisk these ingredients together vigorously until you achieve a smooth, lump-free consistency. The goal is a glaze that is thick enough to coat the tarts but thin enough to drizzle easily.
If the glaze appears too thick and difficult to whisk or drizzle, gradually add another tablespoon of water, whisking continuously until it reaches your desired consistency. Be cautious not to add too much water, as this can make the glaze too thin and runny, preventing it from setting properly on the tarts. This simple glaze adds the perfect touch of sweetness and a beautiful finish.
Step 6: Glaze and Serve
With your golden-brown, flaky phyllo pop tarts cooled and your luscious vanilla glaze prepared, it’s time for the final, beautiful flourish. Using a spoon, fork, or a piping bag with a fine tip, drizzle the vanilla glaze artfully over the top of each pop tart. You can create zig-zags, swirls, or simple lines – let your creativity guide you!
The glaze will begin to set and harden as it sits at room temperature, creating a delightful sweet shell over the crisp phyllo. Allow the glaze to harden completely before attempting to serve or package the pop tarts. This hardening process ensures that the glaze stays put and doesn’t smudge or drip when handled. The contrast between the crunchy pastry and the smooth, sweet glaze is truly divine.
Once the glaze has fully set, your homemade Phyllo Pop Tarts are ready to be enjoyed! These are best served fresh, but can also be stored for a short period. Whether served warm or at room temperature, they offer a delightful balance of textures and flavors that are sure to satisfy any sweet craving. Enjoy this incredibly simple yet impressively delicious treat.
Pro Tips for phyllo pop tarts
Work Efficiently with Phyllo: Phyllo dough dries out very quickly once exposed to air. Keep the sheets you are not actively using covered with a slightly damp (not wet) kitchen towel or plastic wrap. Have all your ingredients measured and ready before you begin assembling to ensure a smooth process.
Butter is Your Friend: Don’t be shy with the melted butter between the phyllo layers. This is what creates the distinct, crispy, flaky texture that makes phyllo so appealing. Ensure each layer is brushed evenly for uniform crisping.
Jam Consistency Matters: Use a jam that is not too runny or watery. A thicker jam will hold its shape better and prevent the phyllo from becoming soggy. If your jam is particularly liquidy, you can thicken it slightly by simmering it with a teaspoon of cornstarch slurry for a few minutes.
Scoring for Clean Cuts: When cutting the phyllo into rectangles, use a pizza cutter for the cleanest lines. If using a knife, ensure it’s very sharp. Press down firmly but gently to cut through all the layers without tearing the delicate phyllo.
Cooling is Key: Allow the pop tarts to cool on a wire rack after baking. This is crucial for maintaining their crispness. If you leave them on a solid surface, the steam can get trapped underneath, leading to a soggy bottom.
Serving Suggestions for phyllo pop tarts
Decoration
The vanilla glaze provides a beautiful, simple finish, but you can elevate the decoration further with a few creative touches. A light dusting of edible glitter or shimmering edible dust can add a touch of sparkle, making these pop tarts perfect for celebrations. You could also pipe a few delicate dots of contrasting colored icing, like pink or chocolate, onto the hardened vanilla glaze for a more intricate design.
For a more rustic appeal, consider adding a sprinkle of freeze-dried fruit powder, such as raspberry or strawberry, over the wet glaze. This not only adds color but also an intensified fruit flavor. A light grating of citrus zest, like lemon or orange, over the glaze before it sets can provide a bright, aromatic finish that complements the sweetness beautifully.
If you’re feeling particularly artistic, you can use a toothpick to swirl the glaze and create marbleized patterns. Alternatively, a few strategically placed edible flowers or a sprinkle of finely chopped toasted nuts (if not serving to those with allergies) can add texture and visual interest. Remember, the goal is to enhance the visual appeal without overwhelming the delicate pastry itself.
Side Dishes
These phyllo pop tarts, being on the sweeter side, pair wonderfully with a simple cup of coffee or tea for a delightful breakfast or brunch experience. For a more substantial brunch spread, consider serving them alongside a fresh fruit salad, the bright, natural flavors of the fruit providing a refreshing contrast to the sweetness of the tarts.
If you’re serving these as a dessert, they are fantastic on their own, but they also complement richer desserts beautifully. Imagine them served alongside a scoop of vanilla bean ice cream or a dollop of freshly whipped cream. A small side of mixed berries, perhaps lightly macerated, can also add a lovely tartness.
For a celebratory occasion, consider pairing them with a light, bubbly beverage like Prosecco or a sparkling cider. The effervescence cuts through the sweetness of the tarts and adds a festive touch. Even a simple glass of cold milk, a nostalgic pairing for any pop tart, is an excellent choice that enhances the comforting nature of the dessert.
Creative Serving Ideas
Transform these pop tarts into a whimsical dessert by arranging them on a tiered stand for a tea party or a special brunch. They also make for adorable, individually portioned desserts for parties – simply place each one on a small doily or a decorative plate.
For a fun activity, especially with children, consider offering a “decorate your own pop tart” station. Set out small bowls of various toppings like sprinkles, colored sugars, mini chocolate chips, and different colored glazes, allowing guests to personalize their own tart.
You can also deconstruct the idea slightly. Serve the baked, un-glazed phyllo bases alongside a small bowl of jam and a separate bowl of glaze. Guests can then assemble their own tarts, experiencing the joy of creating their perfect pop tart. This interactive approach is always a hit at gatherings and makes the dessert a memorable part of the event.
Preparation & Storage
Storing Leftovers
To store leftover phyllo pop tarts, ensure they have cooled completely to room temperature first. This prevents condensation from forming, which can make the phyllo lose its crispness. Once cooled, place them in an airtight container. It’s best to layer them with parchment paper or wax paper between each tart to prevent them from sticking together and to protect the glaze.
These tarts are best enjoyed within 1 to 2 days of being made. While they will still be edible after this, the phyllo will gradually lose its signature crispiness and can become a bit chewy. Storing them in a dry, cool place at room temperature is ideal; avoid refrigerating them, as this tends to make the pastry soft and can affect the glaze.
If you have a very humid environment, you might want to consider using a desiccant packet inside the airtight container to absorb excess moisture, helping to preserve some of the crispness for a little longer. However, the ultimate goal is to consume them as fresh as possible to experience their delightful flakiness.
Freezing
Freezing these phyllo pop tarts is possible, but it requires careful handling to maintain their texture. It’s best to freeze them *before* glazing. Bake the phyllo layers with the jam filling, cut them into rectangles, and allow them to cool completely. Once cooled, place them on a baking sheet in a single layer and freeze until solid, about 1-2 hours.
After they are frozen solid, transfer the individual frozen pop tart bases to a freezer-safe airtight container or a heavy-duty freezer bag. Make sure to remove as much air as possible from the bag to prevent freezer burn. They can be stored in the freezer for up to 1-2 months.
When you’re ready to enjoy them, you can either thaw them at room temperature and then add a fresh glaze, or you can carefully reheat them in a low oven (around 300°F/150°C) for a few minutes to re-crisp the phyllo before glazing. Glazing them while frozen might lead to a watery glaze, so it’s generally recommended to glaze after they are thawed or reheated.
Reheating
If you have leftover phyllo pop tarts that have lost a bit of their crispness, reheating is an excellent way to revive them. Preheat your oven to a moderate temperature, around 300°F (150°C). Place the pop tarts on a baking sheet lined with parchment paper.
Reheat them for approximately 5-7 minutes, or until they are warmed through and have regained some of their crispness. Keep a close eye on them, as phyllo can go from perfectly crisp to burnt very quickly. The goal is gentle warming and crisping, not further browning.
If your pop tarts were frozen and you’re reheating them from their frozen state, you might need to increase the reheating time slightly, perhaps to 8-10 minutes, ensuring they are heated through before removing them from the oven. Once reheated, they will be much more enjoyable, with a revived flaky texture and warm, gooey filling.
Frequently Asked Questions
-
Can I use puff pastry instead of phyllo dough?
Absolutely! While this recipe is specifically designed for the delicate layers of phyllo, puff pastry can be a suitable substitute. Puff pastry will yield a richer, more substantial crust compared to the light crispness of phyllo. You would typically use one sheet of puff pastry, cut it into rectangles, add your filling, top with another piece of puff pastry, seal the edges, and then bake according to puff pastry instructions, usually at a slightly lower temperature for a longer duration to ensure the pastry cooks through. The texture will be different, but still delicious.
-
What kind of jam is best for these pop tarts?
The best jam is one with a good flavor and a consistency that isn’t too watery. Raspberry jam is a classic choice and works wonderfully due to its balance of sweetness and tartness. However, you can use almost any fruit jam you enjoy! Strawberry, blueberry, apricot, cherry, or even a mixed berry jam would be fantastic. For a richer, more decadent flavor, consider a fig jam or a slightly spiced apple butter. The key is to ensure the jam is thick enough not to make the phyllo soggy.
-
How do I prevent the phyllo from becoming soggy?
Preventing sogginess is crucial for maintaining the delightful crispness of phyllo. First, ensure your jam filling is not too liquidy; a thicker jam is preferable. When assembling, always leave a border around the edges to prevent the jam from seeping out during baking. After baking, it is essential to cool the pop tarts on a wire rack. This allows air to circulate underneath, preventing steam from getting trapped and making the bottom layers soggy. If storing leftovers, make sure they are completely cooled and stored in an airtight container, as moisture from the air is the main culprit for losing crispness.