Schokoladige Cheesecake Happen – Bestes Rezept – Muma’s Kitchen

Indulge in the ultimate sweet sensation with these delightful chocolate cheesecake bites. Imagine a perfect fusion of rich, creamy cheesecake and intensely chocolatey flavors, all presented in perfectly portioned, bite-sized delights. These little squares are guaranteed to become a new favorite, whether you’re hosting a party or simply treating yourself.
These delectable treats are more than just a dessert; they are an experience. Each bite offers a symphony of textures, from the satisfying crunch of the chocolate cookie base to the velvety smoothness of the cheesecake filling. They are incredibly versatile, making them ideal for any occasion, from casual coffee breaks to elegant celebrations. Prepare to be amazed by their simplicity and their irresistible charm.
Why You Will Love This Recipe
- Effortless Elegance: These bites look and taste incredibly sophisticated, yet they are surprisingly simple to make, requiring minimal fuss for maximum impact.
- Perfect Portion Control: Individually sized, they eliminate the need for slicing and make it easy to serve guests or enjoy a controlled sweet treat.
- Intense Flavor Combination: The classic pairing of creamy cheesecake and deep chocolate is elevated here, creating a truly decadent and satisfying taste.
- Make-Ahead Magic: Prepare these delightful treats in advance, freeing up valuable time when you need it most, making them perfect for busy hosts.
- Visually Stunning: The marbled effect created during preparation adds a beautiful, artistic touch that is sure to impress anyone who sees them.
Ingredients You Need
The success of these chocolate cheesecake bites hinges on the quality of your ingredients. Opting for good quality chocolate and fresh dairy products will elevate the final taste and texture significantly. Ensuring your cream cheese is at room temperature is crucial for a smooth, lump-free filling, which is key to that signature creamy cheesecake experience.
Chocolate Cheesecake Bites
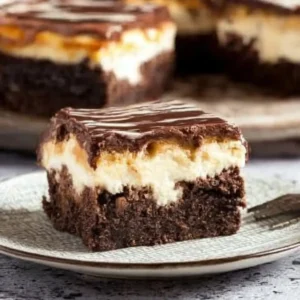
These delightful chocolate cheesecake bites combine a crunchy chocolate wafer crust with a creamy, marbled cheesecake filling and a smooth topping. Perfect as finger food for parties or a sweet snack.
- 200g chocolate wafers
- 50g butter, melted
- 400g cream cheese
- 70g powdered sugar
- 2 egg yolks
- 100g crème fraîche or sour cream
- 1 ½ tbsp cornstarch
- 2 tbsp cocoa powder
- 1-2 tbsp milk
- 60g whipping cream
- 100g cream cheese (for topping)
- 20g powdered sugar (for topping)
- 2 tbsp hazelnut nougat cream
- 1Preheat the oven to 170°C (top/bottom heat). Prepare a small square baking pan with parchment paper.
- 2Crush the chocolate wafers into fine crumbs and mix with the melted butter. Press firmly into the pan and bake for 5 minutes.
- 3Mix cream cheese, 70g powdered sugar, egg yolks, crème fraîche, cornstarch, and vanilla until smooth.
- 4Divide the batter in half. Mix one half with cocoa, extra sugar, and milk to create the chocolate batter.
- 5Dollop both mixtures onto the crust and swirl with a fork for a marble effect.
- 6Bake for 35 minutes. Let it cool in the switched-off oven with the door slightly ajar.
- 7Once cooled, whip the cream and fold it into the remaining cream cheese and sugar. Spread over the cake.
- 8Cut into small cubes and decorate with drizzles of hazelnut nougat cream.
Keywords: Cheesecake, Chocolate, Bites, Dessert, German, Fingerfood
- schokoladenwaffeln: These form the delightful crunchy base, providing a wonderful textural contrast to the creamy filling.
- butter: Acts as the binder for the waffle crumbs, ensuring a solid and stable foundation for your cheesecake bites.
- frischkäse: The star of the filling, providing that essential creamy, tangy, and rich cheesecake essence.
- puderzucker: Sweetens the filling and contributes to its smooth, velvety texture.
- eigelb: Adds richness and helps to bind the cheesecake mixture, contributing to its structure and creamy mouthfeel.
- crème fraîche oder sauerrahm: Introduces a pleasant tanginess and light acidity, balancing the sweetness and adding a sophisticated depth of flavor.
- speisestärke: A vital stabilizer that helps the cheesecake set properly during baking, preventing it from becoming too soft.
- vanillepaste: Infuses the filling with a warm, aromatic vanilla note that complements both the chocolate and the cream cheese beautifully.
- kakao: Essential for creating the rich chocolate swirls, adding intense cocoa flavor and visual appeal.
- milch: Used to achieve the perfect, smooth consistency for the chocolate mixture, ensuring it blends seamlessly.
- schlagsahne: Whipped to perfection, this forms the light and airy topping, adding an extra layer of indulgence.
- frischkäse für das topping: The base for the luscious topping, ensuring it’s rich and holds its shape beautifully.
- puderzucker: Sweetens the topping just right, balancing the creaminess and making it utterly irresistible.
- nuss-nougat-creme: Used for the decorative swirls, adding an extra layer of hazelnut-chocolate goodness and visual flair.
Specific quantities for these ingredients can be found in the recipe card above, ensuring you have precisely what you need for perfect results.
Variations
These chocolate cheesecake bites are a dream for customization, allowing you to tailor them to any dietary preference or flavor desire. Consider transforming them into a vegan delight by using dairy-free cream cheese alternatives and plant-based butter for the crust. Ensure your vegan chocolate also meets these requirements for a fully inclusive treat.
For those following a lower-carbohydrate lifestyle, you can adapt the base by crushing sugar-free chocolate cookies or even using a blend of almond flour and butter. Similarly, the filling can be made lower in sugar by using a sugar substitute that bakes well, ensuring that neither flavor nor texture is compromised. This adaptation keeps the indulgence factor high.
Embrace a burst of freshness by incorporating a layer of fruit compote, like raspberry or cherry, between the crust and the cheesecake filling. Alternatively, swirl a small amount of fruit puree into the cheesecake batter itself before baking for a subtle fruity undertone. These additions bring a wonderful brightness that beautifully cuts through the richness of the chocolate and cream cheese.
How to Prepare chocolate cheesecake bites
Step 1: Crafting the Perfect Chocolate Base
Begin by preheating your oven to the specified temperature, typically around 170 degrees Celsius (340 degrees Fahrenheit) for both top and bottom heat. This initial step is crucial for ensuring even baking and a beautifully set crust. Prepare your chosen baking dish, whether it’s a square pan or individual muffin tins, by lining it with parchment paper or greasing it thoroughly. This prevents sticking and makes for easy removal of the finished cheesecake bites.
Next, take your chocolate wafers and process them into fine crumbs. This can be done in a food processor for the most uniform results or by placing them in a sturdy bag and crushing them with a rolling pin. Melt your butter gently until it is completely liquid and then combine it thoroughly with the chocolate crumbs. You’re aiming for a consistency where the crumbs are evenly coated and hold together when squeezed.
Press this buttery crumb mixture firmly and evenly into the bottom of your prepared baking pan. Use the back of a spoon or a flat-bottomed glass to ensure a compact and level layer. This well-compacted base is essential for preventing it from crumbling apart later. For added stability, briefly pre-bake this crust for approximately five minutes. This helps to set the butter and create a sturdier foundation for the delicate cheesecake filling.
Step 2: Creating the Luscious Cheesecake Filling
In a large mixing bowl, combine the softened cream cheese, powdered sugar, egg yolks, crème fraîche (or sour cream), cornstarch, and vanilla paste. It is imperative that the cream cheese is at room temperature to ensure a completely smooth and lump-free mixture. If your cream cheese is too cold, the mixture can become lumpy, affecting the final texture of your cheesecake.
Using an electric mixer on medium speed, beat the ingredients together until the mixture is exceptionally smooth and creamy. Scrape down the sides of the bowl frequently to ensure all ingredients are incorporated evenly. Avoid overmixing, as this can introduce too much air into the batter, potentially causing cracks during baking. The goal is a homogenous, velvety consistency that is free from any lumps or grainy texture.
Once you have achieved a perfectly smooth base batter, divide it into two roughly equal portions. Take one portion and carefully mix in the cocoa powder, a little extra powdered sugar if needed to maintain consistency, and a tablespoon or two of milk. Mix this second portion until it transforms into a rich, chocolate-flavored cream. The milk helps to ensure this chocolate mixture is also smooth and pourable, not too thick.
Step 3: Marbling for Visual Delight
Now comes the artistic part: creating the beautiful marble effect that makes these cheesecake bites so visually appealing. Take your prepared baking dish with the pre-baked crust. Alternately, dollop spoonfuls of both the plain cheesecake batter and the chocolate cheesecake batter over the crust. Aim for a random distribution, placing dollops of each color next to each other.
Once you have distributed all of the batter, take a skewer or a toothpick and gently swirl it through the two batters. Be careful not to over-mix; you want distinct swirls and patterns, not a uniform brown color. A few gentle passes with the skewer should be sufficient to create an attractive marbled design. This technique ensures that each bite will have a unique and captivating visual appeal, showcasing the contrast between the creamy white and rich chocolate layers.
The marbling process is where you can really let your creativity shine. You can create intricate patterns or simple, elegant swirls. The key is to maintain some separation between the two batters so that the marbled effect is clearly visible in the final product. This visual artistry is what sets these chocolate cheesecake bites apart and makes them a showstopper. The contrast of colors is naturally appealing and hints at the delicious flavors within.
Step 4: The Crucial Baking and Resting Period
Carefully place the pan containing the marbled cheesecake into the preheated oven. Bake for approximately 35 to 40 minutes, or until the edges of the cheesecake appear set and slightly puffed, while the center still has a slight wobble. Overbaking can lead to a dry or cracked cheesecake, so it’s important to keep a close eye on it. The slight wobble in the center is perfectly normal, as the cheesecake will continue to set as it cools.
Once the baking time is complete, turn off the oven. Do not remove the cheesecake immediately; instead, leave the oven door slightly ajar, perhaps by propping it open with a wooden spoon. Allow the cheesecake to cool down gradually within the oven for about an hour. This slow cooling process is vital for preventing the cheesecake from collapsing or developing cracks on its surface. The residual heat gently finishes the cooking process and allows the structure to stabilize.
After the hour of cooling in the oven, remove the pan and let the cheesecake cool completely at room temperature. Do not rush this step. Once it has reached room temperature, transfer the pan to the refrigerator and chill for at least four hours, or preferably overnight. This chilling period is absolutely essential for the cheesecake to firm up completely, allowing it to be sliced cleanly into perfect bite-sized portions. Patience during this cooling and chilling phase is key to achieving the ideal texture and ease of cutting.
Step 5: Preparing the Irresistible Topping
Once the cheesecake has fully chilled and firmed up, it’s time to prepare the luxurious topping. In a clean, chilled bowl, whip the heavy cream until it forms stiff peaks. Be careful not to over-whip, as this can turn the cream into butter. The goal is a light, airy, and stable whipped cream that holds its shape beautifully.
In a separate bowl, combine the additional cream cheese and powdered sugar. Beat these together until they are smooth and creamy. This mixture forms the base of your delicious topping, providing a rich and slightly tangy counterpoint to the whipped cream. Ensure there are no lumps of cream cheese for the best texture. Gently fold the whipped cream into the cream cheese mixture. Do this in stages, folding carefully to maintain as much airiness as possible, creating a light yet decadent topping.
Once the topping is prepared, carefully spread a thin, even layer over the chilled cheesecake. Use an offset spatula for a smooth finish. The goal is a delicate coating that enhances the cheesecake without overpowering it. The creamy white topping provides a beautiful contrast to the marbled cheesecake beneath.
Step 6: The Final Flourish and Slicing
Before the topping sets too firmly, it’s time to add the decorative element using the hazelnut-nougat cream. You can do this by placing the hazelnut-nougat cream into a piping bag with a small, plain tip, or even a zip-top bag with a tiny corner snipped off. Pipe thin, delicate lines or swirls over the white topping. This adds another layer of chocolatey flavor and a striking visual appeal.
If you don’t have a piping bag, you can also warm the hazelnut-nougat cream slightly to make it more fluid and then drizzle it artistically over the topping. A toothpick can then be used to drag through the drizzles to create more intricate patterns. The goal is to add a touch of indulgence and visual interest without making the topping too heavy or sweet. The rich aroma of the hazelnut-nougat cream will entice your guests even before they take a bite.
Now, for the moment of truth: slicing. Use a very sharp knife, preferably one that has been warmed slightly in hot water and then dried. This will help you achieve clean, precise cuts without smudging the topping or the marbled layers. Wipe the knife clean between each cut to ensure the neatest possible results. Slice the chilled cheesecake into small, bite-sized squares. These small portions are perfect for easy serving and for guests to sample without committing to a large piece. Admire your beautiful creations before serving!
Pro Tips for chocolate cheesecake bites
Temperature is Key: Always ensure your cream cheese is at room temperature before starting the filling. This is the most critical step for achieving a perfectly smooth, lump-free cheesecake batter. Cold cream cheese will stubbornly resist blending, leading to a less-than-ideal texture.
Gentle Folding: When incorporating the whipped cream into the topping mixture, fold gently. Overmixing will deflate the whipped cream, resulting in a denser, less airy topping that won’t have the same delightful lightness.
The Power of Patience: Do not be tempted to rush the chilling process. A minimum of four hours, and ideally overnight, is necessary for the cheesecake to fully set and firm up. This ensures clean cuts and the perfect creamy consistency without any sogginess.
Sharp Knife, Clean Cuts: For those perfect, Instagram-worthy squares, a very sharp knife is non-negotiable. Wiping the knife blade clean with a damp cloth between each cut will prevent dragging and smudging, ensuring sharp edges and beautiful presentation.
Avoid the Cracks: Gradual cooling is your best friend in preventing cheesecake cracks. Letting the cheesecake cool in the turned-off oven with the door ajar significantly reduces the risk of the surface collapsing or cracking due to sudden temperature changes.
Serving Suggestions for chocolate cheesecake bites
Decoration
Elevate your chocolate cheesecake bites with a few simple yet elegant decorative touches. A dusting of unsweetened cocoa powder or finely grated dark chocolate can add a sophisticated finish that complements the existing chocolate flavors beautifully. For a pop of color and freshness, consider topping each bite with a single fresh raspberry or a tiny mint leaf just before serving. These small additions make a significant visual impact and add subtle complementary flavors.
If you’ve opted for the hazelnut-nougat cream swirl, you can enhance it further. Perhaps add a few toasted chopped hazelnuts or slivered almonds sprinkled over the topping before it sets. This provides an extra textural element and a delightful nutty aroma that pairs wonderfully with the chocolate and cream. The crunch from the nuts is a welcome addition to the creamy base.
For a truly special presentation, consider a light drizzle of caramel sauce or a sprinkle of edible gold flakes for a touch of luxury. Even a simple dusting of powdered sugar through a delicate stencil can transform these bites into something truly spectacular. The aim is to enhance the existing beauty and flavor without making them overly sweet or complicated.
Side Dishes
While these chocolate cheesecake bites are delightful on their own, they can also be paired with complementary flavors to create a more complete dessert experience. A small scoop of high-quality vanilla bean ice cream or a dollop of freshly whipped cream can add an extra layer of indulgence. The coolness of the ice cream provides a lovely contrast to the rich cheesecake.
Fresh berries are an excellent accompaniment, offering a bright, tart counterpoint to the sweetness and richness. A simple fruit salad featuring strawberries, blueberries, and raspberries makes for a refreshing side that cleanses the palate beautifully. The vibrant colors of the fruit salad also enhance the visual appeal of the dessert platter.
Consider serving them alongside a rich, dark coffee or a specialty tea blend. The slightly bitter notes of coffee or the fragrant aromas of tea can beautifully cut through the sweetness and richness of the cheesecake bites, creating a balanced and satisfying end to any meal. A strong espresso is particularly effective at complementing intense chocolate flavors.
Creative Serving Ideas
Transform your chocolate cheesecake bites into an interactive dessert by setting up a “cheesecake bite bar.” Offer a selection of toppings like various sauces (chocolate, caramel, berry coulis), chopped nuts, shredded coconut, mini chocolate chips, and sprinkles, allowing guests to customize their own creations. This adds an element of fun and engagement for all ages, making your gathering memorable.
For a more elegant presentation, arrange the cheesecake bites on a tiered dessert stand, interspersed with fresh fruit and perhaps some chocolate-dipped strawberries. This creates a stunning centerpiece that is both visually impressive and incredibly tempting. The height and arrangement add a touch of sophistication to any dessert table.
Consider serving them as part of a mini dessert buffet, offering a variety of small treats alongside other delicacies. This allows guests to sample a range of flavors and textures. They also make for perfect party favors; package them in small, decorative boxes or bags for guests to take home as a sweet reminder of your event. This thoughtful gesture is always appreciated.
Preparation & Storage
Storing Leftovers
Proper storage is key to maintaining the freshness and delightful texture of your chocolate cheesecake bites. Once cooled and cut, transfer any leftovers to an airtight container. This prevents them from drying out and absorbing unwanted odors from other foods in the refrigerator. Ensure the container has a secure lid to create a proper seal.
Store the container in the main part of your refrigerator, not in the door where temperature fluctuations are more common. When stored correctly, these cheesecake bites should remain delicious and enjoyably creamy for approximately 3 to 4 days. Before serving, it’s often beneficial to let them sit at room temperature for about 15-20 minutes, allowing the flavors to meld and the texture to soften slightly.
If you find yourself with a surplus, consider portioning them out into individual servings before refrigerating. This makes it easier to grab a single bite-sized treat without having to expose the entire batch to the air each time. This method also helps in planning your consumption and avoids unnecessary handling of the entire batch.
Freezing
Yes, chocolate cheesecake bites freeze exceptionally well, making them a perfect candidate for advance preparation. To freeze them, ensure they are completely chilled and cut into their final bite-sized portions. Place the individual bites on a baking sheet lined with parchment paper in a single layer. This prevents them from sticking together during the initial freezing process, ensuring they remain individual morsels.
Once the bites are frozen solid on the baking sheet (this usually takes about 1-2 hours), carefully transfer them into a freezer-safe container or a heavy-duty freezer bag. Remove as much air as possible from the bag before sealing to prevent freezer burn. Label the container or bag with the date of freezing.
When you’re ready to enjoy them, it’s best to thaw them slowly in the refrigerator overnight. This allows them to gradually come back to their desired texture without compromising their structure. Avoid thawing them at room temperature, as this can lead to condensation and a less desirable consistency. Properly frozen and thawed cheesecake bites can retain their excellent quality for up to 2-3 months.
Reheating
Typically, chocolate cheesecake bites do not require reheating, as they are best served chilled or at room temperature. The delightful creaminess of the cheesecake filling is compromised if heated, potentially making it melt or become oily. The primary goal is to maintain that cool, smooth, and refreshing texture that makes cheesecake so appealing.
If you have thawed them from frozen, as mentioned, the best method is slow refrigeration. This allows them to gently return to their ideal serving temperature and consistency. If you find them too cold after refrigeration, a brief period (15-20 minutes) at room temperature is usually sufficient to bring out their full flavor profile and achieve a pleasant, soft texture.
In the rare instance that you prefer a slightly warmer dessert, you could very gently warm them. However, this is not recommended for traditional cheesecake. If you absolutely must, a very short stint in a very low oven (around 100°C / 200°F for just a few minutes) might be an option, but the risk of melting the filling is high. It’s far better to enjoy them in their intended, chilled state for the best culinary experience.
Frequently Asked Questions
-
How long do chocolate cheesecake bites last, and how should they be stored?
These delightful chocolate cheesecake bites typically remain fresh and delicious for about 3 to 4 days when stored properly. The key to maintaining their optimal texture and flavor is to keep them in an airtight container. This prevents them from drying out or absorbing any unwanted aromas from other foods in your refrigerator, which can happen quite easily in a busy fridge environment. For best results, store them in the main body of the refrigerator, away from temperature fluctuations often found in the door. When you’re ready to serve them after refrigeration, allow them to sit at room temperature for about 15 to 20 minutes. This short resting period helps the flavors to develop more fully and allows the creamy texture to reach its most appealing consistency, enhancing the overall enjoyment of each bite.
-
Can I freeze these chocolate cheesecake bites, and if so, what is the best method?
Absolutely, freezing is an excellent way to preserve these chocolate cheesecake bites for later enjoyment, and they hold up remarkably well. The most effective method is to freeze them individually first. Arrange the cut cheesecake bites in a single layer on a baking sheet lined with parchment paper, ensuring they aren’t touching. Place this sheet in the freezer until the bites are solid, which usually takes about 1 to 2 hours. This initial freezing step prevents them from clumping together. Once they are frozen firm, carefully transfer them into a freezer-safe airtight container or a heavy-duty zip-top freezer bag. Squeeze out as much air as possible from the bag before sealing to minimize the risk of freezer burn. Properly frozen bites can be stored for up to 2 to 3 months. For thawing, it’s recommended to transfer the frozen bites to the refrigerator and let them thaw slowly overnight. This gradual thawing process helps to maintain their creamy texture and prevents them from becoming watery.
-
Why do my cheesecake bites sometimes turn out too soft or not firm enough, and how can I prevent this?
If your chocolate cheesecake bites are consistently too soft or not firm enough, there are a few common culprits to investigate. A primary reason is often insufficient baking time; the cheesecake needs enough time in the oven to set properly. Keep an eye on the edges, which should look set, while the center might still have a slight wobble, as it will continue to firm up as it cools. Another critical factor is the cooling and chilling process. Cheesecake develops its final firm texture as it cools and chills; if you try to cut into it while it’s still warm or hasn’t chilled for a sufficient period (at least 4 hours, preferably overnight), it will be too soft. Also, ensure you’ve used the correct amount of cornstarch or stabilizer as specified in the recipe, as this ingredient is vital for achieving the desired firmness. Finally, overmixing the batter can incorporate too much air, which can lead to a less dense and therefore softer final product. Aim for smooth, but not overly aerated, batter.