Ultimate Christmas Caramel Apples
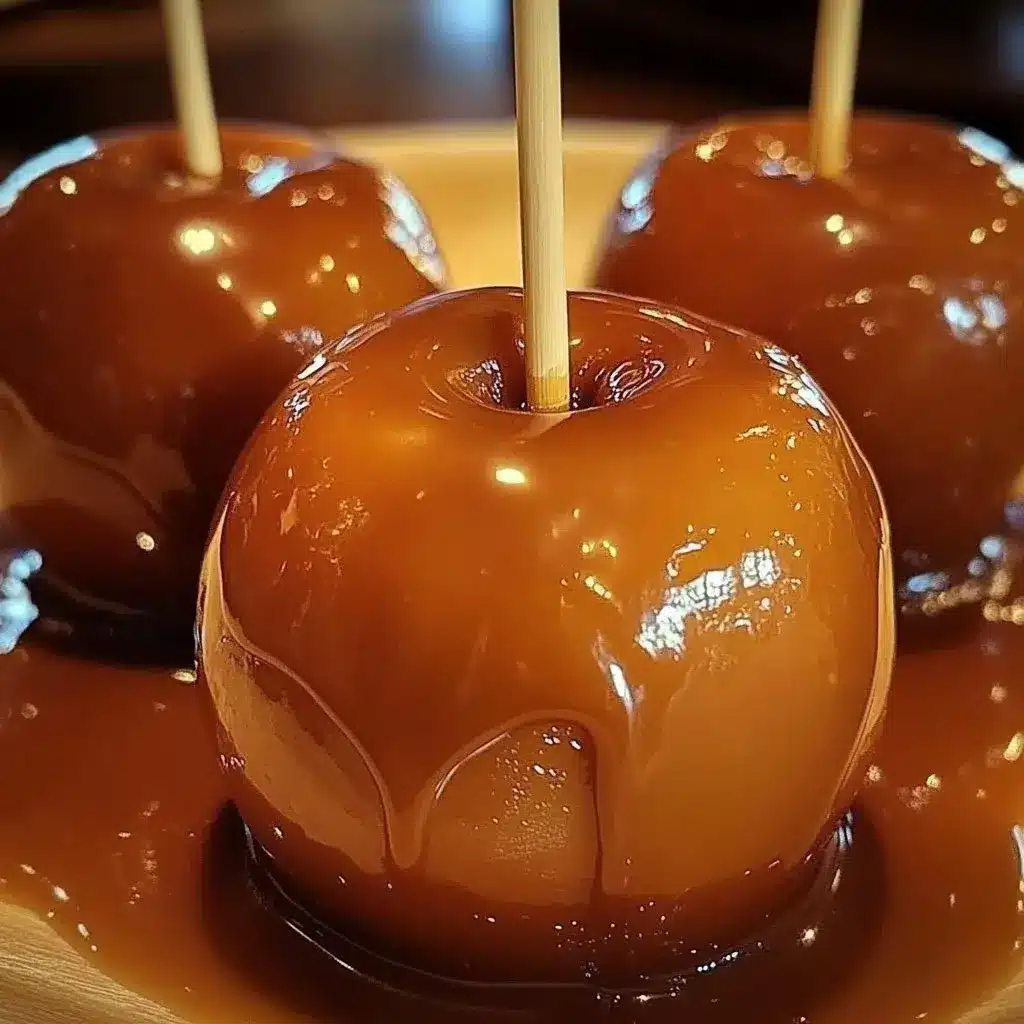
As the holiday season approaches, many people think about the delicious treats that define this special time. One of these delightful desserts is the renowned Christmas Caramel Apples. Imagine warm, gooey caramel enveloping a crisp, juicy apple, creating a perfect balance of flavors and textures that’s hard to resist. This sweet indulgence isn’t just for kids; it’s a dessert that brings out the festive spirit in everyone.
What makes Christmas Caramel Apples even more special is how simple they are to make. You don’t need to be a professional chef to create this tempting treat. In fact, you’ll find it’s quite easy to whip up a batch and share them with family and friends. The beauty of this recipe lies in its ability to be both a festive decoration and a delicious dessert at the same time. Have you ever wondered how such a simple recipe could create such joy during the holiday season?
Why You Will Love This Recipe
- Flavor Explosion: The irresistible combination of sweet, buttery caramel and the crisp tartness of fresh apples creates a symphony of flavors that dance on your palate. It’s a classic pairing that never fails to satisfy.
- Effortless Preparation: This recipe is designed for simplicity, allowing even novice bakers to achieve impressive results. With straightforward steps and common ingredients, you can create these festive treats without any fuss.
- Endless Customization: The true magic of caramel apples lies in their versatility. You can personalize them with a vast array of toppings, from crunchy nuts and vibrant sprinkles to decadent chocolate drizzles, tailoring them to any taste or theme.
- Family Fun: Making Christmas Caramel Apples is an activity that brings people together. Children will delight in assisting with the dipping and decorating, turning kitchen time into cherished family memories.
- Festive Appeal: These glistening, caramel-covered apples are visually stunning and instantly evoke the holiday spirit. They are the perfect centerpiece for any holiday dessert spread or a thoughtful homemade gift.
The originality of Christmas Caramel Apples lies in their unbeatable combination of flavors and textures. The crispness of the apple contrasts beautifully with the silky caramel, creating a delightful eating experience. Additionally, the recipe allows for plenty of customization, as you can roll the caramel apples in chopped nuts or colorful sprinkles to suit your taste or the festive theme of your gathering. These apples are not just a dessert; they’re a statement, and presenting them at parties instantly elevates the festive feel, making them a timeless choice during the holiday season.
Ingredients You Need
The quality of your ingredients will significantly impact the final taste and texture of your Christmas Caramel Apples. Opting for fresh, firm apples and high-quality dairy products will ensure a superior caramel coating and a satisfying crunch. Don’t be afraid to experiment with different apple varieties to find your perfect balance of sweetness and tartness. You can also elevate the flavor profile by using gourmet toppings.
Christmas Caramel Apples
Deliciously festive caramel-coated apples that are easy to make and perfect for sharing during the holiday season.
- 1 cup granulated sugar
- 1/4 cup unsalted butter
- 1/2 cup heavy cream (Can be substituted with coconut cream for dairy-free option.)
- 1/2 cup corn syrup
- 1 teaspoon vanilla extract
- 1 pinch salt
- 4 medium apples (any favorite variety) Such as Granny Smith or Fuji
- Chopped nuts or sprinkles (Optional, for rolling)
- 1Gather all ingredients. Wash and dry the apples completely. Insert sticks into the tops of the apples.
- 2In a saucepan, combine sugar, butter, heavy cream, corn syrup, and salt. Cook over medium heat, stirring constantly until it starts to boil.
- 3Let it boil without stirring for 6-8 minutes until it reaches a deep amber color.
- 4Remove from heat and stir in vanilla extract gently.
- 5Dip each apple in the caramel, allowing excess caramel to drip off.
- 6Roll in chopped nuts or sprinkles if desired.
- 7Place on a greased baking sheet to cool until caramel hardens.
- 8Once the caramel is firm, cut the apples into slices or serve whole. Enjoy!
Keywords: Caramel Apples, Christmas Treats, Easy Dessert, Family-Friendly, Holiday Recipes
- granulated sugar: The foundation of your caramel, providing sweetness and structure.
- unsalted butter: Adds richness and a smooth texture to the caramel, preventing it from becoming too brittle.
- heavy cream: Essential for achieving a creamy, luscious caramel consistency and preventing it from crystallizing.
- corn syrup: Helps prevent sugar crystallization, ensuring a smooth and glossy caramel coating that adheres well to the apples.
- vanilla extract: Infuses the caramel with a warm, comforting aroma and enhances its overall sweetness.
- salt: A small pinch balances the sweetness of the caramel, adding depth and complexity to the flavor profile.
- medium apples: Choose firm, crisp apples that will hold their shape and provide a delightful contrast to the soft caramel.
- chopped nuts or sprinkles: These are optional but add delightful texture and visual appeal, allowing for personalization.
You’ll find the precise quantities for each ingredient listed in the recipe card above, ensuring your caramel apples turn out perfectly every time. These basic components come together to create a classic confectionery delight.
Variations
For a delightful vegan twist, you can easily adapt this recipe. Substitute the unsalted butter with a good quality coconut oil and use full-fat coconut milk or cream in place of heavy cream. The result is a rich, decadent caramel that is entirely plant-based, offering a delicious alternative for those avoiding animal products. This substitution maintains the creamy texture and sweet flavor, making it indistinguishable from the original for many.
If you’re seeking a low-carb option, consider using a sugar substitute specifically designed for baking, like erythritol or xylitol. You’ll need to adjust the quantities based on the sweetener’s potency. While the texture might vary slightly, this allows individuals following a ketogenic or low-carbohydrate lifestyle to enjoy the festive fun of caramel apples. Be sure to ensure your chosen sweetener caramelizes well.
Another exciting variation is the chocolate lover’s dream. After dipping the apples in caramel, allow them to set slightly, then drizzle generously with melted dark, milk, or white chocolate. You can even add crushed peppermint candies or toasted coconut flakes over the chocolate for an extra layer of flavor and texture. This decadent addition transforms the classic caramel apple into an even more indulgent treat, perfect for those with a serious sweet tooth.
How to Prepare Christmas Caramel Apples
Step 1: Selecting and Preparing the Apples
The foundation of any great caramel apple is the apple itself. For the best results, select firm, crisp varieties that will hold their shape and offer a satisfying crunch against the gooey caramel. Apples like Granny Smith, Honeycrisp, Fuji, or Gala are excellent choices, offering a balance of tartness and sweetness. Avoid apples that are too soft or mealy, as they can become mushy and less appealing once coated.
Once you’ve chosen your apples, it’s crucial to prepare them properly. Wash them thoroughly under cool running water to remove any natural waxes or residue that might prevent the caramel from adhering smoothly. After washing, dry each apple completely with a clean towel or paper towels. Any moisture remaining on the apple’s surface can cause the caramel to slip off or create an uneven coating, diminishing the visual appeal and the overall eating experience.
Next, insert a sturdy stick into the stem end of each apple. Wooden popsicle sticks, candy apple sticks, or even clean, sturdy twigs work well. Push the stick about halfway into the apple, ensuring it is firmly embedded. This stick will serve as your handle for dipping and for enjoying the finished caramel apple. A securely placed stick is essential to prevent any accidents during the dipping process.
Step 2: Crafting the Perfect Caramel Base
The heart of this recipe is the homemade caramel. In a heavy-bottomed saucepan, combine the granulated sugar, unsalted butter, heavy cream, corn syrup, and a pinch of salt. Using a heavy-bottomed pot helps to distribute heat evenly, preventing hot spots that can lead to scorching or uneven cooking of the caramel. This combination of ingredients forms the classic caramel flavor and smooth texture.
Place the saucepan over medium heat and stir the ingredients constantly until the sugar has dissolved and the butter has melted. Continue stirring until the mixture begins to reach a gentle boil. It’s important to stir consistently during this initial stage to ensure all components are well incorporated and to prevent any sugar from crystallizing on the sides of the pan. This smooth base is critical for a glossy final product.
Once the mixture starts to boil, cease stirring. You will need to let the caramel mixture boil undisturbed for a specific duration to achieve the correct consistency and color. This is a crucial step where the sugars undergo caramelization, developing their rich flavor and amber hue. Patience here is key to achieving that perfect, chewy caramel.
Step 3: Achieving the Golden Amber Hue
Now comes the delicate stage of caramelizing the sugar mixture. After the caramel has begun to boil, let it continue to cook without stirring for approximately 6 to 8 minutes. During this time, the sugar will transform from a clear liquid to a beautiful, deep golden amber color. The exact time can vary depending on your stove and the pot used, so keeping a close eye on the color is essential.
Use a candy thermometer if you have one, aiming for a temperature between 245-250°F (118-121°C), which is the firm-ball stage. This temperature indicates the caramel is cooked to a consistency that will set firm but remain slightly chewy when cooled. If you don’t have a thermometer, watch for the color change. It should resemble the rich color of maple syrup or a deep amber liquid. Be cautious, as overcooked caramel can become bitter.
The aroma will also intensify, becoming rich and nutty. As the caramel darkens, it’s important to be vigilant. If you notice any signs of burning, remove the pot from the heat immediately. A slightly darker caramel will have a more pronounced flavor, but burnt caramel will be unpleasant. The transition from perfect to burnt can happen quite quickly, so active observation is paramount at this stage.
Step 4: Infusing with Vanilla and Cooling Slightly
Once the caramel has reached the desired deep amber color and temperature, carefully remove the saucepan from the heat. This immediate removal prevents the caramel from continuing to cook and potentially burning. It also allows the caramel to cool slightly, making it more manageable for dipping the apples. The hot caramel is extremely dangerous, so handle it with utmost care.
Gently stir in the vanilla extract at this stage. Adding vanilla extract off the heat preserves its delicate flavor and aroma, preventing it from evaporating. The warmth of the caramel will distribute the vanilla evenly, infusing the entire batch with its comforting fragrance. This simple addition significantly enhances the overall taste profile of your Christmas Caramel Apples.
Allow the caramel to cool for a minute or two. It should still be pourable and liquid enough to coat the apples, but not so hot that it becomes overly thin. If the caramel seems too thick, you can carefully stir in a tablespoon or two of warm heavy cream, a little at a time, until you reach the desired consistency. However, be cautious not to add too much liquid, as this can alter the caramel’s setting properties.
Step 5: The Art of Dipping the Apples
Now for the most exciting part: dipping the apples! Hold an apple by its stick and carefully tilt the saucepan. Submerge the apple into the warm caramel, rotating it gently to ensure an even coating. Aim to cover as much of the apple as possible, leaving a small portion near the stem bare if you prefer a cleaner look. This step requires a steady hand and a quick motion.
Once the apple is coated, lift it out of the caramel and allow any excess caramel to drip back into the saucepan. You can gently swirl the apple to encourage even distribution and to prevent large, unsightly drips from forming. Be mindful of the hot caramel and avoid touching it with your fingers. The caramel will start to thicken as it cools, so work efficiently to achieve a smooth and consistent layer.
If you are using toppings, this is the time to apply them. While the caramel is still wet and sticky, roll the dipped apple in your chosen toppings, such as chopped nuts, sprinkles, mini chocolate chips, or crushed cookies. Press the toppings gently into the caramel to ensure they adhere securely. This is where your creativity can truly shine, personalizing each apple to your liking.
Step 6: Setting the Stage for Perfect Caramel Apples
After dipping and topping your apples, it’s time to let them set. Prepare a baking sheet by lining it with parchment paper or a silicone baking mat, and lightly grease it with non-stick cooking spray or a thin layer of butter. This preparation step is crucial to prevent the caramel apples from sticking to the baking sheet as they cool and harden.
Carefully place each caramel-coated apple onto the prepared baking sheet, ensuring they have enough space between them to avoid touching. If the apples touch while the caramel is still soft, they may meld together, making them difficult to separate later. Allow them to stand upright on their sticks.
Let the caramel apples sit at room temperature for at least 30 minutes to an hour, or until the caramel has completely hardened. You can speed up the setting process by placing the baking sheet in the refrigerator for about 15-20 minutes. The coolness will help the caramel firm up quickly, creating that perfect chewy-yet-firm texture that is characteristic of well-made caramel apples. Once set, they are ready to be admired and, more importantly, devoured.
Step 7: Presentation and Enjoyment
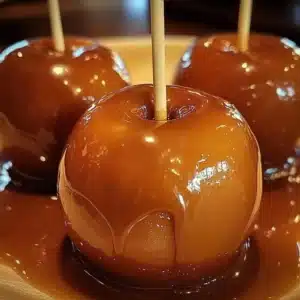
Once the caramel has fully hardened, your Christmas Caramel Apples are ready to be presented and enjoyed. They look beautiful arranged on a platter, interspersed with festive greenery or small holiday decorations. Their glistening appearance and sweet aroma are sure to capture attention and delight your guests. They are a perfect addition to any holiday dessert table or as a standalone treat.
For a truly festive touch, consider adding a final flourish. You could tie a festive ribbon around the stick of each apple, or package them individually in cellophane bags tied with a bow for an elegant presentation. These make for wonderful, homemade gifts that are sure to be appreciated by friends, family, and colleagues. The effort you put into their presentation will be evident and cherished.
And now, the best part: enjoying your creation! Take a bite into the crisp apple, followed by the sweet, chewy caramel. The combination of textures and flavors is simply divine. Whether you eat them whole, or slice them into wedges for easier sharing, these Christmas Caramel Apples are a delightful way to celebrate the holiday season and create sweet memories. Don’t hesitate to savor every bite of this homemade holiday magic.
Pro Tips for Christmas Caramel Apples
Use the Right Apples: For the best texture and flavor contrast, choose firm, crisp apples like Granny Smith, Honeycrisp, or Fuji. Softer apples can become mushy and won’t hold up as well to the caramel coating. Ensure they are at room temperature before coating for optimal adherence.
Dry Apples Thoroughly: After washing, make absolutely sure your apples are bone dry. Any residual moisture will prevent the caramel from sticking properly, leading to a messy and uneven coating. Pat them down with a clean kitchen towel or paper towels until completely dry.
Work Quickly with Caramel: Once your caramel reaches the perfect temperature, it will begin to thicken as it cools. Have your apples and any toppings ready before you start dipping. Work efficiently to ensure a smooth, even coating before the caramel becomes too stiff to spread.
Grease Your Tools: Lightly greasing your baking sheet or parchment paper with a neutral oil or butter will prevent the caramel apples from sticking. This makes removal effortless and cleanup much easier. Similarly, a light greasing of your spatula can help if you need to smooth out any errant drips.
Temperature is Key: For the caramel itself, aim for the firm-ball stage (245-250°F or 118-121°C) on a candy thermometer. This ensures the caramel will set to a chewy, not brittle or overly soft, consistency. If you don’t have a thermometer, learn to recognize the visual cues of the correct amber color.
Serving Suggestions for Christmas Caramel Apples
Decoration
These caramel apples are inherently decorative, but you can enhance their festive appeal even further. After dipping and while the caramel is still wet, immediately roll them in a colorful array of sprinkles, edible glitter, or finely chopped nuts. For a whimsical touch, consider drizzling melted white or dark chocolate over the caramel coating in a zig-zag pattern. You can even use candy melts in festive colors like red, green, or gold for an extra pop.
Tie a small festive ribbon, like red and white baker’s twine or a sparkly gold ribbon, around the stick of each apple. This adds a polished, gift-ready look and makes them easy to handle. Arrange the apples artfully on a tiered stand or a rustic wooden board surrounded by pine sprigs and cinnamon sticks to create a stunning centerpiece that doubles as a dessert.
For a more elaborate display, consider creating themed caramel apples. For instance, use blue and white sprinkles for a “winter wonderland” theme, or red and green sprinkles with chocolate drizzle for a classic Christmas look. Edible pearls or shimmering sugar dust can add a touch of elegance, transforming each apple into a miniature edible work of art that perfectly complements your holiday decor.
Side Dishes
While caramel apples are a complete treat on their own, they pair wonderfully with certain accompaniments that enhance the overall experience. A warm cup of rich hot chocolate is the quintessential partner, offering a comforting contrast to the sweet, sticky caramel and crisp apple. The warmth of the chocolate and the coolness of the apple create a delightful sensory play.
A scoop of high-quality vanilla bean ice cream or a simple dollop of freshly whipped cream can add another layer of indulgence. The creamy, cool texture of ice cream melts slightly with the warm caramel, creating a decadent combination. For those who enjoy a bit of contrast, a small cheese plate featuring mild cheeses like brie or cream cheese can offer a delightful savory counterpoint to the sweetness.
A refreshing fruit salad, especially one featuring complementary fruits like pears, berries, or citrus, can provide a lighter, palate-cleansing option. This balances the richness of the caramel apples and adds a burst of fresh flavor. Offering a selection of these pairings allows guests to customize their dessert experience and enjoy the caramel apples in various delicious ways.
Creative Serving Ideas
Transform your caramel apples into a fun activity by setting up a “decorate your own caramel apple” station at your holiday gathering. Prepare bowls of various toppings like mini chocolate chips, crushed cookies, shredded coconut, and colorful candies. Guests can dip their own apples and create their personalized masterpieces, making for an interactive and memorable experience. This is particularly engaging for children and adds a playful element to the festivities.
Consider serving caramel apples as part of a dessert buffet. Arrange them alongside other holiday treats like gingerbread cookies, peppermint bark, and festive cupcakes. Their unique shape and vibrant color will make them stand out, adding visual interest to your spread. You can also pre-slice them into wedges for easier serving and consumption, making them more approachable for guests who prefer not to bite directly into a whole apple.
For a more elegant presentation, serve individual caramel apples as favors. Package them in clear cellophane bags tied with festive ribbon and a personalized tag. They make for delightful take-home gifts that guests can enjoy later. This thoughtful gesture leaves a lasting impression and allows the festive spirit to continue long after the party has ended. They are a sweet reminder of your wonderful holiday celebration.
Preparation & Storage
Storing Leftovers
If you find yourself with leftover Christmas Caramel Apples, proper storage is key to maintaining their deliciousness. The best way to store them is at room temperature in an airtight container. Ensure the container is truly airtight to prevent the caramel from drying out or absorbing any odors from other foods. If stored correctly, they can last for about 1 to 2 days at room temperature.
However, if your environment is particularly warm or humid, or if you wish to store them for a slightly longer period, refrigeration is an option. Place them in an airtight container in the refrigerator. Be aware that refrigeration can sometimes make the caramel slightly harder and potentially a bit sticky on the outside once they come back to room temperature. It’s always best to consume them as fresh as possible for the optimal texture.
When you’re ready to enjoy them again, it’s recommended to let them come to room temperature for at least 30 minutes before biting in. This allows the caramel to soften slightly, making it more pliable and pleasant to eat. Avoid reheating them, as this can cause the caramel to become overly liquid and melt off the apple.
Freezing
Christmas Caramel Apples can indeed be frozen, which is an excellent option for making them well in advance of the holiday season or for longer storage. To freeze them, ensure that the caramel coating is completely firm. Wrap each caramel apple tightly in plastic wrap, ensuring there are no exposed areas where freezer burn could occur. This initial wrapping is crucial for preserving their quality.
After wrapping each apple individually, place them in a single layer in a freezer-safe airtight container or a heavy-duty freezer bag. This double layer of protection will help prevent moisture loss and protect the apples from any damage during the freezing process. Label the container with the date and contents. Properly frozen caramel apples can maintain good quality for up to 1-2 months.
To thaw frozen caramel apples, transfer them from the freezer to the refrigerator. Allow them to thaw slowly overnight. This gradual thawing process helps to maintain the best possible texture and prevents the caramel from becoming excessively sticky or melting. Once thawed, they can be enjoyed straight from the refrigerator, ideally without further reheating.
Reheating
Reheating Christmas Caramel Apples is generally not recommended, as the process can negatively impact the texture of the caramel. Hot caramel is liquid and highly fluid, and while it hardens when cooled, applying heat again will simply melt it. If you try to reheat them in a microwave or oven, the caramel will likely become a runny mess, and the apple might become too soft or even cooked.
The best approach is to enjoy them as they are after proper thawing. If the caramel seems a bit too hard after refrigeration or freezing, simply letting the apple sit at room temperature for about 30-60 minutes should soften the caramel sufficiently. This allows you to enjoy the intended chewy-crisp texture without compromising the integrity of the coating.
If, for some reason, the caramel has become slightly sticky after thawing, you can try a very brief chill in the refrigerator to firm it up again. However, avoid any form of heating. The beauty of caramel apples lies in their set, slightly chewy texture, which is best preserved through proper cooling and thawing methods, not reheating.
Frequently Asked Questions
-
Can I prepare Christmas Caramel Apples ahead of time, and if so, how should I store them?
Absolutely! Christmas Caramel Apples can be prepared up to a day in advance. For best results, store them in an airtight container at room temperature. Ensure the container is well-sealed to prevent the caramel from drying out or becoming sticky. If your environment is warm, or you plan to store them for slightly longer, you can refrigerate them, but be aware this might make the caramel a bit firmer and potentially stickier once brought back to room temperature.
-
What are the best types of apples to use for Christmas Caramel Apples, and how do I ensure the caramel sticks properly?
Firm, crisp apples work best for Christmas Caramel Apples, such as Granny Smith, Honeycrisp, Fuji, or Gala. These varieties provide a satisfying crunch that contrasts beautifully with the smooth caramel. To ensure the caramel sticks properly, it is crucial to wash the apples thoroughly and, most importantly, dry them completely before dipping. Any moisture on the apple’s surface will prevent the caramel from adhering evenly, leading to a less appealing result.
-
Can I add different flavors or toppings to the caramel, and what are some creative serving suggestions?
Yes, you can absolutely get creative with flavors and toppings! After dipping the apples in caramel, while it’s still wet, you can roll them in chopped nuts, sprinkles, shredded coconut, mini chocolate chips, or crushed cookies. For flavor variations in the caramel itself, you can stir in a teaspoon of cinnamon or a pinch of nutmeg after removing it from the heat. For serving, consider arranging them as a centerpiece, packaging them as gifts, or setting up a “decorate your own” station for a fun, interactive experience. Pairing them with hot chocolate or vanilla ice cream also makes for a delightful treat.