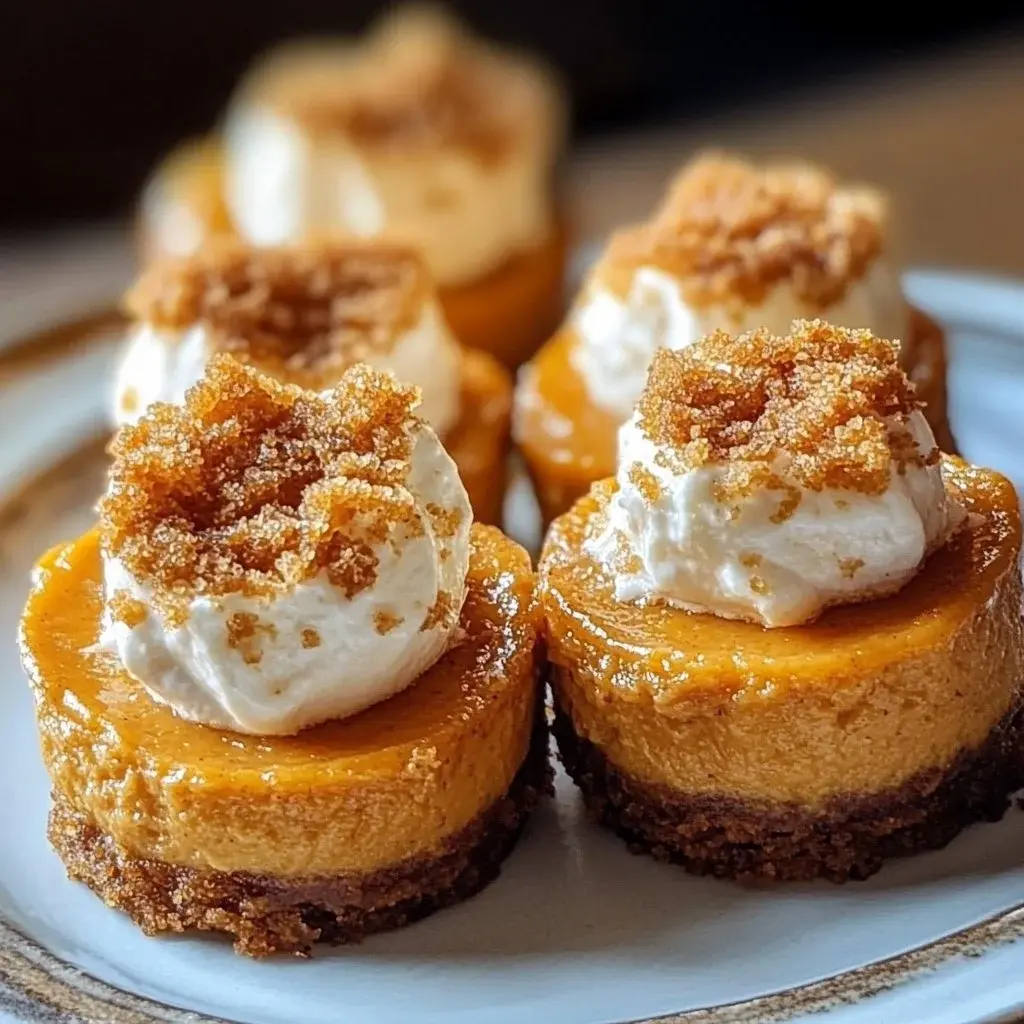
The Ultimate Pumpkin Cheesecake Bites (no-bake)
The crisp, cool air of fall brings a sense of excitement and a wave of flavors that warm the heart. Amongst the array of seasonal delights, nothing quite compares to the rich, creamy goodness of Pumpkin Cheesecake Bites (no-bake). These little treats not only embody the essence of autumn but are also incredibly simple to whip up.
If you’re in search of a dessert that charms your palate without demanding hours of baking, look no further than these delightful no-bake pumpkin cheesecake bites. Imagine each bite bursting with the flavors of pumpkin, cream cheese, and warm spices, all encased in a crunchy graham cracker base. How utterly delightful does that sound for your next gathering or quiet evening?
Why You Will Love This Recipe
- No-Bake Simplicity: Skip the oven entirely and create a stunning dessert with minimal effort, perfect for any season or occasion. This method is ideal for warmer days or when your oven is already occupied with other culinary creations.
- Flavorful Fall Embrace: Experience the quintessential taste of autumn with the warm, comforting blend of pumpkin and aromatic spices in every single bite. It’s like a cozy sweater for your taste buds, delivering pure seasonal bliss.
- Perfect Portion Control: These bites are designed for easy serving and enjoyment, offering just the right amount of sweetness and richness. Their petite size makes them ideal for dessert tables, parties, or a delightful personal treat.
- Crowd-Pleasing Appeal: Universally loved, these bites manage to impress both children and adults with their balanced sweetness and delightful texture. They are a guaranteed hit that will have everyone asking for the recipe.
- Easy Customization: The base recipe is wonderfully adaptable, allowing you to tailor it to your specific preferences or dietary needs with simple ingredient swaps or additions. This flexibility ensures everyone can enjoy these delicious treats.
Ingredients You Need
Crafting these delicious bites relies on a harmonious blend of simple, high-quality ingredients that come together to create a symphony of fall flavors. The cream cheese provides a luxurious, tangy base, while the pumpkin puree infuses a rich, earthy sweetness that is synonymous with the season. Carefully selected spices like cinnamon, nutmeg, and ginger add warmth and depth, transforming the mixture into a true autumn delight. The graham cracker crust offers a delightful textural contrast and a hint of honeyed sweetness that perfectly complements the creamy filling.
No-Bake Pumpkin Cheesecake Bites

Delightful no-bake pumpkin cheesecake bites with a crunchy graham cracker base, perfect for autumn gatherings. These are a flavorful and easy dessert option for any occasion.
- 1 cup cream cheese (softened)
- 1 cup pumpkin puree
- 1/2 cup powdered sugar
- 1 teaspoon vanilla extract
- 1 teaspoon ground cinnamon
- 1/2 teaspoon ground nutmeg
- 1/4 teaspoon ground ginger
- 1/4 teaspoon salt
- 1 cup graham cracker crumbs
- 4 tablespoons melted butter
- 1Gather all ingredients. Ensure cream cheese is at room temperature.
- 2In a mixing bowl, combine softened cream cheese, pumpkin puree, powdered sugar, vanilla extract, cinnamon, nutmeg, ginger, and salt. Mix until smooth and creamy.
- 3In a separate bowl, mix graham cracker crumbs with melted butter until fully coated.
- 4Spoon about 1 teaspoon of the graham cracker mixture into the bottom of each mini muffin cup and press firmly to create the crust.
- 5Top each crust with approximately 1 tablespoon of the pumpkin cheesecake mixture.
- 6Place the filled muffin cups in the refrigerator and chill for at least 2-3 hours, or until firm.
- 7Once set, carefully remove the cheesecake bites from the tray.
- 8Serve chilled, optionally garnishing with whipped cream or a sprinkle of cinnamon.
Keywords: Easy Dessert, Fall Treat, No-Bake Cheesecake, Pumpkin Dessert, Seasonal Dessert, Quick Dessert, Party Food
- cream cheese: softened to room temperature for smooth blending.
- pumpkin puree: ensure it’s pure pumpkin, not pie filling, for the best flavor and consistency.
- powdered sugar: for sweetness and a smooth, creamy texture without grittiness.
- vanilla extract: enhances all the other flavors and adds a subtle, sweet aroma.
- ground cinnamon: a quintessential spice that brings warmth and coziness to the pumpkin.
- ground nutmeg: adds a fragrant, slightly sweet, and nutty note.
- ground ginger: provides a mild, spicy kick that balances the sweetness.
- salt: a pinch of salt is crucial for enhancing and balancing all the sweet flavors.
- graham cracker crumbs: forms the delightful, crunchy base for each bite.
- melted butter: binds the graham cracker crumbs together to create a firm crust.
The specific quantities for these essential components can be found within the detailed recipe card, ensuring perfect results every time.
Variations
For a wonderfully decadent twist, consider infusing the cheesecake filling with rich dark chocolate. You can achieve this by gently melting your favorite dark chocolate and folding it into the cream cheese mixture after it has been blended with the pumpkin and spices. Alternatively, you could swirl melted chocolate into each bite before chilling for a marbled effect, adding a delightful bittersweet contrast to the sweet pumpkin. This variation transforms a classic treat into a sophisticated chocolate-pumpkin fusion that is sure to impress even the most discerning palates. It’s a perfect way to elevate the dessert for special occasions or when you simply crave something extra luxurious.
To cater to those seeking a lighter, more nutrient-dense option, a low-carb variation is readily achievable. For the crust, blend toasted almonds or walnuts into fine crumbs and bind them with a touch of melted coconut oil or unsalted butter. For the filling, replace the powdered sugar with a granular or powdered sugar substitute like erythritol or stevia, adjusting the amount to your desired sweetness level. You might also consider adding a bit of unsweetened shredded coconut to the crust for added texture and healthy fats. This modification makes the bites suitable for ketogenic diets or for anyone looking to reduce their sugar intake without sacrificing flavor.
Embrace the vibrant flavors of other seasonal fruits by incorporating a fruit-forward variation. Imagine adding a spoonful of lingonberry jam or a swirl of tart cherry compote into the center of each cheesecake bite before chilling. The bright, slightly acidic fruit compote will cut through the richness of the cream cheese and complement the warm spices beautifully, creating a complex and refreshing flavor profile. You could also lightly fold in some very finely diced, tart apple or pear into the filling for small bursts of freshness. This approach adds a lovely fruity dimension that pairs exceptionally well with pumpkin.
How to Prepare Pumpkin Cheesecake Bites no-bake
Step 1: Prepare the Foundation
Begin by meticulously gathering all the necessary ingredients and ensuring they are at their optimal temperatures for seamless mixing. It’s highly recommended to let your cream cheese soften to room temperature; this is a critical step that prevents any lumps from forming in your cheesecake filling, ensuring a velvety smooth texture. A slightly softened cream cheese will also incorporate more easily with the other ingredients, saving you time and effort during the mixing process. Having everything pre-measured and laid out on your workspace will streamline the entire preparation, allowing you to move efficiently through each stage of creating these delightful no-bake pumpkin cheesecake bites.
Simultaneously, prepare your graham cracker crust components. Ensure your graham crackers are crushed to a fine, uniform crumb; this can be achieved using a food processor, a rolling pin within a sealed bag, or by simply purchasing pre-crushed crumbs. Measure out the precise amount of graham cracker crumbs needed for the recipe. This fine consistency is crucial for creating a cohesive crust that holds its shape well. The texture of the crumbs directly impacts how well they bind with the melted butter, so aiming for an even texture is beneficial for a stable and enjoyable base for your cheesecake bites.
Step 2: Craft the Luscious Filling
In a generously sized mixing bowl, combine the softened cream cheese, smooth pumpkin puree, and the sifted powdered sugar. If you are opting for a sugar substitute, ensure it is well-dissolved and incorporated. To this mixture, add the aromatic ground cinnamon, fragrant nutmeg, subtle ground ginger, and a pinch of salt. Using an electric mixer on a medium speed, or a sturdy whisk if mixing by hand, blend these ingredients together until they form a completely smooth, creamy, and homogenous consistency. Take your time to scrape down the sides and bottom of the bowl periodically to ensure all ingredients are fully incorporated and no pockets of unmixed cream cheese or pumpkin remain. The goal is a luxurious, lump-free filling that is ready to be paired with its crunchy base.
Once the base ingredients are thoroughly combined and the mixture is wonderfully smooth, add the vanilla extract. Mix it in on a low speed or with a few quick stirs by hand, just until it is fully distributed throughout the filling. Be careful not to overmix at this stage, as excessive mixing can incorporate too much air, which might lead to a softer final product that doesn’t set as firmly. The aroma at this point should be intoxicating, a perfect preview of the delightful flavors to come. This creamy, spiced pumpkin mixture is now ready to be paired with its delightful graham cracker crust, bringing you one step closer to enjoying these exquisite no-bake treats.
Step 3: Form the Irresistible Crust
In a separate, medium-sized bowl, introduce the measured graham cracker crumbs. Pour the melted butter over the crumbs, ensuring even distribution across the surface. Using a fork or a spatula, stir the crumbs and butter together thoroughly until every particle of the graham cracker is completely coated in the melted butter. This mixture should resemble damp sand and will hold together when squeezed lightly in your hand. The butter acts as the binder, crucial for creating a crust that is firm enough to hold its shape and support the cheesecake filling without crumbling apart. Achieving this perfect consistency is key for a stable and satisfying base.
Now, prepare your chosen muffin tin. If you are using a silicone mini muffin tray, you might be able to skip lining, but using small parchment paper liners or silicone molds within the cups can guarantee effortless removal and presentation. For metal muffin tins, it is highly advisable to lightly grease each cup with a non-stick cooking spray or a small amount of butter to prevent any sticking. This preventative measure ensures that your perfectly formed cheesecake bites can be easily extracted once they have set, preserving their lovely shape and integrity for serving.
Step 4: Assemble the Bites
Carefully spoon approximately one teaspoon of the prepared graham cracker and butter mixture into the bottom of each lined or greased muffin cup. Use the back of a spoon, your fingers, or a small tamper to firmly press this mixture down and against the sides of the cup, creating an even and compact layer. This firm packing is essential for forming a sturdy crust that will not disintegrate when the bites are served. Ensure the crust layer is consistent in thickness across all the muffin cups for uniform bites. A well-compacted crust is the foundation for a perfect no-bake cheesecake bite.
Once the crusts are perfectly in place, it’s time to add the luscious pumpkin cheesecake filling. Spoon about one tablespoon of the smooth, creamy pumpkin cheesecake mixture over the top of each graham cracker crust. Gently spread and smooth the top of each portion with the back of a spoon or a small offset spatula. Aim to fill each cup almost to the brim, leaving just a tiny bit of space to prevent any overflow during the chilling process. Ensure the filling is evenly distributed to create visually appealing and delicious bites. This careful layering sets the stage for the final magic to happen.
Step 5: The Crucial Chilling Phase
With all your mini muffin cups now perfectly filled with the graham cracker crust and pumpkin cheesecake mixture, it is time for them to firm up. Carefully place the entire muffin tray into the refrigerator. Allow the bites to chill undisturbed for a minimum of 2 to 3 hours. This crucial chilling period allows the cream cheese to firm up, the flavors to meld together beautifully, and the crust to become perfectly set. Patience is a virtue here; rushing this step can result in bites that are too soft and may not hold their shape when removed from the tin.
For optimal results, especially if you want to ensure they are perfectly firm and easy to handle, consider chilling them for a slightly longer duration, perhaps 4 hours or even overnight. This extended chilling time guarantees that the bites will be wonderfully solid and a pleasure to eat. The cold temperature solidifies the fats in the cream cheese and butter, creating the signature texture of no-bake cheesecake. Once they have reached the desired firmness, you are ready to proceed to the next exciting stage of presentation and enjoyment.
Step 6: Unveiling and Enjoying
Once the Pumpkin Cheesecake Bites (no-bake) have thoroughly chilled and are perfectly set, it is time to carefully remove them from the muffin tray. If you used parchment paper liners or silicone molds, gently lift each bite out of its cup. If you greased a metal tin, you might need to carefully run a thin, flexible knife or an offset spatula around the edges of each bite to loosen it before gently lifting it out. Take your time to avoid damaging their delicate structure; the goal is to present them beautifully.
Serve your exquisite Pumpkin Cheesecake Bites (no-bake) chilled. For an extra touch of elegance and flavor, consider garnishing each bite with a dollop of freshly whipped cream, a sprinkle of cinnamon, a drizzle of caramel sauce, or some crushed pecans. These delightful treats are now ready to be savored, shared, and enjoyed by everyone. Their perfect size, delightful flavor, and easy preparation make them an undeniable winner for any occasion.
Pro Tips for Pumpkin Cheesecake Bites no-bake
- Always use room temperature cream cheese: This is non-negotiable for achieving a silky-smooth filling without any lumps. Cold cream cheese will fight against the other ingredients, creating a gritty texture.
- Don’t overmix the filling: While you want it smooth, overmixing can incorporate too much air, leading to a texture that might be too soft or prone to cracking once chilled. Mix just until combined and smooth.
- Pack the crust firmly: A loosely packed crust will crumble. Use the back of a spoon or your fingers to press the graham cracker mixture down firmly into the muffin cups to create a solid base.
- Chill thoroughly: Resist the temptation to shorten the chilling time. Proper chilling is essential for the bites to set correctly and maintain their shape when removed from the tin.
- Use pure pumpkin puree: Ensure you are using 100% pumpkin puree, not pumpkin pie filling, which contains added sugar and spices that will alter the flavor and consistency.
Serving Suggestions for Pumpkin Cheesecake Bites no-bake
Decoration
Elevate the visual appeal of your Pumpkin Cheesecake Bites with a few simple yet stunning decorative touches. A classic choice is a swirl of fresh, homemade whipped cream on top of each bite, offering an extra layer of creamy indulgence. For a touch of elegance, a delicate drizzle of caramel sauce or a rich chocolate ganache can add both flavor and visual interest, creating beautiful patterns. A light dusting of extra cinnamon or nutmeg across the top can enhance the autumnal theme and aroma. Alternatively, a sprinkle of crushed toasted pecans, walnuts, or even some buttery graham cracker crumbs can add textural contrast and a sophisticated look, making each bite a miniature work of art.
Side Dishes
While these bites are perfectly delightful on their own, they can be wonderfully complemented by other elements on a dessert platter or buffet. Consider pairing them with fresh, seasonal fruits like crisp apple slices, pear wedges, or even a small bowl of pomegranate seeds for a burst of tartness and color. Alongside them, a selection of complementary cookies, such as ginger snaps or shortbread, can offer a variety of textures and flavors. For a warm contrast, a small pitcher of warm, spiced apple cider or a rich hot chocolate would be an excellent accompaniment, especially during cooler months. This thoughtful pairing creates a well-rounded dessert experience.
Creative Serving Ideas
Think beyond the standard muffin tin presentation for truly memorable servings. Arrange these adorable bites on a rustic wooden board or a decorative platter for an impressive buffet centerpiece. For individual servings, place each bite in a small, colorful paper candy cup or a mini ramekin to add a touch of festivity. You could also create a “build-your-own” dessert bar by offering various toppings like chocolate chips, chopped nuts, caramel sauce, and fruit compotes, allowing guests to customize their own perfect bite. For a more formal occasion, serve them on elegant dessert plates with a delicate berry coulis on the side, transforming them into a gourmet treat.
Preparation & Storage
Storing Leftovers
To keep your delightful Pumpkin Cheesecake Bites (no-bake) fresh and delicious for as long as possible, it is essential to store them properly. Once they have been fully chilled and are ready to be put away, place them in an airtight container. Ensure the container is well-sealed to prevent any air from entering, which can lead to them drying out or absorbing unwanted odors from the refrigerator. Store the container in the main compartment of your refrigerator, where the temperature is consistent and ideal for preserving their texture and flavor.
When stored correctly in an airtight container in the refrigerator, these no-bake pumpkin cheesecake bites can maintain their excellent quality for up to five days. For best results, try to consume them within the first three to four days, as their texture might begin to soften slightly over time. If you plan on keeping them for longer, freezing is a much better option. Always ensure they are completely cooled and set before attempting to store them, as any residual warmth can negatively impact their texture and shelf life.
Freezing
For those occasions when you want to prepare these delightful treats in advance or have more than you can consume within a week, freezing is an excellent strategy. After the cheesecake bites have fully set in the refrigerator, carefully place them into a freezer-safe airtight container. To prevent them from sticking together, it’s a good practice to place a layer of parchment paper or wax paper between each layer of bites. This simple step ensures that each bite remains individual and easy to retrieve from the container when you’re ready to enjoy them.
Once they are neatly arranged in the freezer-safe container with protective layers, seal the container tightly. Label the container with the contents and the date you froze them. Properly stored in the freezer, these no-bake pumpkin cheesecake bites can retain their delicious flavor and texture for up to three months. This makes them a perfect make-ahead option for holidays, parties, or simply for having a convenient sweet treat on hand whenever the craving strikes.
Reheating
The beauty of these no-bake Pumpkin Cheesecake Bites is that they are designed to be enjoyed cold, so there is no need for reheating. In fact, attempting to reheat them would likely compromise their intended creamy texture and might cause them to become mushy or melt. They are best served directly from their chilled state, providing a refreshing and delightful dessert experience. If you are thawing them from a frozen state, the ideal method is to simply transfer them from the freezer to the refrigerator and allow them to thaw overnight. This gentle thawing process helps them retain their structure and creamy consistency.
Avoid the temptation to thaw them at room temperature for a quicker solution. Leaving them out on the counter for an extended period can affect their texture, potentially making them too soft, and may also raise food safety concerns. The slow thawing in the refrigerator is the safest and most effective way to bring them back to their perfect serving temperature. Once thawed, they are ready to be enjoyed just as if they were freshly made, offering that delightful cool and creamy sensation with every bite.
Frequently Asked Questions
- Can I prepare these Pumpkin Cheesecake Bites ahead of time?
Absolutely! These delightful bites are incredibly well-suited for making ahead. You can prepare them a day or even two in advance and store them in an airtight container in the refrigerator. This makes them an ideal make-ahead dessert for entertaining, busy holidays, or simply for ensuring you have a delicious treat ready to go whenever the craving strikes. Proper storage is key to maintaining their freshness and delightful texture. - Is it possible to freeze these bites for longer storage?
Yes, these Pumpkin Cheesecake Bites freeze exceptionally well, making them a fantastic option for long-term preparation. After they have fully set in the refrigerator, carefully arrange them in a single layer in a freezer-safe airtight container, with parchment paper between layers to prevent sticking. When you’re ready to enjoy them, simply transfer them from the freezer to the refrigerator and let them thaw overnight. - How long do the prepared bites typically last, and what are the best substitutions if needed?
When stored properly in an airtight container in the refrigerator, these bites generally last for about five days. For substitutions, if you need a dairy-free option, feel free to use a good quality vegan cream cheese alternative and ensure your graham cracker crumbs are also dairy-free. To make them gluten-free, use certified gluten-free graham cracker crumbs or a nut-based crust alternative. For those who prefer a less processed sweetener, maple syrup or agave can often be used in place of powdered sugar, though you may need to adjust the amount slightly to achieve the desired sweetness and consistency.