My Family's Traditional Baklava Recipe – How to Make Baklava!

Welcome to a journey through one of the most beloved and iconic desserts from the Mediterranean and Middle Eastern regions: Baklava. This sweet, crispy, and utterly delightful pastry has captured hearts and taste buds for centuries with its intricate layers and rich, nutty filling. It’s a treat that evokes warmth, celebration, and tradition, often gracing the tables of family gatherings and special occasions.
The magic of baklava lies in its deceptive simplicity and the symphony of textures and flavors it offers. Imagine flaky, golden-brown layers of phyllo dough, each brushed with rich butter, encasing a generous filling of finely chopped nuts, subtly spiced and sweetened. This masterpiece is then drenched in a fragrant, often lemony, syrup, which infuses overnight, transforming crispness into a tender chewiness that is simply divine. Get ready to discover how to create this culinary treasure in your own kitchen.
Why You Will Love This Recipe
- Authentic Flavor: Experience the true taste of traditional baklava, perfected over generations for an unparalleled sweet and nutty delight.
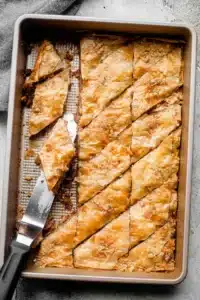
- Impressive Presentation: The beautiful diamond or square cut, golden hue, and glistening syrup make this dessert a showstopper for any occasion.
- Satisfying Textures: Enjoy the delightful contrast between the ultra-crispy phyllo layers and the rich, slightly chewy nut filling, all enhanced by the luscious syrup.
- Versatile Nut Filling: While walnuts are traditional, this recipe encourages personalization with other nuts or even dried fruits for a unique twist every time.
- A Cherished Family Recipe: This recipe is a direct link to culinary heritage, bringing a piece of Macedonian tradition and family warmth to your home.
Ingredients You Need
Crafting an exceptional baklava begins with selecting high-quality ingredients, as each element plays a crucial role in the final masterpiece. From the delicate phyllo dough to the aromatic spices and fresh nuts, attention to detail ensures a truly memorable dessert. The right balance of sweetness, spice, and nuttiness is key to achieving that authentic baklava experience. Remember that the exact quantities are detailed in the recipe card below, allowing for precise replication of this delightful treat.
Classic Baklava Recipe
This sweet and crispy baklava recipe is prepared with buttery and flaky sheets of phyllo dough layered with walnuts and topped with a sweet, lemony, simple syrup. A traditional dessert passed down through generations.
- For the Simple Syrup:
- 1 cup water
- 1 cup sugar
- 1 tablespoon fresh lemon juice
- For the Baklava:
- 4 cups walnuts, finely chopped
- 1 cup granulated sugar
- ½ tablespoon lemon zest
- 1 teaspoon ground cinnamon
- 1 cup unsalted butter, melted
- 16 ounces phyllo dough (about 40 sheets), thawed according to directions on the package
- 1For the Simple Syrup: Combine water, sugar, and lemon juice in a saucepan. Set the saucepan over medium-high heat and bring the mixture to a simmer; simmer, occasionally stirring, until the sugar has completely dissolved. Continue to simmer for 5 more minutes. Remove from heat; set aside and let cool down completely.
- 2For the Baklava: Preheat oven to 325˚F. In a large bowl combine chopped walnuts, sugar, lemon zest, and cinnamon. Set aside. Brush the bottom of a 9×13 baking pan with melted butter. Unroll the phyllo sheets; as you work with them, keep the stack covered with a damp paper towel so they don’t dry out while you’re working. You can also use plastic wrap to cover the stack.
- 3Arrange 10 layers of phyllo sheets into the prepared baking pan, one sheet at a time, brushing each sheet with butter before adding the next. So, layer 1 sheet, brush with butter, then layer the next, brush with butter, and so on.
- 4After buttering the tenth phyllo sheet, sprinkle about ¾ cup of the walnut mixture over the phyllo.
- 5Continue to layer 5 more phyllo sheets, brushing each sheet with butter before adding the next. Then, sprinkle with a layer of ¾ cup walnut mixture. Repeat this 4 more times.
- 6Finish the baklava with a layer of 10 phyllo sheets and brush the top with more butter.
- 7Cut the baklava into diamond or square shapes; cut through the baklava and down to the bottom of the pan using a sharp knife. You can cut it vertically into 4 long rows and then cut diagonally to make diamond shapes or cut straight across to make square shapes.
- 8Bake for 55 minutes to 1 hour or until the top of the Baklava is golden and crisp.
- 9Remove from the oven and pour the cooled syrup evenly over the entire Baklava.
- 10Let the Baklava cool completely in a dry and cool place. For best results, let Baklava sit overnight.
Keywords: Baklava, dessert, walnuts, phyllo, syrup, sweet, pastry, traditional, Macedonian
- water: the essential base for creating the sweet syrup that infuses the baklava.
- sugar: provides the necessary sweetness and body for the syrup, creating that characteristic sticky glaze.
- fresh lemon juice: adds a crucial bright, zesty note to the syrup, balancing the intense sweetness and preventing it from becoming cloying.
- walnuts: traditionally used for their earthy flavor and pleasant crunch, they form the heart of the nutty filling.
- granulated sugar: sweetens the nut mixture, helping it bind together and adding another layer of delightful sweetness.
- lemon zest: imparts a fragrant citrus aroma and flavor to the nut filling, complementing the syrup beautifully.
- ground cinnamon: introduces a warm, comforting spice that is a hallmark of classic baklava, enhancing the overall flavor profile.
- unsalted butter: melted to perfection, it’s brushed between each phyllo layer, creating incredible crispness and richness.
- phyllo dough: the star of the show, these paper-thin sheets are what give baklava its signature flaky texture.
Variations
While the classic walnut and cinnamon filling is undeniably delicious, baklava offers a delightful canvas for creativity. Exploring different nut combinations can lead to entirely new flavor profiles and textures, elevating this traditional dessert into something uniquely your own.
For a truly opulent variation, consider a pistachio-centric baklava. Finely chopped pistachios, perhaps mixed with a touch of cardamom or rosewater, create a vibrant green filling with a distinct, slightly floral sweetness. This version offers a sophisticated elegance that is perfect for more formal occasions or when you want to present a truly special treat.
If you’re looking for a lower-carbohydrate option or simply prefer a different taste, almonds make an excellent substitute for walnuts. You can also experiment with a mix of almonds and pecans for a deeper, richer flavor. To keep the syrup lighter, consider using a sugar substitute or a smaller amount of a natural sweetener like honey, though be mindful of its distinct flavor.
Another exciting avenue for variation lies in the syrup itself. Instead of a simple lemon syrup, you could infuse it with orange blossom water for an exotic floral note, or add a cinnamon stick and cloves during simmering for a more complex spice blend. Even a splash of brandy or a liqueur like Grand Marnier can add an adult twist, making your baklava a sophisticated dessert for connoisseurs.
Don’t shy away from incorporating dried fruits into the nut mixture. Finely chopped dates, figs, or apricots can add pockets of chewy sweetness and a lovely tartness that complements the nuts and syrup. A few raisins or dried cranberries, tossed with the nut filling, can provide delightful bursts of flavor and texture, making each bite a new discovery.
Finally, for those who enjoy a textural surprise, consider adding shredded coconut to the nut filling. It offers a subtle tropical hint and a pleasant chewiness that contrasts beautifully with the crisp phyllo. This can be a wonderful addition, especially when paired with a citrusy syrup to cut through the richness and sweetness.
How to Prepare baklava recipe
Step 1: Preparing the Sweet Syrup
The foundation of any exceptional baklava is its sweet syrup, and this recipe ensures it’s perfectly balanced. Begin by combining one cup of water with one cup of granulated sugar in a medium saucepan. This simple ratio creates a syrupy consistency that will beautifully coat and infuse the layers of phyllo dough.
Add one tablespoon of fresh lemon juice to the saucepan. The citrus not only adds a bright, refreshing note but also helps prevent the sugar from crystallizing, ensuring a smooth and luscious syrup. Place the saucepan over medium-high heat and bring the mixture to a gentle simmer, stirring occasionally until all the sugar has completely dissolved. This step is crucial for achieving a smooth texture.
Once the sugar is dissolved, allow the syrup to continue simmering for an additional five minutes. This simmering period helps to thicken the syrup slightly, ensuring it has the perfect consistency to soak into the baklava without making it soggy. After simmering, remove the saucepan from the heat and set it aside to cool down completely. A fully cooled syrup is essential for pouring over the hot, freshly baked baklava, creating the perfect textural transformation.
Step 2: Preparing the Nut Filling
The heart of this baklava lies in its rich and aromatic nut filling. In a large mixing bowl, combine four cups of finely chopped walnuts. The fineness of the chop is important for creating a cohesive filling that will hold together within the phyllo layers. For an extra layer of flavor, you can lightly toast the walnuts before chopping them, though this is entirely optional and the raw nuts will still yield a delicious result.
Add one cup of granulated sugar to the chopped walnuts. This sugar will not only sweeten the filling but also help to bind the nuts together as the baklava bakes and the syrup is absorbed. Next, incorporate half a tablespoon of lemon zest. The bright citrus notes from the zest will cut through the richness of the nuts and butter, adding a refreshing counterpoint to the sweetness.
Finally, sprinkle in one teaspoon of ground cinnamon. This classic spice is essential for that traditional baklava aroma and flavor. For a more complex spice profile, you could also add a tiny pinch of ground nutmeg or cloves. Gently toss all the ingredients together until they are well combined, ensuring the spices and sugar are evenly distributed throughout the walnuts. This fragrant mixture is now ready to be layered.
Step 3: Assembling the Baklava Layers
This is where the magic truly begins. Preheat your oven to 325°F (160°C). Take a 9×13 inch baking pan and generously brush the bottom and sides with some of the melted unsalted butter. This initial buttering ensures the bottom layers won’t stick and will develop a beautiful golden crust. Ensure you have about one cup of unsalted butter melted for this process.
Carefully unroll your phyllo dough, which should be thawed according to package instructions. It’s vital to keep the phyllo sheets from drying out while you work. The best method is to keep the stack covered with a slightly damp paper towel or a clean tea towel. Alternatively, you can use plastic wrap to cover the phyllo sheets you’re not immediately using. This simple step prevents the delicate dough from cracking and becoming unmanageable.
Begin layering the phyllo sheets into the prepared pan. Place one sheet down, then brush it lightly but evenly with melted butter. Continue this process, layering ten sheets of phyllo dough, brushing each individual sheet with butter before adding the next. This meticulous layering is what creates the signature flakiness of the baklava.
Once you have laid and buttered the tenth phyllo sheet, sprinkle about three-quarters of a cup of the prepared walnut mixture evenly over the top. This forms your first substantial layer of nutty filling. Now, continue layering another five sheets of phyllo dough, again brushing each one with butter before adding the next. After buttering the fifth sheet, sprinkle another three-quarters of a cup of the walnut mixture over it.
You will repeat this process four more times: layer five buttered phyllo sheets, then add another three-quarters of a cup of the walnut mixture. This creates the alternating layers of pastry and nuts that define the baklava’s structure. The visual progression of these layers is a satisfying part of the baking process, building towards the final pastry masterpiece.
Finally, top the entire construction with a layer of ten more phyllo sheets. Just as you did with the bottom layers, brush each of these top sheets with melted butter. Ensure the very top layer is thoroughly buttered; this will be the surface that bakes to a beautiful golden-brown crispness. The meticulous buttering throughout is paramount for achieving that desirable flaky texture and rich flavor that makes baklava so beloved.
Step 4: Cutting the Baklava
Before baking, it’s essential to cut the baklava into individual portions. Using a very sharp knife, carefully cut the assembled baklava into your desired shapes. You can choose classic diamond shapes or simple squares; either way, ensure you cut all the way through the layers, down to the bottom of the baking pan. This is a crucial step, as it allows the syrup to penetrate all the way to the base after baking.
For diamond shapes, you can first cut the baklava into four long, even rows lengthwise. Then, make diagonal cuts across these rows at an angle to create the traditional diamond pattern. Alternatively, for square shapes, simply cut straight across the baklava in even intervals. The sharpness of your knife is key here; a dull knife can tear the delicate phyllo layers, compromising the visual appeal and texture.
Take your time with this cutting process. Precision ensures that each piece will separate easily after baking and will absorb the syrup evenly. The visual appeal of neatly cut baklava is part of its charm, making it ready to serve and impress. Don’t worry if the edges look a little messy; the syrup and baking will smooth things out.
Step 5: Baking to Golden Perfection
Place the pan containing the cut baklava into the preheated oven at 325°F (160°C). Allow it to bake for approximately 55 minutes to 1 hour. The exact baking time will depend on your oven, so keep a close eye on it towards the end of the cooking period. You are looking for a beautifully golden-brown and crisp top layer.
As the baklava bakes, the butter will sizzle and seep into the phyllo layers, creating that signature crispiness. The nuts will toast slightly, releasing their wonderful aroma and flavor. The entire kitchen will soon be filled with the sweet, nutty, and buttery scent of baklava baking, a truly inviting aroma that signals a delicious treat is on its way.
Once the baklava has reached a deep golden hue and appears crisp on top, carefully remove it from the oven. At this point, the syrup you prepared earlier should be completely cool. Slowly and evenly pour the cooled syrup over the entire surface of the hot baklava. You will hear a satisfying sizzle as the syrup hits the hot pastry, and you’ll see it begin to soak into the layers. Ensure every part of the baklava, especially the edges, receives an adequate amount of syrup.
Step 6: Cooling and Resting
This is perhaps the most challenging step for eager eaters: patience. After pouring the syrup over the hot baklava, it needs to cool completely in a dry and cool place. Avoid placing it in a humid environment, as this can make the pastry soft and lose its crispness. Allow it to sit undisturbed at room temperature for at least a few hours.
For the absolute best results, however, it is highly recommended to let the baklava sit overnight before serving. This extended resting period allows the syrup to fully penetrate all the layers, from the crisp top to the very bottom. This infusion process not only softens the phyllo layers just enough to create a delightful chewiness but also melds all the flavors together into a harmonious whole. The overnight rest is what truly transforms a good baklava into an extraordinary one, ensuring each bite is perfectly soaked and incredibly delicious.
Pro Tips for baklava recipe
- Thaw Phyllo Properly: Never thaw phyllo dough on the countertop at room temperature, as it can become sticky and difficult to handle. Instead, allow it to thaw slowly in the refrigerator overnight. This gradual thawing process helps maintain the dough’s integrity and makes it much easier to work with.
- Keep Phyllo Covered: Phyllo dough dries out incredibly fast once exposed to air. As you work with it, always keep the stack of unused sheets covered with a slightly damp, not wet, paper towel or a clean tea towel. You can also use plastic wrap as an alternative, but ensure it’s sealed to prevent air from getting in.
- Butter Generously: Don’t be shy with the butter! Each individual sheet of phyllo dough needs to be brushed with melted butter. This is not the place to skimp. The butter is essential for creating the flaky, crisp layers that are characteristic of delicious baklava and adds richness to every bite.
- Sharp Knife is Key: When it’s time to cut the baklava, use a very sharp knife. This is crucial for cutting cleanly through all the layers without tearing or crushing them. A sharp knife ensures neat edges, allowing the syrup to be absorbed evenly and maintaining the beautiful appearance of the dessert.
- Cool Syrup on Hot Pastry: Always ensure your syrup is completely cooled before pouring it over the hot, freshly baked baklava. This contrast in temperatures is what creates the perfect texture – the hot pastry absorbs the cool syrup without becoming soggy, leading to that delightful balance of crisp and tender.
- Overnight Rest is Mandatory: While tempting to serve immediately, allowing the baklava to rest overnight at room temperature is non-negotiable for the best texture and flavor. This extended period allows the syrup to fully meld with the pastry and nuts, creating a cohesive and deeply flavorful dessert.
Serving Suggestions for baklava recipe
Decoration
Once your baklava has rested and is ready to be served, you can elevate its visual appeal with a few simple decorative touches. A very traditional and elegant decoration is to sprinkle a small amount of finely chopped pistachios over the top of the cooled baklava, focusing on the edges or a central pattern. The vibrant green of the pistachios offers a beautiful contrast to the golden-brown pastry.
For a more aromatic and visually appealing finish, you could lightly dust the top with a tiny bit of edible gold leaf or edible glitter, especially for special occasions. Alternatively, a light dusting of powdered sugar can give a softer, more whimsical look, though this is less common for traditional baklava.
Side Dishes
Baklava is a dessert in its own right and typically stands alone, but if you are serving it as part of a larger dessert spread or a meal, it pairs wonderfully with simple, complementary items. A small scoop of plain vanilla bean ice cream or a dollop of unsweetened whipped cream can offer a delightful contrast in temperature and texture, taming the sweetness slightly.
For a more authentic experience, consider serving it alongside a small cup of strong, unsweetened Turkish coffee or a fragrant mint tea. These beverages are often enjoyed with such rich desserts as they help to cleanse the palate and cut through the sweetness, allowing for a more balanced enjoyment of each bite of baklava.
Creative Serving Ideas
Beyond the classic squares or diamonds, consider serving baklava in slightly more unconventional ways for a modern twist. You could arrange smaller, bite-sized pieces on a tiered serving stand for an impressive buffet display. This makes it easier for guests to sample without committing to a large piece.
Another creative idea is to crumble some of the baklava over a fruit salad, particularly one featuring berries or stone fruits. The sweet, nutty, and crispy elements of the baklava can add a delightful textural contrast and a burst of flavor to fresh fruit. This turns a simple fruit salad into a more decadent and satisfying dessert.
For a truly unique presentation, you could even deconstruct the baklava slightly. Serve small pieces of crisp phyllo, a spoonful of the nut filling, and a drizzle of syrup separately on a plate, allowing guests to assemble their own perfect bite. This interactive approach can be a fun talking point and caters to individual preferences for syrup-to-pastry ratios.
Preparation & Storage
Storing Leftovers
Proper storage is key to maintaining the delightful texture of your homemade baklava. Once completely cooled, store any leftovers in an airtight container at room temperature. Avoid refrigerating baklava, as the moisture in the refrigerator can make the phyllo dough soggy and lose its signature crispness.
Baklava can typically be kept at room temperature for about 10 to 14 days. Ensure the container is well-sealed to prevent the pastry from drying out or absorbing unwanted odors from other foods. If you notice any condensation inside the container, it’s a sign that the humidity is too high, and you might want to transfer it to a drier spot.
When you are ready to enjoy the leftovers, they are often best served at room temperature. If they happen to feel a little too dry, you can very lightly mist them with a bit of water or a tiny bit more syrup, but this should be done with extreme caution to avoid sogginess. The ideal scenario is that it remains perfectly crisp from its initial resting period.
Freezing
For longer storage, baklava can be successfully frozen, but it’s best to do so before baking to retain optimal texture upon thawing and baking. Assemble the baklava completely as per the recipe instructions, but do not bake it. Once assembled and cut into portions, wrap it very tightly in several layers of plastic wrap, ensuring no air can get in.
After wrapping tightly, place the wrapped baklava into a heavy-duty freezer bag or an airtight freezer-safe container. This double protection is crucial to prevent freezer burn, which can severely affect the quality of the phyllo dough and the overall flavor. Properly frozen, unbaked baklava can be kept in the freezer for up to 3 months.
When you are ready to bake it, remove the baklava from the freezer and place it directly on the kitchen counter to thaw. Allow it to come to room temperature completely, which might take a few hours depending on the size and thickness. Once thawed, bake as directed in the recipe, keeping in mind it might take slightly longer than usual to reach the desired golden-brown crispness due to being chilled.
Reheating
If your baklava has been stored at room temperature and you find it has lost some of its crispness, or if you’ve thawed a frozen unbaked batch and are ready to bake, reheating is a straightforward process. For room-temperature baklava that has become slightly soft, you can try a very short stint in a moderate oven. Preheat your oven to around 300°F (150°C) and place the baklava on a baking sheet for about 5-10 minutes.
This gentle reheating can help to crisp up the phyllo layers again. Be very careful not to overheat, as this can burn the sugars in the syrup or dry out the pastry excessively. The goal is simply to reactivate the crispness, not to cook it further. Keep a close eye on it during this process.
If you are reheating previously baked and cooled baklava that has become slightly stale or soft, the same gentle oven method can be applied. The key is low and slow heat to draw out any excess moisture and re-crisp the delicate phyllo. For best results, always aim to serve baklava fresh or after its initial overnight rest, as reheating can sometimes alter the perfect texture achieved in the first instance.
Frequently Asked Questions
-
What is the best way to ensure my phyllo dough stays pliable and doesn’t tear while I’m assembling the baklava?
To keep your phyllo dough pliable and prevent it from tearing, the most critical step is proper thawing and constant covering. Ensure the phyllo is thawed slowly overnight in the refrigerator, not at room temperature, to maintain its moisture content and prevent stickiness. As you work, keep the stack of unused phyllo sheets covered with a slightly damp (not wet) paper towel or tea towel. This creates a humid environment that keeps the delicate sheets from drying out and becoming brittle. You can also use plastic wrap for an extra layer of protection. Work efficiently, layering and buttering each sheet before moving to the next, minimizing the time any single sheet is exposed to the air.
-
Why does my baklava sometimes turn out too soggy or not sweet enough?
Sogginess in baklava is usually due to one of two main reasons: an improperly cooled syrup or improper storage. The syrup must be completely cooled before being poured over the hot, freshly baked baklava. Pouring hot syrup onto hot pastry can cause the phyllo to steam rather than absorb the syrup correctly, leading to a mushy texture. Conversely, pouring cooled syrup onto cooled baklava won’t allow for adequate absorption. For sweetness issues, ensure you are using the correct ratio of sugar in both the filling and the syrup, and that the syrup has simmered long enough to thicken properly. Also, remember that the overnight rest is crucial; it allows the syrup to fully permeate the layers, balancing the sweetness and texture. Storing baklava in the refrigerator can also lead to sogginess due to condensation.
-
Can I substitute the walnuts in this recipe with other nuts, and what are the implications for the flavor and texture?
Absolutely, you can substitute walnuts with other nuts! Pistachios are a popular and delicious alternative, offering a vibrant color and a distinct, slightly floral sweetness that pairs wonderfully with baklava. Almonds are another excellent choice; they provide a milder, nuttier flavor and a satisfying crunch. You can also create a mix, such as combining walnuts with pecans for a deeper, richer flavor, or adding a smaller proportion of hazelnuts for complexity. When substituting, consider the moisture content and oiliness of the nuts. For instance, if using nuts that are naturally drier, you might need to add a touch more butter to the filling mixture to help bind them. The texture will vary slightly depending on the nuts chosen; for example, pistachios will provide a slightly finer texture than roughly chopped walnuts. The overall flavor profile will shift subtly, but the fundamental delightful character of baklava will remain, making it a versatile and adaptable dessert.