Ultimate Delicious Strawberry Cheesecake Bars Recipe
Sinking my fork into the cool, creamy goodness of Strawberry Cheesecake Bars always brings me back to summer picnics filled with laughter and sunshine. This recipe beautifully captures that nostalgic bliss, offering luscious layers of smooth cheesecake, juicy strawberries, and an irresistible, crunchy graham cracker crust that simply melts in your mouth.
With just a bit of preparation, these bars transform into a delightful treat that’s perfect for any gathering, a backyard BBQ, or just a cozy evening at home indulging in something truly special. Enjoying them feels like unwrapping a slice of pure happiness, leaving your taste buds thoroughly satisfied and your heart wonderfully full. Plus, they are incredibly easy to make ahead, ensuring you have a sweet delight ready for those spontaneous dessert cravings that inevitably arise!
Why You Will Love This Recipe
- Irresistibly Creamy: The luscious cheesecake filling melts in your mouth with every bite, perfectly balanced by the vibrant freshness of the strawberries for an unparalleled taste experience.
- Effortless Preparation: This recipe is meticulously designed for maximum ease, making it wonderfully accessible for both novice cooks and seasoned bakers alike, ensuring success every time.
- Versatile Base Options: Feel free to swap the classic graham cracker crust for options like oatmeal cookies or gluten-free crumbs, making this recipe incredibly adaptable to anyone’s specific taste preferences or dietary needs.
- Perfect for Any Occasion: Whether it’s a casual summer picnic, an elegant holiday gathering, or just a quiet, cozy evening at home, these bars are guaranteed to impress and bring smiles to all who try them.
- Crowd-Pleasing Delight: Their beautiful visual presentation combined with the delightful harmony of flavors makes them a universally loved treat that is sure to be a hit with guests of all ages.
Ingredients You Need
Gathering high-quality ingredients is the cornerstone of creating truly exceptional Strawberry Cheesecake Bars. The freshness and flavor of each component will significantly contribute to the overall success and deliciousness of your dessert. Using ripe, seasonal strawberries, for example, will impart a vibrant sweetness that can’t be replicated with less-than-perfect fruit.
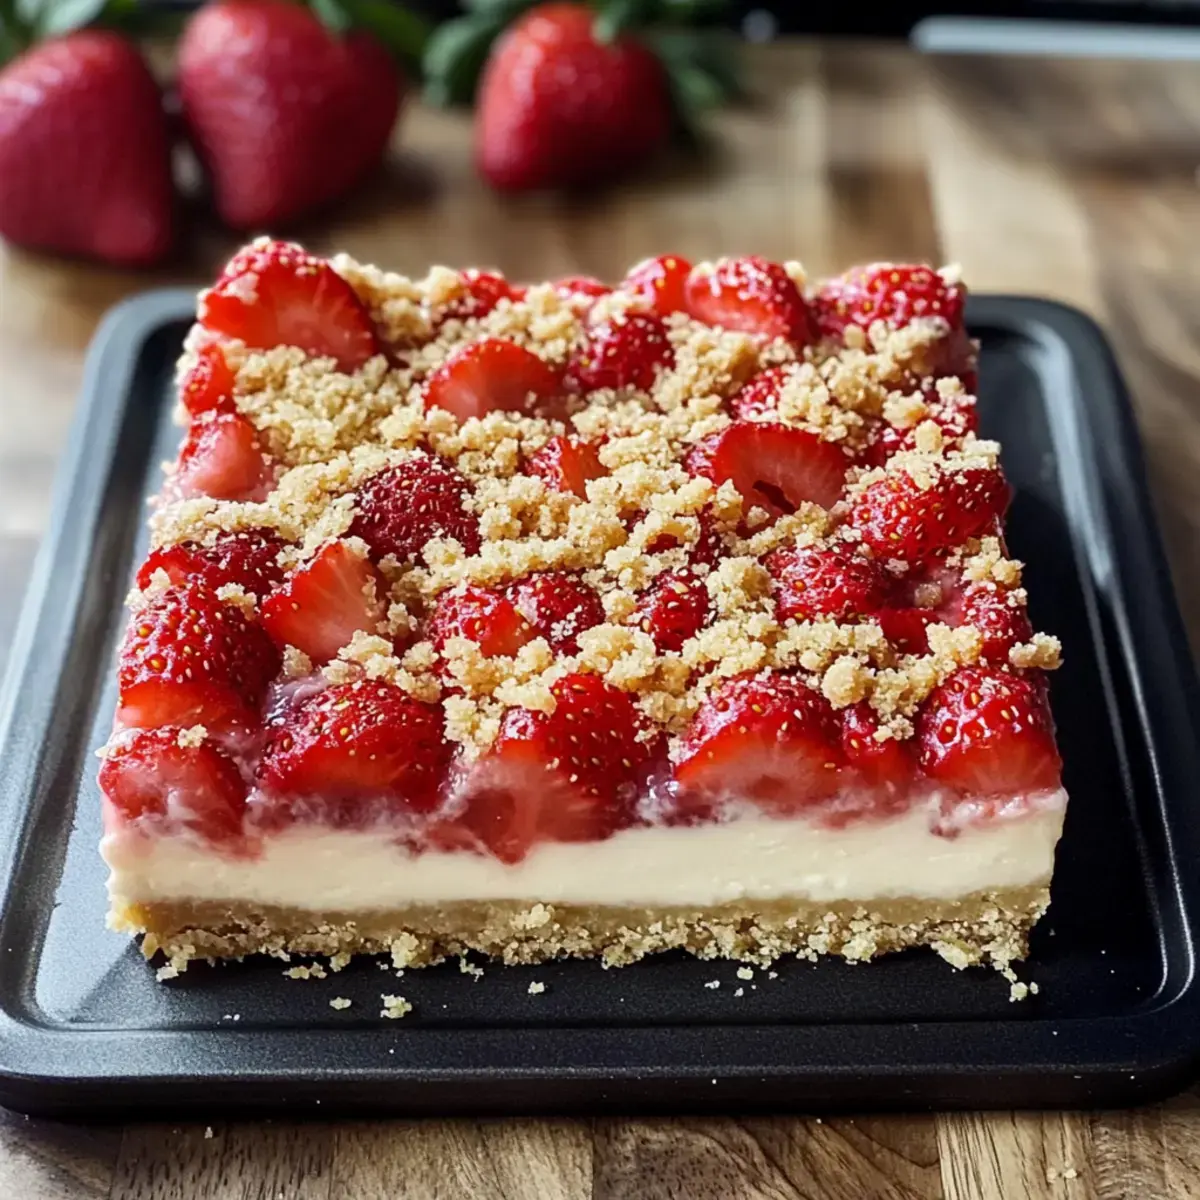
Strawberry Cheesecake Bars
Indulge in these Strawberry Cheesecake Bars that blend luscious cheesecake, fresh strawberries, and a crunchy crust, perfect for summer gatherings. This recipe captures nostalgic bliss with its luscious layers of smooth cheesecake, juicy strawberries, and an irresistible, crunchy graham cracker crust. With just a bit of prep time, these bars transform into a delightful treat that’s perfect for any gathering or just a cozy evening at home. Enjoying them feels like indulging in a slice of happiness, leaving your taste buds satisfied and your heart full. Plus, they are easy to make ahead and can be stored for those spontaneous dessert cravings!
- For the Crust:
- 1 cup Graham Cracker Crumbs (Substitute with gluten-free crumbs if needed.)
- 1/2 cup Melted Butter (Coconut oil works for a dairy-free option.)
- 1/4 cup Granulated Sugar (Can be swapped with coconut sugar for a healthier choice.)
- For the Filling:
- 16 oz Cream Cheese (Full-fat gives a richer flavor.)
- 2 large Eggs (Flax eggs can be used for a vegan alternative.)
- 1/2 cup Sugar (Adjust to taste for your ideal sweetness.)
- 1 tsp Vanilla Extract (Use pure vanilla for the best results.)
- 1/4 tsp Salt (Essential for flavor development.)
- For Topping:
- 1 cup Fresh Strawberries (Can substitute with blueberries or raspberries.)
- 1/2 cup All-Purpose Flour (Almond flour is a gluten-free option.)
- 1/4 cup Brown Sugar (Light or dark can be used based on preference.)
- 1Preheat your oven to 350°F (175°C). Line a 9x9-inch baking dish with parchment paper.
- 2Combine graham cracker crumbs, melted butter, and granulated sugar in a mixing bowl until the mixture resembles wet sand. Press the crumb mixture evenly into the base of the baking dish and bake for 10 minutes until lightly golden.
- 3Beat softened cream cheese in a large mixing bowl until smooth. Mix in eggs, sugar, vanilla extract, and salt until fully combined.
- 4Gently fold in the diced fresh strawberries into the cheesecake filling, then spread this mixture over the crust.
- 5Mix all-purpose flour, brown sugar, and a pinch of salt in a separate bowl. Pour in melted butter and stir until crumbly. Sprinkle the crumb mixture over the strawberry-filled cheesecake.
- 6Bake for 35-40 minutes. Let it cool at room temperature for about one hour, then refrigerate for at least one hour before slicing.
Keywords: Strawberry Cheesecake Bars, Cheesecake Bars, Fruit Cheesecake, Summer Dessert, Easy Dessert, Baked Cheesecake
- graham cracker crumbs: a base for a delightful crunch and texture, forming the foundation of your dessert.
- melted butter: essential for binding the crumbs together, creating a cohesive and sturdy crust.
- granulated sugar: sweetens the crust and helps it to set perfectly when baked, adding a subtle sweetness.
- cream cheese: the star of the filling, providing that signature tangy, creamy, and rich cheesecake flavor that is utterly irresistible.
- eggs: act as a binder for the cheesecake filling, ensuring it sets beautifully and has a smooth, even consistency.
- sugar (for filling): sweetens the cheesecake mixture, creating a balanced flavor profile that complements the tartness of the strawberries.
- vanilla extract: enhances the richness and depth of flavor in the cheesecake filling, adding a classic aromatic note.
- salt: a small but crucial ingredient that balances the sweetness and amplifies all the other flavors present.
- fresh strawberries: bring a burst of bright, fruity flavor and a lovely texture contrast to the creamy filling, making them the star topping.
- all-purpose flour: used to create a delicious crumble topping, adding another layer of texture and flavor.
- brown sugar: adds a warm, caramel-like sweetness to the crumble topping, enhancing its deliciousness.
The precise quantities for each of these essential ingredients can be found within the detailed recipe card, ensuring you have everything you need for baking success.
Variations
Imagine transforming these delightful Strawberry Cheesecake Bars into something uniquely yours with a few creative twists. The beauty of this recipe lies in its inherent adaptability, allowing you to cater to different dietary needs and flavor preferences with remarkable ease.
For a vibrant and wonderfully refreshing change, consider a Berry Medley variation. Instead of using just strawberries, introduce a colorful combination of blueberries, raspberries, or even a few blackberries into the cheesecake filling. This not only adds a stunning visual appeal with its mosaic of colors but also offers a more complex and nuanced fruity flavor profile that tantalizes the palate.
If you’re looking to add a touch of decadence and indulgence, a Chocolate Drizzle is an excellent choice. Once the bars have been fully baked and chilled to perfection, melt some high-quality dark or milk chocolate and artfully drizzle it over the top. This creates a rich, sophisticated finish that chocolate lovers will absolutely adore, providing a delightful contrast to the sweet and tangy cheesecake.
For those who appreciate an added layer of texture and a nutty depth of flavor, incorporating a Nutty Crunch into the crumble topping is a game-changer. Finely chopped pecans, walnuts, or even slivered almonds can be mixed into the topping ingredients before baking. This creates a wonderfully satisfying crunch with every bite, adding another dimension of enjoyment to your already delicious bars.
If you’re seeking more unique flavor profiles, perhaps you’d enjoy exploring other wonderful recipes on our site. For instance, our easy berry tart recipe offers a similar fruity delight with a different textural experience, or perhaps the funfetti cookies would satisfy a craving for something playful and celebratory.
How to Prepare Strawberry Cheesecake Bars
Step 1: Preheat the Oven and Prepare the Pan
Begin by preheating your oven to a moderate 350 degrees Fahrenheit (175 degrees Celsius). This crucial first step ensures that your oven is at the optimal temperature for baking, allowing the crust and filling to cook evenly and achieve the perfect consistency. A properly preheated oven is fundamental for successful baking, preventing undercooked centers or burnt edges.
Next, take a standard 9×9-inch baking dish and carefully line it with parchment paper. Ensure that the parchment paper extends slightly over the sides of the dish, creating a kind of sling or overhang. This thoughtful preparation makes removing the baked bars from the dish incredibly simple and clean, preventing any sticking and ensuring that your beautiful bars can be lifted out in one piece.
This initial setup provides a solid foundation for your Strawberry Cheesecake Bars and promises an effortless transition from baking to serving. The parchment paper sling will be your best friend when it comes time to slice and present your delectable creation, minimizing mess and maximizing the visual appeal of your finished product.
Step 2: Crafting the Perfect Graham Cracker Crust
In a medium-sized mixing bowl, combine the graham cracker crumbs with the melted butter and granulated sugar. Use your fingertips or a sturdy spatula to mix these ingredients thoroughly until the entire mixture resembles coarse, wet sand. The goal is to ensure that all the crumbs are evenly coated with the butter and sugar, which will help them bind together effectively.
Once the crumb mixture is well combined, carefully press it firmly and evenly into the bottom of your prepared baking dish. Using the back of a spoon or a flat-bottomed glass can help achieve a compact and uniform layer. This even pressing is vital for creating a sturdy crust that won’t crumble apart when you serve the bars.
Bake this crust in the preheated oven for approximately 10 minutes, or until it achieves a lightly golden hue. This brief baking period helps to set the crust, making it firm and less likely to become soggy. Once baked, remove it from the oven and allow it to cool slightly while you prepare the luscious cheesecake filling.
Step 3: Creating the Silky Smooth Cheesecake Filling
In a large mixing bowl, introduce your softened cream cheese. Using an electric mixer, beat the cream cheese on medium speed until it becomes incredibly smooth and creamy, with absolutely no lumps remaining. This is a critical step for achieving that signature velvety texture that makes cheesecake so beloved.
To the smooth cream cheese, gradually add the eggs, granulated sugar, pure vanilla extract, and a pinch of salt. Continue to mix on medium speed, ensuring all ingredients are thoroughly incorporated. Beat for about 2 to 3 minutes, or until the mixture is light, fluffy, and homogenous. Be careful not to overmix at this stage, as this can lead to a tougher texture in the final baked product.
The resulting filling should be a beautiful, pale yellow, with a consistency that is both rich and airy. This delightful mixture will form the heart of your Strawberry Cheesecake Bars, offering a creamy contrast to the crunchy crust that awaits.
Step 4: Introducing the Juicy Strawberry Element
Gently fold the diced fresh strawberries into the prepared cheesecake filling. Use a spatula and a light hand to incorporate them, ensuring that they are evenly distributed throughout the mixture without breaking them down too much. You want to maintain the integrity of the strawberry pieces for a delightful burst of flavor in every bite.
Carefully spread this vibrant, fruit-infused cheesecake filling evenly over the pre-baked and slightly cooled graham cracker crust. Take your time to ensure that the filling covers the entire surface of the crust without any gaps. This step is crucial for creating beautiful, uniform bars with an appealing presentation.
As you spread the filling, envision the delightful combination of textures and flavors that will emerge. The juicy strawberries nestled within the creamy cheesecake promise a truly satisfying dessert experience, setting the stage for the final layers of deliciousness.
Step 5: Assembling the Delightful Crumble Topping
In a separate, clean bowl, combine the all-purpose flour, brown sugar, and a tiny pinch of salt. Whisk these dry ingredients together briefly to ensure they are well mixed.
Pour the melted butter into the bowl with the dry ingredients. Stir with a fork or your fingers until the mixture begins to clump together and forms a crumbly, sand-like texture. This topping is what will provide a wonderful sweet crunch to the top of your Strawberry Cheesecake Bars.
Evenly sprinkle this prepared crumb mixture over the strawberry-filled cheesecake layer. Distribute it as uniformly as possible across the entire surface to ensure consistent texture and flavor in every single bar you cut later on.
Step 6: Baking Your Masterpiece to Perfection
Carefully place the assembled baking dish into the preheated oven. Bake the Strawberry Cheesecake Bars for approximately 35 to 40 minutes. During this time, the edges of the cheesecake should start to look set and slightly golden.
It’s perfectly normal for the center of the cheesecake to remain slightly jiggly when gently nudged. This slight wobble indicates that it is not overcooked, and it will firm up beautifully as the bars cool and chill in the refrigerator. Overbaking can lead to a dry and crumbly texture, so aim for that gentle jiggle.
Keep a watchful eye on the bars during the final few minutes of baking. If the topping begins to brown too quickly, you can loosely tent the dish with aluminum foil to prevent excessive browning while allowing the interior to finish cooking.
Step 7: The Crucial Cooling and Chilling Process
Once the baking time is complete, carefully remove the dish containing your Strawberry Cheesecake Bars from the oven. Allow them to cool completely on a wire rack at room temperature for about one hour. This gradual cooling is essential for the cheesecake to set properly without cracking.
After the initial cooling period, cover the baking dish tightly with plastic wrap or aluminum foil. Transfer the dish to the refrigerator and allow the bars to chill for at least one hour, though longer is often better for optimal firmness and flavor melding. Chilling allows the cheesecake to fully set and makes slicing much cleaner.
This important chilling phase allows the flavors to meld beautifully and the cheesecake to achieve its ideal creamy, firm texture. Properly chilled bars slice much more cleanly, ensuring that each serving is as visually appealing as it is delicious, and ready for you to enjoy every delightful bite.
Pro Tips for Strawberry Cheesecake Bars
Room Temperature is Key: Always ensure your cream cheese is softened to room temperature before you begin mixing the filling. This simple step is vital for achieving a luxuriously smooth and creamy texture, eliminating any pesky lumps and ensuring a homogenous mixture.
Gentle Mixing is Best: When preparing the cheesecake filling, resist the urge to overmix. Excessive beating can incorporate too much air, leading to a denser, less desirable texture in your finished bars. Aim for just combined and fluffy.
Chill for Clean Slices: Patience is a virtue when it comes to slicing! Always chill your bars thoroughly in the refrigerator for at least an hour, or even longer, before attempting to cut them. This allows the filling to set completely, resulting in perfectly clean, sharp edges on each slice.
Watch the Bake Time Closely: Ovens can be notoriously inconsistent. Keep a close eye on your bars during the final stages of baking. It’s always better to slightly underbake—a center that’s a bit jiggly will firm up as it cools—than to overbake and end up with dry bars.
Embrace Ingredient Swaps: Don’t be afraid to get creative! Feel free to experiment with different berries like blueberries or raspberries, or even a mix, for a personalized touch. You can also adapt the crust with crushed cookies or nuts to suit your taste preferences.
For more baking insights and delicious inspiration, explore our German pancake recipe for a delightful breakfast option, or delve into the rich flavors of our easy lobster bisque for a savory adventure.
Serving Suggestions for Strawberry Cheesecake Bars
Decoration
To elevate the visual appeal of your Strawberry Cheesecake Bars, consider a few elegant finishing touches. A light dusting of powdered sugar can add a delicate, snowy finish that enhances their homemade charm. Alternatively, a delicate drizzle of melted white chocolate or a rich, dark chocolate ganache can provide a beautiful contrast and an extra layer of indulgence.
For a pop of color and freshness, garnish each bar with a single fresh strawberry slice or a small mint leaf just before serving. These simple additions not only make the bars look more appealing but also hint at the delightful flavors within. A few extra berries scattered around the serving platter can create a more abundant and inviting presentation.
Side Dishes
Complementing the creamy richness of these bars with refreshing accompaniments enhances the overall dessert experience. A small scoop of tangy lemon sorbet can cut through the sweetness and richness beautifully, offering a palate-cleansing contrast. Fresh whipped cream, lightly sweetened and perhaps infused with a hint of vanilla or lemon zest, provides an extra layer of luxurious creaminess that pairs wonderfully.
Consider serving alongside a simple, crisp fruit salad featuring melon, grapes, and perhaps a few extra berries. This adds a light, refreshing element that balances the decadent nature of the cheesecake. For a beverage pairing, a glass of chilled sweet iced tea or a refreshing homemade lemonade offers a perfect counterpoint to the dessert’s sweetness, making every bite even more enjoyable.
Creative Serving Ideas
Transform your Strawberry Cheesecake Bars into a delightful dessert buffet by arranging them alongside other complementary treats. You could serve them with a selection of artisanal cheeses, allowing guests to enjoy a sweet and savory experience. Consider pairing them with crunchy almond biscotti or delicate shortbread cookies for a delightful textural contrast.
For a truly memorable presentation, serve them slightly warm by giving them a brief moment in a low oven or microwave, and top with a scoop of creamy vanilla bean or strawberry ice cream. This creates a warm-meets-cold sensation that is utterly divine. You can also present them individually on small dessert plates, perhaps with a swirl of berry coulis on the side for an elegant, restaurant-style touch.
Preparation & Storage
Storing Leftovers
Once your delectable Strawberry Cheesecake Bars have been enjoyed, storing any leftovers properly is key to maintaining their delightful texture and flavor. It’s best to keep them in an airtight container to prevent them from drying out or absorbing any unwanted odors from the refrigerator. Ensure the container is well-sealed before placing it inside.
If you plan to consume them within a few days, storing them in the refrigerator is the ideal method. They will maintain their creamy consistency and refreshing taste for up to 5 days when kept cool and sealed. For best results, let them sit at room temperature for about 10-15 minutes before serving to allow the flavors to bloom.
Freezing
For longer storage, freezing these bars is an excellent option, allowing you to enjoy them at a later date. To do this effectively, first ensure the bars are completely cooled and chilled. Then, wrap each individual bar securely in plastic wrap, making sure there are no exposed edges to prevent freezer burn.
After individually wrapping, place the wrapped bars into a freezer-safe airtight container or a heavy-duty zip-top bag. Press out as much air as possible before sealing the bag or container. Properly frozen, your Strawberry Cheesecake Bars can retain their quality for up to 2 months.
Reheating
These Strawberry Cheesecake Bars are best enjoyed chilled, as this is when their creamy texture and refreshing flavors are at their peak. Therefore, reheating is generally not recommended, as it can alter the delicate consistency of the cheesecake filling and potentially melt the crust too much.
However, if you have a particular preference for a slightly warmer dessert, you can very briefly warm them. A few seconds in a microwave (around 10-15 seconds) might be enough to slightly soften the texture, but be extremely cautious not to overheat them. The goal is a subtle warmth, not a melted mess.
Frequently Asked Questions
-
How should I select ripe strawberries for this recipe?
Absolutely! Look for strawberries that are a vibrant, bright red with a natural shine and healthy green caps attached. Avoid any berries that show signs of dark spots, mold, or a dull appearance, as these indicate they are past their prime and may lack optimal flavor. For the sweetest and most flavorful strawberries, choose those that have been allowed to reach room temperature; cold strawberries can often taste less sweet and vibrant than those that have warmed up a bit!
-
What is the best way to store leftover Strawberry Cheesecake Bars?
You can effectively store your Strawberry Cheesecake Bars in an airtight container for up to 5 days directly in the refrigerator. To ensure they maintain their luscious creaminess and prevent any drying out, make sure the container is sealed tightly. Interestingly, these bars often taste even better after spending a full day in the fridge, as the flavors have more time to meld beautifully and develop into a more complex taste profile!
-
Can I freeze Strawberry Cheesecake Bars?
Of course! Freezing is a fantastic method for preserving these delightful bars for future enjoyment. To freeze them, carefully wrap each individual bar securely in plastic wrap, and then place them into a freezer-safe container or a robust zip-top bag, ensuring minimal air exposure. When stored correctly, they can be frozen for up to 2 months. When you’re ready to indulge, simply transfer the frozen bars to the refrigerator overnight to thaw gently, and they’ll be ready to enjoy!
-
What should I do if my cheesecake filling is too thick?
If you find that your cheesecake filling is proving to be too thick during the preparation process, it might indicate that the cream cheese wasn’t sufficiently softened. For next time, try letting your cream cheese sit out at room temperature for about 30 minutes before you begin mixing it. If it still feels too thick during preparation, you can carefully add a tiny splash of milk, perhaps about a tablespoon at a time, while continuing to mix until you achieve your desired, lusciously creamy consistency. Remember to be gentle and avoid overmixing, as this can impact the final texture.
-
Is it safe to serve these bars to someone with a gluten allergy?
Yes, absolutely! Making these Strawberry Cheesecake Bars suitable for those with gluten sensitivities is quite straightforward. Simply substitute the standard graham cracker crumbs with certified gluten-free crumbs for the crust. Additionally, ensure that all other ingredients you use, such as the flour and sugar, are also clearly labeled as gluten-free. This ensures that everyone, regardless of dietary restrictions, can safely enjoy this delightful creamy dessert without any worry!
-
What’s the best way to slice the bars once they’re chilled?
For achieving the cleanest, most professional-looking cuts on your chilled bars, it’s a useful trick to use a sharp knife that has been briefly dipped in hot water and then thoroughly wiped dry. The warmth of the blade will allow it to glide smoothly through the creamy layers without dragging or smearing the filling. After each cut, it’s a good practice to re-dip and dry the knife to maintain those neat, crisp edges—after all, nobody truly enjoys a messy slice of pie or bar, right? Enjoy every perfect piece!