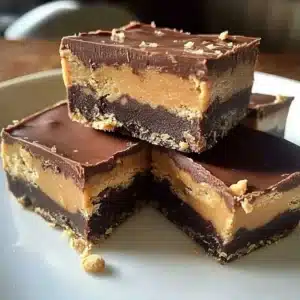
Chocolate Peanut Butter Fudge: 5 Reasons to Indulge Today

Indulging in something sweet can brighten anyone’s day, and what could be better than a rich, creamy Chocolate Peanut Butter Fudge? Imagine a dessert that combines the comforting flavors of chocolate and peanut butter into a bite-sized treat that melts in your mouth. This delightful recipe is not only delicious but also incredibly easy to make, allowing you to whip up a batch whenever a craving strikes.
This Chocolate Peanut Butter Fudge is a perfect example of how simple ingredients can create something truly magical. It’s a dessert that appeals to all ages and is guaranteed to be a hit at any gathering. Get ready to discover why this easy fudge recipe is about to become your new go-to treat for every sweet craving.
Why You Will Love This Recipe
- Decadent Flavor: The classic combination of rich chocolate and creamy peanut butter creates an irresistible taste that will have everyone asking for more.
- Effortless Preparation: This fudge requires no complicated techniques or baking, making it a perfect option for beginners or when you need a quick dessert fix.
- Versatile Treat: Whether it’s for holidays, birthdays, or just a simple afternoon pick-me-up, this fudge fits every occasion perfectly.
- Minimal Ingredients: You likely have most of the necessary ingredients in your pantry already, making it an accessible treat to whip up anytime.
- Quick Setting Time: After a few hours in the refrigerator, this delicious fudge is ready to be cut and enjoyed, satisfying your sweet tooth sooner rather than later.
Ingredients You Need
The beauty of this Chocolate Peanut Butter Fudge lies in its simplicity, requiring just a few common pantry staples. Using high-quality ingredients will elevate the flavor profile, ensuring a truly exceptional taste experience. You don’t need a long list of exotic items to create this delightful treat; the magic happens with everyday items.
Chocolate Peanut Butter Fudge
A rich and creamy dessert that combines the delightful flavors of chocolate and peanut butter into a mouthwatering fudge, perfect for any occasion.
- 1 cup creamy peanut butter
- 1 cup chocolate chips (Use semi-sweet or milk chocolate for best flavor.)
- 1/2 cup sweetened condensed milk
- 1 teaspoon vanilla extract
- 1Gather all ingredients and utensils needed for making the fudge.
- 2Line an 8x8 inch baking dish with parchment paper.
- 3In a saucepan, combine the peanut butter, chocolate chips, and sweetened condensed milk over low heat. Stir frequently until everything is melted and smooth.
- 4Remove the saucepan from heat and add the vanilla extract. Stir well to combine.
- 5Pour the melted mixture into the lined baking dish, spreading it evenly with a spatula.
- 6Refrigerate the fudge for at least 2 hours or until firm.
- 7Once the fudge is firm, lift it out of the dish using the parchment paper and cut it into squares.
- 8Serve chilled or at room temperature.
Keywords: Chocolate Peanut Butter Fudge, Easy Dessert, Fudge Recipe, indulgent treat, No-Bake Fudge
- creamy peanut butter: a smooth, velvety base that provides richness and that unmistakable nutty flavor.
- chocolate chips: semi-sweet or milk chocolate chips melt beautifully to create the core chocolate component, offering a balanced sweetness.
- sweetened condensed milk: this ingredient is key to achieving the fudge’s signature creamy texture and sweet, luscious consistency.
- vanilla extract: a touch of pure vanilla extract enhances the overall flavor, adding a warm, aromatic depth to the fudge.
Specific quantities for these essential ingredients can be found within the recipe card for precise execution.
Variations
While the classic Chocolate Peanut Butter Fudge is undeniably delicious, the possibilities for customization are truly endless. Consider adding a handful of chopped roasted peanuts to the mixture before pouring it into the pan for an extra layer of crunch and intensified peanut flavor. This simple addition transforms the texture and deepens the overall taste experience, making each bite even more satisfying.
For those seeking a more decadent experience, a swirl of caramel sauce through the fudge before it sets can add a wonderful chewy texture and a delightful caramel undertone. Alternatively, a sprinkle of flaky sea salt over the top just as it begins to firm up offers a sophisticated contrast to the sweetness, elevating the fudge to gourmet levels.
If you’re feeling adventurous, try incorporating finely chopped pretzel pieces for a salty-sweet crunch, or even a drizzle of white chocolate for a visually appealing and flavor-contrasting finish. These creative twists ensure that your Chocolate Peanut Butter Fudge remains a delightful and exciting treat, catering to a variety of palates and preferences.
Explore the world of desserts with these exciting variations, ensuring every batch of fudge is a new adventure. You can also find inspiration for other sweet treats on Pinterest, a fantastic resource for culinary inspiration.
How to Prepare Chocolate Peanut Butter Fudge
Step 1: Gathering and Preparing Your Ingredients
The journey to delicious Chocolate Peanut Butter Fudge begins with meticulous preparation. Ensure you have all your components measured out and ready to go before you start cooking. This includes the creamy peanut butter, your chosen chocolate chips, the sweetened condensed milk, and the pure vanilla extract.
Having everything pre-measured not only streamlines the cooking process but also helps prevent any last-minute rushes or potential mistakes. It allows you to focus on the melting and combining stages without interruption, ensuring a smoother, more enjoyable cooking experience. This foundational step is crucial for a perfect outcome.
The Importance of Mise en Place: In the culinary world, this preparation stage is known as ‘mise en place,’ meaning ‘everything in its place.’ For fudge, it’s especially important because the melting process happens relatively quickly, and you want to be ready to move on to the next step without delay. A well-prepared setup guarantees a well-executed fudge.
Step 2: Preparing the Baking Dish
Before you begin melting your fudge ingredients, it’s essential to prepare your baking vessel. For an 8×8 inch square baking dish, lining it with parchment paper is highly recommended. Ensure the parchment paper extends slightly up the sides of the dish, creating convenient handles for lifting the fudge out later.
This lining serves a dual purpose: it prevents the fudge from sticking to the pan, which can be a significant hassle, and it makes the entire process of removing and cutting the fudge much cleaner and easier. A well-lined dish is the secret to perfectly formed fudge pieces.
A Note on Parchment Paper: Parchment paper, also known as baking paper, is coated with silicone, making it non-stick and oven-safe. It’s a kitchen staple that simplifies many baking and candy-making tasks, including this one. Without it, you might find yourself scraping stubborn fudge residue from your pan.
Step 3: Melting the Fudge Base
In a medium saucepan, combine the creamy peanut butter, chocolate chips, and sweetened condensed milk. Place this saucepan over low heat on your stovetop. It is crucial to use low heat to prevent the chocolate from burning or the mixture from becoming grainy. You want a gentle, steady melt.
Stir the mixture continuously and patiently as it begins to melt. Use a silicone spatula or a wooden spoon to ensure all ingredients are incorporated smoothly. Continue stirring until everything is completely melted, combined, and forms a glossy, uniform, and luscious mixture. The smooth consistency is key to achieving that perfect fudge texture.
The Science of Melting Chocolate: Chocolate contains cocoa solids, cocoa butter, and sugar. When heated, the cocoa butter melts, allowing the solids to disperse. Overheating can cause the cocoa butter to separate, leading to a greasy texture, or the sugar to seize up, creating a grainy product. Low and slow heat is your best friend here.
Step 4: Incorporating the Vanilla Extract
Once your peanut butter and chocolate mixture is perfectly smooth and glossy, carefully remove the saucepan from the heat. It’s important to take it off the heat before adding the vanilla extract to preserve its delicate aroma and flavor. Adding it while too hot can cause the alcohol in the extract to evaporate too quickly, diminishing its impact.
Add the teaspoon of vanilla extract to the warm fudge mixture. Stir it in thoroughly with your spatula or spoon, ensuring it is evenly distributed throughout the entire batch. This step adds a subtle yet essential layer of flavor that complements the dominant chocolate and peanut butter notes, creating a more complex and satisfying taste.
Why Vanilla Matters: Vanilla extract acts as a flavor enhancer in many desserts. It doesn’t just add its own taste; it also amplifies and rounds out the other flavors present, making the chocolate richer and the peanut butter more pronounced. It’s a small addition with a significant impact on the final taste profile.
Step 5: Pouring and Spreading the Mixture
With the fudge mixture beautifully melted and infused with vanilla, it’s time to transfer it to its final resting place. Carefully pour the warm, luscious mixture into the prepared baking dish that you lined with parchment paper in Step 2. Use your spatula to scrape out every last bit from the saucepan; you wouldn’t want to waste any of this deliciousness.
Once poured, use your spatula to gently spread the mixture evenly across the entire surface of the dish. Aim for a smooth, flat top. This even distribution is crucial, as it ensures that when you cut the fudge into individual pieces, each square will have a consistent thickness and a beautiful presentation. A level surface guarantees uniform setting.
Achieving a Smooth Surface: To get an exceptionally smooth top, you can gently tap the baking dish on your counter a few times after spreading the fudge. This action helps to settle the mixture and eliminate any air bubbles that might have been incorporated during stirring. It’s a small trick for a more polished final product.
Step 6: The Crucial Chilling Phase
Now comes the waiting game, but it’s an essential one for achieving the perfect fudge texture. Place the baking dish containing the spread fudge into your refrigerator. You need to let it chill for a minimum of two hours, or until it is completely firm to the touch. Patience is key during this stage.
This chilling period allows the fats from the chocolate and peanut butter to solidify, transforming the pourable mixture into a firm, sliceable confection. Rushing this step will result in soft, crumbly fudge that is difficult to handle and serve. The refrigerator provides the ideal cool, consistent environment for proper setting.
The Science of Setting Fudge: Fudge sets because as it cools, the sugar crystals that were dissolved in the liquid begin to recrystallize. In this recipe, the combination of fats from peanut butter and chocolate, along with the sugar in the condensed milk, creates a matrix that solidifies upon chilling. This controlled cooling process is what gives fudge its characteristic firm yet melt-in-your-mouth texture.
Step 7: Cutting the Fudge into Servings
Once your Chocolate Peanut Butter Fudge has reached the desired firmness, it’s time to transform it into bite-sized treats. Carefully lift the entire slab of fudge out of the baking dish using the extended parchment paper edges as handles. Place this slab onto a clean cutting board or a flat surface.
Using a sharp knife, cut the fudge into your desired serving sizes. Squares are traditional, but rectangles or even small diamonds are also perfectly acceptable. For the cleanest cuts, you can slightly warm your knife blade under hot water and wipe it dry between each cut, ensuring precise edges and a professional appearance.
Tips for Neat Cuts: If your fudge is very firm, a sharp, heavy knife will work best. For exceptionally clean cuts, consider using a bench scraper or a pizza cutter, especially if making a large batch. Wiping the blade clean after each cut removes any adhering fudge, preventing messy edges and ensuring each piece is distinct.
Step 8: Serving and Enjoying Your Creation
Your delicious homemade Chocolate Peanut Butter Fudge is now ready to be savored! You can serve it chilled, directly from the refrigerator, which provides a firmer texture, or allow it to sit at room temperature for about 15-20 minutes for a slightly softer, creamier consistency. Both serving temperatures offer a delightful eating experience.
Arrange the fudge pieces on a platter or serve them individually. They make a wonderful accompaniment to coffee or tea, a delightful addition to a dessert spread, or simply a perfect standalone treat to satisfy any sweet craving. Share them with friends and family, or keep them all to yourself – we won’t judge!
The Ultimate Reward: The satisfaction of creating something so delicious from scratch is immense. Take a moment to appreciate the rich flavors and creamy texture you’ve achieved. This is more than just a dessert; it’s a little piece of edible happiness you’ve brought into existence. Enjoy every single bite of your homemade masterpiece!
Pro Tips for Chocolate Peanut Butter Fudge
Use High-Quality Ingredients: The flavor of your fudge will directly reflect the quality of the ingredients you use. Opt for good quality peanut butter and chocolate chips; it makes a noticeable difference in the final taste and texture. High-quality chocolate will melt more smoothly and impart a richer flavor than cheaper alternatives.
Don’t Overheat: When melting the peanut butter, chocolate, and condensed milk, use low heat and stir constantly. Overheating can cause the chocolate to seize, become grainy, or even burn, ruining the smooth texture of your fudge. Gentle heat ensures a velvety finish.
Ensure Complete Setting: Resist the urge to cut the fudge before it’s fully set. Insufficient chilling time will result in soft, messy fudge that crumbles when you try to cut it. Allow at least two hours, or even longer if your refrigerator is less cold, to ensure a firm, sliceable consistency.
Storage is Key: Store your finished fudge in an airtight container to keep it fresh. If left uncovered, it can absorb odors from the refrigerator or dry out, compromising its texture and flavor. Proper storage extends its deliciousness significantly.
Consider a Pinch of Salt: If your peanut butter is unsalted, adding a small pinch of salt to the mixture can enhance the overall flavor profile. Salt balances the sweetness and brings out the richness of both the chocolate and peanut butter. It’s a small addition that makes a big difference.
Serving Suggestions for Chocolate Peanut Butter Fudge
Decoration
Elevate your Chocolate Peanut Butter Fudge with simple yet elegant decorations. A light sprinkle of flaky sea salt just before the fudge sets can create a beautiful contrast and a sophisticated flavor profile. You could also add a few mini chocolate chips on top for visual appeal and an extra burst of chocolatey goodness.
For a more festive look, consider drizzling melted white chocolate over the top in a zigzag pattern once the fudge has slightly firmed up. This adds a beautiful visual element and a complementary flavor. Chopped roasted peanuts sprinkled on top also provide a lovely textural contrast and reinforce the peanut butter flavor.
Edible Glitter: For special occasions or a touch of whimsy, a very light dusting of edible glitter can add a magical sparkle to your fudge. Ensure it’s food-grade and use it sparingly to maintain the fudge’s delicious appeal without overwhelming its appearance.
Side Dishes
While Chocolate Peanut Butter Fudge is a standalone delight, it pairs wonderfully with certain accompaniments. A steaming mug of freshly brewed coffee or a classic cup of hot tea makes for a perfect comforting pairing, cutting through the richness of the fudge. The warmth of the beverage enhances the cozy dessert experience.
Fresh fruit can offer a refreshing counterpoint to the sweet, dense fudge. Sliced strawberries, raspberries, or even banana slices provide a bright, fruity contrast that cleanses the palate between bites. This combination offers a balanced dessert experience.
Ice Cream Companions: For the ultimate indulgence, serve a piece of this rich fudge alongside a scoop of creamy vanilla or even a contrasting chocolate ice cream. The combination of warm, dense fudge with cold, smooth ice cream is a classic dessert pairing that never disappoints.
Creative Serving Ideas
Think beyond just serving squares! For a party setting, cut the fudge into smaller, bite-sized pieces and arrange them artfully on a tiered stand. This makes them easy for guests to grab and mingle with. You can also serve them in mini cupcake liners for an individual, elegant presentation.
Consider using cookie cutters to create fun shapes if you have a particularly firm batch. Stars, hearts, or even simple rounds can add a playful touch, especially if serving to children. This also allows for creative arrangements on a dessert platter.
Fudge Truffles: If your fudge is exceptionally firm, you can even roll it into small balls and coat them in cocoa powder, chopped nuts, or extra mini chocolate chips to create elegant fudge truffles. This transforms the fudge into a more sophisticated petit four, perfect for gifting or special occasions.
Preparation & Storage
Storing Leftovers
Proper storage is crucial for maintaining the delicious texture and flavor of your Chocolate Peanut Butter Fudge. Once the fudge has been cut into portions, transfer it to an airtight container. Ensure the container is sealed tightly to prevent air from reaching the fudge, which can lead to staleness or the absorption of unwanted refrigerator odors.
You can store the fudge at room temperature if you plan to consume it within a day or two, especially in cooler climates. However, for optimal freshness and to prevent any softening, refrigerating it is the best practice. This ensures it retains its delightful firmness for longer periods.
A Note on Humidity: In humid environments, it’s even more important to use a truly airtight container. Moisture in the air can also affect the texture of fudge, potentially making it sticky or soft, so a good seal is your best defense.
Freezing
For long-term storage, freezing is an excellent option to preserve the quality of your Chocolate Peanut Butter Fudge. Ensure the fudge is completely set and cut into individual pieces before freezing. Wrap each piece tightly in plastic wrap, then place the wrapped pieces into a freezer-safe airtight container or a heavy-duty freezer bag.
Properly wrapped, your fudge can maintain its delicious quality for up to three months in the freezer. This allows you to make a large batch and have a ready supply of this delectable treat for future cravings or unexpected guests. Freezing is a great way to ensure you never run out.
Preventing Freezer Burn: The key to successful freezing is minimizing air exposure. Double-wrapping the fudge in plastic wrap and then placing it in a well-sealed container significantly reduces the risk of freezer burn, which can dry out the fudge and affect its taste.
Reheating
If you’ve frozen your Chocolate Peanut Butter Fudge, the best method for thawing is to simply transfer the wrapped fudge from the freezer to the refrigerator. Let it thaw overnight. This gradual thawing process helps the fudge retain its texture and prevents condensation from forming too quickly, which could make it soft.
Once thawed, you can enjoy the fudge as is. If you prefer a slightly softer consistency, you can briefly warm it. Place a piece of fudge on a microwave-safe plate and microwave on the lowest power setting for just 5-10 second intervals. Be extremely careful not to overheat, as it will melt very quickly.
Testing for Softness: After a short microwave burst, test the fudge with your finger. You want it to be just slightly softened, not liquid. It should still feel firm to the touch but have a bit more pliability. This brief warming is ideal for those who prefer a melt-in-your-mouth texture.
Frequently Asked Questions
-
Can I prepare it ahead of time?
Absolutely! Chocolate Peanut Butter Fudge is an excellent make-ahead dessert. You can prepare it up to 2-3 days in advance and store it in an airtight container in the refrigerator. This makes it a convenient option for parties or busy weeks when you need a treat ready to go.
-
Can I freeze it?
Yes, you can definitely freeze Chocolate Peanut Butter Fudge for longer storage. Wrap individual pieces tightly in plastic wrap and then place them in a freezer-safe airtight container or bag. Properly stored, it can last in the freezer for up to three months without significant loss of quality. This is perfect for stocking up on your favorite homemade treat.
-
How long does it last?
When stored correctly in an airtight container in the refrigerator, Chocolate Peanut Butter Fudge typically stays fresh and delicious for about one week. The cool environment helps maintain its firm texture and rich flavor, making it a consistently enjoyable treat throughout its storage period. Ensure the container is well-sealed to prevent it from drying out or picking up other food smells.