Apple Cinnamon Crepes Vegan Gluten Free: 7 Comforting Ways
When you think of comfort food, what’s the first dish that comes to mind? For many, it’s a warm, delightful crepe filled with sweet apples and a sprinkle of cinnamon. Imagine sinking your fork into a light, fluffy crepe, bursting with the fresh flavors of apples, all while being completely vegan and gluten-free!
What makes this recipe truly special is its simplicity. Using just a handful of wholesome ingredients, you can whip up a batch of these delightful crepes in no time. If you’re looking for an easy breakfast option, a cozy dessert, or a lovely brunch dish, look no further. The combination of almond milk and gluten-free flour provides the perfect canvas for the warm, cinnamon-spiced apples that are sautéed to perfection.
Why You Will Love This Recipe
- Flavorful Fusion: The sweet, tangy apples paired with warm cinnamon are a match made in heaven, creating a symphony of comforting tastes in every bite.
- Simplicity Itself: The step-by-step process makes it incredibly easy for even beginner cooks to master, ensuring a delightful outcome every time.
- Versatile Filling: Customize the apple filling with additions like chopped walnuts, plump raisins, or a hint of ginger to suit your personal preference.
- Family-Friendly Appeal: This recipe is perfect for all ages, making it an ideal and inclusive choice for any family breakfast or weekend treat.
- Quick to Prepare: You can whip these delicious crepes up in under 30 minutes, making them a perfect solution for busy mornings or spontaneous cravings.
Ingredients You Need
Selecting the finest ingredients is key to achieving the perfect texture and taste in your Apple Cinnamon Crepes. The gluten-free flour blend provides the essential structure, ensuring your crepes hold together beautifully, while the choice of almond milk contributes to a wonderfully light and airy batter. Each component, from the sweet maple syrup to the aromatic cinnamon, is carefully chosen to create a harmonious and satisfying dish that is both comforting and indulgent.
Apple Cinnamon Crepes (Vegan & Gluten-Free)

Delicious, warm crepes filled with sautéed apples and cinnamon, perfect for breakfast or dessert, suitable for vegan and gluten-free diets. These crepes offer a comforting and nostalgic taste with a modern, dietary-conscious twist.
- For the crepes:
- 1 cup gluten-free flour
- 1.5 cups almond milk (Can substitute with oat or coconut milk)
- 1 tbsp maple syrup
- 1 tsp vanilla extract
- 0.5 tsp cinnamon
- 0.25 tsp salt
- 1 tbsp coconut oil (For cooking)
- For the filling:
- 2 apples, peeled and sliced (Any variety of apples can be used)
- 2 tbsp brown sugar (For sautéing apples)
- 1Preparation: Gather all your ingredients. Peel and slice the apples into thin wedges.
- 2Mix the Batter: In a clean bowl, whisk together gluten-free flour, almond milk, maple syrup, vanilla extract, cinnamon, and salt until smooth and free of lumps.
- 3Cook the Crepes: Preheat a non-stick skillet over medium heat and add a small amount of coconut oil. Pour a ladle of batter into the skillet, swirling to spread evenly. Cook for 2-3 minutes until edges lift. Flip the crepe using a spatula and cook for an additional 1-2 minutes until golden brown. Repeat with remaining batter.
- 4Sauté the Apples: In a separate pan, melt coconut oil over medium heat and add the sliced apples with brown sugar. Sauté until soft and caramelized, about 5-7 minutes.
- 5Assemble and Serve: Take a crepe, spoon sautéed apples in the center, and fold over the filling. Serve warm, optionally drizzled with maple syrup or dusted with powdered sugar.
Keywords: Apple Cinnamon Crepes, Comfort Food, Gluten-Free Breakfast, Healthy Dessert, Vegan Crepes
- gluten-free flour: the base for your crepes, ensuring a delicate yet sturdy texture that holds the delicious filling.
- almond milk: provides a creamy liquid component that keeps the batter light and dairy-free, contributing to the crepes’ soft consistency.
- maple syrup: adds a natural sweetness to the crepe batter, complementing the spiced apple filling without being overpowering.
- vanilla extract: enhances the overall flavor profile, adding a warm, aromatic depth to each bite.
- cinnamon: the quintessential spice for this recipe, infusing the crepes with its cozy and comforting essence.
- salt: a small pinch that balances the sweetness and brings out the other flavors in the batter.
- apples: the star of the filling, providing a sweet and slightly tart contrast to the tender crepes.
- coconut oil: used for cooking the crepes and sautéing the apples, it adds a subtle richness and prevents sticking.
- brown sugar: caramelizes with the apples, creating a rich, sweet, and slightly gooey filling that elevates the entire dish.
The precise quantities for these delightful ingredients can be found within the recipe card above, ready for your culinary adventure.
Variations
Exploring different flavor profiles can transform these Apple Cinnamon Crepes into entirely new delightful experiences. Consider a **Berry Bliss Variation**, where you gently fold a handful of fresh or frozen mixed berries into the warm apple filling just before serving. This adds a vibrant burst of tartness and a beautiful array of colors, making each bite a celebration of seasonal flavors.
For a richer, more indulgent treat, try the **Chocolate Hazelnut Dream Variation**. Instead of apple filling, spread a generous layer of your favorite vegan hazelnut chocolate spread onto the warm crepes. Top with a sprinkle of toasted chopped hazelnuts and perhaps a few fresh raspberries for a decadent dessert that feels truly special and satisfying.
If you’re leaning towards a more savory profile, the **Savory Herb and Mushroom Variation** offers an exciting alternative. Omit the sweet spices from the crepe batter and instead incorporate a pinch of nutritional yeast and finely chopped fresh herbs like chives or parsley. The filling could then be a mix of sautéed mushrooms, spinach, and a hint of garlic, creating a sophisticated and unexpected crepe that works wonderfully as a light lunch or appetizer. These variations demonstrate how versatile the humble crepe can be.
How to Prepare Apple Cinnamon Crepes Vegan Gluten Free
Step 1: Preparing the Apple Filling
Begin by selecting two medium-sized apples, ensuring they are ripe and firm for the best texture when cooked. You can opt for a sweeter variety like Fuji or Gala, or a slightly tarter one such as Granny Smith for a delightful contrast. Carefully peel the apples using a vegetable peeler, then slice them into thin, uniform wedges. The goal is to have pieces that are about 1/4 inch thick, which will allow them to cook evenly and become tender.
Once the apples are sliced, set them aside in a bowl. This initial preparation ensures that the apples are ready to go once the crepe batter is made. Having them prepped and waiting means you can move seamlessly to the cooking stage, minimizing any potential downtime that could affect the crepe’s texture or temperature.
The next crucial part of preparing the filling is to sauté these apple slices to perfection. In a separate non-stick skillet, melt 1 tablespoon of coconut oil over medium heat. Once the oil is shimmering and warm, carefully add the prepared apple slices to the pan. Sprinkle them evenly with 2 tablespoons of brown sugar, which will help them caramelize beautifully. Stir the apples gently to coat them with the sugar and oil.
Allow the apples to cook for approximately 5 to 7 minutes, stirring occasionally. You are looking for them to become tender and slightly softened, with a beautiful caramelized glaze forming around them. The brown sugar will melt and create a luscious coating that intensifies the natural sweetness of the apples and adds a wonderful depth of flavor. Be careful not to overcook them, as you want them to retain some slight bite rather than turn to mush.
As the apples cook, the kitchen will fill with a warm, inviting aroma of cinnamon and caramelized fruit. This step is essential for developing the rich, sweet, and slightly tart flavor that is characteristic of this dish. The gentle cooking process breaks down some of the apple fibers, making them incredibly succulent and a perfect complement to the delicate crepes.
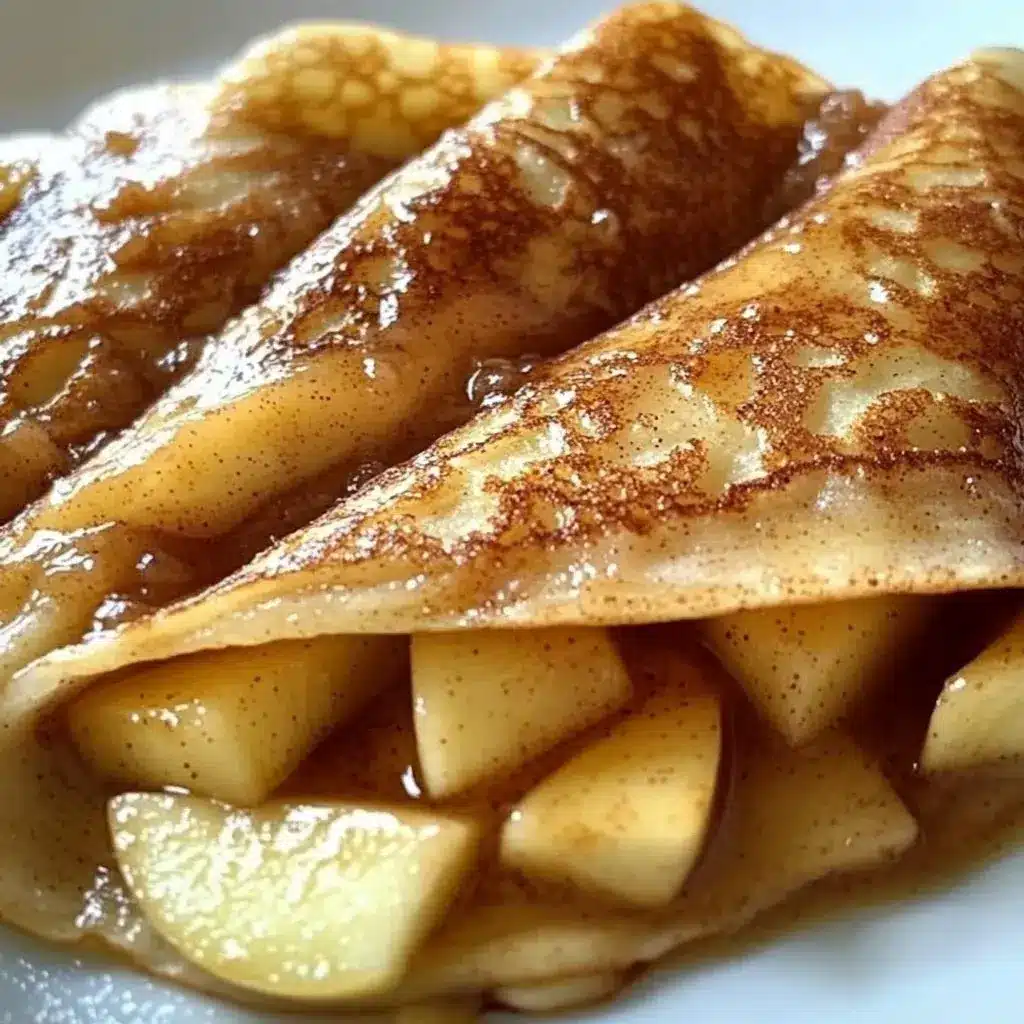
Once the apples have reached the desired tenderness and have a lovely caramelized sheen, remove the skillet from the heat. You can add an extra pinch of cinnamon at this stage if you desire a more intense spiced flavor. The filling should be slightly saucy from the melted sugar and apple juices, which will create a beautiful glaze when folded into the crepes. This prepared apple filling is now ready to be used to generously stuff your freshly made crepes.
Step 2: Mixing the Crepe Batter
In a medium-sized mixing bowl, combine the primary dry ingredients for the crepe batter. Start with 1 cup of gluten-free flour, ensuring it’s a good quality blend designed for baking to avoid grittiness. Add 1/2 teaspoon of ground cinnamon to this flour, along with 1/4 teaspoon of salt. Whisk these dry ingredients together thoroughly to ensure the cinnamon and salt are evenly distributed throughout the flour.
This initial dry mix is important for creating an even base for your batter. It helps prevent any clumps of spice or salt from forming and ensures consistent flavor in every crepe. A well-combined dry mixture contributes to a smoother batter and ultimately, a more consistent final product.
Next, gradually incorporate the wet ingredients into the dry mixture. Pour in 1 1/2 cups of unsweetened almond milk. You can substitute this with oat milk or coconut milk if you have allergies or simply prefer a different flavor profile. Add 1 tablespoon of maple syrup for a touch of natural sweetness and 1 teaspoon of vanilla extract for that essential warm aroma and depth of flavor.
Begin whisking the mixture gently. It is crucial not to overmix the batter at this stage. Overmixing gluten-free batters can sometimes lead to a tougher texture, whereas a gentle approach encourages a tender crepe. Continue whisking until you achieve a smooth, lump-free consistency, similar to that of thin cream or heavy whipping cream. If the batter seems too thick, you can add a tablespoon or two more of almond milk until it reaches your desired pourable consistency.
The ideal batter consistency is key for creating thin, even crepes. If it’s too thick, the crepes will be dense and difficult to spread thinly in the pan. If it’s too thin, they might become fragile and tear easily when flipping. Aim for a batter that coats the back of a spoon lightly and drizzles off easily.
Once the batter is perfectly smooth, let it rest for about 10 to 15 minutes. This resting period is particularly beneficial for gluten-free batters, as it allows the starches in the flour to fully hydrate. This hydration step helps to develop a better texture, making the crepes more tender and less prone to breaking during cooking and folding. Covering the bowl with a clean kitchen towel or plastic wrap while it rests is a good practice.
This resting time is also an opportunity to ensure your skillet is properly heated for cooking. Having the batter ready and rested means you can move directly to the cooking phase once the pan is at the optimal temperature, leading to a more efficient and enjoyable cooking experience. The batter should be a beautiful, pale golden hue and have a smooth, fluid consistency.
Step 3: Heating the Skillet and Cooking the First Crepe
Select a good quality non-stick skillet for this process; a well-seasoned cast iron skillet can also work if you’re confident in its non-stick properties. Place the skillet over medium heat. It’s important to achieve the right temperature before you add any batter; too cool and the crepe will stick and be difficult to flip, too hot and it will burn before cooking through.
To test if the skillet is ready, you can sprinkle a tiny drop of water onto the surface. If it sizzles and evaporates quickly, the pan is likely at the correct temperature. Alternatively, a small piece of butter or oil should shimmer but not smoke when added to the pan. Getting this initial heat right is fundamental to crepe success.
Once the skillet has reached the optimal temperature, add a small amount of coconut oil. You only need about 1 teaspoon of coconut oil to adequately grease the bottom of the pan for the first crepe. Swirl the pan gently to ensure the oil coats the entire cooking surface evenly. This thin layer of oil acts as a lubricant, preventing the delicate crepe batter from adhering to the pan.
If your non-stick skillet is truly excellent, you might even get away with using less oil, but it’s always a good idea to have a little to ensure a smooth release. The oil should be hot but not smoking. Once the oil is evenly distributed, it’s time to add the batter. Ensure the batter is well-stirred after its resting period, as gluten-free flours can sometimes settle at the bottom.
Using a ladle, pour approximately 1/4 cup of the prepared crepe batter into the center of the hot, greased skillet. Immediately after pouring, quickly lift the skillet and tilt and swirl it in a circular motion. The goal is to spread the batter thinly and evenly across the entire bottom surface of the pan. This swirling action is crucial for achieving those characteristic thin, delicate crepes.
Continue swirling until the batter forms a thin, uniform layer that covers the base of the skillet. If there are any small gaps or thick spots, you can gently use a spatula to even them out before the batter sets. The batter will start to cook almost immediately upon contact with the hot pan. You should begin to see small bubbles forming on the surface of the crepe.
Allow the crepe to cook undisturbed for about 2 to 3 minutes. During this time, the edges of the crepe will start to look dry and may even lift slightly away from the sides of the pan. The surface will change from wet and shiny to dull and opaque. This indicates that the crepe is nearly ready to be flipped. Peeking underneath with a thin spatula can help you gauge its browning.
Once the edges appear set and slightly golden, and the surface is no longer wet, it’s time for the flip. Carefully slide a thin, flexible spatula underneath the entire crepe. It’s important to get the spatula as far under as possible to support the crepe.
Step 4: Flipping and Cooking the Second Side
With the spatula securely positioned beneath the cooked crepe, execute a swift and confident flip. This motion requires a little practice, but the key is to be decisive. Lift the crepe with the spatula and quickly invert it over the pan. The cooked side should be a beautiful, pale golden brown. If the crepe breaks, don’t worry; it happens to the best of us, especially with gluten-free variations, and it will still taste delicious.
Once flipped, allow the second side of the crepe to cook. This side usually cooks much faster than the first, typically taking only about 1 to 2 minutes. The goal here is to lightly brown the second side and ensure the center is fully cooked through. You don’t want to overcook it, as this can make the crepe dry and brittle.
While the second side is cooking, you can begin to prepare for the next crepe. If your skillet seems dry, add another tiny amount of coconut oil, just enough to lightly coat the surface again. This ensures that each crepe releases easily from the pan.
Once the second side of the crepe has achieved a light golden hue, it’s ready to be removed from the skillet. Use your spatula to gently lift the crepe from the pan and place it onto a plate. You can then begin the process of filling and folding this crepe, or set it aside with the first one if you plan to make a stack.
Continue this process for the remaining batter. For each new crepe, ensure the skillet is lightly greased and at the correct medium heat. Pour about 1/4 cup of batter, swirl to coat the pan thinly, and cook for 2-3 minutes, then flip and cook for another 1-2 minutes. The consistency of the batter may change slightly as you work through it, so don’t hesitate to add a touch more almond milk if it thickens too much between crepes.
Stacking the cooked crepes on top of each other as you make them helps to keep them warm and pliable. The residual heat from the freshly cooked crepe will gently steam the ones underneath, preventing them from becoming dry or stiff. If you’re making a large batch, you can keep the stack covered with a clean kitchen towel or a large piece of foil to maintain their warmth and softness.
Pay attention to the cooking time for each crepe. The first one is often a test run to gauge your heat and batter consistency. Subsequent crepes may cook slightly faster or slower depending on how the pan temperature fluctuates. The key is to aim for a delicate, tender crepe with a lightly golden exterior on both sides. The aroma of warm crepes will undoubtedly fill your kitchen, signaling a delightful treat is on its way.
Step 5: Assembling and Filling the Crepes
With your crepes beautifully cooked and stacked, it’s time to bring them all together with the delicious apple filling. Take one warm crepe from the stack. If they have cooled slightly, you can briefly warm them in a microwave for 15-20 seconds, or in a very low oven for a minute or two, to ensure they are pliable and easy to fold.
Lay the crepe flat on a clean plate or a clean work surface. Spoon a generous portion of the sautéed cinnamon-spiced apples onto the center of the crepe. Don’t overfill it, as this can make folding difficult and lead to the filling spilling out. A good rule of thumb is to use about 2 to 3 tablespoons of the apple mixture per crepe.
Carefully fold the crepe. You can do this by folding it in half, creating a semi-circle, and then folding it in half again to form a triangle. Alternatively, you can fold in the sides of the crepe towards the center, then roll it up from the bottom, creating a neat wrap. The folding method is largely a matter of personal preference and how you intend to serve the crepes.
Ensure the filling is well-contained within the folded crepe. The warmth of the crepe will help the edges to stick slightly, keeping the filling securely inside. The texture of the warm crepe should be soft and yielding, making it easy to fold without tearing. If you encounter any small tears, don’t be concerned, as the filling will help to hold it together.
Repeat this filling and folding process for all the crepes you have made. As you finish each crepe, you can place it back onto the serving plate, arranging them attractively. If you are serving them immediately, you can stack them slightly or arrange them side-by-side.
The sight of the golden crepes, neatly folded and cradling the glistening, caramelized apples, is incredibly appealing. The aroma of cinnamon, apple, and vanilla is truly inviting and promises a delightful culinary experience. This step is where the individual components of the recipe come together to create the final, comforting dish.
For an extra touch of indulgence, you might consider adding a small drizzle of additional maple syrup over the filled crepes just before serving. A light dusting of powdered sugar or a sprinkle of chopped nuts like pecans or walnuts can also elevate the presentation and add textural contrast. This final assembly stage is where your culinary artistry truly shines, transforming simple ingredients into a delectable treat.
Step 6: Serving and Enjoying
Serve the Apple Cinnamon Crepes immediately while they are warm. The warmth is essential for enjoying the full flavor and texture of both the crepes and the apple filling. Warm crepes are soft and tender, and the heat allows the spices in the apples to release their full aromatic potential.
Present them beautifully on a plate. You can arrange them in a fan shape, stack them slightly, or serve them individually. The visual appeal of the golden crepes filled with glistening apples is already quite inviting. The simple act of serving them warm enhances their comforting nature.
To further enhance the dining experience, consider offering optional toppings. A dollop of vegan whipped cream or a swirl of dairy-free yogurt can add a creamy richness. A little extra drizzle of maple syrup is always welcome for those who enjoy a sweeter finish. Chopped toasted nuts, such as pecans or walnuts, provide a delightful crunch that contrasts beautifully with the soft crepes and tender apples.
This dish is perfect for a leisurely breakfast, a delightful brunch, or even as a cozy dessert after a meal. The comforting combination of flavors and textures makes it suitable for various occasions. Imagine enjoying these warm crepes on a cool morning with a cup of coffee or tea, or as a special treat on a weekend afternoon. They bring a sense of warmth and homeliness to any table.
The joy of this recipe lies not only in its delicious taste but also in its adaptability. Whether enjoyed simply as they are or adorned with various toppings, these Apple Cinnamon Crepes are sure to bring smiles and satisfaction. They are a testament to how simple, wholesome ingredients can be transformed into something truly special and comforting, catering to diverse dietary needs without compromising on flavor or enjoyment.
Pro Tips for Apple Cinnamon Crepes Vegan Gluten Free
Achieve the Perfect Batter Consistency: The ideal crepe batter should be thin and pourable, similar to heavy cream. If it’s too thick, your crepes will be dense. Add almond milk a tablespoon at a time until you reach the right consistency. Gluten-free flours can absorb liquid differently, so this adjustment is key.
Master the Skillet Heat: Medium heat is your best friend when making crepes. Too low and they won’t cook properly; too high and they’ll burn before they cook through. A properly preheated non-stick skillet is crucial for easy release and even cooking. Test your heat with a tiny drop of batter; it should sizzle immediately.
Don’t Overcrowd the Pan: Use just enough batter to thinly coat the bottom of the skillet when swirled. A ladleful of about 1/4 cup is usually sufficient for a standard 8-10 inch pan. Spreading the batter thinly is what creates those delicate, light crepes.
Embrace the Flip: The flip is often the most intimidating part, but patience and a good, thin spatula are key. Ensure the edges are set and the surface is no longer wet before attempting to slide the spatula underneath. A confident, swift flip prevents tearing.
Keep Them Warm: As you cook each crepe, stack them on a plate. The residual heat from the freshly cooked crepes will keep the ones underneath warm and pliable. Covering the stack with a clean kitchen towel or a piece of foil further helps maintain their softness until serving.
Serving Suggestions for Apple Cinnamon Crepes Vegan Gluten Free
Decoration
Elevate the visual appeal of your Apple Cinnamon Crepes with simple yet elegant decorations. A light dusting of powdered sugar across the top of the folded crepes mimics a fresh snowfall, adding a touch of whimsy. For a more natural touch, sprinkle a few fresh berries, like raspberries or blueberries, around the plate. A delicate drizzle of vegan caramel sauce, artfully traced over the crepes, adds a gourmet flair and a touch of visual richness.
Side Dishes
Complement the sweet flavor of the crepes with a variety of complementary side dishes. A small bowl of plain or vanilla-flavored vegan yogurt provides a refreshing tang that cuts through the sweetness. A handful of toasted chopped nuts, such as pecans or almonds, offers a delightful crunch and added texture. For a lighter option, a simple side salad with a light vinaigrette can balance the richness.
Creative Serving Ideas
Think beyond the traditional fold. For a more playful presentation, roll the crepes up like little scrolls and arrange them vertically on a platter. You could also create a “crepe tower” by layering filled crepes with a little vegan whipped cream or a dollop of apple compote between each layer. Consider serving them alongside a warm mug of spiced apple cider or a refreshing glass of freshly squeezed orange juice for a complete breakfast or brunch experience.
Preparation & Storage
Storing Leftovers
To store any leftover Apple Cinnamon Crepes, allow them to cool completely to room temperature first. Once cooled, place them in an airtight container. You can layer them with parchment paper between each crepe to prevent them from sticking together. Store the container in the refrigerator for up to 3 days. They will retain their flavor and most of their texture.
Freezing
For longer storage, freezing is an excellent option. After the crepes have cooled completely, place a piece of parchment paper on each crepe. Stack them, then wrap the entire stack tightly in plastic wrap, followed by a layer of aluminum foil, or place them in a freezer-safe bag. Properly frozen crepes can be stored for up to 1 month. This method ensures they maintain their quality.
Reheating
Reheating crepes is a straightforward process that brings them back to their delicious, warm state. If refrigerated, gently reheat them in a non-stick skillet over low heat for a minute or two per side, or in a microwave for about 20-30 seconds until warm. If reheating from frozen, thaw them overnight in the refrigerator first, then follow the same reheating methods. Alternatively, you can warm them in a preheated oven at 350°F (175°C) for about 10 minutes, wrapped in foil to retain moisture.
Frequently Asked Questions
-
Can I prepare the crepe batter ahead of time for convenience?
Yes, absolutely! You can prepare the crepe batter the night before and store it in an airtight container in the refrigerator. The gluten-free flour will have ample time to hydrate, potentially leading to an even better texture. Just remember to give it a good stir before using, as gluten-free batters can sometimes separate. This makes morning preparation significantly quicker and less stressful.
-
What are the best substitutions if I don’t have gluten-free flour or almond milk?
For gluten-free flour, you can use a reliable all-purpose gluten-free baking blend that contains xanthan gum. If you prefer not to use almond milk, unsweetened oat milk, soy milk, or even regular dairy milk (if not vegan) are excellent substitutes that will yield similar results in terms of batter consistency and flavor. Coconut milk can also work, though it might impart a subtle coconut flavor.
-
How can I ensure my crepes don’t stick to the pan, especially when they are gluten-free?
A high-quality non-stick skillet is your first line of defense. Ensure the pan is properly preheated over medium heat before adding any batter. Use a small amount of coconut oil or vegan butter to lightly grease the pan for each crepe, swirling it to create a thin, even layer. If your crepes still tend to stick, it might indicate the pan isn’t hot enough, or you need a slightly more robust non-stick surface. Don’t be afraid to add a touch more oil if needed, especially for the first few crepes.