Ultimate Silver Snow Vanilla Cupcakes

Imagine a warm kitchen filled with the sweet, inviting aroma of freshly baked cupcakes. Isn’t that a delightful thought? Silver Snow Vanilla Cupcakes embody this cozy feeling with every bite. These cupcakes are not just any ordinary treat; they bring a sense of joy and comfort that can brighten anyone’s day. Whether you’re celebrating a special occasion or simply satisfying a sweet tooth, this recipe stands out.
The beauty of Silver Snow Vanilla Cupcakes lies in their simplicity and versatility. Crafted with basic ingredients, they transform into delightful bites of fluffy goodness. What makes this recipe special is its balance between flavors. The lightness of vanilla paired with just the right amount of sweetness creates a cupcake that’s both comforting and indulgent. Have you ever craved something special but didn’t want to spend all day in the kitchen? This recipe delivers just that.
Why You Will Love This Recipe
- Fluffy Texture: The light and airy texture makes these cupcakes a divine treat, providing a melt-in-your-mouth experience with every bite.
- Easy to Make: With straightforward steps, even beginners can create these delicious cupcakes, making baking accessible and enjoyable for everyone.
- Versatile Flavors: The simple yet classic flavor of vanilla pairs exceptionally well with various toppings and fillings, allowing for endless customization.
- Family-Friendly: These cupcakes are a guaranteed hit among both kids and adults, often becoming a requested favorite for any gathering.
- Perfect for Any Occasion: Great for parties, celebrations, and cozy family gatherings, their elegant look and delightful taste elevate any event.
Ingredients You Need
The magic of Silver Snow Vanilla Cupcakes begins with selecting high-quality ingredients. Using fresh, room-temperature butter and eggs ensures your batter will emulsify beautifully, creating that signature light and tender crumb. Don’t underestimate the impact of good vanilla extract; it’s the star of this simple yet sublime flavor profile.
Silver Snow Vanilla Cupcakes
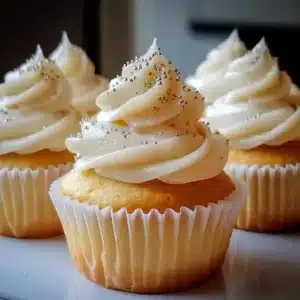
These fluffy and delightful Silver Snow Vanilla Cupcakes are perfect for any occasion, featuring a light vanilla flavor and topped with elegant silver sprinkles. They are easy to make and family-friendly, offering a classic taste with a festive finish.
- 1 1/2 cups all-purpose flour
- 1 1/2 teaspoons baking powder
- 1/2 teaspoon salt
- 1/2 cup unsalted butter, softened
- 1 cup granulated sugar
- 2 large eggs
- 2 teaspoons vanilla extract
- 1/2 cup milk
- Silver sprinkles for topping
- 1Gather all ingredients and preheat oven to 350°F (175°C). Line cupcake trays with liners.
- 2In a bowl, whisk together flour, baking powder, and salt.
- 3In a separate bowl, cream softened butter and sugar until light and fluffy.
- 4Add eggs one at a time, mixing well after each, then stir in vanilla extract.
- 5Gradually mix dry ingredients into wet, alternating with milk. Mix gently until just combined.
- 6Fill cupcake liners about 2/3 full.
- 7Bake for 18-20 minutes, or until a toothpick comes out clean.
- 8Cool in pans for 5 minutes, then transfer to a wire rack to cool completely.
- 9Once cooled, frost cupcakes and top with silver sprinkles.
Keywords: Baking, Cupcake Recipe, Dessert Recipe, Sweet Treats, vanilla cupcakes, easy baking, party desserts
- all-purpose flour: the foundation for a tender crumb
- baking powder: essential for achieving that signature fluffy rise
- salt: balances the sweetness and enhances the overall flavor
- unsalted butter, softened: provides richness and a delicate texture
- granulated sugar: adds sweetness and contributes to the cupcake’s moistness
- large eggs: bind the ingredients and add structure
- vanilla extract: the soul of this classic vanilla cupcake
- milk: ensures the batter is moist and contributes to a tender crumb
- silver sprinkles for topping: for that dazzling, signature “silver snow” finish
The exact quantities for these ingredients are detailed within the recipe card.
Variations
For those seeking a dairy-free option, substituting the regular milk with almond milk, soy milk, or oat milk works wonderfully. Ensure the plant-based milk is unsweetened to maintain the intended flavor balance. The butter can also be replaced with a plant-based butter substitute or a neutral-flavored oil like canola or melted coconut oil. These simple swaps create a delicious vegan version without compromising the delicate texture.
To cater to a lower-carbohydrate lifestyle, consider using a sugar substitute like erythritol or stevia blend for the granulated sugar. Almond flour or a coconut flour blend can be used in place of all-purpose flour, though you might need to adjust the liquid content slightly. This allows for a delightful treat that fits within a low-carb eating plan.
Injecting a burst of citrus can elevate the simple vanilla flavor. Adding the zest of one or two lemons or oranges to the batter during the creaming stage introduces a bright, refreshing note. This variation pairs beautifully with a light lemon buttercream frosting for an extra zesty experience.
How to Prepare silver snow vanilla cupcakes
Step 1: The Foundation – Gathering and Preparing
The journey to perfect Silver Snow Vanilla Cupcakes begins with meticulous preparation. Begin by preheating your oven to the specified temperature of 350°F (175°C). This crucial step ensures that the cupcakes bake evenly from the moment they enter the heat. Simultaneously, prepare your cupcake tins by lining them with decorative or plain cupcake liners. Ensure you have enough liners for the expected yield of the recipe, which is typically around 12 cupcakes.
Gathering all your ingredients beforehand is not just a suggestion; it’s a fundamental practice that prevents baking mishaps. Measure out your flour, sugar, and leavening agents precisely. Have your butter softened to room temperature and your eggs ready. This organized approach to ingredient preparation is often referred to as “mise en place” and is a hallmark of efficient baking. It allows for a smooth transition between mixing steps.
Double-check that your eggs and milk are at room temperature. This is vital because room-temperature ingredients incorporate much better into the batter, leading to a smoother, more homogenous mixture and ultimately, a lighter, fluffier cupcake. Cold ingredients can cause the butter to seize up and prevent proper emulsification. This initial setup is the silent hero of a successful bake.
Step 2: Building the Structure – Dry Ingredients Unite
In a medium-sized mixing bowl, combine your dry ingredients: the all-purpose flour, baking powder, and salt. Whisk these ingredients together thoroughly. The goal here is to evenly distribute the leavening agent (baking powder) and the salt throughout the flour. This ensures that every cupcake rises uniformly and that the salt’s flavor-enhancing properties are present in every bite, preventing any bland pockets.
A gentle whisking motion is all that’s needed. You don’t want to overwork the flour at this stage, as it can develop gluten prematurely. The whisking action helps to aerate the flour slightly, which can also contribute to a lighter final product. Imagine this step as laying the groundwork, creating a stable and well-balanced base for the wet ingredients that will soon join.
Once thoroughly combined, set this bowl of dry ingredients aside. It will be integrated into the wet ingredients in a specific manner during a later stage. Having this pre-mixed dry component ready streamlines the subsequent steps and ensures consistent results every time you bake this recipe. It’s a small step that makes a big difference in the texture and rise of your cupcakes.
Step 3: The Creaming Process – Unlocking the Fluffiness
In a large mixing bowl, combine the softened unsalted butter and granulated sugar. This is where the magic of creaming begins. Using an electric mixer (stand mixer or hand mixer), beat the butter and sugar together on medium speed. Continue beating for approximately 3 to 5 minutes, or until the mixture becomes pale yellow, light, and noticeably fluffy. This process incorporates air into the batter, which is essential for achieving a tender crumb and good volume.
The pale yellow color indicates that the sugar crystals have begun to dissolve and are being suspended within the fat of the butter. The fluffy texture signifies that air has been thoroughly incorporated, creating tiny pockets that will expand during baking. Scrape down the sides and bottom of the bowl periodically to ensure all the butter and sugar are evenly creamed. This step is arguably one of the most critical for achieving that signature light and airy texture in your cupcakes.
Resist the temptation to rush this creaming process. Patience here pays dividends in the final outcome. The air incorporated during this stage acts as an initial leavening agent, working in conjunction with the baking powder. A well-creamed butter and sugar mixture is the foundation for cupcakes that are not dense or heavy but wonderfully light and melt-in-your-mouth delicious. This is the heart of your cupcake’s structure and tenderness.
Step 4: Incorporating Moisture and Flavor – Eggs and Vanilla
With the butter and sugar mixture beautifully creamed, it’s time to add the eggs. Introduce them one at a time, ensuring that each egg is fully incorporated into the batter before adding the next. Beat the mixture well after each egg addition. This gradual incorporation helps to maintain the emulsion and prevents the batter from becoming greasy or curdled. The eggs add moisture, richness, and act as binders, contributing to the cupcake’s structure.
Once the eggs are thoroughly mixed in, it’s time to infuse the batter with the quintessential vanilla flavor. Stir in the vanilla extract. Use a good quality vanilla extract for the best taste; it truly makes a difference in simple recipes like this. Ensure the vanilla is evenly distributed throughout the creamy mixture. The aroma at this stage is already incredibly inviting.
At this point, you will have a smooth, luscious base that is ready to receive the dry ingredients and milk. The combination of the creamy butter-sugar mixture, the binding eggs, and the fragrant vanilla creates a foundation that promises delightful flavor and texture. This stage signifies a significant step towards the final delicious product, building on the airy foundation established in the previous step.
Step 5: The Delicate Dance – Combining Wet and Dry
Now comes a crucial step: combining the wet and dry ingredients. This is where you’ll alternate adding the pre-whisked dry ingredients with the milk to the creamed butter-sugar-egg mixture. Begin by adding about one-third of the dry ingredients to the bowl. Mix on low speed until just combined. Then, add about half of the milk and mix again until just combined. Repeat this process, alternating between dry ingredients and milk, ending with the dry ingredients.
The key here is to mix until *just* combined. Overmixing at this stage can develop the gluten in the flour too much, resulting in tough and dense cupcakes. Stop mixing as soon as you no longer see streaks of dry flour. It’s perfectly acceptable, and often preferable, to finish incorporating the last bits of flour by hand with a spatula, ensuring you don’t overwork the batter. Gentle handling is paramount for tenderness.
This alternating method helps to create a stable emulsion and prevents the batter from becoming too dense or too wet. The dry ingredients absorb moisture gradually, and the milk helps to create a smooth, cohesive batter. The resulting batter should be thick but pourable, with a smooth consistency. This careful integration ensures that your Silver Snow Vanilla Cupcakes will achieve their desired light and fluffy texture.
Step 6: Filling the Vessels – Ready for Transformation
With your beautifully combined batter ready, it’s time to portion it into the prepared cupcake liners. A common and effective method is to use an ice cream scoop of a consistent size. This ensures that each cupcake will bake evenly, as they all start with the same amount of batter. Fill each liner approximately two-thirds of the way full. This is important because it leaves adequate space for the cupcakes to rise gracefully during baking without overflowing.
Overfilling the liners can lead to a messy baking experience, with batter spilling over the sides and potentially burning onto the pan. Underfilling, on the other hand, can result in flatter, less appealing cupcakes. The two-thirds full guideline is a tried-and-true method for achieving perfectly domed tops on your vanilla cupcakes. Take your time with this step to ensure uniformity across the batch.
Once all the liners are filled, gently tap the cupcake pan on the counter a couple of times. This simple action helps to release any large air bubbles trapped in the batter, contributing to a smoother interior texture. Now, your cupcakes are perfectly poised for their transformation in the oven, ready to puff up into delightful, airy treats.
Step 7: The Fiery Transformation – Baking to Perfection
Carefully place the filled cupcake tins into the preheated oven. Position them in the center rack to ensure even heat distribution. The baking time for these cupcakes is typically between 18 to 20 minutes. However, ovens can vary, so it’s essential to keep a close watch, especially during the last few minutes of baking. You are looking for a beautiful golden-brown color on the edges and a puffed-up center.
The most reliable way to check for doneness is by inserting a toothpick or a thin skewer into the center of a cupcake. If it comes out clean, with no wet batter clinging to it, your cupcakes are ready. A few moist crumbs attached to the toothpick are perfectly fine, indicating they are moist but not underbaked. Avoid opening the oven door too frequently, as this can cause the temperature to fluctuate and affect the rise of the cupcakes.
Once baked to perfection, remove the cupcake tins from the oven. Allow the cupcakes to cool in the tins for about 5 to 10 minutes. This brief cooling period in the pan helps them to firm up slightly, making them easier to handle without losing their shape. Rushing this step can lead to broken cupcakes. Patience is a virtue, especially in baking.
Step 8: The Cooling Ritual – Essential for Frosting
After the initial cooling period in the tins, carefully transfer the cupcakes to a wire cooling rack. A wire rack allows air to circulate freely around the cupcakes, ensuring they cool down evenly and preventing the bottoms from becoming soggy. It’s important to let the cupcakes cool completely before you even think about frosting them. Attempting to frost warm cupcakes is a recipe for disaster; the frosting will melt and slide right off, creating a sticky, unappealing mess.
This cooling phase is critical for achieving a smooth and beautiful frosting finish. It might be tempting to frost them as soon as they feel slightly warm, but the wait is well worth it. A completely cooled cupcake provides a stable base for your frosting, allowing you to create those elegant swirls and designs that make the Silver Snow Vanilla Cupcakes truly shine. This pause ensures your decorative efforts will be rewarded.
The process of cooling is as important as the baking itself. It allows the internal structure of the cupcake to set properly. Once they have reached room temperature, they are ready for the final, decorative touches that will transform them from simple cakes into delightful Silver Snow Vanilla Cupcakes. This stage is the calm before the final burst of creativity.
Step 9: The Grand Finale – Adornment and Celebration
With the cupcakes completely cooled, it’s time for the most visually exciting part: decorating them. While the recipe itself focuses on the vanilla cake, the “Silver Snow” aspect comes to life with your choice of frosting and the signature silver sprinkles. Apply your favorite frosting; a classic vanilla buttercream, a rich cream cheese frosting, or a light whipped cream frosting are all excellent choices. Use a spatula for a rustic, homemade look or a piping bag with various tips for elegant swirls, rosettes, or other decorative patterns.
The true “silver snow” effect is achieved by generously sprinkling the silver sprinkles over the frosted cupcakes. You can go for a light dusting or a more abundant coverage, depending on your preference and the occasion. These sprinkles catch the light beautifully, giving the cupcakes a festive and elegant appearance. They transform ordinary vanilla cupcakes into something truly special and celebratory.
Take a moment to admire your handiwork. The combination of the perfectly baked cupcakes, the smooth frosting, and the shimmering silver sprinkles creates a delightful visual and culinary experience. These Silver Snow Vanilla Cupcakes are now ready to be shared and enjoyed, bringing joy and sweetness to any occasion. This final step is where the recipe’s name truly comes to life.
Pro Tips for silver snow vanilla cupcakes
Don’t Overmix the Batter: Overmixing develops the gluten in the flour, leading to tough, dense cupcakes. Mix the dry and wet ingredients until they are just combined, and use a spatula to fold in the last bits of flour. This ensures a tender crumb.
Room Temperature Ingredients are Key: Ensure your butter, eggs, and milk are at room temperature before you start. This allows them to emulsify properly, creating a smooth batter and contributing to a lighter, fluffier texture. Cold ingredients can cause the batter to separate.
Properly Measure Flour: Spoon flour into your measuring cup and level it off with a straight edge. Scooping directly from the bag can pack too much flour into the cup, leading to dry cupcakes. Accurate measurements are foundational for consistent baking results.
Don’t Overfill the Liners: Fill cupcake liners only about two-thirds full. This gives the batter enough room to rise without overflowing, ensuring beautifully domed cupcakes rather than messy spills. A consistent fill helps with even baking.
Cool Completely Before Frosting: This is a crucial step that many overlook. Frosting warm cupcakes will cause the frosting to melt and slide off. Allow the cupcakes to cool completely on a wire rack for a smooth and stable frosting application. This prevents a greasy appearance and ensures your decorations hold.
Enhance Vanilla Flavor: For a more intense vanilla flavor, consider using a combination of vanilla extract and vanilla bean paste. The paste contains actual vanilla bean specks, adding visual appeal and a richer taste. High-quality vanilla extract makes a noticeable difference.
Serving Suggestions for silver snow vanilla cupcakes
Decoration
The “silver snow” moniker truly comes alive with the right decorative touch. A swirl of classic vanilla buttercream frosting, piped using a star tip, creates an elegant base. Immediately after frosting, generously sprinkle the silver nonpareils and edible glitter over the top, ensuring they adhere to the frosting before it sets. For an extra touch of sparkle, consider adding a few larger silver dragees strategically placed on top of the frosting.
Alternatively, a smooth layer of cream cheese frosting offers a slightly tangy contrast to the sweet cupcake. You can then use a fine sieve to dust a light layer of edible silver dust or shimmering luster dust over the frosted cupcakes, giving them a subtle, ethereal glow. This method provides a more delicate “snow” effect.
For themed parties, you can introduce other complementary decorations. Edible silver stars, metallic edible paint splatters, or even small fondant snowflakes can enhance the visual appeal, making these cupcakes truly stand out for events like winter celebrations or elegant dessert tables.
Side Dishes
While Silver Snow Vanilla Cupcakes are a perfect standalone treat, they can be wonderfully complemented by a variety of beverages and light accompaniments. A warm cup of coffee, a soothing herbal tea, or a glass of cold milk are classic pairings that enhance the subtle vanilla flavor. The warmth of coffee or tea can amplify the comforting notes of the cupcake.
For a more indulgent dessert experience, consider serving the cupcakes alongside a scoop of premium vanilla bean ice cream or a light raspberry sorbet. The contrast in temperature and texture is delightful. Fresh berries, such as raspberries or strawberries, also offer a refreshing counterpoint to the sweetness of the cupcake.
Lightly sweetened whipped cream can be served on the side for those who want an extra layer of creaminess without the commitment of frosting the entire cupcake. A small fruit salad featuring complementary fruits like peaches or pears can also add a healthy and flavorful dimension to the dessert presentation.
Creative Serving Ideas
Elevate your presentation by arranging the Silver Snow Vanilla Cupcakes on a tiered dessert stand, creating a stunning centerpiece for any celebration. Each tier can be adorned with edible silver confetti or small decorative snowflakes to reinforce the theme. This arrangement adds a touch of elegance and makes the cupcakes easily accessible to guests.
Consider a “decorate-your-own” cupcake station for parties, providing plain frosted cupcakes and an array of toppings including the silver sprinkles, colored frosting, and perhaps even edible glitter. This interactive approach adds fun and personalization for guests, especially children.
For a more sophisticated event, serve the cupcakes individually on elegant dessert plates, perhaps with a drizzle of white chocolate ganache or a dusting of powdered sugar. A small sprig of mint or a single raspberry can add a pop of color and freshness. These thoughtful touches transform a simple cupcake into a gourmet dessert experience.
Preparation & Storage
Storing Leftovers
To keep your Silver Snow Vanilla Cupcakes fresh and moist for as long as possible, proper storage is essential. Store any leftover cupcakes in an airtight container at room temperature. This prevents them from drying out and protects them from absorbing any unwanted odors from other foods in your kitchen. A good quality airtight container is your best friend here.
For optimal moisture, you can add a slice of bread to the container along with the cupcakes. The bread will release moisture, helping to keep the cupcakes soft. This simple trick is a baker’s secret for maintaining freshness for baked goods that don’t require refrigeration.
These cupcakes are best enjoyed within 2 to 3 days when stored at room temperature. While they can be refrigerated, this can sometimes lead to a drier texture. If you live in a very warm climate, refrigeration might be a better option to prevent spoilage, but be mindful of potential dryness.
Freezing
Silver Snow Vanilla Cupcakes freeze exceptionally well, making them a perfect make-ahead treat for future events or cravings. To freeze them, ensure they are completely cooled and unfrosted. Wrap each individual cupcake tightly in plastic wrap to prevent air exposure and potential freezer burn. After wrapping, place the individually wrapped cupcakes into a heavy-duty freezer bag or an airtight container.
Freezing them unfrosted is recommended as frosting can sometimes change texture when thawed. This method ensures that the cupcakes maintain their delicate texture and flavor. Properly stored, unfrosted cupcakes can last in the freezer for up to three months.
When you’re ready to enjoy them, simply remove the desired number of cupcakes from the freezer. Thaw them slowly in the refrigerator overnight. This gentle thawing process helps to retain their moisture and prevents condensation, which can make them soggy. Alternatively, they can be thawed at room temperature for a few hours.
Reheating
If you’ve refrigerated your cupcakes and they feel a bit firm, or if you simply prefer them slightly warmer, a quick reheating method can revive their softness. Place an unfrosted or frosted cupcake on a microwave-safe plate. Microwave on low power for very short intervals, such as 10-15 seconds at a time. Be cautious not to overheat, as this can quickly dry them out or melt the frosting.
The goal of reheating is to gently warm the cupcake, bringing it back to a pleasant, soft consistency. This is particularly useful if the cupcakes were stored in the refrigerator and you want to enjoy them as if they were freshly baked. A few seconds is often all that’s needed to achieve the desired result.
For frosted cupcakes, a very brief warming is best to avoid excessive melting. If they are frosted, warming them slightly can make the frosting softer and more pliable. Always check the temperature carefully after each short interval to prevent over-warming. This ensures your cupcakes are perfectly tender and delicious.
Frequently Asked Questions
-
Can I make the Silver Snow Vanilla Cupcakes ahead of time? If so, how should I store them?
Absolutely! These cupcakes are ideal for making ahead of time. You can bake the cupcakes one or two days in advance and store them in an airtight container at room temperature. For the best results, it’s often recommended to frost them on the day you plan to serve them. This ensures the frosting remains fresh and perfectly applied, and the cake itself maintains its optimal moisture level.
-
What is the best way to freeze Silver Snow Vanilla Cupcakes, and how long do they last?
Yes, these cupcakes freeze wonderfully! For optimal results, it’s best to freeze them unfrosted. Wrap each cooled cupcake individually and tightly in plastic wrap to prevent freezer burn. Then, place them in a freezer-safe bag or airtight container. Properly stored, unfrosted cupcakes can last in the freezer for up to three months. When you’re ready to use them, thaw them overnight in the refrigerator for the best texture.
-
Are there any good substitutions for common ingredients like flour, butter, or milk if I have dietary restrictions?
Certainly! For a gluten-free version, you can substitute all-purpose flour with a good quality gluten-free all-purpose flour blend. When replacing dairy milk, unsweetened almond milk, soy milk, or oat milk work very well. For a dairy-free butter option, a plant-based butter substitute or even a neutral oil like melted coconut oil can be used. These substitutions allow you to adapt the recipe to various dietary needs without significantly compromising taste or texture.