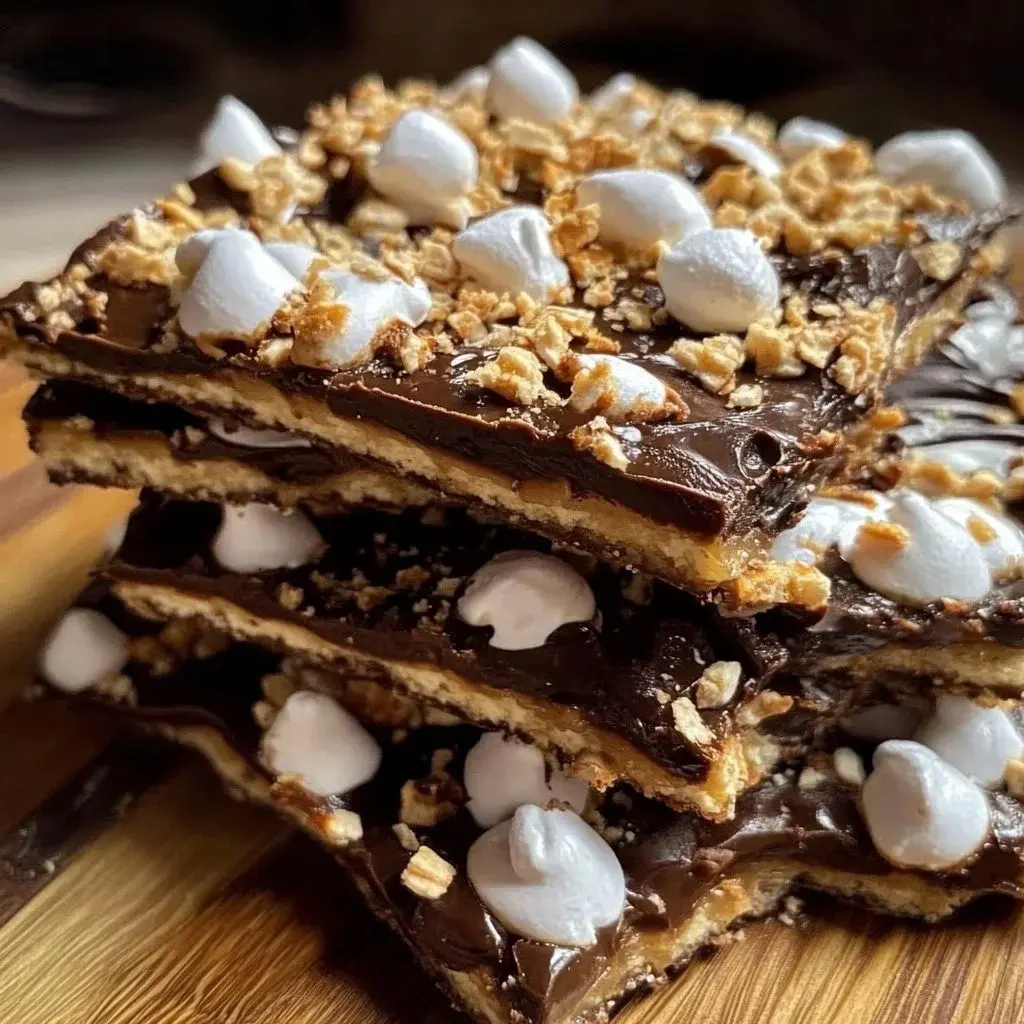
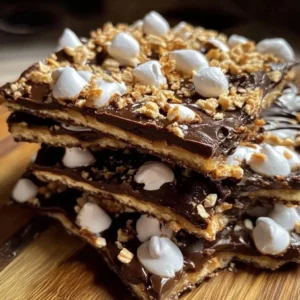
Ultimate Campfire S’mores Bark
There’s something magical about the flavor combination of chocolate, graham crackers, and marshmallows. That delightful experience of biting into a gooey, melty s’more around a campfire brings back memories of warmth and laughter.
Now, what if I told you that you could capture that essence in a simple, easy-to-make dessert? Enter the Ultimate Campfire S’mores Bark. This recipe takes all the beloved flavors of a classic s’more and transforms them into a beautiful, shareable bark that’s perfect for any occasion.
Why You Will Love This Recipe
- Nostalgic Flavors: Indulge in the classic taste of s’mores, perfectly captured in a convenient bark format. It evokes feelings of cozy evenings and outdoor adventures.
- Incredible Ease of Preparation: This recipe requires minimal effort and no baking, making it ideal for quick sweet cravings or last-minute dessert needs. You can have it ready in no time.
- Highly Customizable: Feel free to adapt this bark to your personal preferences by adding nuts, different chocolate types, or even a drizzle of caramel. It’s a fantastic base for creative variations.
- Perfect for Sharing: Its appealing presentation and delightful taste make it a guaranteed hit at parties, gatherings, or as a thoughtful homemade gift. Everyone loves a good s’more!
- No Oven Required: Enjoy the flavors of s’mores without the need for a campfire or oven. This bark is a testament to simple, delicious dessert-making.
Ingredients You Need
The foundation of this delightful bark lies in the simple yet iconic ingredients that make up a classic s’more. High-quality chocolate, crunchy graham crackers, and fluffy marshmallows are essential for achieving that perfect balance of flavor and texture. Ensure your ingredients are fresh to maximize the deliciousness of the final product.
Ultimate Campfire S’mores Bark
A delightful, easy-to-make dessert that captures the nostalgic taste of s'mores with chocolate, graham crackers, and marshmallows. This recipe is perfect for parties, holidays, or simply as a sweet treat at home, offering a customizable and shareable experience.
- 2 cups milk chocolate chips (Can substitute with dark chocolate for a richer flavor.)
- 1 cup graham cracker crumbs (Use gluten-free graham cracker crumbs for a gluten-free option.)
- 1 cup mini marshmallows (Consider dairy-free options if needed.)
- 1/2 cup semi-sweet chocolate chips (Alternate with milk chocolate if preferred.)
- 1Start by gathering all your ingredients. Measure out the chocolate chips, graham cracker crumbs, and marshmallows.
- 2In a microwave-safe bowl, melt the milk chocolate chips in 30-second intervals, stirring in between until completely smooth.
- 3Once melted, stir in the graham cracker crumbs until every crumb is coated with chocolate.
- 4Line a baking sheet with parchment paper. Pour and spread the chocolate and graham cracker mixture onto the sheet.
- 5Sprinkle the mini marshmallows evenly over the chocolate layer, pressing them slightly to stick.
- 6In a separate bowl, melt the semi-sweet chocolate chips using the same method. Drizzle over the marshmallows.
- 7Refrigerate the baking sheet for 1-2 hours or until the bark is firm.
- 8Once set, break the bark into pieces and serve.
Keywords: Bark, Campfire Treat, Chocolate, Easy Dessert, S'mores, Holiday Treat, Party Snack, No Bake Dessert
- milk chocolate chips: a generous amount to form the base of your bark.
- graham cracker crumbs: providing that essential crunchy texture and slightly sweet, wheaty flavor.
- mini marshmallows: for that signature gooey, melted s’more marshmallow experience.
- semi-sweet chocolate chips: used for drizzling, adding an extra layer of chocolatey goodness and visual appeal.
The precise quantities for these ingredients are detailed within the recipe card. Feel free to explore substitutions and additions to personalize your bark.
Variations
Take your Campfire S’mores Bark to the next level with these creative variations. Each offers a unique twist on the classic flavor profile, ensuring there’s something for everyone to enjoy. Experimenting with these can lead to delightful new favorites.
For those who love a bit of crunch and depth, consider a Nutty Delight variation. Incorporate finely chopped peanuts, almonds, or even pecans into the melted chocolate mixture along with the graham cracker crumbs. Toasting the nuts beforehand can further enhance their flavor, adding a wonderful roasted dimension to the bark. This elevates the simple treat into something truly special and satisfyingly complex.
Embrace a refreshing flavor change with the Mint Chocolate variation. Swap out the traditional milk and semi-sweet chocolate chips for their mint-flavored counterparts. The cool, invigorating taste of mint paired with the sweet, sticky marshmallows and crunchy graham crackers creates a surprisingly harmonious and delightful dessert. This version is particularly welcome during warmer months or as a palate cleanser after a rich meal.
Indulge in the irresistible combination of sweet and salty with the Sweet and Salty Sensation. After drizzling the semi-sweet chocolate, add a swirl of rich caramel sauce over the marshmallows. Finish with a sprinkle of flaky sea salt. The salt beautifully balances the sweetness of the chocolate and marshmallows, creating an addictive flavor profile that keeps you coming back for more. This adds a sophisticated touch to your homemade bark.
Another exciting option is the Chocolate Swirl Masterpiece. Instead of a simple drizzle, create an artistic marble effect. Melt both milk and dark chocolate separately, then dollop them randomly onto the graham cracker base. Use a skewer or toothpick to gently swirl the chocolates together, creating beautiful patterns before adding the marshmallows. This visually stunning bark is as much a feast for the eyes as it is for the palate.
Finally, for those with specific dietary needs, the Dietary Adjustment approach is key. To make the bark vegan, opt for dairy-free chocolate chips, vegan graham crackers, and plant-based marshmallows. For a gluten-free version, ensure you use certified gluten-free graham cracker crumbs. These simple swaps allow everyone to enjoy the magic of s’mores bark without compromise, making your dessert inclusive and universally appealing.
How to Prepare Campfire Smores Bark
Step 1: Gathering and Preparing Your Culinary Arsenal
The initial step in crafting your Campfire S’mores Bark is to meticulously gather and prepare all the necessary ingredients and equipment. This involves accurately measuring out your chocolate chips, ensuring the graham crackers are finely crumbed, and having your mini marshmallows readily accessible. Having everything prepped and within easy reach streamlines the entire process, minimizing the chance of errors or rushed steps. This organized approach is fundamental for a smooth and enjoyable baking experience, even though no actual baking is involved.
This includes lining your baking sheet with parchment paper; this seemingly small detail is crucial for effortless removal of the finished bark. Parchment paper prevents sticking, allowing your beautifully crafted bark to slide off cleanly, preserving its delicate structure. Furthermore, preparing your workspace ensures that once the chocolate begins melting, you can transition seamlessly through each subsequent step without interruption. A calm, prepared environment fosters creativity and precision in your dessert making.
It’s also a good time to ensure your microwave is clean and ready for use, as melting the chocolate is a key component. Having a few clean bowls and spatulas ready will also prevent any last-minute scrambling. This thorough preparation sets the stage for success, transforming the creation of this delightful treat into a truly pleasant and efficient endeavor. Remember, a well-prepared chef is a confident chef.
Step 2: The Art of Melting Milk Chocolate
Melting the milk chocolate chips is a delicate operation that requires patience and careful attention. Place your measured milk chocolate chips into a microwave-safe bowl. The key here is to heat them in short, controlled bursts, typically in 30-second intervals. This prevents the chocolate from overheating, which can cause it to seize and become grainy or even burn.
After each 30-second interval, remove the bowl from the microwave and stir the chocolate thoroughly with a spatula. The residual heat will continue to melt the chips, and stirring distributes this heat evenly. Continue this process until the chocolate is almost entirely smooth, with just a few small lumps remaining. At this point, vigorous stirring should melt these last few lumps into a glossy, uniform consistency. This technique ensures a perfectly smooth and pourable chocolate base for your bark.
Avoid the temptation to microwave for longer periods, as this is the most common pitfall. Overheated chocolate can become very difficult to salvage. The goal is a luxuriously smooth, melted chocolate that coats the back of your spatula beautifully. This is the canvas upon which your s’mores flavors will be built, so achieving this perfect melt is paramount for the final texture and appearance of your bark.
Step 3: Integrating the Graham Cracker Crumble
Once your milk chocolate has achieved that perfect, glossy melted state, it’s time to introduce the graham cracker crumbs. Gently fold the crumbs into the melted chocolate using your spatula. The aim is to coat every single crumb thoroughly, ensuring that the chocolate acts as a binder and gives the bark its structure.
As you mix, you’ll notice the mixture becoming thicker and more cohesive. Keep stirring until there are no dry spots of graham cracker visible. This creates a wonderfully textured base, providing that essential crunch that complements the smoothness of the chocolate and the eventual gooeyness of the marshmallows. The ratio of chocolate to crumbs is important here for achieving the right consistency for spreading.
This mixture forms the core of your s’mores bark, embodying the classic combination that evokes campfire memories. A good, even distribution ensures that each piece of bark will have that satisfying crunch in every bite. It’s a crucial step that sets the stage for the layers of flavor and texture that will follow. Take your time to ensure a thorough incorporation for the best results.
Step 4: Spreading the Foundation on the Baking Sheet
With your chocolate and graham cracker mixture ready, it’s time to transfer it to your prepared baking sheet. Carefully pour the thick mixture onto the parchment paper-lined sheet. Use your spatula to spread it out evenly, aiming for a consistent thickness across the entire surface. This even distribution is vital for ensuring that all pieces of your bark will set uniformly and break into similarly sized portions.
The ideal thickness for your bark is typically about ¼ to ½ inch. Thinner bark can be too brittle, while thicker bark might not set as firmly. Gently coax the mixture towards the edges of the parchment paper, creating a somewhat rectangular or freeform shape, depending on your preference. The rustic look of uneven edges is part of the charm of homemade bark.
Ensuring a smooth, even surface helps the marshmallows and the subsequent chocolate drizzle to adhere properly. A well-spread base is the unsung hero of this recipe, providing the sturdy foundation for all the delightful toppings that are yet to come. Don’t rush this step; take a moment to make it as neat and uniform as possible for a professional-looking finish.
Step 5: The Marshmallow Embrace
Now comes the fun part: scattering the mini marshmallows over the still-soft chocolate and graham cracker layer. Distribute them as evenly as possible across the entire surface. The warmth of the chocolate will help them adhere slightly, preventing them from sliding off once the bark sets. You want a generous, even coating that hints at the s’more goodness within.
Once the marshmallows are scattered, gently press them down into the chocolate mixture with your fingertips or the back of your spatula. This slight pressing ensures they are well-anchored and won’t easily dislodge. It also helps them to soften slightly, contributing to that desirable gooey texture when the bark is enjoyed. This step truly transforms the base into its recognizable s’mores form.
The visual appeal of the marshmallows peeking through the chocolate is a key characteristic of s’mores bark. Aim for an abundant yet uniform distribution so that every bite offers that delightful burst of soft, sweet marshmallow. This layer is what truly bridges the gap between a simple chocolate bark and the beloved campfire treat.
Step 6: Crafting the Semi-Sweet Drizzle
In a separate, clean microwave-safe bowl, repeat the melting process for the semi-sweet chocolate chips. Just as with the milk chocolate, heat them in 30-second intervals, stirring well after each session until the chocolate is completely smooth and glossy. This drizzle adds another dimension of chocolate flavor and a beautiful visual contrast to the bark.
Achieving a smooth, fluid consistency for the semi-sweet chocolate is important for creating attractive drizzles. If the chocolate seems too thick, you can add a tiny amount of neutral oil, like vegetable or canola oil, to thin it out slightly. This will help it flow more easily from your spoon or piping bag. Be cautious not to add too much oil, as it can make the chocolate greasy.
The semi-sweet chocolate drizzle isn’t just for aesthetics; it enhances the overall chocolate experience. The slight bitterness of the semi-sweet chocolate can beautifully balance the sweetness of the milk chocolate and marshmallows, creating a more complex flavor profile. This is where you can get creative with your drizzling technique, making each piece of bark unique.
Step 7: The Artistic Drizzle and Final Touches
With your melted semi-sweet chocolate ready, it’s time for the artistic drizzle. Using a spoon, carefully drizzle the melted chocolate back and forth over the marshmallow-covered bark. You can create zigzag patterns, random lines, or even a more intricate lattice design. The goal is to add visual interest and an extra layer of chocolate flavor.
For a more controlled drizzle, you can spoon the chocolate into a piping bag or a resealable plastic bag with a tiny corner snipped off. This allows for more precise lines and patterns. Don’t worry if your drizzles aren’t perfect; the rustic charm of homemade bark is part of its appeal. Embrace the imperfections and let your creativity flow.
This drizzling step is the final decorative touch before the bark sets. It adds a professional and appealing finish to your creation. The contrasting color of the semi-sweet chocolate against the milk chocolate and white marshmallows makes the bark visually enticing. It’s a moment to admire your work before it solidifies.
Step 8: The Chill and Set Period
Once your Campfire S’mores Bark is fully assembled with its layers of chocolate, graham crackers, and marshmallows, it’s time for the essential setting phase. Carefully place the entire baking sheet into the refrigerator. This is where the magic of solidification happens, transforming the gooey mixture into a firm, breakable bark.
Allow the bark to chill in the refrigerator for at least 1 to 2 hours. The exact time may vary depending on the thickness of your bark and the temperature of your refrigerator. You’ll know it’s ready when the chocolate is completely firm to the touch and no longer yields to gentle pressure. Resist the urge to open the refrigerator door frequently, as this can disrupt the setting process.
This chilling period is crucial for achieving the desired texture. It allows the fats in the chocolate to crystallize properly, giving the bark its signature snap and firmness. Rushing this step by trying to break it apart too soon will result in a soft, smudgy mess. Patience during this phase is key to a successful, well-set bark that will break cleanly.
Step 9: The Satisfying Break
Once the bark has fully set and is firm to the touch, it’s time for the immensely satisfying part: breaking it into pieces. Remove the baking sheet from the refrigerator. You can either use your hands to break the bark into rustic, irregular shapes or use a sharp knife to cut it into more uniform pieces. Both methods yield a delightful result.
If using your hands, lift the bark off the parchment paper and gently snap it apart. The pre-scored lines from the marshmallows and the natural fissures in the chocolate should guide your breaking. For cleaner cuts, especially if you want more uniform pieces for gifting, a sharp chef’s knife works best. You might need to apply a little firm pressure, but the set chocolate should break cleanly.
The act of breaking the bark is wonderfully tactile and adds to the homemade charm. The uneven edges and varied sizes make each piece unique. This is where your creation truly comes to life, ready to be shared and enjoyed. Hearing the satisfying crack as the bark breaks is a testament to its perfect setting.
Step 10: Presentation and Indulgence
Your Ultimate Campfire S’mores Bark is now complete and ready to be devoured! Arrange the broken pieces on a festive platter for immediate enjoyment, or package them up attractively for gifting. The visual appeal, combined with the irresistible aroma, makes it a truly celebratory treat.
This bark is perfect for an impromptu dessert, a contribution to a potluck, or simply a sweet indulgence to enjoy with your favorite beverage. Its portability makes it an excellent choice for picnics, camping trips (ironically, without the campfire!), or outdoor gatherings. The joy it brings is amplified when shared with loved ones.
Serve it as is, or consider pairing it with a scoop of vanilla ice cream for an extra decadent experience. The contrast of the cold, creamy ice cream with the slightly chewy and crunchy bark is divine. However you choose to present and serve it, this Campfire S’mores Bark promises pure delight with every bite.
Pro Tips for Campfire Smores Bark
Quality Chocolate Matters: For the best flavor and texture, use good quality chocolate chips. Brands that melt smoothly and have a rich taste will significantly enhance your final bark. Avoid using chocolate meant for candy melts if you want a true chocolate flavor profile. Experimenting with different cacao percentages in your dark chocolate can also add complexity.
Parchment Paper is Your Friend: Never skip the parchment paper. It ensures your bark lifts off the baking sheet cleanly, preserving its shape and making cleanup a breeze. Wax paper can sometimes stick, so parchment is the superior choice for this recipe. A silicone baking mat is another excellent alternative if you have one.
Even Distribution is Key: When spreading the chocolate and graham cracker mixture, aim for a uniform thickness. This ensures that all pieces of the bark set at the same rate and have a consistent texture. Similarly, spread the marshmallows evenly so each bite gets a good marshmallow ratio.
Don’t Overheat the Chocolate: Melting chocolate requires patience. Use short bursts in the microwave and stir frequently. Overheated chocolate becomes clumpy and difficult to work with, potentially ruining the smooth texture. If you’re using a double boiler, ensure the water doesn’t touch the bottom of the top bowl, and keep the heat low and steady.
Consider the Marshmallow Melt: For a slightly more “toasted” marshmallow effect without a torch, you can briefly place the bark under a broiler for about 30 seconds after adding the marshmallows, watching *very* carefully to prevent burning. Alternatively, placing a few marshmallows on top and lightly toasting them with a kitchen torch before the final chilling can add an authentic campfire element.
Serving Suggestions for Campfire Smores Bark
Decoration
The intrinsic beauty of Campfire S’mores Bark often needs little embellishment, but a few touches can elevate its presentation. For festive occasions, consider adding colorful sprinkles that match your theme over the semi-sweet chocolate drizzle before it sets. Edible glitter can add a touch of sparkle for holidays or birthdays, making the bark look extra magical. A light dusting of powdered sugar can mimic a snowy landscape, perfect for winter celebrations.
If you’ve opted for a specific flavor variation, such as the nutty version, ensure a few extra toasted nuts are artfully scattered on top for visual cues. For the sweet and salty variation, an extra, artful drizzle of caramel and a few strategically placed flakes of sea salt can highlight the flavor profile. The goal is to enhance the visual appeal without overwhelming the delicious simplicity of the bark itself.
Consider creating a rustic display by arranging the pieces on a wooden board or in a galvanized metal tin. This plays into the “campfire” theme and adds a charming, country-inspired aesthetic. The natural, uneven breaks of the bark lend themselves beautifully to this style of presentation, making it look both inviting and homemade.
Side Dishes
While Campfire S’mores Bark is a standalone delight, it pairs wonderfully with certain accompaniments that complement its sweet and chocolatey profile. A simple scoop of high-quality vanilla bean ice cream offers a creamy, cool contrast that enhances the flavors. The cold temperature also balances the richness of the chocolate.
Fresh fruit provides a refreshing counterpoint to the sweetness. Sliced strawberries, raspberries, or even banana slices can offer a burst of natural sweetness and a slightly tart or creamy element. For a more sophisticated pairing, consider a drizzle of raspberry coulis or a dollop of whipped cream infused with a hint of liqueur. These additions can transform a simple treat into a gourmet dessert experience.
Hot beverages are also ideal companions. A steaming mug of hot chocolate, especially one topped with whipped cream and a mini marshmallow, echoes the bark’s flavors perfectly. A rich, dark roast coffee can also cut through the sweetness and provide a satisfying end to a meal. The warmth of the drink contrasts delightfully with the cool, firm bark.
Creative Serving Ideas
Beyond a simple platter, think about how to serve your S’mores Bark in unique ways. For parties, create individual “s’more bark packets” by placing a few pieces in small cellophane bags tied with ribbon. This makes for easy distribution and is a charming favor guests can take home.
Another idea is to crumble the bark over a rich chocolate or vanilla cake for an added layer of texture and flavor. It can also be crushed and used as a decorative element for cupcakes, brownies, or even a layered trifle. Imagine a s’mores-themed trifle with layers of chocolate pudding, graham cracker crumbs, marshmallows, and chunks of this delightful bark.
For a more interactive experience, serve the bark pieces alongside a fondue pot filled with melted chocolate or caramel. Guests can dip the bark pieces for an extra layer of indulgence. This encourages mingling and adds a fun, participatory element to your dessert spread, turning it into an event in itself.
Preparation & Storage
Storing Leftovers
To ensure your delicious Campfire S’mores Bark remains as delightful as the day it was made, proper storage is key. The best method is to keep it in an airtight container at room temperature. This prevents it from absorbing any unwanted odors from other foods in your pantry and protects it from humidity, which can make the chocolate sticky.
If you live in a particularly warm climate or during summer months, the refrigerator is a better option to prevent the chocolate from softening or melting. When refrigerating, ensure the container is well-sealed. The bark should retain its quality and deliciousness for up to a week when stored correctly. Avoid direct sunlight, as it can also cause the chocolate to degrade.
When you retrieve the bark from the refrigerator, allow it to sit at room temperature for about 10-15 minutes before serving. This allows the chocolate to slightly soften, reaching its optimal texture and flavor. Eating it too cold can make it brittle and less flavorful.
Freezing
Yes, you can absolutely freeze Campfire S’mores Bark for longer storage. Freezing is an excellent option if you’ve made a large batch or want to prepare it well in advance for future enjoyment. To freeze it, it’s best to break it into individual serving-sized pieces first.
Layer these pieces between sheets of parchment paper or wax paper to prevent them from sticking together in a solid block. Then, place the layered pieces into an airtight, freezer-safe container or a heavy-duty freezer bag. Squeeze out as much air as possible from the bag before sealing it tightly. Properly stored, the bark can maintain its quality in the freezer for up to 2-3 months.
When you’re ready to enjoy your frozen bark, the best method for thawing is to transfer the container or bag to the refrigerator. Allow it to thaw overnight. This gradual thawing process helps to prevent condensation from forming on the chocolate, which could affect its texture and appearance. Avoid thawing at room temperature, as this can lead to a softer, potentially less appealing consistency.
Reheating
Typically, Campfire S’mores Bark does not require reheating. It is designed to be enjoyed at room temperature or slightly chilled. However, if it has been stored in the refrigerator and you prefer it to be softer and more yielding, simply allow it to come to room temperature for about 15-20 minutes before serving. This brings out the full flavor and texture of the chocolate and marshmallows.
If you are looking to achieve a slightly gooey, warm marshmallow effect, a very brief warming might be considered, but this carries risks. You could potentially place a few pieces on a microwave-safe plate and heat them on the lowest power setting for just 5-10 seconds, monitoring constantly. The goal is to slightly soften the marshmallows, not melt the chocolate into a puddle. This is an experimental step and not typically recommended for the best texture of the bark.
For most purposes, enjoying the bark as is, after it has reached a suitable serving temperature, is the ideal approach. The textural contrast between the crisp chocolate, crunchy crackers, and soft marshmallows is best experienced when the components are at their optimal state, which is usually not warm.
Frequently Asked Questions
-
Can I prepare this Campfire S’mores Bark ahead of time, and if so, how should I store it to maintain freshness?
Absolutely! The beauty of this bark is its make-ahead potential, making it perfect for parties or busy schedules. You can prepare it a day or two in advance. For optimal freshness, store the cooled and set bark in an airtight container at room temperature, away from direct sunlight and heat. If you live in a very warm climate, or if your kitchen tends to be warm, refrigerating it in an airtight container is recommended to prevent melting. Ensure the container is well-sealed to prevent the bark from absorbing any off-flavors from other foods.
-
What are the best ingredient substitutions or variations I can consider to tailor this recipe to my preferences or dietary needs?
This recipe is incredibly versatile. For a richer flavor profile, substitute milk chocolate chips with dark chocolate or a blend of both. If you need a gluten-free option, simply use certified gluten-free graham cracker crumbs, which are readily available. For a vegan version, opt for dairy-free chocolate chips, vegan graham crackers, and vegan marshmallows; many delicious plant-based options exist now. You can also add texture and flavor by incorporating chopped nuts like peanuts or pecans, or even crushed pretzels for a salty crunch. A drizzle of caramel sauce before the bark sets adds a delightful sweet and salty dimension.
-
How long does Campfire S’mores Bark typically last, and what is the best method for freezing it if I want to store it for a longer period?
When stored properly in an airtight container at room temperature, Campfire S’mores Bark usually stays fresh and delicious for up to a week. If refrigerated, it will also maintain its quality. If you wish to store it for an extended period, freezing is an excellent option. Break the bark into individual pieces and layer them between sheets of parchment paper to prevent sticking. Place these in a freezer-safe airtight container or bag, removing as much air as possible before sealing. Frozen bark can last for 2-3 months. To thaw, transfer it to the refrigerator overnight for the best texture and to prevent condensation issues.