Coconut Cake with Raspberry Filling

This Coconut Cake with Raspberry Filling is a dream made real for anyone who loves a taste of the tropics kissed by a bright berry embrace. It delivers those soft, bakery-style coconut layers you crave, a delightful burst of fruit in the center, and a tangy frosting that feels incredibly special without demanding complex culinary maneuvers. This cake is a reliable star for any celebration, a beautiful centerpiece on any cake stand, and a masterclass in flavor contrast, balancing sweet coconut, tart raspberries, and rich cream cheese frosting.
It’s the perfect kind of confection to whip up when you desire something more elegant than your everyday dessert, yet remain entirely comfortable and in control within your own kitchen. The clever use of a cake mix and pudding in the batter ensures wonderfully tender and consistent layers, while the homemade raspberry filling introduces an essential element of freshness and vibrant color. This dessert truly offers the best of both worlds: convenience and impressive results.
Why You Will Love This Recipe
- Delicate Coconut Layers: The cake boasts incredibly soft and moist coconut-infused layers that melt in your mouth, providing a delightful tropical base.
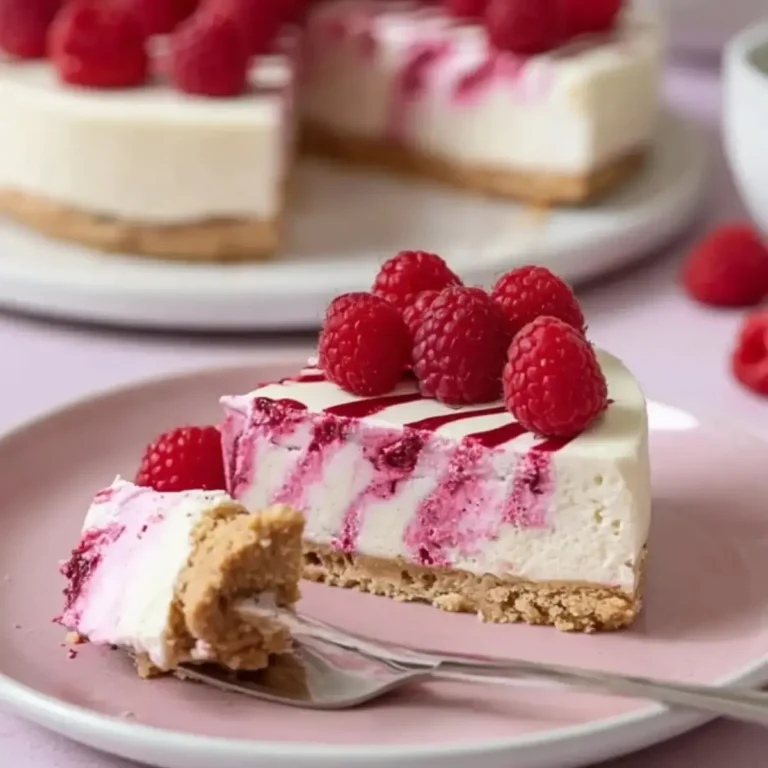
- Vibrant Raspberry Filling: A bright and slightly tart raspberry filling cuts through the sweetness, adding a beautiful burst of fruity flavor and a gorgeous visual appeal.
- Tangy Cream Cheese Frosting: A luscious, smooth cream cheese frosting provides a perfect counterpoint to the sweet cake and tart berries, creating a harmonious flavor profile.
- Elegant Presentation: With toasted coconut flakes adorning the exterior, this cake looks sophisticated and restaurant-quality, making it ideal for special occasions.
- Achievable Baking: Despite its impressive look and taste, the recipe incorporates elements like cake mix to simplify the process, making it accessible for bakers of all skill levels.
Ingredients You Need
The key to this stunning coconut cake lies in the quality of its components, each chosen to contribute to the final masterpiece. Using good quality ingredients will elevate the cake from good to absolutely divine, ensuring a memorable dessert experience for you and your guests. Fresh, ripe raspberries will offer the most vibrant flavor for the filling, while full-fat dairy products ensure a rich and creamy frosting.
Creamy Coconut Cake with Raspberry Filling
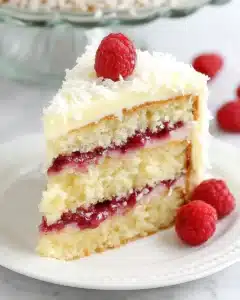
This bakery-style Coconut Cake with Raspberry Filling features soft coconut layers, a bright, tangy raspberry center, and a rich cream cheese frosting. It's a manageable yet polished dessert perfect for celebrations.
- Raspberry Filling: 2 cups raspberries (fresh or frozen and thawed), 1/4 cup granulated sugar, 2 teaspoons lemon juice, 1 1/2 tablespoons cornstarch, 1 1/2 tablespoons water, 1/4 teaspoon vanilla extract
- Cake: 4 large eggs, 1 package yellow cake mix, 1 small package vanilla instant pudding mix, 1/2 cup canola oil, 1 cup full-fat unsweetened coconut milk (stirred before measuring), 1 1/2 cups shredded coconut
- Cream Cheese Frosting: 12 ounces full-fat cream cheese (softened), 3/4 cup unsalted butter (room temperature), 6 cups icing sugar (sifted), 1 teaspoon vanilla essence, 1 to 2 tablespoons unsweetened coconut milk, 1 small pinch of salt
- Garnish: 1 cup toasted coconut flakes
- 1Prepare the Raspberry Filling: In a medium saucepan, simmer raspberries, sugar, and lemon juice until softened and thickened (8-10 mins). Whisk cornstarch and water into a smooth slurry, then stir into the raspberry mixture. Cook for 2-3 minutes until thickened. Stir in vanilla and cool completely. Refrigerate if needed.
- 2Prepare Cake Pans: Preheat oven to 325°F (163°C). Line the bases of three 8-inch round cake pans with parchment paper, spray with cooking spray, and set aside.
- 3Make Cake Batter: In a large bowl, combine cake mix, instant pudding, eggs, coconut milk, and canola oil. Beat for 2 minutes until smooth. Fold in shredded coconut.
- 4Bake Cake Layers: Divide batter evenly among prepared pans. Smooth tops. Bake for 22-25 minutes, until centers spring back lightly. Let cool in pans for 15-30 minutes, then invert onto a wire rack to cool completely.
- 5Prepare Frosting: Beat softened cream cheese and butter until smooth. Gradually add sifted icing sugar. Blend in vanilla essence, coconut milk, and salt until light and combined. Adjust consistency as needed.
- 6Toast Coconut: Melt 1 teaspoon of butter in a frying pan over low-medium heat. Add coconut and stir frequently until lightly golden. Watch carefully to prevent burning. Transfer to cool on wax paper.
- 7Assemble Cake: Place one cake layer top-side up on a serving stand. Spread a thin layer of frosting, then pipe a border around the edge. Spoon raspberry filling inside the border. Repeat with the second layer.
- 8Final Assembly: Place the final cake layer top-side down. Apply a thin crumb coat of frosting over the entire cake. Chill for 10-15 minutes. Cover the chilled cake with remaining frosting. Press toasted coconut flakes around the outside of the cake.
Keywords: Coconut Cake, Raspberry Filling, Cream Cheese Frosting, Bakery Style, Celebration Cake, Summer Dessert, Tropical Cake
You will find the precise quantities for each ingredient listed within the recipe card provided.
Variations
To truly personalize this delightful Coconut Cake with Raspberry Filling, consider a few creative twists that can tailor it to specific dietary needs or flavor preferences. Each variation aims to maintain the spirit of the original while offering a unique experience.
For a completely vegan iteration, the eggs in the cake can be replaced with a flax egg mixture (1 tablespoon flaxseed meal mixed with 3 tablespoons water, let sit for 5 minutes) or a commercial egg replacer. The dairy in the cake batter and frosting needs careful substitution; opt for full-fat canned coconut milk for the cake and a vegan cream cheese and butter alternative for the frosting, ensuring they are designed for baking to maintain texture and richness. You might also need to adjust the amount of liquid or fat in the frosting to achieve the desired consistency, perhaps using a touch more vegan butter or a plant-based milk.
If you’re aiming for a low-carb or keto-friendly version, the yellow cake mix is the primary component to swap. You would need a good quality keto cake mix or create a base using almond flour, coconut flour, a sugar substitute like erythritol or xylitol, baking powder, and a binder like psyllium husk. The raspberry filling would also require a sugar substitute, and the amount of fruit might need to be reduced slightly to keep the carb count low, focusing on the flavor rather than sweetness. The cream cheese frosting can remain largely the same, using a powdered sugar substitute.
Another exciting variation could involve infusing the cake layers with a hint of lime or cardamom for an unexpected aromatic complexity. A lime zest added to the cake batter would complement the coconut and raspberry beautifully, providing a subtle tropical tang. Alternatively, a pinch of ground cardamom folded into the batter could offer a warm, exotic note that pairs wonderfully with the sweet coconut and tart fruit, adding an element of surprise to every bite.
How to Prepare Coconut Cake with Raspberry Filling
Step 1: Crafting the Luscious Raspberry Filling
Begin by preparing the vibrant raspberry filling, as this element requires ample time to cool completely before it can be incorporated into the cake. This cooling period is crucial for ensuring the filling maintains its structure and doesn’t melt the frosting during assembly. In a medium saucepan, gently combine the raspberries, granulated sugar, and fresh lemon juice. The sugar will help draw out the juices from the berries, while the lemon juice brightens their natural flavor and adds a pleasant tang.
Cook this mixture over low to medium heat, stirring frequently, until the raspberries have softened significantly and begun to break down, creating a jam-like consistency. This usually takes about 8 to 10 minutes. Meanwhile, in a small separate bowl, whisk together the cornstarch and water until a smooth, lump-free slurry forms. This slurry is the key to achieving a nicely thickened filling that will sit beautifully between cake layers without becoming watery.
Once the raspberry mixture is jammy, slowly pour in the cornstarch slurry while stirring continuously. Continue to cook for another 2 to 3 minutes, stirring all the while, until the filling thickens to a point where it holds its shape. Remove the pan from the heat and stir in the vanilla extract for an extra layer of aroma and flavor. Transfer the cooked filling to a bowl and allow it to cool completely to room temperature, or even refrigerate it to speed up the process. A fully chilled filling is essential for clean cake assembly.
Step 2: Preparing the Cake Pans for Perfect Layers
Proper preparation of your cake pans is a non-negotiable step for achieving flawless cake layers, especially with a cake designed to be this tender. You will need three 8-inch round cake pans for this recipe. Start by lining the bottom of each pan with a circle of parchment paper. This creates a barrier that significantly reduces the chance of the cake sticking to the pan’s base.
Following the parchment paper, generously grease the bottom and sides of each pan with cooking spray or softened butter. Once greased, you can lightly dust the insides of the pans with a bit of flour or finely shredded coconut, tapping out any excess. This double layer of protection—parchment and grease/flour—ensures that your delicate coconut cake layers will release cleanly after baking, making the assembly process much smoother and preventing any heartbreak from torn cake.
Setting these prepared pans aside ensures they are ready to go as soon as the batter is mixed. The time and care invested in this simple step will pay dividends when it comes time to unmold your beautiful cake layers. Ensuring the pans are uniformly greased and floured is the foundation for professional-looking results, even if you are a beginner baker. Remember to work efficiently so the batter doesn’t sit too long before baking.
Step 3: Mixing the Tender Coconut Cake Batter
Now it’s time to create the batter for your wonderfully moist coconut cake layers. In a large mixing bowl, preferably one fitted with a stand mixer’s paddle attachment for best results, combine the yellow cake mix and the vanilla instant pudding mix. The pudding mix is a secret weapon for extra moisture and a tender crumb, contributing significantly to the cake’s delightful texture.
Add the large eggs, canola oil, and full-fat unsweetened coconut milk to the dry ingredients. Ensure the coconut milk has been stirred well before measuring, as the cream and liquid can separate. Beat these ingredients together on medium speed for approximately 2 minutes. You are looking for a smooth, silky batter that is thoroughly combined, with no pockets of dry ingredients remaining. The consistency should be pourable but not too thin.
Once the batter is luxuriously smooth, gently fold in the shredded coconut. Be careful not to overmix at this stage; you simply want to distribute the shredded coconut evenly throughout the batter. Overmixing can develop the gluten too much, leading to a tougher cake, which is the opposite of what we aim for here. This simple folding step ensures that every bite of your cake will have delightful little pockets of coconut texture.
Step 4: Baking and Cooling the Cake Layers
With your batter perfectly mixed and your pans expertly prepared, it’s time to bake these beautiful coconut layers to perfection. Preheat your oven to 325°F (163°C). This slightly lower temperature helps to ensure the cake bakes through gently without the edges getting too brown or dry, which is especially important for delicate coconut cakes.
Divide the prepared batter evenly among the three prepared 8-inch cake pans. Aim for an equal amount of batter in each pan to ensure they bake at the same rate and result in uniform layers. You can weigh the batter in each pan if you want to be extremely precise, but eyeballing it generally works well. Smooth the tops of the batter in each pan with a spatula to create an even surface for baking.
Bake the cakes for approximately 22 to 25 minutes. The cakes are done when the centers spring back lightly when gently touched and the edges appear just beginning to turn golden brown. Avoid overbaking, as this can lead to dry layers. Once baked, allow the cakes to rest in their pans on a wire rack for about 15 to 30 minutes. This resting period allows the cakes to firm up slightly, making them easier to handle. Then, carefully invert them onto the wire rack to cool completely. Ensuring they are fully cooled before frosting is paramount for successful assembly.
Step 5: Whipping Up the Dreamy Cream Cheese Frosting
While your cake layers are cooling to room temperature, it’s time to prepare the luscious cream cheese frosting that will bind and adorn your masterpiece. In a large mixing bowl, preferably with a stand mixer, beat the softened full-fat cream cheese and room-temperature unsalted butter until they are wonderfully smooth and creamy. Ensure both ingredients are truly at room temperature for the creamiest, most homogenous frosting texture. This step is critical for avoiding lumps in your frosting.
Gradually add the sifted icing sugar to the cream cheese and butter mixture, beating on low speed initially to prevent a sugar cloud, then increasing to medium speed. Sifting the icing sugar is a small but significant step that helps ensure a silky-smooth frosting without any grainy texture. Continue beating until the frosting is light, fluffy, and well combined. The amount of icing sugar can be adjusted slightly to achieve your desired sweetness and consistency.
Next, incorporate the vanilla essence for its warm, comforting aroma and flavor. Add 1 to 2 tablespoons of unsweetened coconut milk, starting with one and adding more if needed to reach your desired spreadable consistency. A small pinch of salt is also added; this often overlooked ingredient enhances all the other flavors and balances the sweetness of the frosting, making it truly sing. Beat the frosting just until it’s light, creamy, and perfectly combined. You want it soft enough to glide over the cake but firm enough to pipe a decorative border if desired.
Step 6: Toasting Coconut for Irresistible Crunch
The final decorative touch that elevates this cake is the irresistible crunch and aroma of toasted coconut flakes. This step is quick and requires careful attention, as coconut can go from perfectly golden to burnt in a matter of seconds. In a dry frying pan over low to medium heat, add the shredded or flaked coconut you’re using for garnish. You don’t need to add any butter or oil; dry toasting is often preferred for coconut to keep it from becoming greasy.
Stir the coconut frequently and constantly to ensure even toasting. Watch closely as the coconut begins to turn a beautiful light golden brown. The aroma will become wonderfully nutty and fragrant. This process usually takes just a few minutes. As soon as it reaches your desired golden hue, immediately remove the toasted coconut from the hot pan and spread it out onto a plate lined with wax paper or paper towels. This stops the cooking process and prevents the coconut from continuing to toast in residual heat.
Allow the toasted coconut to cool completely. Once cooled, these crunchy, aromatic flakes will be ready to be pressed around the sides of your assembled cake, adding a delightful textural contrast and a beautiful, professional finish. This simple step makes a significant impact on both the appearance and the overall sensory experience of the cake, making it truly irresistible.
Step 7: Assembling the Masterpiece
With all components ready—cooled cake layers, chilled raspberry filling, creamy frosting, and toasted coconut—it’s time for the grand finale: assembling your stunning Coconut Cake with Raspberry Filling. Place the first cake layer onto your serving plate or cake stand, ensuring the top side is facing upwards. This provides a stable base for the layers to follow.
Spread a thin, even layer of the cream cheese frosting over the entire surface of this first cake layer. This acts as a subtle base and helps to seal the cake. Then, using a piping bag fitted with a plain round tip (or even a ziplock bag with one corner snipped off), pipe a border of frosting around the outer edge of this layer. This border is crucial; it creates a dam to hold the raspberry filling neatly in place, preventing it from oozing out the sides.
Carefully spoon the cooled raspberry filling inside the frosting border, spreading it out evenly. Place the second cake layer on top of the filling, again with the top side facing upwards. Repeat the process: spread a thin layer of frosting, pipe a frosting border, and fill with raspberry goodness. Finally, place the third and final cake layer on top, this time with the bottom side facing upwards for a perfectly flat top surface. A thin, even crumb coat of frosting is then applied over the entire cake, including the top and sides. This seals in any loose crumbs and provides a smooth base for the final frosting layer. Chill the cake for 10-15 minutes to set the crumb coat before applying the final, generous layer of frosting, and then press the toasted coconut flakes around the outside of the cake.
Pro Tips for Coconut Cake with Raspberry Filling
- Cooling is Key: Always ensure the raspberry filling is completely cool before assembling the cake. Warm filling can melt the frosting border, causing the layers to slide and the filling to escape.
- Full-Fat is Your Friend: For the richest flavor and the smoothest frosting consistency, always opt for full-fat coconut milk and full-fat cream cheese. These ingredients contribute significantly to the luxurious texture of the cake and frosting.
- Crumb Coat Confidence: Applying a thin crumb coat of frosting and then chilling the cake for 10-15 minutes is a game-changer. This step firms up the frosting and traps any loose crumbs, allowing the final frosting layer to be applied much more cleanly and smoothly, and helps the toasted coconut adhere better.
- Gentle Toasting: When toasting the coconut flakes, keep the heat moderate and stir constantly. Coconut burns very quickly due to its natural oils and sugars, so vigilance is paramount to achieve that perfect golden hue and nutty aroma.
- Room Temperature Matters: Ensure your cream cheese and butter are properly softened to room temperature before making the frosting. This is essential for achieving a smooth, lump-free, and easily spreadable frosting.
Serving Suggestions for Coconut Cake with Raspberry Filling
Decoration
The exterior of this cake is already a showstopper with its coating of toasted coconut flakes. For an extra touch, consider piping a decorative border around the top edge of the cake using the cream cheese frosting. You could also add a few fresh raspberries or a sprinkle of edible flowers on top for a burst of color and elegance. A light dusting of powdered sugar over the top, just before serving, can also add a delicate, snowy finish.
Side Dishes
While this cake is wonderfully complete on its own, it pairs beautifully with a simple scoop of high-quality vanilla bean ice cream. The cold, creamy contrast to the cake’s flavors and textures is delightful. For a lighter accompaniment, a small side of fresh berries, perhaps a mix of raspberries, strawberries, and blueberries, can enhance the fruity theme.
Creative Serving Ideas
For a more informal gathering, consider serving individual cake slices with a dollop of sweetened whipped cream or a drizzle of raspberry coulis. You can also present the cake as part of a dessert buffet, allowing guests to enjoy it alongside other treats. If you are looking for a slightly more sophisticated presentation, serve small, elegant slices with a tiny glass of dessert wine, such as a Moscato d’Asti, or a rich espresso.
Preparation & Storage
Storing Leftovers
Due to the presence of cream cheese frosting and fruit filling, this Coconut Cake with Raspberry Filling must be stored in the refrigerator. Cover the cake tightly with plastic wrap or place it in an airtight cake container to prevent it from drying out and to protect it from absorbing odors from other foods. Properly stored, leftovers can remain delicious for up to 4 days.
When you’re ready to serve leftover cake, it’s best to allow it to sit at room temperature for about 15 to 20 minutes before slicing. This brief resting period helps the frosting to soften slightly, restoring a more tender texture to the cake itself and allowing the full flavors to be appreciated. Chilled cake can sometimes taste a bit dense, so this step makes a noticeable difference in enjoyment.
Freezing
This cake freezes remarkably well, making it an excellent candidate for advance preparation. You can freeze the entire cake, or more conveniently, individual slices. Wrap each slice very securely in plastic wrap, followed by a layer of aluminum foil or placing them in an airtight freezer-safe container. This double protection helps to prevent freezer burn.
Frozen cake slices can be stored for up to 2 months. To thaw, remove the wrapped slice from the freezer and place it in the refrigerator overnight. Once thawed in the fridge, let it sit at room temperature for about 15-20 minutes before enjoying, just as you would with refrigerated leftovers, to achieve the best texture and flavor.
Reheating
Reheating is generally not necessary for this type of cake, as it is best served at a cool to room temperature. The cream cheese frosting and raspberry filling are designed to be enjoyed chilled or slightly softened from refrigeration. Attempting to reheat the cake might cause the frosting to melt and the filling to become too runny, compromising the cake’s structure and overall appeal.
The focus should be on bringing the cake to the optimal serving temperature after refrigeration. As mentioned, allowing it to sit out for a short period is the recommended method for enjoying its best texture. If you are serving a slice that has been frozen, the overnight thawing in the refrigerator followed by a brief period at room temperature is the ideal approach.
Frequently Asked Questions
-
Can I make the raspberry filling ahead of time?
Absolutely! The raspberry filling is an excellent component to prepare in advance. In fact, it tends to thicken and develop a better consistency as it chills. Once cooled, store it covered in the refrigerator. Before using it to assemble the cake, give it a gentle stir to ensure it’s smooth and spreadable. This make-ahead step significantly streamlines the final assembly process.
-
My cake layers seem very delicate; how can I prevent them from sliding or breaking during assembly?
The key to preventing sliding cake layers lies in a few crucial techniques. Firstly, ensuring the raspberry filling is completely cooled and thickened is vital; it acts as a stable layer. Secondly, piping a sturdy border of cream cheese frosting around each layer before adding the filling creates a dam that contains it. Finally, chilling the cake after applying the initial crumb coat significantly firms everything up, making the final frosting layer much more manageable and preventing movement.
-
Can I substitute frozen raspberries for fresh ones in the filling?
Yes, you can definitely use frozen raspberries for the filling. Thaw them completely before you begin cooking the filling. Frozen berries may release a bit more liquid as they cook compared to fresh ones, but the cornstarch slurry you add will effectively thicken the mixture to the desired jam-like consistency, ensuring the filling sets up beautifully between the cake layers.