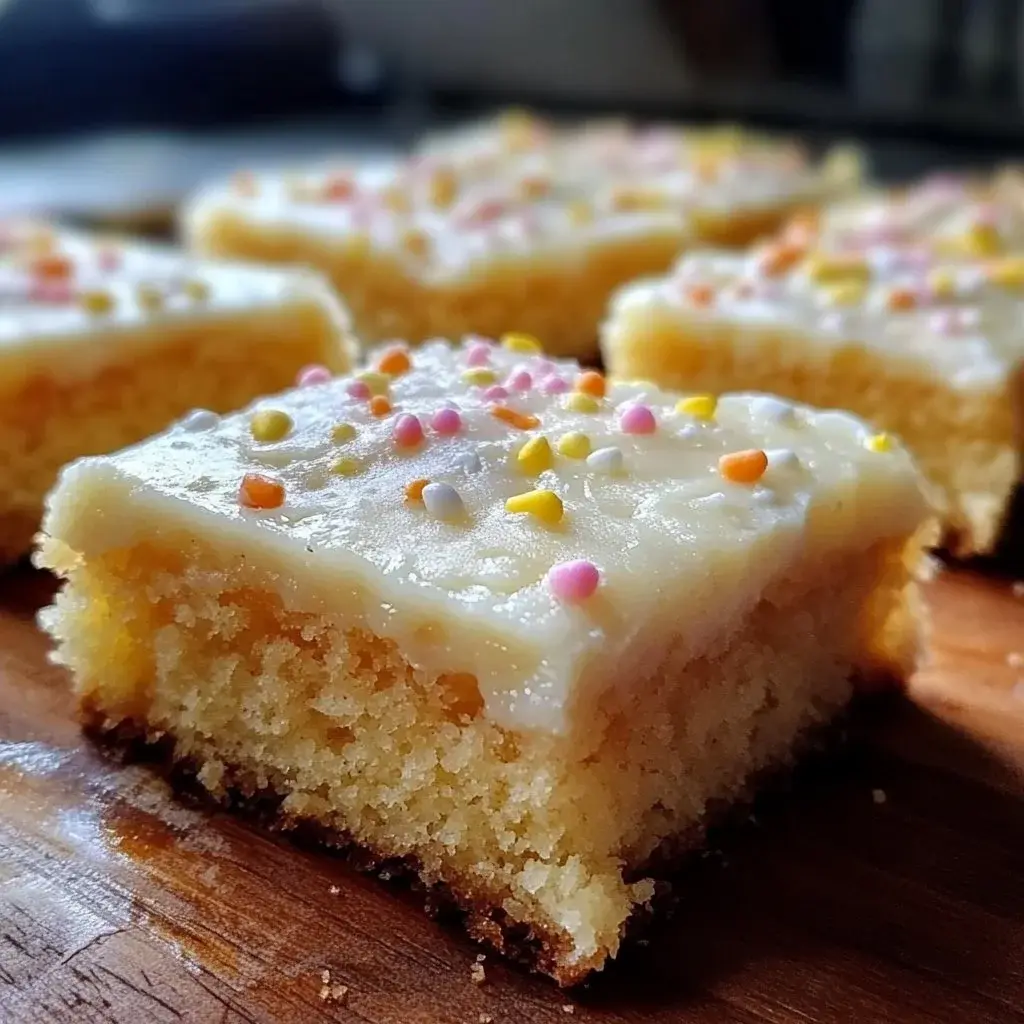
Ultimate Frosted Sugar Cookie Bars
Making desserts at home can be one of the most rewarding experiences. Imagine a warm batch of Frosted Sugar Cookie Bars, fresh out of the oven, filling your kitchen with a delightful aroma.
These bars are not just any ordinary cookies; they are a soft, chewy treat topped with a luscious frosting that’s simply irresistible. You might wonder why this recipe is so special. Well, it’s incredibly easy to whip up, makes a generous batch, and you can customize it in countless ways to suit any occasion.
Whether you want to celebrate a birthday, a school event, or just have a cozy night in, Frosted Sugar Cookie Bars are perfect. They are versatile enough to pair with a cup of tea or coffee, making them suitable for both gatherings and quiet afternoons. And let’s not forget the joy of sharing homemade treats with family and friends.
The smiles you’ll receive as they sink their teeth into these delicious bars will be a reward in itself. If you love sugar cookies but don’t want the fuss of rolling out dough and cutting shapes, this recipe is for you. It combines the classic flavors of sugar cookies in a bar form that’s quick and easy to bake. Have you ever bored of the same old cookie recipes? Give these Frosted Sugar Cookie Bars a try, and you’ll find a new favorite. The joy these bars bring is bound to leave a lasting impression on anyone who tries them.
Why You Will Love This Recipe
- Delicious Flavor: The combination of butter, sugar, and vanilla creates a rich taste that appeals to all ages, making these bars a universally loved treat.
- Simple Preparation: This recipe requires minimal effort with straightforward steps, making it perfect for novice bakers who want to achieve impressive results with ease.
- Versatile Customization: You can easily change the flavors or colors of the frosting to match any celebration, theme, or personal preference, allowing for endless creativity.
- Family-Friendly Appeal: Adults and kids alike love sugar cookies, and these bars are sure to please every palate with their classic, comforting taste.
- Perfect for Sharing: A large batch means more to share at parties, picnics, or even as thoughtful homemade gifts that are always appreciated.
Ingredients You Need
The success of these delightful Frosted Sugar Cookie Bars hinges on the quality and freshness of your ingredients. Using good quality butter, fresh eggs, and pure vanilla extract will significantly enhance the overall flavor profile and texture of both the cookie base and the creamy frosting.
Frosted Sugar Cookie Bars
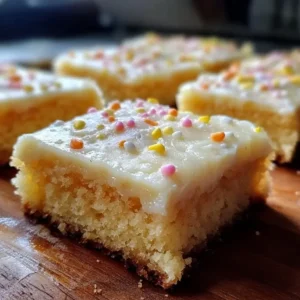
These Frosted Sugar Cookie Bars are incredibly easy to make, yielding a soft, chewy treat topped with a luscious frosting. They are perfect for any occasion, from birthdays to cozy nights in, and can be customized endlessly with colors and sprinkles.
- 2 cups all-purpose flour
- 1 cup granulated sugar
- 1/2 cup unsalted butter, softened
- 1 large egg
- 1 teaspoon vanilla extract
- 1/2 teaspoon baking powder
- 1/4 teaspoon salt
- 1 cup powdered sugar
- 2 tablespoons milk
- 1 teaspoon vanilla extract for frosting
- Food coloring (optional)
- 1Preheat oven to 350°F (175°C). Gather all ingredients.
- 2In a bowl, sift together the all-purpose flour, baking powder, and salt.
- 3In another bowl, cream together softened unsalted butter and granulated sugar until light and fluffy, about 2-3 minutes.
- 4Add the egg and vanilla extract to the butter-sugar mixture and mix well.
- 5Gradually add the dry ingredients to the wet mixture, stirring until just combined.
- 6Spread the cookie dough evenly in a greased or parchment-lined baking pan.
- 7Bake for 20-25 minutes until lightly golden and a toothpick comes out clean.
- 8Allow the baked bars to cool completely on a wire rack.
- 9Mix together powdered sugar, milk, and vanilla for the frosting until smooth. Add food coloring if desired.
- 10Spread the frosting over cooled bars and let it set before cutting into squares.
Keywords: cookie bars, Easy Dessert, frosted bars, Homemade Treats, Sugar Cookie
- all-purpose flour: a fine, versatile flour that forms the tender structure of the cookie bars.
- granulated sugar: provides sweetness and contributes to the tender crumb and slightly crisp edges.
- unsalted butter, softened: essential for richness, flavor, and achieving a light, creamy texture when mixed.
- large egg: binds the ingredients together, adds moisture, and contributes to the overall structure and richness.
- vanilla extract: imparts a warm, classic aroma and flavor that is synonymous with sugar cookies.
- baking powder: acts as a leavening agent, helping the bars to rise and achieve a light, cake-like texture.
- salt: balances the sweetness and enhances the overall flavor profile of the cookie base.
- powdered sugar: forms the base of the smooth, sweet, and luscious frosting.
- milk: thins the powdered sugar to create a spreadable frosting consistency; water or cream can also be used.
- vanilla extract for frosting: adds another layer of classic vanilla flavor to the sweet topping.
- food coloring (optional): allows for vibrant and festive customization of the frosting to match any theme or occasion.
The exact quantities for each ingredient are detailed in the recipe card above, ensuring you have the perfect balance for a delicious outcome every time.
Variations
To elevate your Frosted Sugar Cookie Bars beyond the classic, consider infusing them with exciting new flavors. Adding a touch of citrus zest, like lemon or orange, to the cookie dough can provide a bright, refreshing counterpoint to the sweetness, making them particularly delightful during warmer months or as a palate cleanser after a rich meal. This simple addition transforms the familiar into something wonderfully vibrant and unexpected, appealing to those who enjoy a nuanced flavor profile in their desserts.
For those seeking a richer, more decadent experience, a chocolate chip variation is an absolute winner. Gently fold in your favorite chocolate chips—milk, dark, or white—into the cookie dough before pressing it into the pan. The melted pockets of chocolate interspersed with the soft, sweet cookie base create a delightful texture contrast and a burst of comforting chocolate flavor with every bite. This modification is perfect for any chocolate lover and adds a satisfying depth to the traditional sugar cookie bar.
Another exciting avenue for variation involves introducing seasonal spices or extracts. During the autumn, a pinch of cinnamon and nutmeg, or a teaspoon of pumpkin pie spice, can transform these bars into a cozy, autumnal treat. For the winter holidays, peppermint extract in the frosting, or a sprinkle of crushed candy canes, adds a festive flair. These seasonal adaptations not only enhance the flavor but also make your Frosted Sugar Cookie Bars a perfect fit for holiday celebrations, offering a taste of the season in every delicious square.
How to Prepare Frosted Sugar Cookie Bars
Step 1: Gathering and Preparing Your Ingredients
Before embarking on the baking journey for these delightful Frosted Sugar Cookie Bars, it’s crucial to gather all your ingredients. Having everything measured and ready ensures a smooth and efficient preparation process, minimizing the chances of forgetting a key component. Take a moment to read through the entire recipe to familiarize yourself with each step and the expected outcome.
Simultaneously, you’ll want to preheat your oven to the specified temperature, typically 350°F (175°C). This step is fundamental for even baking. An oven that is not properly preheated can lead to undercooked centers and overcooked edges, compromising the desired texture of your cookie bars. Ensure your oven rack is positioned in the center of the oven for optimal heat circulation.
Prepare your baking pan by greasing it thoroughly with butter or non-stick cooking spray, or by lining it with parchment paper. Parchment paper is particularly helpful as it creates a non-stick surface and allows for easy removal of the baked bars. This proactive preparation ensures that once your dough is ready, you can promptly transfer it to the pan without delay, maintaining the dough’s optimal temperature and consistency.
Step 2: Combining the Dry Ingredients
In a medium-sized mixing bowl, you will combine all the dry ingredients. This typically includes the all-purpose flour, baking powder, and salt. Using a whisk or a fork to combine these elements ensures that they are evenly distributed throughout the flour mixture. This even distribution is critical for proper leavening and consistent flavor in the final cookie bars.
Sifting the flour before adding it to the bowl is a highly recommended step that many bakers overlook. Sifting aerates the flour, removing any lumps and ensuring a lighter, more tender crumb in your finished product. This also helps the dry ingredients to combine more uniformly without excessive mixing later on, which can toughen the dough.
Once combined, set this bowl of dry ingredients aside. It will be gradually incorporated into the wet ingredients in a later step. Keeping the dry ingredients separate until this point is a standard baking practice that helps to control gluten development and ensures the dough achieves the perfect consistency for bars.
Step 3: Creaming the Butter and Sugar
In a separate, larger mixing bowl, begin the process of creaming the softened unsalted butter and granulated sugar. This is a cornerstone technique in baking that introduces air into the mixture, which contributes significantly to the texture and lift of the final bars. Using an electric mixer, either a stand mixer with a paddle attachment or a hand mixer, is highly recommended for this step to achieve the best results efficiently.
Continue to beat the butter and sugar together for approximately 2 to 3 minutes, or until the mixture becomes visibly lighter in color and achieves a fluffy, cloud-like consistency. The mixture should appear pale yellow and feel airy, indicating that ample air has been incorporated. This creaming process is vital; if the butter is too cold, it won’t cream properly, and if it’s too warm or melted, the mixture can become greasy, affecting the final texture.
Scrape down the sides and bottom of the bowl periodically with a spatula to ensure all the butter and sugar are incorporated evenly into the creaming process. This consistent scraping guarantees that the entire mixture is worked uniformly, leading to a homogenous batter in the subsequent steps. The airy texture achieved here is key to a tender cookie bar.
Step 4: Incorporating the Wet Ingredients
Once the butter and sugar have been perfectly creamed to a light and fluffy stage, it’s time to introduce the remaining wet ingredients. Add the large egg and the vanilla extract directly into the creamed butter-sugar mixture. These ingredients add moisture, richness, and essential binding properties to the cookie dough.
Mix these wet ingredients into the creamed mixture on a medium speed until they are thoroughly combined and the batter appears smooth and uniform. It’s important not to overmix at this stage, as excessive beating can lead to a tougher texture in the final cookie bars. A gentle but thorough incorporation is what you’re aiming for to create a cohesive wet base.
Ensure that the egg is fully integrated into the batter, and there are no streaks of yolk or white visible. The vanilla extract should also be evenly distributed, infusing the entire mixture with its characteristic warm aroma and flavor. This step completes the formation of the wet base, which is now ready to be combined with the dry ingredients.
Step 5: Combining Wet and Dry Mixtures
Now, it’s time to bring the two sets of ingredients together. Gradually add the combined dry ingredients (from Step 2) to the wet ingredients (from Step 4). It’s best to add them in two or three additions, mixing on low speed after each addition, or by gently folding them in with a spatula.
The key here is to mix only until the flour streaks just disappear. Overmixing the dough at this stage can develop the gluten in the flour too much, resulting in tough, dense cookie bars instead of the desired soft and chewy texture. A tender crumb is the hallmark of a great sugar cookie bar, and minimal mixing is crucial for achieving this.
The dough will likely be soft and perhaps a little sticky, which is perfectly normal for this type of recipe. Resist the urge to add more flour unless the dough is unmanageably sticky; often, a slight stickiness will resolve itself as the dough rests or as it bakes. The goal is a cohesive dough that holds together when pressed.
Step 6: Spreading the Dough in the Pan
With your dry and wet ingredients successfully combined to form a soft dough, the next step is to transfer and spread it evenly into your prepared baking pan. Use a spatula or your hands (lightly floured or greased if the dough is particularly sticky) to press the dough into the pan. Aim for an even layer across the entire surface of the pan, ensuring consistent thickness from edge to edge.
An even spread is vital for uniform baking. If some areas are thicker than others, they will bake at different rates, leading to some parts being perfectly done while others may be undercooked or overcooked. Take your time to gently smooth the surface, ensuring there are no significant dips or mounds. This evenness will also contribute to neat, uniform cuts once the bars are baked and cooled.
If the dough is proving very difficult to spread evenly, you can lightly dampen a spatula or your fingertips with water or a bit of cooking spray. This helps prevent the dough from sticking and makes it easier to achieve a smooth, level surface. A well-leveled dough is the foundation for perfectly shaped cookie bars ready for baking.
Step 7: Baking to Perfection
Place the prepared pan containing the cookie dough into the preheated oven, typically in the center rack. Bake for the duration specified in the recipe, usually around 20 to 25 minutes. The exact baking time can vary depending on your oven and the thickness of your cookie bars.
You’ll know the bars are done when the edges are lightly golden brown and the center appears set, not wet or doughy. A toothpick inserted into the center of the bars should come out clean or with a few moist crumbs attached; if it comes out with wet batter, they need a few more minutes. Be careful not to overbake, as this can lead to dry, hard bars.
Once baked, carefully remove the pan from the oven. Allow the bars to cool in the pan for a few minutes before attempting to transfer them to a wire rack. This initial cooling period in the pan helps them to set up slightly, making them less likely to break when moved.
Step 8: Cooling Completely Before Frosting
This is perhaps the most critical step for achieving perfectly frosted bars. Once the bars have cooled in the pan for about 10-15 minutes, carefully invert them onto a wire cooling rack. If you used parchment paper, this process should be quite straightforward, allowing the bars to lift out easily.
It is absolutely imperative that the cookie bars cool down completely before you even think about applying the frosting. Attempting to frost warm or even slightly warm bars will cause the frosting to melt, slide off, and create a messy, unappealing result. Patience here is key to a professional-looking finish and a delightful taste experience.
Allow the bars to sit on the wire rack until they have reached room temperature, which can take anywhere from 1 to 2 hours depending on your kitchen’s ambient temperature. A completely cool surface ensures the frosting stays put and sets up beautifully, ready for cutting and serving. Use this time to prepare your frosting.
Step 9: Preparing the Frosting
While the cookie bars are cooling, you can prepare the luscious frosting that will crown them. In a clean medium bowl, combine the powdered sugar, milk (or your liquid of choice), and the additional teaspoon of vanilla extract for the frosting. Start with a smaller amount of milk and add more gradually as needed to achieve your desired consistency.
Whisk these ingredients together vigorously until the frosting is perfectly smooth, creamy, and free of lumps. You are aiming for a consistency that is thick enough to spread easily without being runny, but not so thick that it’s difficult to work with. If the frosting is too thick, add a tiny bit more milk; if it’s too thin, add a bit more powdered sugar.
If you desire colored frosting for a festive touch, this is the stage to add your food coloring. Add a drop or two of gel or liquid food coloring and stir until the color is uniformly distributed. Remember that gel colors are more concentrated, so start with a very small amount. The vibrant frosting is now ready to adorn your cooled cookie bars.
Step 10: Frosting and Serving
Once your Frosted Sugar Cookie Bars are completely cool to the touch, it’s time for the final, exciting step: frosting! Using an offset spatula or a regular knife, spread the prepared frosting evenly over the entire surface of the cooled cookie bars. Ensure you get all the way to the edges for a complete and attractive finish.
After frosting, allow the frosting to set slightly before cutting the bars into individual portions. This might take anywhere from 15 to 30 minutes at room temperature. If you’re in a hurry, you can place the pan in the refrigerator for about 10-15 minutes to speed up this setting process. Setting prevents the frosting from smearing when you cut the bars.
Once the frosting has set, use a sharp knife to cut the bars into your desired size and shape, typically squares or rectangles. Clean the knife between cuts for the neatest edges. Arrange the beautiful Frosted Sugar Cookie Bars on a serving platter and enjoy your delicious homemade creation!
Pro Tips for Frosted Sugar Cookie Bars
Softened Butter is Key: Ensure your butter is truly softened to room temperature but not melted. This is crucial for achieving that light and fluffy texture when creaming with sugar. Cold butter won’t cream properly, and melted butter can lead to greasy, flat bars.
Don’t Overmix the Dough: Once you add the dry ingredients to the wet, mix only until just combined. Overmixing develops gluten, which can result in tough, chewy bars instead of the desired tender, cake-like texture. Stop mixing as soon as you no longer see dry flour streaks.
Cool Completely Before Frosting: This cannot be stressed enough! Frosting warm bars will result in a melty, messy disaster. Patience is a virtue when it comes to desserts; allow the bars to cool entirely to room temperature before applying the frosting.
Even Thickness for Even Baking: When spreading the dough in the pan, strive for an even layer. Uneven thickness means uneven baking, with some parts potentially being undercooked while others are overbaked. Use a spatula or damp fingers to gently level the surface.
Parchment Paper is Your Friend: Lining your baking pan with parchment paper makes removing the baked bars significantly easier and cleaner. This prevents sticking and helps you achieve neat, intact bars, especially when transferring them to a cooling rack.
Serving Suggestions for Frosted Sugar Cookie Bars
Decoration
The decorative possibilities for Frosted Sugar Cookie Bars are virtually endless, allowing you to tailor them to any theme or celebration. Beyond simple sprinkles, consider using edible glitter for a touch of sparkle, edible pearls for a more sophisticated look, or even small edible shapes like stars or hearts. For holiday-themed bars, think about using colored frosting to mimic festive colors, or piping on intricate designs with different colored frostings. You can also use stencils to create patterns with powdered sugar or cocoa powder on top of the frosting before it fully sets.
Side Dishes
While Frosted Sugar Cookie Bars are a decadent dessert on their own, they pair wonderfully with a variety of accompaniments that can enhance the overall dessert experience. A simple side of fresh, seasonal fruit, like berries or sliced melon, can provide a refreshing contrast to the sweetness of the bars, offering a lighter element to the indulgence. For a truly celebratory spread, consider serving them alongside a scoop of high-quality vanilla bean ice cream or a rich chocolate gelato; the contrast in temperature and texture is always a crowd-pleaser.
A warm beverage is another classic pairing that complements the comforting nature of these cookie bars. A steaming mug of coffee, whether a simple brewed cup or a more elaborate latte, cuts through the sweetness and enhances the buttery notes of the cookie. Similarly, a soothing cup of herbal tea, like chamomile or peppermint, can offer a calming counterpoint. For a childhood throwback, a tall glass of cold milk is an indispensable partner to sugar cookies, creating a nostalgic and satisfying combination.
Creative Serving Ideas
To make your Frosted Sugar Cookie Bars even more special, think outside the traditional square cut. You can use cookie cutters to create fun shapes directly from the baked and frosted slab, though this works best if the frosting is applied after cutting. For parties, consider cutting them into smaller, bite-sized squares or rectangles, perfect for a dessert buffet or for guests to easily sample multiple treats. Another creative idea is to serve them as part of a larger dessert board, alongside other cookies, brownies, and perhaps some chocolate-dipped fruits.
For a whimsical presentation, especially for children’s parties, you could stack them or arrange them to resemble a small cake or building blocks. You could also slightly warm them before serving and top with a small dollop of whipped cream and a maraschino cherry for an elevated, à la mode presentation. If you’re feeling particularly ambitious, consider using them as a base for mini trifle cups, layering crumbled bars with whipped cream and fruit, offering a delightful deconstructed dessert experience.
Preparation & Storage
Storing Leftovers
Proper storage is key to maintaining the delightful texture and flavor of your Frosted Sugar Cookie Bars. Once completely cooled and frosted, store them in an airtight container at room temperature. This prevents them from drying out or absorbing unwanted odors from other foods in your pantry or refrigerator. A well-sealed container is your best defense against staleness and ensures they remain as fresh as possible for consumption.
If you live in a particularly warm or humid climate, you might consider refrigerating the bars, especially if they have a cream cheese or buttercream frosting that could spoil at room temperature. However, be aware that refrigeration can sometimes alter the texture of the cookie base, making it slightly firmer. If you refrigerate them, it’s best to bring them back to room temperature for about 15-20 minutes before serving to soften them up.
When storing, avoid stacking too many layers of bars directly on top of each other without protection. Placing a layer of parchment paper or wax paper between layers can prevent the frosting from sticking to the bottom of the bars above, maintaining their neat appearance. This simple step ensures each bar remains pristine and ready to be enjoyed.
Freezing
Frosted Sugar Cookie Bars freeze exceptionally well, making them an excellent make-ahead treat. To freeze them, ensure they are completely cooled and the frosting is set. Cut the bars into individual portions, as this makes it easier to thaw only what you need. Place the cut bars in a single layer on a baking sheet lined with parchment paper and freeze for about 1-2 hours until they are firm.
Once firm, carefully transfer the frozen bars into a freezer-safe airtight container or a heavy-duty freezer bag. Remove as much air as possible from the bag before sealing to prevent freezer burn. Properly packaged, these bars can maintain their delicious quality for up to three months in the freezer. This is a fantastic way to have a homemade treat ready for unexpected guests or a sudden craving.
When you are ready to enjoy your frozen Frosted Sugar Cookie Bars, it’s best to thaw them slowly to prevent condensation from affecting the texture. Remove the container from the freezer and place it in the refrigerator overnight. This gradual thawing process allows the bars to come back to room temperature gently, preserving their soft cookie texture and the integrity of the frosting. Alternatively, you can let them thaw at room temperature for a few hours, but the refrigerator method is generally preferred for best results.
Reheating
Reheating Frosted Sugar Cookie Bars is generally not recommended if you want to maintain their original texture and appearance. The delicate frosting can melt or become greasy when subjected to heat, and the cookie base can become dry or tough. The primary goal of reheating would likely be to slightly soften a bar that has become too firm from refrigeration or freezing, or simply to serve it warm.
If you absolutely desire a slightly warm cookie bar, the microwave is the quickest option, but it must be done with extreme caution. Place a single bar on a microwave-safe plate and heat it in very short intervals, perhaps 5-10 seconds at a time, checking its warmth frequently. Overheating can quickly turn them mushy or hard. This method is best suited for those who enjoy a slightly gooey, warm cookie experience and are willing to sacrifice the frosting’s pristine condition.
For a less risky warm treat, consider serving the bars at room temperature after they have thawed from being frozen or refrigerated. If you wish to add a warm element, it’s often better to pair a thawed, room-temperature bar with a warm beverage like coffee or tea, or a small scoop of warm ice cream, rather than attempting to reheat the bar itself. This approach ensures the delightful qualities of the cookie and frosting are preserved.
Frequently Asked Questions
-
Can I prepare the cookie dough ahead of time and bake it later?
Yes, you can absolutely prepare the cookie dough for these Frosted Sugar Cookie Bars ahead of time. Once the dough is mixed and before it’s pressed into the pan, you can wrap it tightly in plastic wrap and store it in the refrigerator for up to 2-3 days. When you’re ready to bake, allow the dough to soften slightly at room temperature for about 20-30 minutes, then press it into the prepared pan and proceed with baking as usual. For longer storage, you can freeze the unbaked dough; it will keep for up to 3 months. Thaw it in the refrigerator overnight before using.
-
What are the best substitutions for common ingredients if I have dietary restrictions or limited pantry items?
There are several excellent substitutions you can make. For a dairy-free option, substitute the unsalted butter with a high-quality vegan butter alternative or coconut oil (though coconut oil may impart a slight flavor). For a gluten-free version, a 1:1 gluten-free baking flour blend works wonderfully in place of all-purpose flour; ensure it contains xanthan gum. If you need to reduce sugar, you can experiment with granulated sugar substitutes like erythritol or a monk fruit blend, though this may slightly alter the texture and sweetness profile. For the frosting, almond milk or oat milk can replace dairy milk.
-
Why did my Frosted Sugar Cookie Bars turn out dry or crumbly instead of soft and chewy?
Several factors can lead to dry or crumbly bars. The most common culprits are overbaking and inaccurate measuring of flour. If the bars are baked for too long, they will lose moisture and become dry. Always bake until the edges are just lightly golden and the center is set, and err on the side of underbaking slightly, as they will continue to cook as they cool. Additionally, if you scoop flour directly from the bag and pack it down, you might be using too much flour, which can make the bars dry and crumbly. It’s best to spoon flour lightly into your measuring cup and level it off. Incorrectly softened butter (too cold or too melted) can also affect the texture, leading to a less tender bar.