Irresistible Salted Caramel Brownie Bites: Fudgy Delights

The first time I sank my teeth into a Salted Caramel Brownie Bite, it felt like a true culinary awakening.
Imagine a rich, fudgy chocolate base cradling a gooey caramel center, creating an unforgettable dance of sweet and salty flavors that truly tantalize the senses. These delightful little morsels aren’t just a treat for the taste buds; they’re also incredibly simple to whip up and can easily be tailored to fit any dietary needs—think gluten-free or vegan! Whether you’re hosting a gathering or simply treating yourself after a long day, these brownie bites promise to impress while stealing a moment of pure joy and delectable indulgence.
Ready to learn how to make these irresistible treats that everyone will love and rave about for days? Let’s dive into the wonderful world of baking these mini masterpieces together!
Why You Will Love This Recipe
- Rich Flavor Combination: The exquisite blend of deep, dark chocolate and lusciously gooey salted caramel creates a mouthwatering experience that is simply unparalleled in every single bite.
- Easy Adaptability: Whether you follow a vegan lifestyle or need to avoid gluten, this recipe provides flexible and straightforward substitution options, ensuring everyone can partake in the deliciousness.
- Perfect for Any Event: These bites are not only ideal for casual get-togethers but also elegant enough for special celebrations, quickly making them a beloved crowd-pleaser.
- Quick to Make: The entire process is surprisingly speedy, allowing you to satisfy those intense sweet cravings in a remarkably short amount of time, perfect for impromptu dessert needs.
- Impressive Presentation: Despite their simple preparation, these brownie bites look incredibly sophisticated, making them a fantastic choice for impressing guests with minimal fuss.
Ingredients You Need
Crafting these Salted Caramel Brownie Bites begins with selecting high-quality ingredients that form the foundation of their incredible taste and texture. Using fresh, premium components is key to unlocking the full potential of this recipe, ensuring a truly satisfying baking experience and a delightful end product that speaks for itself.
Salted Caramel Brownie Bites
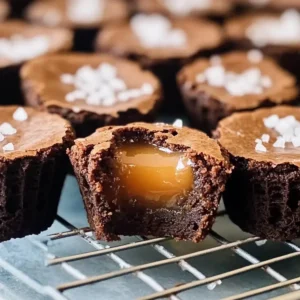
Rich, fudgy chocolate brownie bites with a gooey salted caramel center. These irresistible treats are easy to make and perfect for any occasion. They can also be adapted for gluten-free and vegan diets.
- For the Brownie Base:
- 12 tablespoons Unsalted Butter (Substitution: Use plant-based butter for a vegan option.)
- 1/2 cup Semisweet Chocolate Chips (Substitution: Dark chocolate chips can enrich the taste.)
- 1/2 cup Natural Cocoa Powder
- 1/2 teaspoon Instant Coffee Grounds (Optional: Omit if sensitive to caffeine.)
- 1 cup Light Brown Sugar (Substitution: Coconut sugar can lower the glycemic index.)
- 1/2 cup Granulated Sugar
- 2 large Eggs (Substitution: Flax eggs can be used for a vegan version.)
- 1 teaspoon Vanilla Extract
- 1 cup + 2 tablespoons All-Purpose Flour (Substitution: Gluten-free flour blend can be used for gluten-free option.)
- 1/2 teaspoon Baking Powder
- 1/2 teaspoon Salt (Optional: Use less for low-sodium diets.)
- For the Caramel Filling:
- 35 pieces Unwrapped Caramels (Substitution: Use homemade caramel for a fresher taste.)
- 1/2 cup Heavy Cream (Substitution: Coconut cream can be used for a dairy-free option.)
- For the Topping:
- Fine Sea Salt
- 1Preheat your oven to 350°F (175°C) and thoroughly grease a 24-count mini muffin tin.
- 2In a microwave-safe bowl, combine the unsalted butter and semisweet chocolate chips. Microwave in 30-second increments, stirring between each, until completely melted and smooth.
- 3Stir the cocoa powder, instant coffee grounds, light brown sugar, granulated sugar, eggs, and vanilla extract into the melted chocolate mixture until well combined and smooth.
- 4In a separate bowl, whisk together the all-purpose flour, baking powder, and salt. Gradually fold this dry mixture into the wet batter until just incorporated, being careful not to overmix.
- 5Fill each muffin cup about 1.5 tablespoons full with the batter. Bake in the preheated oven for 15-18 minutes, or until a toothpick inserted into the center comes out with moist crumbs.
- 6Remove the brownie bites from the oven and let them cool for about 5 minutes in the pan. Gently press the center of each bite with a small spoon or your thumb to create a well.
- 7In a saucepan over medium-low heat, combine the unwrapped caramels and heavy cream. Stir continuously until the mixture is completely melted and silky smooth.
- 8Carefully pour the melted caramel filling into each well of the brownie bites. Sprinkle a pinch of fine sea salt on top of each bite.
- 9Allow the brownie bites to cool completely in the pan before removing them from the molds for serving.
Keywords: Brownie Bites, Salted Caramel, Chocolate, Dessert, Baking, Easy Recipe, Kid-Friendly, Make-Ahead
- unsalted butter: provides a creamy base for richness and helps create a tender crumb.
- semisweet chocolate chips: offer a deep chocolate flavor that is the heart of the brownie base.
- natural cocoa powder: intensifies the chocolate flavor and contributes to the fudgy texture.
- instant coffee grounds: subtly enhances the chocolate notes, adding depth without an overpowering coffee taste.
- light brown sugar: adds moisture and a lovely caramel-like sweetness, contributing to the chewy texture.
- granulated sugar: helps achieve slightly crisp edges and provides overall sweetness.
- large eggs + egg yolk: act as binders, add richness, and contribute to the fudgy texture of the brownie bites.
- vanilla extract: imparts a warm, aromatic flavor that complements the chocolate and caramel beautifully.
- all-purpose flour: forms the structural base of the brownie bites, providing the necessary framework.
- baking powder: helps the bites rise slightly, contributing to a tender, not overly dense, texture.
- salt: balances the sweetness of the chocolate and caramel, bringing out all the flavors.
- unwrapped caramels: form the gooey, molten center that makes these bites so irresistible.
- heavy cream: helps melt the caramels smoothly, creating a luscious and pourable filling.
- fine sea salt: sprinkled on top, it creates the signature “salted” element, perfectly contrasting the sweetness.
The precise quantities for each ingredient, crucial for achieving the perfect balance of flavors and textures, are readily available within the detailed recipe card provided.
Variations
These Salted Caramel Brownie Bites are incredibly versatile, allowing for delightful adaptations to suit various dietary needs and flavor preferences. Experimenting with these variations can open up a whole new world of delicious possibilities, ensuring everyone can enjoy these decadent treats.
Vegan Delight: For a completely plant-based treat, swap the unsalted butter for your favorite vegan butter substitute. Replace the eggs with flax eggs—simply mix one tablespoon of ground flaxseed with three tablespoons of water and let it sit for a few minutes to thicken—and use a dairy-free caramel and coconut cream in place of heavy cream. The resulting brownie bites will be just as rich and satisfying.
Gluten-Free Indulgence: Those avoiding gluten can easily transform this recipe by substituting the all-purpose flour with a high-quality gluten-free all-purpose flour blend. Ensure the blend contains xanthan gum, which helps mimic the binding properties of gluten, to achieve the perfect fudgy texture.
Nutty Crunch Addition: Elevate the texture and flavor profile by folding in a handful of chopped toasted pecans or walnuts into the brownie batter before baking. The added crunch beautifully contrasts with the soft brownie and gooey caramel, offering an extra layer of sensory delight.
Double Chocolate Intensity: For the ultimate chocolate lover, use dark chocolate chips instead of semisweet in the brownie base. You can also add a tablespoon of extra cocoa powder to the dry ingredients for an even more profound chocolate experience that will truly captivate.
How to Prepare Salted Caramel Brownie Bite
Step 1: Preparing the Baking Environment
The initial step in creating these exquisite Salted Caramel Brownie Bites involves preparing your oven and baking equipment with meticulous care. Begin by preheating your oven to a precise 350°F (175°C), ensuring the temperature is perfectly calibrated for optimal baking. Simultaneously, take a standard 24-count mini muffin tin and prepare it for the batter by greasing it thoroughly with a quality baking spray or a light, even dusting of all-purpose flour.
This careful preparation of the muffin tin is absolutely crucial for ensuring that your finished brownie bites will release cleanly and effortlessly once baked. A well-greased tin prevents the delicate brownies from sticking, which can otherwise lead to breakage and a less appealing presentation. This simple yet vital step sets the stage for successful baking, guaranteeing that each bite maintains its perfect shape and integrity.
Allowing the oven to reach its set temperature ensures that the brownies begin to bake immediately and evenly from the moment they enter the heat. This uniformity in temperature is key to developing the desired fudgy texture and rich flavor, preventing hot spots that could lead to uneven cooking. Therefore, patience in this initial stage is a virtue that will be richly rewarded in the final outcome.
Step 2: Melting the Chocolate Base
Next, you will focus on creating the decadent chocolate foundation for your brownie bites by melting the butter and chocolate chips together. Select a microwave-safe bowl and combine the specified amount of unsalted butter with the semisweet chocolate chips. It is essential to use good quality chocolate for the best flavor and texture.
Place the bowl in the microwave and heat the mixture in short intervals, typically 30 seconds at a time. Between each interval, remove the bowl and stir the contents thoroughly. Continue this process until the butter is completely melted and the chocolate chips have dissolved into a smooth, glossy, and uniform liquid mixture. This smooth consistency is vital for a rich and fudgy brownie base.
The goal here is a perfectly emulsified blend of butter and chocolate. Overheating can cause the chocolate to seize or burn, so exercising caution and stirring frequently is paramount. The resulting melted chocolate mixture will form the luscious core of your brownie bites, infusing them with deep chocolate flavor and contributing significantly to their signature fudgy texture.
Step 3: Incorporating the Flavors
With the chocolate base beautifully melted, it’s time to introduce the remaining wet ingredients and flavor enhancers to create a cohesive and intensely flavored batter. Into the warm, melted chocolate and butter mixture, carefully stir in the natural cocoa powder, instant coffee grounds, light brown sugar, granulated sugar, large eggs, the extra egg yolk, and the fragrant vanilla extract. Each ingredient plays a role in developing the complex flavor profile and the desirable fudgy consistency.
Whisk these ingredients together vigorously and patiently until all components are thoroughly combined and the batter achieves a wonderfully smooth, glossy, and uniform appearance. This stage is where the magic truly starts to happen, as the distinct components meld together to form a rich, luxurious chocolate concoction. The sugars will dissolve, the eggs will emulsify, and the cocoa powder will fully hydrate, creating a decadent foundation for your brownie bites.
The addition of coffee grounds, while optional for some, plays a crucial role in amplifying the chocolate flavor, making it taste even richer and more pronounced without imparting a distinct coffee taste. The combination of brown and granulated sugar contributes to both the moisture and the slightly crisp edges, striking a perfect balance of textures. This smooth, intensely flavored batter is now ready for the dry ingredients.
Step 4: Combining and Baking to Perfection
Now, it’s time to unite the wet and dry components to form the final brownie batter, ensuring a delicate touch to maintain that coveted fudgy texture. In a separate mixing bowl, whisk together the all-purpose flour, baking powder, and salt until they are thoroughly combined and evenly distributed. This ensures that the leavening agent and salt are dispersed uniformly throughout the flour, preventing any pockets of unevenness.
Gently fold this dry mixture into the wet chocolate batter using a spatula or wooden spoon. It is imperative to mix only until the ingredients are just incorporated; overmixing can develop the gluten in the flour too much, resulting in tougher brownies, which is precisely what we want to avoid for that tender, fudgy outcome. A few streaks of flour remaining are perfectly acceptable at this stage.
Using a tablespoon or a small cookie scoop, carefully fill each prepared mini muffin cup approximately 1.5 tablespoons full with the luscious batter. Do not overfill them, as this can cause overflow during baking. Place the muffin tin in the preheated oven and bake for 15 to 18 minutes. It’s essential to start checking for doneness around the 15-minute mark; a toothpick inserted into the center should come out with moist crumbs attached, indicating that the brownies are perfectly fudgy and not overbaked.
Step 5: Creating the Caramel Wells
Once your beautifully baked brownie bites have achieved that perfect state of fudgy goodness, the next crucial step involves preparing them to receive their sweet, gooey caramel filling. Carefully remove the mini muffin tin from the oven and allow the brownie bites to cool in the tin for about 5 minutes. This brief cooling period is important as it allows the brownies to set slightly, making them more stable and easier to handle without collapsing.
After this initial cooling phase, gently create a small indentation or “well” in the center of each brownie bite. This can be achieved by using the back of a small spoon, a petite measuring spoon, or even your thumb (if the brownies are cool enough to touch comfortably and safely). The goal is to press down just enough to form a small cavity without breaking through the bottom or sides of the brownie bite, creating a perfect little nest for the caramel.
This carefully crafted well is designed to hold the luscious caramel filling, preventing it from spilling out during baking or once the bites are assembled. Allowing the brownie bites to cool slightly further while you prepare the caramel is also important, primarily to avoid any accidental burns from handling the warm baked goods or the hot caramel itself. This thoughtful preparation ensures that the caramel will nestle perfectly into each bite, creating that irresistible gooey center.
Step 6: Preparing the Luscious Caramel Filling
Now comes the delightful process of preparing the rich, flowing caramel that will transform these brownie bites into true decadent treasures. In a small saucepan, combine the unwrapped caramels with the heavy cream. It is important to use good quality caramels for the smoothest melt and best flavor.
Place the saucepan over medium-low heat. Stir the mixture continuously and patiently using a whisk or a heat-resistant spatula. The key here is gentle, constant motion to ensure the caramels melt evenly and the cream incorporates smoothly without scorching the bottom of the pan. Continue stirring until the caramel and cream mixture is completely melted, lump-free, and achieves a beautifully silky-smooth consistency, resembling a thick, pourable sauce.
This smooth, luscious caramel is the heart of the “salted caramel” experience, providing that wonderfully gooey texture that oozes out when you bite into the brownie. Ensuring there are no remaining caramel lumps is vital for a pleasant mouthfeel and an appealing appearance. This perfectly prepared caramel is now ready to fill the wells of your pre-baked brownie bites, promising pure indulgence.
Step 7: Filling, Finishing, and Cooling
The final assembly of your Salted Caramel Brownie Bites is where all the elements come together to create a masterpiece of sweet and salty perfection. Carefully spoon or pour the warm, melted caramel filling into each of the wells you created in the brownie bites. Be generous, filling each cavity generously to ensure a satisfying gooey center.
Once each well is filled with the luscious caramel, it’s time for the signature touch: a sprinkle of fine sea salt. Sprinkle a tiny pinch of sea salt over the top of each caramel-filled bite. This final flourish is what elevates these treats from simply sweet to the sophisticated “salted caramel” experience, perfectly balancing the richness of the chocolate and the sweetness of the caramel.
Allow the brownie bites to cool completely in the muffin tin. This cooling process is essential as it allows the caramel filling to set and firm up slightly, making the bites easier to handle and preventing them from falling apart. Once fully cooled, gently remove them from the mini muffin molds to serve and enjoy the ultimate treat that combines fudgy chocolate, gooey caramel, and a hint of salt.
Pro Tips for Salted Caramel Brownie Bites
Elevate your baking game with these expert tips, designed to ensure your Salted Caramel Brownie Bites turn out absolutely perfect every single time. These little details can make a significant difference in texture, flavor, and overall presentation, turning a good bake into an extraordinary one.
Perfect Muffin Wells: To guarantee that your caramel-filled wells are neat and that the bites release flawlessly, be exceptionally thorough when greasing and flouring your mini muffin tin. Using a baking spray that contains flour is particularly effective. This prevents any sticking and ensures that each brownie bite maintains its structural integrity, looking as beautiful as it tastes.
Watch the Timer Closely: Brownies, especially smaller ones, can go from perfectly fudgy to overbaked very quickly. Start checking your brownie bites for doneness at the 15-minute mark of the baking time specified. A toothpick should ideally come out with moist crumbs attached, signaling that the centers are still wonderfully gooey.
High-Altitude Baking Adjustments: If you reside at a higher altitude, you may need to make slight adjustments to your baking powder. A common recommendation is to reduce the amount of baking powder slightly, as it can cause baked goods to rise too rapidly and then potentially collapse. This ensures your brownies achieve that ideal rich, dense texture.
Cool for Integrity: Patience is key when it comes to the final stages. Always allow your brownie bites to cool completely in the pan before attempting to remove them or cut them. This cooling period is crucial for the structure of the brownies and for the caramel to set properly, preventing them from becoming a sticky mess and ensuring they hold their delightful shape.
Masterful Storage: To keep your Salted Caramel Brownie Bites tasting fresh and wonderfully chewy, store them in an airtight container. At room temperature, they will stay delicious for up to 3 days. For a longer shelf life and a firmer texture, refrigerate them for up to a week, but allow them to come back to room temperature before serving for the best gooey experience.
Serving Suggestions for Salted Caramel Brownie Bites
Decoration
These bites are delightful on their own, but a few decorative touches can elevate them to showstopper status. A delicate drizzle of extra melted caramel sauce over the top, in addition to the filling, adds an extra layer of gooey sweetness and visual appeal. A light dusting of flaky sea salt right before serving enhances both the flavor and the sophisticated look, creating a beautiful contrast against the dark brownie.
For a touch of elegance, consider a sprinkle of edible gold or silver dust for a glamorous shimmer, especially for special occasions. A tiny dollop of whipped cream or a small dollop of coconut cream on top, finished with a single raspberry or a sliver of candied orange peel, offers a pop of color and an additional flavor dimension.
Side Dishes
While these brownie bites are perfectly self-contained treats, they can also be paired with complementary elements to create a more elaborate dessert experience. A scoop of high-quality vanilla bean ice cream or a swirl of rich chocolate gelato provides a cool, creamy counterpoint to the warm, fudgy brownie and gooey caramel.
Fresh berries, such as ripe raspberries, strawberries, or even a few tart blueberries, offer a refreshing contrast to the sweetness, cutting through the richness with their natural acidity. A small glass of milk, a robust espresso, or a warm cup of coffee can also serve as perfect accompaniments, enhancing the chocolate notes and providing a comforting sipping experience.
Creative Serving Ideas
Transform these individual bites into a stunning dessert platter by arranging them artfully on a serving board. You can create a “brownie sundae bar” by offering various toppings like whipped cream, chopped nuts, sprinkles, and extra sauces for guests to customize their own creations.
For a unique presentation, serve them warm with a side of crème anglaise or a dusting of powdered sugar for a classic yet elegant touch. They also make for a delightful addition to a dessert charcuterie board, nestled amongst other small sweets, fruits, and cheeses, offering a delightful sweet bite amidst a variety of flavors and textures.
Preparation & Storage
Storing Leftovers
Should you find yourself with any leftover Salted Caramel Brownie Bites, storing them properly is key to maintaining their delicious texture and flavor. For best results, place the cooled brownie bites in an airtight container. At room temperature, they will remain wonderfully chewy and fudgy for up to 3 days.
If you wish to extend their shelf life or prefer a firmer texture, they can be stored in the refrigerator for up to a week. Ensure the container is well-sealed to prevent them from drying out. When ready to enjoy refrigerated bites, allow them to sit at room temperature for about 15-20 minutes to soften the caramel and brownie for the optimal texture.
Freezing
These Salted Caramel Brownie Bites freeze exceptionally well, making them an excellent choice for preparing ahead of time. To freeze, ensure the brownie bites are completely cooled. Individually wrap each bite tightly in plastic wrap to protect it from freezer burn. Once individually wrapped, place the bites in a freezer-safe airtight container or a heavy-duty zip-top bag.
When stored properly in the freezer, these delightful treats can maintain their quality for up to 3 months. This is a fantastic way to have a ready supply of homemade treats for unexpected cravings or last-minute guests. Properly wrapped, they retain their fudgy texture and gooey caramel center beautifully.
Reheating
If you are serving frozen brownie bites, the best way to enjoy them is to thaw them overnight in the refrigerator. Once thawed, you can enjoy them at room temperature, or for an extra special treat, you can gently reheat them. Place a thawed brownie bite on a microwave-safe plate and heat it in the microwave on low power for about 10-15 seconds.
This brief reheating will warm the brownie slightly and re-melt the caramel center, bringing back that wonderfully gooey texture that is so characteristic of these bites. Be cautious not to overheat, as this can make the brownie dry or the caramel too hot. The goal is a gentle warmth that enhances the sensory experience.
Frequently Asked Questions
-
How do I ensure my caramel filling stays gooey and doesn’t harden?
To maintain a gooey caramel filling, it’s essential to use good quality caramels that are fresh and pliable. When melting them with heavy cream, stir constantly over medium-low heat until just smooth and combined; overcooking can cause them to become tough. Ensure you don’t overbake the brownie bites themselves, as this can also affect the overall texture of the finished product. If your caramel does harden slightly, gently reheating the brownie bite for a few seconds in the microwave can often revive its gooeyness.
-
What are the best substitutes for eggs and heavy cream if I want to make these vegan?
For a vegan version, the eggs can be effectively replaced with flax eggs; simply whisk together 1 tablespoon of ground flaxseed with 3 tablespoons of water and let it sit for 5-10 minutes until it forms a gel-like consistency. For the heavy cream in the caramel, a full-fat coconut cream (the solid part from a can of refrigerated coconut milk) works wonderfully and provides a rich, creamy texture without a strong coconut flavor in the final caramel. Ensure you use a good quality vegan butter for the brownie base as well.
-
Can I make these brownie bites in advance for a party, and how should I store them?
Yes, these Salted Caramel Brownie Bites are perfect for making ahead! You can bake the brownie bites and let them cool completely. Store them in an airtight container at room temperature for up to 3 days. For the caramel filling, you can prepare it up to 2 days in advance and store it in an airtight container in the refrigerator; gently warm it before filling the brownie wells. For longer storage, you can freeze the baked, unfilled brownie bites for up to 2 months. Add the caramel and salt just before serving for the freshest results.