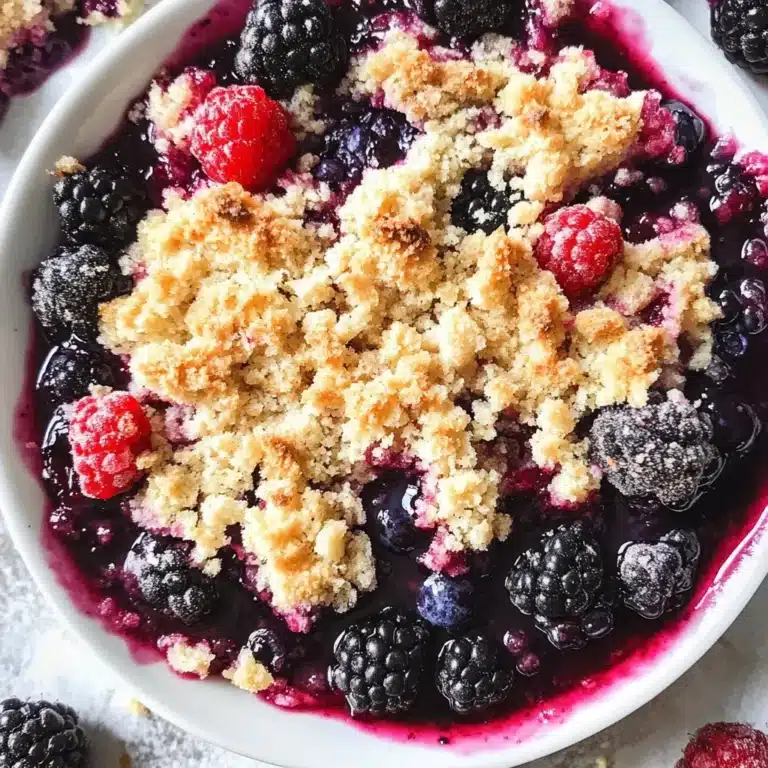
Irresistible Buttery Blueberry Rhubarb Crumble Bars

As I sifted through my pantry this morning, the sight of vibrant blueberries and tart rhubarb sparked a sudden, sweet inspiration for baking. That creative spark led to these Buttery Blueberry Rhubarb Crumble Bars, a dessert that perfectly balances sweet fruit notes with a signature tangy punch.
These bars are an incredibly easy-to-make treat that works beautifully for weekend picnics or a simple cozy gathering at home. With just a handful of pantry staples, you can whip up this crowd-pleasing delight that stores perfectly for busy weeks ahead.
Why You Will Love This Recipe
- Quick Preparation: You can have this impressive dessert ready for the oven with minimal effort and very little cleanup required.
- Perfectly Balanced Flavors: The natural tartness of the rhubarb cuts through the sweetness of the berries, creating a sophisticated profile that delights every palate.
- Customizable Texture: The combination of a chewy oat base and a crunchy, buttery crumble topping provides a multi-dimensional eating experience in every single bite.
- Seasonal Flexibility: This base recipe is highly adaptable, allowing you to swap in whatever fresh fruits are currently in season for year-round baking success.
- Crowd-Pleasing Appeal: Whether you are hosting a large party or just craving a breakfast-friendly treat, these bars offer a professional look and taste that everyone will love.
Ingredients You Need
Success in baking begins with high-quality components, so aim to use fresh, crisp stalks and plump, juicy berries whenever they are available. These specific ingredients were chosen to create a stable, delicious structure that holds together perfectly while remaining soft enough to melt in your mouth. You can find the exact measurements and full ratios for these ingredients in the recipe details below.
Buttery Blueberry Rhubarb Crumble Bars
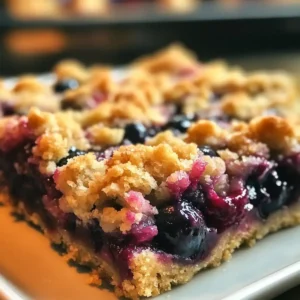
These Buttery Blueberry Rhubarb Crumble Bars perfectly balance sweet and tangy flavors. With a rich, buttery crumble base and a jammy fruit filling, they are a delightful crowd-pleaser for any gathering.
- 7 oz Rhubarb, chopped
- 6 oz Blueberries
- 4 oz Sugar
- 2.5 tbsp Cornstarch
- 1.5 tsp Ground Cinnamon
- 1 Lemon, zested and juiced
- 4 oz Old-fashioned Oats
- 7.5 oz All-Purpose Flour
- 7.5 oz Brown Sugar
- 0.5 tsp Baking Powder
- 6.5 oz Cold Butter, cubed
- 0.5 tsp Salt
- 1Preheat oven to 356°F (180°C) and line a 9×13 inch baking dish with parchment paper.
- 2In a large bowl, whisk together flour, oats, brown sugar, baking powder, and salt.
- 3Work the cold butter into the dry mixture until it resembles coarse breadcrumbs.
- 4Reserve one-third of the mixture, and press the remainder firmly into the baking dish.
- 5Bake the base for 10 minutes until lightly set.
- 6In a saucepan, combine rhubarb, blueberries, sugar, cornstarch, and cinnamon. Cook over medium heat for 15 minutes until thickened.
- 7Stir in lemon zest and juice.
- 8Spread the fruit filling over the base and sprinkle the reserved crumble on top.
- 9Bake for 25–30 minutes until golden brown and bubbling.
- 10Cool in the pan for at least 2 hours before slicing.
Keywords: blueberry, rhubarb, crumble bars, dessert, picnic, baking
- rhubarb: fresh or frozen stalks to provide the signature tart flavor profile.
- blueberries: juicy, sweet berries that thicken beautifully when cooked into a compote.
- sugar: granulated white sugar helps to balance the acidity of the fruit filling.
- cornstarch: an essential thickening agent that prevents the fruit layer from becoming too watery.
- ground cinnamon: adds a warm, aromatic spice that ties the fruit flavors together.
- lemon: fresh zest and juice are used to brighten the overall flavor of the filling.
- old-fashioned oats: provide a hearty, chewy texture that contrasts with the soft fruit.
- all-purpose flour: acts as the primary structure builder for both the base and the crumb topping.
- brown sugar: adds a deep, molasses-like sweetness and helps create a beautiful golden color.
- baking powder: helps the topping achieve a light, airy rise during the baking process.
- cold butter: the most critical element for achieving a flaky, rich, and delicious crumble texture.
- salt: a small pinch is required to elevate and highlight the sweetness of all other ingredients.
Variations
The Vegan Twist: You can easily transform these into a plant-based treat by substituting the dairy butter for a high-quality vegan butter stick or refined coconut oil. Ensure your brown sugar is certified vegan, and your bars will remain just as buttery and rich.
Low-Carb Modifications: If you are looking to reduce the sugar content, feel free to use a granulated erythritol or monk fruit sweetener for both the filling and the crumble topping. Swap the traditional flour for an almond flour blend, though note that this may result in a slightly more delicate structure.
Tropical Fusion: Elevate the recipe by adding a tablespoon of shredded unsweetened coconut to the topping mixture for an exotic crunch. You can also mix in a splash of vanilla extract or even a tiny bit of cardamom to push the flavor profile toward a sophisticated, tropical dessert experience.
How to Prepare Blueberry Rhubarb Crumble Bars
Step 1: Preheat and Prepare
The First Step: Start by preheating your oven to 356°F (180°C) to ensure a consistent baking environment. Preparing the oven early is vital for allowing the heat to stabilize before the bars enter.
Lining the Pan: Line a standard 9×13 inch baking dish with parchment paper, leaving a slight overhang on the sides for easy removal later. This small effort ensures your bars will slide out perfectly without sticking to the pan walls.
Step 2: Combine Dry Ingredients
The Base Foundation: In a large mixing bowl, combine your all-purpose flour, old-fashioned oats, and brown sugar. Adding the baking powder and salt at this stage ensures they are distributed evenly throughout the mixture.
Achieving Texture: Use a whisk to blend these dry components until the mixture looks uniform. An even distribution of the flour and oats is the secret to a consistent crumb structure throughout the entire base layer.
Step 3: Incorporate Cold Butter
The Golden Rule: The butter must be kept cold, ideally cut into small 1/2-inch cubes right before you add it to the bowl. Keeping the butter cold is the only way to achieve that sought-after, flaky, and crumbly texture in your finished dessert.
Mixing Technique: Use a pastry cutter or your fingertips to work the butter into the flour mixture until it resembles coarse, damp sand. Don’t overwork the butter, as you want to maintain small, pea-sized chunks for the best final result.
Step 4: Form the Crumble Base
Reserving the Topping: Before pressing anything, scoop out about one-third of the crumble mixture and set it aside in a separate bowl. This reserved portion will become your beautiful, crunchy top layer later.
Pressing the Base: Take the remaining two-thirds of the mixture and dump it into your prepared baking dish. Firmly press this down with the back of a measuring cup or your hands to create a compact, even foundation.
Step 5: Bake the Base
Pre-Baking: Slide the base into the center of your oven and bake for approximately 10 minutes. This short period helps the base set and prevents it from becoming soggy when the fruit is added on top.
Monitoring: You are looking for a light set; it should not be fully browned at this point. Once it looks slightly firm to the touch, carefully remove it from the oven to prepare for the assembly phase.
Step 6: Cook the Fruit Filling
Combining Ingredients: In a medium saucepan, combine your chopped rhubarb, fresh blueberries, sugar, cornstarch, and spices. Cooking the filling in a pan beforehand ensures that the cornstarch activates properly, creating a thick, jam-like consistency.
The Cooking Process: Heat the mixture over medium heat for about 15 minutes, stirring occasionally to prevent sticking. The fruit will break down, releasing its vibrant juices and thickening into a glossy, delicious compote.
Step 7: Add Freshness
The Final Zest: Just as you remove the saucepan from the heat, stir in the fresh lemon juice and zest. This final addition provides a necessary brightness that cuts through the richness of the butter and the sweetness of the sugar.
Aromatic Finish: The scent of fresh lemon mixing with the cooked berries is one of the best parts of this process. This final step is crucial for balancing the acidity and making the flavor pop.
Step 8: Assemble the Bars
Pouring the Filling: Carefully spread the hot fruit filling evenly across the top of your pre-baked crust. Work quickly but gently so that you do not disturb the integrity of the warm base beneath.
Adding the Topping: Take your reserved crumble mixture and sprinkle it evenly over the top of the fruit layer. Do not press it down this time, as leaving it loose will allow it to bake into a beautiful, crunchy topping.
Step 9: Bake the Assembled Bars
The Final Bake: Place the dish back into the oven and bake for 25 to 30 minutes. You want the fruit filling to be bubbling actively around the edges of the pan.
Check for Color: The topping should reach a deep golden brown color, indicating that the butter has toasted and the oats are perfectly cooked. If you need a bit more color, you can broil it for thirty seconds, but watch it very carefully.
Step 10: Cool and Serve
Patience is Key: Allow the bars to cool in the pan for at least two hours before attempting to cut them. Cooling is the most important step for letting the fruit filling set into a sliceable, stable square.
Slicing Technique: Use a sharp, hot knife to make clean cuts through the bars. If the bars are still slightly warm, you may need to wipe your knife clean between each cut to ensure every piece looks perfect.
Pro Tips for Blueberry Rhubarb Crumble Bars
Tip 1: Always ensure your butter is cubed and cold before mixing; if it gets too soft, your crumble will become greasy rather than crunchy. You can even place the butter cubes in the freezer for 10 minutes before you start.
Tip 2: To achieve that perfect, clean slice, try chilling the bars in the refrigerator for an extra hour after they have reached room temperature. This makes the filling firm and prevents the bars from crumbling when you cut through the oat layer.
Tip 3: Don’t skip the lemon zest. The natural oils in the zest are much more fragrant than the juice alone, providing a deep, sophisticated citrus flavor that complements the earthiness of the rhubarb perfectly.
Tip 4: If you find the fruit filling is too watery, you can slightly increase the amount of cornstarch by an extra half teaspoon. Always make sure the filling is visibly thickening in the pan before pouring it onto the base.
Tip 5: Use a piece of Pinterest-worthy parchment paper that hangs over the edges of your pan. This makes it incredibly easy to lift the entire batch out of the pan once cooled for cleaner slicing on a cutting board.
Serving Suggestions for Blueberry Rhubarb Crumble Bars
Decoration
For a beautiful presentation, dust the tops of the cut bars with a light coating of powdered sugar. A small sprig of fresh mint placed on each square adds a pop of green that looks stunning against the deep purple and red colors of the fruit.
Side Dishes
These bars are hearty enough to stand alone, but they pair exceptionally well with a cold scoop of vanilla bean ice cream. If you prefer something less sweet, a dollop of unsweetened Greek yogurt provides a creamy tang that balances the rich, buttery topping perfectly.
Creative Serving Ideas
For a brunch setting, serve these warm with a side of fresh berries and a hot cup of black coffee. Alternatively, turn these into a decadent dinner party dessert by drizzling a warm balsamic reduction over the plates, which enhances the savory-sweet notes of the rhubarb.
Preparation & Storage
Storing Leftovers
Keep your leftover bars in an airtight container to maintain their texture. They stay fresh at room temperature for up to two days, but they are best kept in the refrigerator if you live in a humid climate. Always place a sheet of parchment paper between layers if you are stacking them to prevent sticking.
Freezing
These bars freeze remarkably well for up to three months. To maximize quality, wrap each individual square in plastic wrap, then place them inside a heavy-duty freezer bag or container. When you are ready to indulge, simply move them to the refrigerator to thaw overnight.
Reheating
To restore the crunch of the topping, reheat your bars in the oven at 350°F (175°C) for about five to seven minutes. Using the microwave is faster, but it may soften the crumble, so use short 15-second intervals if you are in a rush.
Frequently Asked Questions
- How do I ensure my fruit filling isn’t too runny? The secret lies in cooking the filling until it reaches a thick, jam-like consistency in the saucepan before it ever enters the oven. If you see the liquid bubbling and thickening significantly, you have likely reached the right stage; however, don’t be afraid to let it cook for an extra minute or two if the berries look too loose.
- Can I use frozen fruit if fresh isn’t available? Yes, frozen rhubarb and blueberries are excellent alternatives, but they do require an extra step. You should thaw them completely and drain away any excess liquid before tossing them with the cornstarch and sugar, as the excess water from the freezing process can make the base soggy.
- Are these bars suitable for a gluten-free diet? You can certainly adapt this recipe by swapping the all-purpose flour for a high-quality gluten-free 1-to-1 baking flour blend. Just make sure that your old-fashioned oats are specifically labeled as certified gluten-free, as standard oats are often cross-contaminated during harvesting or processing.