Ultimate Raspberry Chocolate Chunk Ice Cream – Deliciously Easy
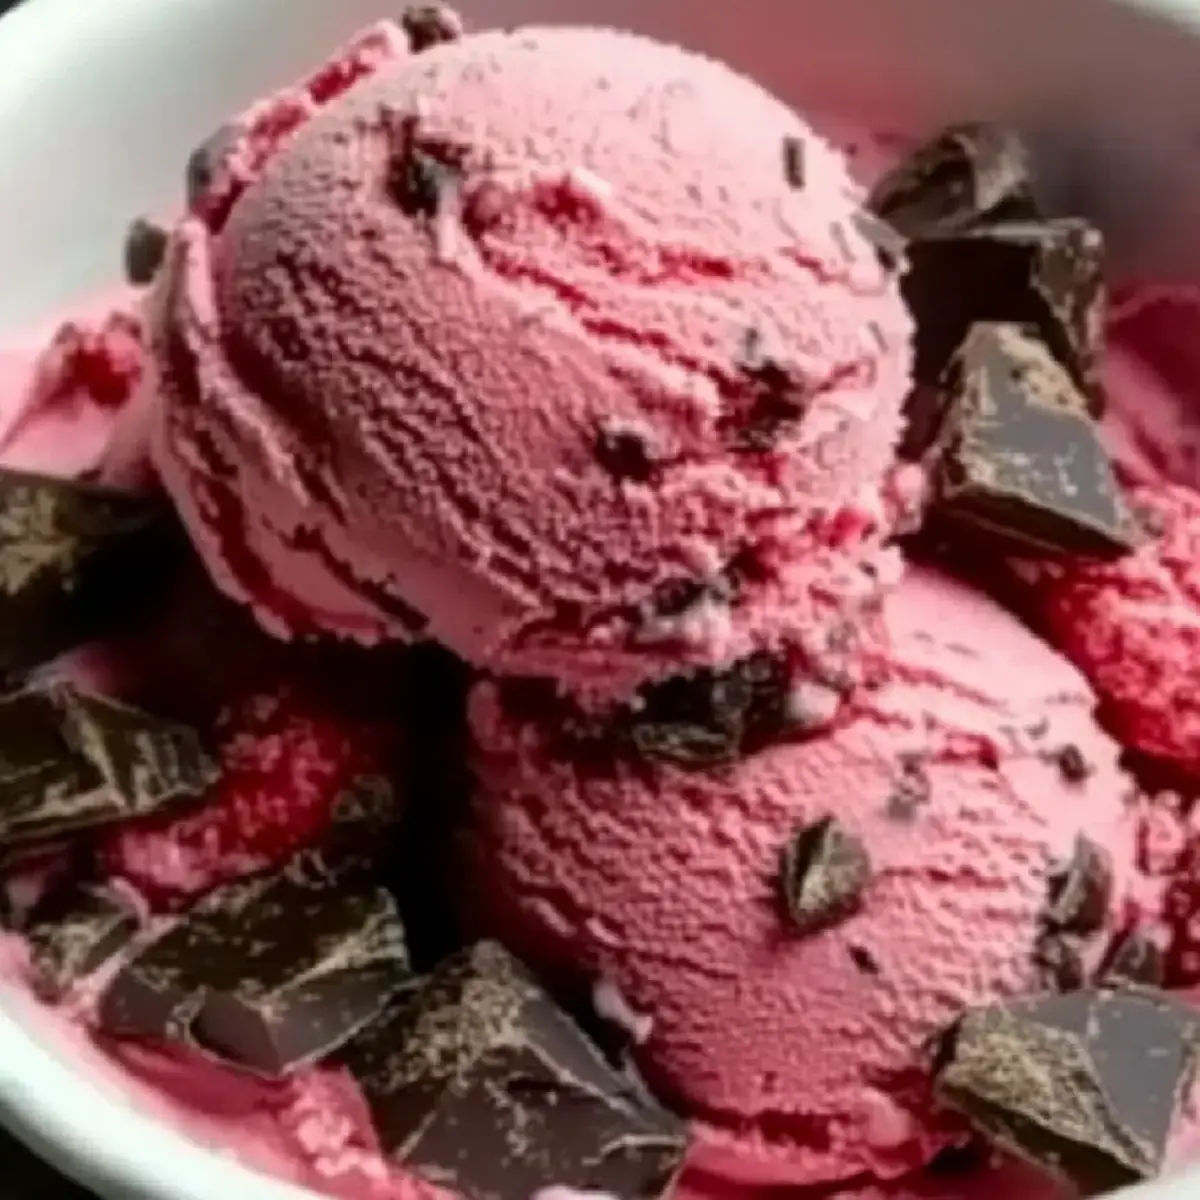
The summer sun casts a warm glow as I stand in my kitchen, eager to craft something special. Nothing captures the essence of sunny days quite like a scoop of Raspberry Chocolate Chunk Ice Cream, a truly delightful and refreshing homemade treat.
This eggless delight marries the tangy sweetness of ripe raspberries with rich, dark chocolate chunks for an unparalleled flavor experience. Not only is this recipe incredibly easy to whip up, but it’s also customizable for those seeking dairy-free or vegan options, ensuring everyone can enjoy this frozen wonder.
Why You Will Love This Recipe
- Creamy Indulgence: This Raspberry Chocolate Chunk Ice Cream delivers a luscious, velvety texture that melts in your mouth, making it a delight for any dessert lover.
- Customizable Options: With easy adjustments for dairy-free and vegan alternatives, everyone can enjoy this treat! Transform it to suit any dietary preference while maintaining exceptional taste.
- Vibrant Flavor: The refreshing combination of sweet-tart raspberries paired with rich chocolate chunks creates a winning taste that dances on your palate, perfect for summer festivities or cozy evenings.
- Quick and Easy: The straightforward process means you can whip up this tasty dessert in no time, allowing you to enjoy a gourmet treat without the fuss.
- Perfect for Sharing: This dish not only looks beautiful with its lovely pink color but offers a crowd-pleasing experience that’s perfect for gatherings, making it a guaranteed hit.
Ingredients You Need
Choosing the right ingredients is paramount to achieving that perfect scoop of Raspberry Chocolate Chunk Ice Cream. High-quality frozen raspberries provide the foundational tartness and vibrant color, while fresh lemon juice amplifies their natural sweetness. The richness comes from luscious heavy whipping cream, which creates that signature velvety texture we all adore.
Raspberry Chocolate Chunk Ice Cream
This eggless Raspberry Chocolate Chunk Ice Cream marries the tangy sweetness of ripe raspberries with rich, dark chocolate. It's an easy-to-make, customizable, and refreshing summer treat with a creamy texture that feels indulgent without being heavy.
- For the Base:
- 2 cups Frozen Raspberries (Fresh can be used if preferred)
- 1 cup Sugar (Adjust based on taste preferences)
- 2 tbsp Lemon Juice (Freshly squeezed is always best)
- 2 cups Heavy Whipping Cream (Substitute with full-fat coconut milk for dairy-free options)
- For the Flavor:
- 1 tsp Vanilla Extract (Choose pure for the best flavor)
- 1 pinch Coarse Salt (A small pinch goes a long way)
- For the Texture:
- 1 cup Chocolate Chunks (You can swap for white chocolate or nuts if desired)
- Optional Addition:
- 1 tbsp Vodka (Omit for a firmer texture)
- 1Make Raspberry Puree: In a medium saucepan, combine frozen raspberries, sugar, and lemon juice. Heat over medium heat until the mixture reaches a gentle boil (about 5 minutes). Stir until raspberries soften and sugar dissolves.
- 2Blend: Let the raspberry mixture cool slightly, then transfer to a blender and puree until smooth (about 30 seconds to 1 minute).
- 3Strain: Pour the raspberry puree through a fine-mesh sieve into a bowl. Use a spatula to press the mixture, extracting as much puree as possible. Cover and chill in the refrigerator for several hours or overnight.
- 4Mix: In a large mixing bowl, whisk together the chilled raspberry puree, heavy whipping cream, vanilla extract, and a pinch of coarse salt until well combined.
- 5Churn: Pour the mixture into an ice cream maker and churn according to manufacturer's instructions, about 20–25 minutes, until it reaches a soft-serve consistency.
- 6Add Chocolate: In the final minute of churning, add the chopped chocolate chunks and optional vodka. Mix briefly until evenly distributed.
- 7Freeze: Transfer the churned ice cream into a freezer-safe container, smooth the top, cover tightly, and freeze for 8–10 hours or overnight until firm.
Keywords: ice cream, raspberry, chocolate, dessert, eggless, summer, frozen dessert, homemade
- frozen raspberries: provides the sweet-tart base; fresh can be used if preferred.
- sugar: sweetens the mixture; feel free to adjust based on your taste preferences.
- lemon juice: enhances raspberry flavor; freshly squeezed is always best.
- heavy whipping cream: creates a rich texture; substitute with full-fat coconut milk for dairy-free options.
- vanilla extract: adds warmth and depth; choose pure for the best flavor.
- coarse salt: elevates overall flavor; a small pinch goes a long way.
- chocolate chunks: delivers richness; you can swap for white chocolate or nuts if desired.
- vodka: lowers the freezing point for creamier ice cream; omit for a firmer texture.
The exact quantities for each ingredient are detailed within the accompanying recipe card, ensuring precision in your creation.
Variations
This Raspberry Chocolate Chunk Ice Cream is wonderfully adaptable, allowing you to tailor it to your specific cravings and dietary needs.
For a delightful dessert experience that caters to vegans, simply swap the heavy whipping cream for full-fat coconut milk. This substitution lends a subtle tropical undertone and ensures a creamy, decadent result without any dairy.
If you’re embracing a low-carb lifestyle, consider using a sugar substitute like erythritol or stevia, adjusting the amount to your preferred sweetness. You can also experiment with adding a handful of chopped almonds or pecans for a satisfying crunch instead of chocolate chunks, offering a delightful nutty contrast.
Another exciting variation involves infusing a floral essence into the ice cream. A splash of elderflower cordial or a few drops of rosewater can add a sophisticated and fragrant note, transforming this classic dessert into something truly extraordinary. For those who enjoy a bit of a kick, a tiny pinch of cayenne pepper or a hint of freshly grated ginger can create an unexpected yet delightful spicy-sweet profile.
How to Prepare Raspberry Chocolate Chunk Ice Cream
Step 1: Prepare the Raspberry Puree
Begin by combining your chosen raspberries, whether fresh or frozen, with sugar and lemon juice in a medium saucepan. Place this mixture over medium heat, allowing it to reach a gentle simmer. This initial heating process helps to soften the raspberries and ensures the sugar dissolves completely, creating a beautifully blended base.
Stir the mixture continuously as it heats, which should take approximately five minutes. You’ll notice the raspberries begin to break down and the liquid will transform into a vibrant, luscious pink. The aroma of warm raspberries is simply intoxicating at this stage, signaling that the foundation for your delicious ice cream is forming beautifully.
The goal here is to achieve a consistency where the raspberries are tender and easily mashable, and the sugar has fully incorporated into the juices. This step is crucial for extracting the maximum flavor from the fruit and preparing it for the next stage of blending. A well-made raspberry puree is the heart of this ice cream’s exquisite taste and color.
Step 2: Blend the Raspberry Mixture
Once the raspberry mixture has cooled slightly, carefully transfer it to a high-powered blender. The ideal consistency for this stage is a smooth, seedless puree that will form the vibrant core of your ice cream. Blending for about 30 seconds to a minute should be sufficient to achieve this velvety texture.
Ensure that you blend long enough to completely break down any remaining raspberry solids and fully emulsify the ingredients. If your blender struggles, you might need to add a tiny splash of water or lemon juice to help it along. The smoother the puree, the more luxurious the final texture of your Raspberry Chocolate Chunk Ice Cream will be.
The objective is to create a silken liquid that is free of any fibrous raspberry bits or seeds. This meticulous blending ensures that every single bite of your ice cream is incredibly smooth and enjoyable. A well-blended puree guarantees that the raspberry flavor is distributed evenly throughout the entire batch.
Step 3: Strain for Ultimate Smoothness
To achieve that impeccably smooth, restaurant-quality texture in your Raspberry Chocolate Chunk Ice Cream, straining the puree is an essential step. Pour the blended raspberry mixture through a fine-mesh sieve set over a clean bowl. This process will effectively separate the seeds from the luscious fruit pulp.
Use a spatula or the back of a spoon to press down on the solids in the sieve. This action helps to extract as much of the flavorful liquid as possible, maximizing your yield of pure raspberry essence. Don’t be tempted to skip this step; it truly makes a significant difference in the final mouthfeel of your ice cream.
After straining, cover the bowl containing the smooth raspberry puree and refrigerate it for at least several hours, or ideally overnight. This chilling period allows the flavors to meld and deepen, resulting in a more complex and satisfying taste for your homemade treat. Proper chilling is a key contributor to a superb ice cream base.
Step 4: Combine the Creamy Elements
In a large mixing bowl, gently whisk together the thoroughly chilled raspberry puree with the cold heavy whipping cream. Add the pure vanilla extract and a small pinch of coarse salt to this mixture. The salt acts as a flavor enhancer, beautifully balancing the sweetness and tartness of the raspberries.
Continue whisking until all the ingredients are well combined and the mixture takes on a uniform, creamy pink hue. This should take about one to two minutes of steady whisking. You’re looking for a homogenous blend that promises a rich and satisfying ice cream base, ready for churning.
The goal is to create a smooth, luscious liquid that is ready to be transformed into ice cream. Ensuring everything is well-mixed at this stage contributes to an even flavor distribution and a consistent texture throughout your final product. This is the point where the magic of turning simple ingredients into frozen delight truly begins to take shape.
Step 5: The Churning Process
Now it’s time to bring your Raspberry Chocolate Chunk Ice Cream to life using your ice cream maker. Carefully pour the prepared creamy raspberry mixture into the bowl of your ice cream maker. Always follow the manufacturer’s specific instructions for your particular model to ensure optimal results.
Churn the mixture for approximately 20 to 25 minutes. During this time, the ice cream will gradually thicken and increase in volume, transforming into a soft-serve consistency. You’ll know it’s nearing completion when the texture becomes noticeably denser and it starts to pull away from the sides of the machine.
The slow churning process incorporates air into the mixture while simultaneously freezing it. This aeration is critical for achieving that light, fluffy, and incredibly smooth texture characteristic of well-made ice cream. The soft-serve consistency achieved here is the perfect stage before adding the final delightful inclusions.
Step 6: Incorporate the Chocolatey Goodness
During the final minute of the churning cycle, it’s time to add your generous portions of chocolate chunks. If you are using the optional vodka, now is also the time to drizzle it in. The vodka helps to lower the freezing point, resulting in a creamier, more scoopable ice cream, even when fully frozen.
Allow the ice cream maker to briefly mix the chocolate chunks into the thickened ice cream. You want them to be evenly distributed throughout the batch, providing delightful pockets of rich chocolate in every spoonful. This brief mixing ensures the chocolate is dispersed without becoming overly pulverized.
The contrast between the creamy, fruity ice cream and the satisfying crunch of the chocolate is what makes this recipe so irresistible. It’s the signature element that elevates a simple berry ice cream into the spectacular Raspberry Chocolate Chunk Ice Cream that everyone will adore. This addition truly defines the dessert.
Step 7: The Final Freeze
Once the churning is complete and the chocolate chunks are incorporated, carefully transfer the semi-frozen ice cream into a freezer-safe container. Use a spatula to smooth the top surface of the ice cream. This helps to create an even freezing surface and can prevent the formation of large ice crystals.
Seal the container tightly with a lid or plastic wrap to prevent air from entering. Place the container in the coldest part of your freezer and allow it to freeze for at least 8 to 10 hours, or preferably overnight. This extended freezing period is essential for the ice cream to fully firm up to a scoopable consistency.
You’ll know your Raspberry Chocolate Chunk Ice Cream is ready when the surface is firm to the touch, yet still yields to the pressure of a scoop. The anticipation builds as it hardens, promising a delightful reward for your efforts. This final stage ensures you have a perfectly scoopable and wonderfully delicious frozen dessert.
Pro Tips for Raspberry Chocolate Chunk Ice Cream
Chill Everything Thoroughly: For the creamiest Raspberry Chocolate Chunk Ice Cream, ensure all your base ingredients—especially the raspberry puree and heavy cream—are thoroughly chilled before churning. Cold ingredients freeze faster and more evenly, minimizing ice crystal formation.
Don’t Skip the Strain: Straining the raspberry puree is non-negotiable if you desire a perfectly smooth texture. While seeds add some texture, they can detract from the luxurious mouthfeel that makes homemade ice cream so special. A fine-mesh sieve is your best friend here.
Taste and Adjust Sweetness: Raspberries can vary significantly in their tartness. Always taste your base mixture before churning and adjust the sugar level accordingly. A little extra sweetness can make a world of difference in the final flavor profile.
Consider the Vodka (or Other Alcohol): While optional, a tablespoon of vodka (or even a neutral spirit like gin) really does make a difference. Alcohol has a lower freezing point than water, which helps prevent the ice cream from freezing rock-solid, keeping it delightfully scoopable.
Embrace the No-Churn Method if Needed: If you don’t have an ice cream maker, don’t despair! You can achieve a delicious no-churn version by whisking condensed milk into your raspberry and cream base, then freezing and stirring vigorously every 30-60 minutes for the first few hours to break up ice crystals. It requires a bit more effort but yields fantastic results.
Serving Suggestions for Raspberry Chocolate Chunk Ice Cream
Decoration
Elevate the visual appeal of your Raspberry Chocolate Chunk Ice Cream with a few thoughtful garnishes. A few fresh raspberries scattered on top add a burst of vibrant color and a hint of fresh fruitiness. A light dusting of unsweetened cocoa powder can enhance the chocolate notes and add a sophisticated touch.
For a bit of sparkle, consider a delicate drizzle of melted dark chocolate or even some edible glitter. A sprig of fresh mint offers a pop of green and a refreshing aroma that complements the fruit and chocolate beautifully. Consider also a small curl of white chocolate for a contrasting color and flavor element.
Even a simple sprinkle of chocolate shavings or a few extra chocolate chunks can make a significant difference. The goal is to create a visually enticing dessert that hints at the delightful flavors waiting within. Think of it as art on a plate, enhancing the overall dining experience before the first bite.
Side Dishes
This decadent Raspberry Chocolate Chunk Ice Cream pairs wonderfully with a variety of delicious side dishes that complement its rich flavors. Warm, fudgy brownies or rich chocolate cakes are classic companions, creating a symphony of chocolate on chocolate. For a lighter contrast, consider serving it alongside a delicate berry tart or a crisp lemon shortbread cookie.
A simple fruit salad, especially one featuring complementary berries or stone fruits, can add a refreshing element to the dessert course. For those who enjoy a textural contrast, a bowl of lightly toasted slivered almonds or a sprinkle of crushed chocolate-covered pretzels can offer a delightful crunch. This adds an extra dimension to every mouthful.
Consider serving it with a slice of angel food cake or pound cake for a tender, airy base that allows the ice cream’s flavors to shine. The key is to choose accompaniments that either enhance the existing flavors or provide a pleasant counterpoint without overpowering the star of the show.
Creative Serving Ideas
Think beyond the scoop! You can transform this Raspberry Chocolate Chunk Ice Cream into a stunning dessert centerpiece. Layer it in parfait glasses with crumbled cookies, fresh berries, and a dollop of whipped cream for a visually impressive presentation.
Another creative idea is to use it as a filling for homemade ice cream sandwiches. Simply sandwich a generous scoop between two chewy cookies, like funfetti cookies, and refreeze until firm. This offers a delightful handheld treat perfect for picnics or parties. You can also blend it into a thick, decadent milkshake for an indulgent beverage.
For a more elegant presentation, serve small quenelles of the ice cream alongside a warm fruit compote or a delicate chocolate sauce. You could also use it as the base for a semi-freddo, layering it with crumbled meringue or biscotti. The possibilities are truly endless when it comes to showcasing this magnificent ice cream.
Preparation & Storage
Storing Leftovers
Should you be fortunate enough to have any Raspberry Chocolate Chunk Ice Cream leftover, proper storage is key to maintaining its delightful texture and flavor. Transfer any remaining ice cream into an airtight, freezer-safe container. It’s crucial to minimize air exposure to prevent ice crystals from forming on the surface.
Pressing a piece of parchment paper or plastic wrap directly onto the surface of the ice cream before sealing the container can further protect it from freezer burn. This simple step helps to maintain the creaminess and prevent the development of undesirable textures. Stored correctly, your homemade ice cream should remain delicious for up to a month.
Avoid leaving the container out at room temperature for extended periods, as repeated thawing and refreezing can degrade the quality of the ice cream. The goal is to keep it in a consistently frozen state until you are ready to enjoy it once more.
Freezing
The freezing process is essential for transforming the churned ice cream into a scoopable dessert. Once churned, the ice cream has a soft-serve consistency and needs time to harden. Transferring it to a pre-chilled freezer-safe container is highly recommended.
Ensure the container is as full as possible or use a smaller container to minimize the headspace, further reducing air exposure. Cover the ice cream tightly, either with its lid or by pressing plastic wrap directly onto the surface before adding the lid. This creates a barrier against moisture and air.
Place the container in the coldest part of your freezer. This is typically the back of the freezer, away from the door, where the temperature is most stable. Allow it to freeze for a minimum of 8 to 10 hours, but overnight is ideal for achieving the perfect firm, scoopable consistency. Patience during this stage is key to enjoying your homemade ice cream at its best.
Reheating
For Raspberry Chocolate Chunk Ice Cream that has become excessively hard or difficult to scoop, a gentle “reheating” process is often necessary. The goal isn’t to melt it, but rather to soften it just enough to make scooping effortless.
The most effective method is to simply let the container sit at room temperature for about 10-15 minutes before attempting to scoop. This allows the ice crystals to slightly soften, making the ice cream more pliable. You can gauge its readiness by pressing gently on the surface; it should yield slightly.
Alternatively, for individual servings, you can carefully microwave a scoop for just 5-10 seconds. Be extremely cautious with this method, as it’s very easy to overdo it and end up with melted ice cream. The room temperature thawing method is generally preferred for maintaining the best texture.
Frequently Asked Questions
-
How do I select the best raspberries for this ice cream?
Absolutely! When choosing raspberries, look for ones that are plump, firm, and have a vibrant color. Avoid any that show dark spots or appear mushy, as these will compromise both flavor and texture. If using fresh raspberries, make sure they are ripe, as they will provide the best flavor for your Raspberry Chocolate Chunk Ice Cream. Frozen raspberries are an excellent and convenient option, often picked at peak ripeness and flash-frozen, preserving their quality and flavor for this recipe.
-
What is the best way to store this ice cream?
For optimal storage, transfer your Raspberry Chocolate Chunk Ice Cream to an airtight, freezer-safe container. It can last for up to one month, but to maintain its peak freshness and creamy texture, it’s highly recommended to smooth the surface before sealing. Additionally, wrapping it with parchment paper or plastic wrap directly on the surface can prevent freezer burn and the formation of ice crystals, ensuring every scoop is as delightful as the first.
-
Can I freeze this ice cream if I made too much?
Absolutely! To freeze your Raspberry Chocolate Chunk Ice Cream, simply scoop it into a freezer-safe container, smooth the top surface with a spatula, and cover it tightly. This helps to minimize air exposure, preserving its creamy texture. It will remain delicious for about one month. When you’re ready to enjoy it, just let it sit at room temperature for about 10 minutes to soften before scooping, making it perfectly scoopable.