Irresistible Strawberry Crunch Bars: Easy No-Bake Delight
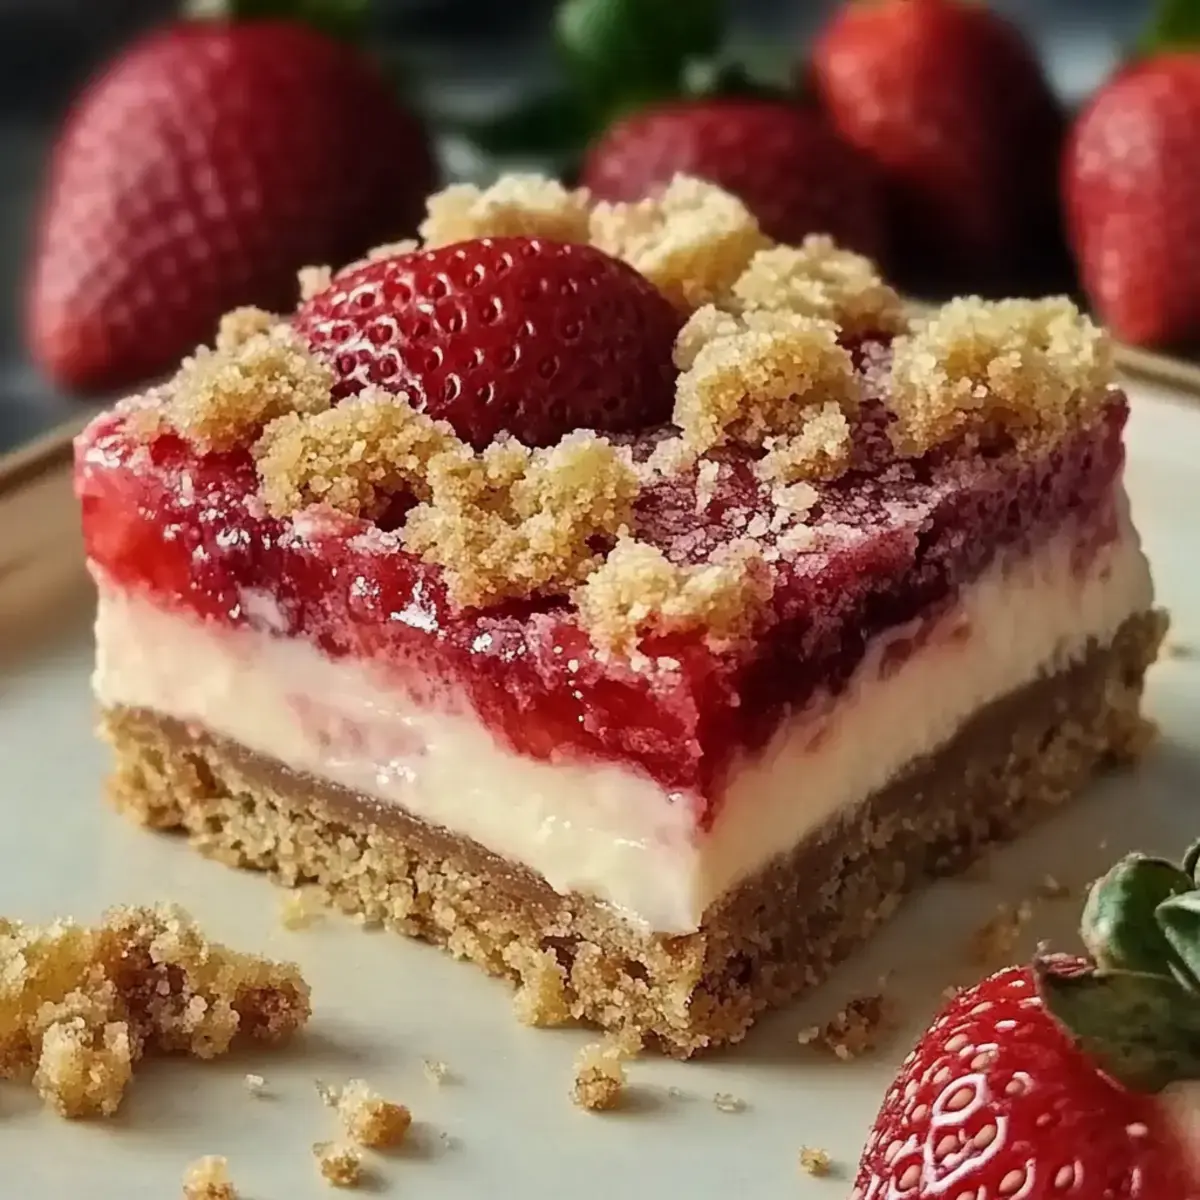
As I dusted off the old recipe box, a familiar wave of nostalgia washed over me—the kind that transports you back to summer picnics and sweet indulgences. These No-Bake Strawberry Crunch Bars embody that delightful feeling, marrying the classic flavors of strawberry shortcake with the irresistible crunch of golden Oreos. Not only are they a crowd-pleaser at potlucks and gatherings, but their no-bake nature also makes them a breeze to whip up on busy days. With each creamy bite, you’ll discover the perfect balance of fruity freshness and satisfying texture, quickly becoming your go-to recipe for warm weather treats.
Curious to see how easy it is to recreate this summer joy? Let’s dive into the vibrant world of Strawberry Crunch Bars, a treat that promises sunshine in every bite and a delightful journey for your taste buds. Prepare to be amazed by the simplicity and the incredibly rewarding outcome of this dessert.
Why You Will Love This Recipe
- Effortless Preparation: Say goodbye to oven preheating and long baking times; these bars come together with minimal effort, making them ideal for spontaneous dessert cravings or busy weeknights.
- Nostalgic Flavors: Each bite is a trip down memory lane, perfectly capturing the essence of classic strawberry shortcake with a delightful, modern twist that appeals to all ages.
- Irresistible Texture Combination: The delightful contrast between the creamy, smooth strawberry filling and the crisp, crunchy golden Oreo crust and topping is simply addictive.
- Visually Appealing: With their vibrant pink hue and layered appearance, these bars are as beautiful to look at as they are delicious to eat, making them a perfect centerpiece for any dessert table.
- Highly Customizable: While delicious as is, these bars offer a fantastic canvas for your creativity, allowing for easy substitutions and additions to suit your personal preferences and dietary needs.
Ingredients You Need
The quality of your ingredients plays a pivotal role in the final flavor and texture of these delightful bars, so opt for the freshest, finest components you can find. Using ripe, sweet strawberries is key to achieving that authentic, vibrant fruity taste, while good quality cream cheese ensures a lusciously smooth filling. The buttery crunch of golden Oreos forms the foundation and topping, providing that essential textural contrast and sweet vanilla note that makes these bars so beloved.
No-Bake Strawberry Crunch Bars

These No-Bake Strawberry Crunch Bars embody the delightful feeling of summer picnics and sweet indulgences, marrying the classic flavors of strawberry shortcake with the irresistible crunch of golden Oreos. They are effortless to prepare, visually stunning, and a guaranteed crowd-pleaser.
- For the Crust:
- 24 Golden Oreos, crushed
- 6 tablespoons butter, melted
- For the Filling:
- 1 cup fresh strawberries, chopped
- 8 ounces cream cheese, softened
- 1/2 cup granulated sugar
- 8 ounces whipped topping (Cool Whip)
- For the Topping:
- 10 Golden Oreos, crushed
- 2 tablespoons butter, melted
- 1 package strawberry gelatin mix
- 1Prepare the Crust: Crush 24 Golden Oreos and mix with 6 tablespoons of melted butter. Press this mixture into the bottom of a lined 9x13 inch pan. Place in the freezer.
- 2Make the Filling: Beat 8 ounces of softened cream cheese with 1/2 cup of granulated sugar until smooth. Fold in 1 cup of chopped fresh strawberries and 8 ounces of whipped topping until evenly mixed.
- 3Add the Topping: Combine 10 crushed Golden Oreos with 2 tablespoons melted butter and the strawberry gelatin mix until coated. Sprinkle this mixture evenly over the creamy strawberry filling.
- 4Refrigerate: Cover the pan and chill in the refrigerator for at least 4 hours, or until set.
- 5Serve: Slice the chilled bars into squares and serve cold.
Keywords: strawberry, no-bake, bars, dessert, crunch, cookies, cream cheese, summer
- golden oreos: crushed for the base and topping, these provide a sweet vanilla crunch that is essential to the bar’s character.
- butter: melted to bind the cookie crumbs together, enhancing the overall richness and texture of the crust and topping.
- fresh strawberries: chopped and added to the filling, these impart a natural fruity sweetness and vibrant color.
- cream cheese: softened and beaten until smooth, it forms the creamy, luscious base of the filling.
- granulated sugar: used to sweeten the cream cheese filling, balancing the tartness of the strawberries.
- whipped topping (cool whip): lightens the filling, creating a mousse-like texture that is airy and delightfully creamy.
- strawberry gelatin mix: provides an intense burst of strawberry flavor and a beautiful, vivid color to the topping.
The specific quantities for each ingredient are readily available within the detailed recipe card, ensuring you have everything you need for a perfect batch of Strawberry Crunch Bars.
Variations
For those seeking a delightful vegan alternative, consider substituting the cream cheese with a thick, plain cashew cream and using vegan butter for the crust. The whipped topping can be replaced with a plant-based whipped cream alternative, ensuring a completely dairy-free experience without compromising on creaminess.
If you’re following a low-carb lifestyle, opt for a sugar-free cream cheese and use a sugar substitute like erythritol or stevia in the filling. For the crust and topping, crushed almond flour mixed with butter can offer a wonderfully nutty, low-carb crunch, and sugar-free strawberry Jell-O can be used for that signature flavor and color.
To elevate the fruity notes even further, consider adding a layer of your favorite strawberry jam between the crust and the creamy filling, or mix a small amount of fresh lemon zest into the filling. This addition will provide an extra layer of complexity and a brighter, more vibrant citrusy undertone that complements the strawberries beautifully.
For an added textural surprise, incorporating a layer of crushed graham crackers or even a sprinkle of toasted shredded coconut into the Oreo crumb base can offer a different kind of delightful crunch. These subtle additions can transform the familiar texture into something uniquely yours, making each bite an exciting discovery.
You could also experiment with different flavored Oreos; while Golden Oreos are classic, consider strawberry-flavored Oreos for an even more intense berry experience, or even vanilla sandwich cookies for a milder base. The possibilities are truly endless, allowing you to tailor these bars to your exact taste preferences.
How to Prepare Strawberry Crunch Bars
Step 1: Crafting the Perfect Foundation
The journey to creating these irresistible Strawberry Crunch Bars begins with the crust, which sets the stage for the layers of flavor and texture to come. Start by taking approximately 24 golden Oreo cookies; these will form both the base and the delightful crunchy topping. It’s essential to crush these cookies into fine crumbs, which can be achieved most efficiently using a food processor. If a food processor isn’t available, don’t worry; you can place the cookies in a sturdy zip-top bag and crush them with a rolling pin until you achieve a fine, sand-like consistency.
Once your golden Oreos have been transformed into fine crumbs, it’s time to introduce the binder that will hold them together. Melt approximately 6 tablespoons of unsalted butter until it’s fully liquid. Gradually add this melted butter to the cookie crumbs, mixing thoroughly until every crumb is evenly coated. This mixture should resemble damp sand and should hold its shape when squeezed. This thorough coating ensures a cohesive crust that won’t crumble apart when sliced.
Now, prepare your 9×13 inch baking pan by lining it with parchment paper, leaving some overhang on the sides. This parchment paper will serve as a helpful handle for lifting the bars out of the pan later. Press the butter-coated cookie crumb mixture firmly and evenly into the bottom of the prepared pan. Use the back of a spoon or the bottom of a glass to create a compact, flat layer. Once this crust is securely in place, place the pan in the freezer for about 15-20 minutes while you proceed to prepare the creamy filling; this chilling process helps the crust set firmly, ensuring a clean separation later.
Step 2: Whipping Up the Luscious Filling
With the crust chilling in the freezer, it’s time to focus on the star of the show: the luscious, creamy strawberry filling. In a large mixing bowl, combine 8 ounces of softened cream cheese with 1/2 cup of granulated sugar. Ensure the cream cheese is at room temperature; this is crucial for achieving a smooth, lump-free mixture. Beat these two ingredients together using an electric mixer on medium speed until the mixture is exceptionally smooth and creamy, which typically takes about 2-3 minutes. Scrape down the sides of the bowl occasionally to ensure everything is incorporated.
Next, it’s time to introduce the fresh, fruity element that gives these bars their signature flavor. Carefully fold in 1 cup of chopped fresh strawberries into the cream cheese mixture. It’s best to chop the strawberries into small, bite-sized pieces to ensure they are evenly distributed throughout the filling. If you are using thawed frozen strawberries, make sure they have been thoroughly drained to remove any excess moisture, as this could make the filling too runny.
Finally, to achieve that signature airy and light texture, gently fold in 8 ounces of whipped topping (such as Cool Whip). Do this carefully to maintain the fluffiness of the whipped topping; overmixing can deflate it. Continue folding until the mixture is just combined and uniformly pink and creamy, with no streaks of cream cheese or whipped topping visible. This filling should be light, fluffy, and irresistibly smooth, ready to be spread over the chilled crust.
Step 3: Assembling the Delectable Layers
Now that you have your perfectly chilled crust and your luscious strawberry filling ready, it’s time to assemble these beautiful bars. Retrieve the 9×13 inch pan from the freezer. Carefully spoon the creamy strawberry filling evenly over the prepared crust. Use an offset spatula or the back of a spoon to spread the filling smoothly, ensuring it reaches all the corners and edges of the pan. A uniform layer of filling is key to achieving consistent slices and a balanced flavor in every bite.
Once the creamy filling is perfectly smooth, it’s time to prepare the delightful crunchy topping that gives these bars their name. Take the remaining 10 golden Oreo cookies and crush them into fine crumbs, similar to how you prepared the crust. In a small bowl, combine these crushed Oreo crumbs with 2 tablespoons of melted butter and the contents of one package of strawberry gelatin mix. Mix these ingredients together until the crumbs are evenly coated with the butter and the pink gelatin powder, creating a vibrant, crumbly topping.
Sprinkle this prepared crunchy topping evenly over the entire surface of the strawberry filling. Gently spread it out to ensure complete coverage, creating a beautiful mosaic of pink cream and golden crumbs. This final layer not only adds a wonderful textural contrast but also intensifies the strawberry flavor and provides a visually appealing finish to your no-bake creation.
Step 4: The Crucial Setting Period
This step is perhaps the most vital for achieving the perfect texture in your Strawberry Crunch Bars; patience is truly a virtue here. Once the bars are fully assembled with their crust, filling, and topping, it’s time to let them chill and set. Cover the pan tightly with plastic wrap, ensuring that the wrap doesn’t touch the surface of the topping, if possible. This prevents any odors from the refrigerator from being absorbed and keeps the topping fresh.
Place the covered pan in the refrigerator to chill for a minimum of 4 hours. However, for the best results and a firm, sliceable consistency, it’s highly recommended to allow them to chill for at least 6-8 hours, or even overnight. During this chilling period, the cream cheese and whipped topping in the filling will firm up considerably, allowing the bars to hold their shape beautifully when cut. The butter in the crust will also solidify, ensuring a solid base.
Resist the temptation to cut into the bars too early; an under-set filling will result in a messy, unappealing presentation and a less satisfying eating experience. The extended chilling time allows all the flavors to meld together, creating a harmonious and delicious dessert that is worth the wait. You’ll know they are ready when the filling is completely firm to the touch and the topping is crisp.
Step 5: The Grand Finale – Serving Perfection
The moment you’ve been waiting for has arrived: it’s time to slice and serve your magnificent Strawberry Crunch Bars. Once the bars have chilled sufficiently and are fully set, carefully remove the pan from the refrigerator. The parchment paper overhang you created earlier will be your best friend here; gently lift the entire block of bars out of the pan and place it on a clean cutting board.
Using a sharp knife, slice the chilled bars into your desired serving portions. For classic squares, aim for about 12-16 bars, depending on how large you prefer them. To achieve the cleanest cuts and prevent the bars from smearing or sticking to the knife, it’s a useful trick to dip your knife in hot water and wipe it dry between each cut. This simple step will make a remarkable difference in the presentation, keeping those beautiful layers distinct and tidy.
Arrange the perfectly sliced Strawberry Crunch Bars on a decorative platter or individual dessert plates. These bars are best served chilled, as this is when their texture is at its optimal—creamy, yet firm, with a delightful crunch. Garnish them with a fresh strawberry slice or a dollop of whipped cream for an extra touch of elegance, and get ready to watch them disappear!
Pro Tips for Strawberry Crunch Bars
Use Ripe, Seasonal Strawberries: For the most intense and natural strawberry flavor, always opt for fresh, ripe strawberries. They should be bright red, fragrant, and firm to the touch. Overripe or underripe berries can significantly impact the final taste and texture of your filling.
Thoroughly Drain Frozen Strawberries: If fresh strawberries are out of season or unavailable, thawed frozen strawberries can be used. However, it’s absolutely crucial to drain them very well after thawing. Press them gently with paper towels or strain them through a fine-mesh sieve to remove as much excess liquid as possible. Excess moisture is the enemy of a firm filling.
Don’t Skimp on Chilling Time: The chilling process is non-negotiable for these no-bake bars. A minimum of 4 hours is required for the filling to set properly, but for the best sliceable consistency and perfectly firm texture, aim for 6-8 hours or even overnight. This allows the cream cheese and whipped topping to firm up completely.
Experiment with Oreo Flavors: While Golden Oreos are the classic choice, don’t be afraid to get creative with the cookie component. Strawberry-flavored Oreos can amplify the berry taste, while chocolate Oreos can add a richer, more decadent dimension. Consider even vanilla sandwich cookies for a subtler base if you prefer.
Achieve Neat Slices with a Hot Knife: For picture-perfect presentation, a sharp knife dipped in hot water and wiped dry between each cut is a game-changer. This simple technique prevents the creamy filling from sticking to the blade and ensures clean, distinct layers for each bar.
Serving Suggestions for Strawberry Crunch Bars
Decoration
Elevate the visual appeal of your Strawberry Crunch Bars with simple yet impactful decorations. A single fresh strawberry, artfully placed on top of each bar, adds a burst of color and signals the deliciousness within. A light dusting of powdered sugar can create a delicate, snowy effect, reminiscent of a winter wonderland contrasting with the summery strawberry flavor.
For a touch of elegance, a delicate drizzle of melted white chocolate or even dark chocolate can create beautiful contrasting patterns across the pink surface. A few fresh mint leaves, strategically placed, offer a vibrant green accent and a hint of fresh aroma, making the presentation both enticing and refreshing. Consider adding edible flowers for a truly whimsical and sophisticated touch that will surely impress your guests.
Side Dishes
These bars are a complete dessert on their own, but pairing them with complementary items can create a truly memorable experience. A small scoop of vanilla bean ice cream alongside a slice of the Strawberry Crunch Bar creates a classic, beloved dessert combination that enhances both the creamy and fruity notes. A side of fresh berries, such as blueberries or raspberries, adds another layer of fruity goodness and a refreshing palate cleanser.
For a lighter accompaniment, a dollop of unsweetened whipped cream can provide a soft, cloud-like contrast to the bars’ textures without overpowering their flavor. Alternatively, a simple fruit salad featuring complementary fruits like melon, kiwi, or grapes can offer a refreshing, healthy counterpoint to the sweetness of the bars. A warm, buttery pound cake or angel food cake can also serve as a delightful base, soaking up any delicious juices and adding a cakey texture.
Creative Serving Ideas
Think beyond the individual slice! For a party setting, arrange the cut bars on a tiered stand, alternating with fresh berries or small cupcakes. You can also deconstruct the elements: serve the crust mixture in the bottom of individual glasses, top with the creamy filling, and then sprinkle the crunchy topping over that for a parfait-style dessert. This allows guests to see the beautiful layers individually.
Consider transforming the bars into mini cheesecakes by using mini muffin liners for the crust and a smaller portion of filling, topped with the crunch. For a fun brunch or breakfast treat, serve smaller bars alongside a stack of pancakes or waffles, allowing guests to enjoy the flavors in a different context. You could also chop the bars into bite-sized pieces and serve them as a topping for vanilla yogurt or a fruit smoothie, adding a delightful crunch and sweet flavor boost.
Preparation & Storage
Storing Leftovers
Storing any remaining Strawberry Crunch Bars properly is key to maintaining their delightful texture and flavor for as long as possible. Once cut, place the leftover bars in an airtight container. Ensure the container is truly airtight to prevent the bars from drying out or absorbing any unwanted odors from your refrigerator. If stacked, consider placing parchment paper between layers to prevent them from sticking together.
These bars can be stored in the refrigerator for up to 5 days. The chilling process helps them maintain their firmness. Always ensure they are kept cool; leaving them at room temperature for extended periods can cause the creamy filling to soften and lose its structure, affecting the overall enjoyment of the dessert. Properly stored, they remain a delicious treat to enjoy throughout the week.
Freezing
For longer-term storage, freezing is an excellent option for Strawberry Crunch Bars, allowing you to enjoy them at a later date. It’s best to freeze them before they are cut into individual portions if possible, though cut bars can also be frozen. Wrap the entire un-cut bar or individual cut bars tightly in plastic wrap, ensuring there are no air pockets.
Once securely wrapped, place them in a freezer-safe container or a heavy-duty freezer bag. This double layer of protection helps prevent freezer burn. Properly frozen Strawberry Crunch Bars can last for up to 1 month. Label the container with the date of freezing so you can keep track of their freshness. This makes them a convenient option for future cravings or unexpected guests.
Reheating
Reheating Strawberry Crunch Bars is generally not necessary, as they are designed to be served chilled. However, if you have frozen them and wish to enjoy them, proper thawing is essential. Remove the bars from the freezer and place them in the refrigerator. Allow them to thaw completely for several hours, or preferably overnight, before serving.
Avoid the temptation to microwave them to speed up the thawing process. Microwaving can lead to an uneven texture, potentially melting the creamy filling while leaving the crust soggy or the topping still frozen. The slow thawing in the refrigerator ensures that the bars return to their intended creamy yet firm consistency, preserving the delicate balance of flavors and textures that make them so appealing. Once thawed, they should be enjoyed promptly.
Frequently Asked Questions
-
What type of strawberries are best for Strawberry Crunch Bars, and can I use frozen ones?
For the most vibrant flavor and texture, fresh, ripe strawberries are always the best choice for these bars. Look for plump, bright red berries that are fragrant and firm. If fresh strawberries are not in season or readily available, you can certainly use frozen strawberries. However, it is absolutely crucial to thaw them completely and then drain them thoroughly to remove as much excess liquid as possible. You can do this by spreading them on paper towels or straining them through a fine-mesh sieve. Excess moisture from strawberries can make the filling too watery and prevent it from setting correctly, so thorough draining is key.
-
How should I store Strawberry Crunch Bars to maintain their freshness and texture?
To keep your delicious Strawberry Crunch Bars tasting their best, store any leftovers in an airtight container in the refrigerator. This method is essential for preventing them from drying out or absorbing any unwanted odors from other foods in your fridge. Ensure the container seals tightly. Properly stored, these bars will remain fresh and flavorful for up to 5 days. If you find yourself with more bars than you can eat within that timeframe, freezing is an excellent long-term storage solution.
-
Can I freeze Strawberry Crunch Bars, and if so, how long do they last?
Absolutely! Freezing is a fantastic way to preserve your Strawberry Crunch Bars for later enjoyment. For the best results, wrap each bar individually and tightly in plastic wrap to prevent freezer burn. After wrapping, place the individually wrapped bars into a freezer-safe container or a heavy-duty freezer bag. This double protection ensures their quality. When stored correctly in the freezer, Strawberry Crunch Bars can maintain their delicious quality for up to one month. Remember to label your container with the date of freezing so you can keep track.