Ultimate Chocolate Cherry Thumbprint Cookies
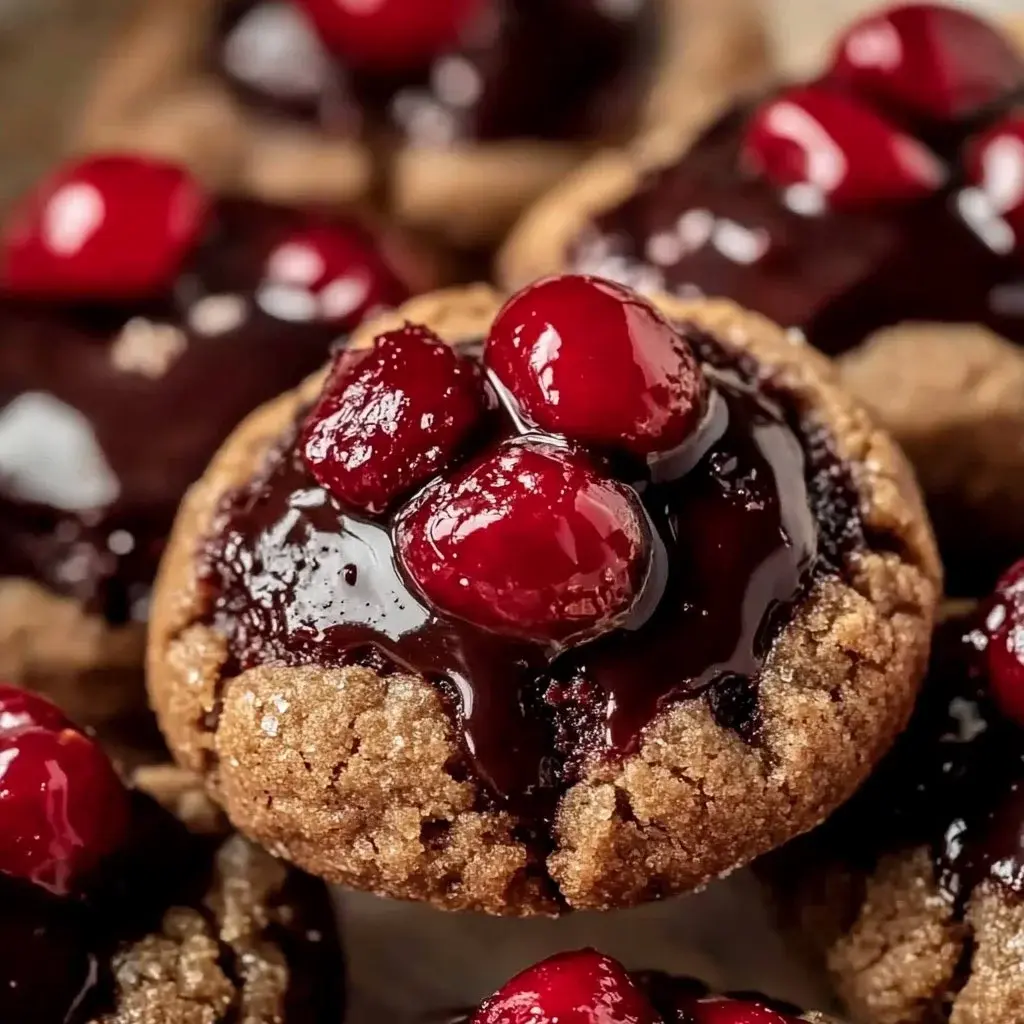
There’s something undeniably special about the aroma of freshly baked cookies filling the kitchen, and Chocolate Cherry Thumbprint Cookies bring a unique blend of festive charm and decadent flavor. These aren’t just ordinary cookies; they’re a delightful marriage of rich, dark chocolate and the sweet-tart burst of cherries, all nestled within a tender, cocoa-infused cookie base. Imagine the satisfying crunch followed by the smooth, luscious filling – it’s a sensory experience that promises pure joy with every bite.
This recipe is designed to bring a touch of gourmet flair to your home baking, proving that exquisite desserts don’t require professional expertise. Whether you’re a seasoned baker or just starting your culinary journey, these Chocolate Cherry Thumbprint Cookies are wonderfully accessible and incredibly rewarding. They embody the spirit of homemade goodness, perfect for sharing during special occasions or simply for treating yourself to a moment of sweet indulgence. Get ready to create a batch that will have everyone asking for the recipe!
Why You Will Love This Recipe
- Irresistible Flavor Combination: The deep richness of chocolate perfectly complements the bright, tangy notes of cherry, creating a balanced and utterly delicious taste.
- Festive Appearance: The deep red jewel-like center against the dark cookie makes these visually stunning, ideal for holiday tables or any celebration.
- Satisfying Texture Contrast: Enjoy the delightful interplay between the slightly crisp edges, the tender cookie crumb, and the smooth, gooey ganache filling.
- Versatile Treat: Whether for Christmas, Valentine’s Day, or just a simple afternoon pick-me-up, these cookies fit every occasion beautifully.
- Easy to Customize: While the classic combination is perfect, you can easily adapt the filling or add extra elements to make them uniquely yours.
Ingredients You Need
Crafting these exquisite Chocolate Cherry Thumbprint Cookies begins with selecting quality ingredients that will sing together in harmony. Using good quality dark chocolate, fresh cherries (or high-quality preserves), and butter that is perfectly softened are key to achieving the best texture and flavor. These foundational elements ensure that each cookie is a testament to simple, delicious baking.
Chocolate Cherry Thumbprint Cookies

Delightful cookies blending rich chocolate and tangy cherries, topped with a creamy ganache, perfect for any occasion. These easy-to-make cookies have a unique texture and flavor profile that's sure to impress.
- 188 g all-purpose flour
- 40 g Dutch-process cocoa powder
- 0.5 tsp baking powder
- 0.5 tsp sea salt
- 168 g unsalted butter, softened
- 165 g light brown sugar, packed
- 50 g granulated white sugar
- 2 large egg yolks, room temperature
- 1.5 tsp vanilla extract
- 140 g dark chocolate with dried cherries, chopped
- 90 ml heavy cream
- 85 g cherry preserves
- 1Measure out all ingredients and ensure butter is softened.
- 2Whisk together flour, cocoa powder, baking powder, and salt in a medium bowl.
- 3Cream softened butter with brown and granulated sugar in a large bowl until pale and fluffy.
- 4Beat in egg yolks and vanilla extract until light and smooth.
- 5Slowly add dry ingredients to wet ingredients and mix on low speed until just combined to form a soft dough.
- 6Scoop about a tablespoon of dough, roll into a ball, and create an indent in the center with your thumb.
- 7Place dough balls on parchment-lined trays and chill in the refrigerator for 60 minutes.
- 8Preheat oven to 175°C (350°F) 15 minutes before baking.
- 9Bake 8 cookies on a baking sheet for 9-11 minutes until set but fudgy.
- 10Gently re-press indents while warm.
- 11Cool on baking sheet for 5 minutes, then transfer to a wire rack.
- 12Chop dark chocolate and place in a medium bowl. Heat heavy cream until just before boiling, pour over chocolate, let sit, then stir until smooth.
- 13Mix cherry preserves into the warm chocolate ganache until combined.
- 14Fill cookie indents with ganache once cookies have cooled.
- 15Chill cookies for 10-15 minutes to set the ganache.
Keywords: Baking, Chocolate Cherry Cookies, Dessert Recipes, Holiday Cookies, Thumbprint Cookies
- all-purpose flour: the foundational structure for our cookie dough, providing a tender crumb.
- Dutch-process cocoa powder: lends a deep, rich chocolate flavor and a beautiful dark color to the cookies.
- baking powder: acts as a leavening agent, ensuring the cookies are light and not too dense.
- sea salt: enhances all the other flavors, balancing the sweetness and bringing out the chocolate notes.
- unsalted butter, softened: essential for creating a tender and flavorful cookie dough; must be at room temperature for proper creaming.
- light brown sugar, packed: adds moisture and a subtle caramel note to the cookies, contributing to their chewiness.
- granulated white sugar: provides sweetness and helps with the cookie’s structure and crispness.
- egg yolks, room temperature: bind the ingredients and add richness and a softer texture to the cookie dough.
- vanilla extract: a classic flavoring that enhances the overall taste profile of the cookies.
- dark chocolate with dried cherries, chopped: the star of our filling, providing intense chocolate flavor with delightful fruity bursts; high-quality chocolate is recommended.
- heavy cream: used to create a luscious, smooth ganache that perfectly coats the chocolate and cherries.
- cherry preserves: adds a vibrant, tangy sweetness that cuts through the richness of the chocolate, offering a delightful flavor contrast.
The precise quantities for each ingredient can be found within the provided recipe card, ensuring you have all the necessary details for a successful bake.
Variations
Looking to put a unique spin on these delightful cookies? Consider a spiced version where a touch of cinnamon or nutmeg is added to the dry ingredients. This subtle warmth can beautifully enhance the chocolate and cherry flavors, especially during cooler months. You might also try adding a pinch of cayenne pepper to the dough for a hint of surprising heat that plays wonderfully with the chocolate.
Another exciting variation involves changing the fruit component. While cherry is classic, raspberry preserves offer a sharper, more tart counterpoint, and blueberry jam can provide a sweeter, more mellow fruitiness. For an added textural element, consider folding in finely chopped toasted nuts like walnuts or pecans into the dough before shaping. These additions can bring a delightful crunch and nutty depth to every cookie.
For those who adore white chocolate, a drizzle of melted white chocolate over the finished cookies after the ganache has set can offer a lovely visual contrast and a different sweet flavor profile. You could also experiment with different extracts in the ganache, such as a hint of almond or even orange zest, to create entirely new flavor dimensions. The possibilities for customization are truly extensive, allowing you to tailor these cookies to your exact preferences.
How to Prepare Chocolate Cherry Thumbprint Cookies
Step 1: Gather and Prepare Your Ingredients
Before you begin the mixing process, it’s crucial to have all your ingredients measured out and ready. This organized approach, often referred to as mise en place, ensures a smooth and stress-free baking experience. Pay close attention to the butter and egg yolks, ensuring they are at room temperature as specified; this is vital for proper emulsification and a tender cookie dough. The temperature of these ingredients significantly impacts the final texture and consistency of your cookies, so don’t rush this initial step.
Take a moment to pre-read the entire recipe, familiarizing yourself with each stage of the process. This foresight helps prevent any surprises or missteps down the line. Ensure your workspace is clean and uncluttered, giving you ample room to move and mix without feeling cramped. Having all your tools, such as mixing bowls, whisks, and spatulas, within easy reach will also contribute to a more efficient workflow.
Finally, if your chocolate for the ganache isn’t already chopped, take this time to do so. Aim for small, uniform pieces, which will allow the chocolate to melt more evenly and quickly when the hot cream is added. Preparing everything beforehand allows you to transition seamlessly from one step to the next, minimizing the time the dough is handled, which is important for maintaining its texture.
Step 2: Combine the Dry Ingredients
In a medium-sized mixing bowl, whisk together the all-purpose flour, Dutch-process cocoa powder, baking powder, and sea salt. Whisking these dry components thoroughly ensures that the leavening agent and salt are evenly distributed throughout the flour and cocoa mixture. This even distribution is key to preventing pockets of unsalted dough or uneven rising in the finished cookies.
The act of whisking also helps to aerate the flour and cocoa powder, contributing to a lighter texture in the final cookie. Make sure to break up any clumps that might be present in the cocoa powder. A fine-mesh sieve can also be used to sift these ingredients together, which guarantees an exceptionally smooth and lump-free dry mixture. This meticulous step lays the groundwork for a consistent dough.
Once combined, set this bowl aside. This dry mixture will be incorporated into the wet ingredients in a later stage, bringing together all the elements that form the delicious base of your thumbprint cookies. The careful combination of these dry components is a fundamental step in achieving the desired flavor and texture.
Step 3: Cream the Butter and Sugars
In a large mixing bowl, combine the softened unsalted butter with both the light brown sugar and granulated white sugar. Using an electric mixer, typically with the paddle attachment, cream these ingredients together on medium-high speed. Continue mixing for approximately 2 to 3 minutes, or until the mixture becomes pale in color and achieves a light, fluffy consistency. This creaming process is crucial as it incorporates air into the dough, which contributes to the cookie’s tender texture and helps them spread just the right amount during baking.
The fluffy texture signifies that the sugar crystals have begun to dissolve into the butter, creating a smooth emulsion. This step is more than just mixing; it’s about creating a light and airy foundation for your cookie dough. If your butter isn’t soft enough, it won’t cream properly, potentially leading to tougher cookies. Conversely, if it’s too melted, the dough may become greasy.
Scrape down the sides and bottom of the bowl periodically during the creaming process to ensure all the butter and sugar are thoroughly incorporated. This meticulous attention to detail guarantees that every part of the dough benefits from the aeration and sweetness, leading to consistently delicious results. A well-creamed butter and sugar mixture is a hallmark of good cookie baking.
Step 4: Incorporate Wet Ingredients
To the wonderfully creamy butter and sugar mixture, add the two room-temperature egg yolks and the vanilla extract. Beat these ingredients into the creamed mixture on medium speed. Continue mixing for another 1 to 2 minutes, until everything is well combined and the mixture appears light and smooth. The egg yolks add richness and help bind the dough, while the vanilla extract introduces its signature warm aroma and flavor, enhancing the overall cookie experience.
Ensure the egg yolks are fully incorporated. This step is important for creating a stable emulsion, preventing the dough from separating later. The mixture should look cohesive and slightly lighter in color after the addition of the egg yolks and vanilla. Avoid overmixing at this stage; you’re aiming for integration, not toughening the dough.
Take care to scrape down the sides of the bowl once more after adding the egg yolks and vanilla. This ensures that any residual butter or sugar clinging to the bowl is incorporated into the main mixture, promoting uniformity throughout the dough. This thoroughness is a small but significant step towards achieving perfectly textured cookies.
Step 5: Combine Wet and Dry Mixtures
Now, it’s time to bring the wet and dry components together. Gradually add the whisked dry ingredients (flour, cocoa powder, baking powder, salt) to the wet ingredients in the large mixing bowl. Mix on low speed, just until the ingredients are combined and a soft dough begins to form. It is absolutely critical to avoid overmixing at this stage. Overmixing can develop the gluten in the flour too much, resulting in tough, dense cookies rather than the desired tender crumb.
Stop mixing as soon as you no longer see streaks of dry flour. A few small streaks might be acceptable, as they will incorporate during the next shaping phase. The dough should be soft but manageable, not sticky or overly wet. If the dough seems too dry, it might indicate that your butter was too cold, or not enough was used; if too wet, it might be too warm, or too much butter was used.
Gently fold in any remaining dry bits with a spatula to ensure everything is just incorporated. The resulting dough will have a rich, chocolatey aroma and a pliable texture, perfect for shaping into cookies. This stage is about delicate integration, bringing all the flavors and textures together without compromising the desired cookie outcome.
Step 6: Shape the Cookies
Scoop about a tablespoon of the chocolate cookie dough and gently roll it into a smooth ball between your palms. Aim for uniform size for even baking. Once you have a nice, round ball, place it on a baking sheet lined with parchment paper. This is where the “thumbprint” comes in: use your thumb, or the back of a small measuring spoon (like a 1/4 teaspoon or a small melon baller), to create a well or indent in the center of each dough ball. Be careful not to press all the way through to the bottom of the cookie; you want a nice, deep cavity to hold the filling.
Ensure the indents are relatively even across all the cookies to hold a consistent amount of filling. If the dough is a bit sticky, you can lightly dust your fingers or the shaping tool with a little extra cocoa powder or flour. However, be mindful not to add too much, as this can alter the dough’s balance. The goal is to create a sturdy yet tender cookie that can hold its delicious filling.
As you shape each cookie, place them on the parchment-lined baking sheets, leaving about 1.5 to 2 inches between each one. This spacing allows for slight spreading during baking without the cookies running into each other. Having all your cookies shaped and ready before chilling is an efficient way to manage the baking process.
Step 7: Chill the Dough
Once your cookies are shaped and their characteristic indents are made, it’s time for a crucial step: chilling. Place the baking sheets with the shaped cookie dough balls into the refrigerator and chill for at least 60 minutes. This chilling period is vital for several reasons. Firstly, it solidifies the butter within the dough, which prevents the cookies from spreading too much during baking, ensuring they retain their lovely thumbprint shape.
Secondly, chilling allows the flavors to meld together further, deepening the overall taste profile of the cookies. A well-chilled dough is also easier to handle, especially if your kitchen is warm. This step contributes significantly to achieving cookies that are both beautifully shaped and perfectly textured, with a delightful chewiness and structure. It’s a small investment of time that yields significant improvements in the final baked product.
Don’t skip this step! The 60-minute chill is ideal, but if you’re pressed for time, a minimum of 30 minutes in the freezer can also work, though it may slightly alter the spread. For optimal results, aim for the full hour in the refrigerator. This patient approach will be rewarded with beautifully formed cookies.
Step 8: Preheat the Oven
About 15 minutes before you plan to take the cookies out of the refrigerator to bake, it’s time to preheat your oven. Set your oven temperature to 175°C (350°F). It is essential that the oven is fully preheated to the specified temperature before the cookies go in. An oven that hasn’t reached its correct temperature can lead to uneven baking, where the cookies might bake too slowly, spread too much, or even burn before they are cooked through.
Ensure your oven rack is positioned in the center of the oven. This central placement guarantees that the cookies receive consistent heat from all sides, promoting even baking and browning. If you have an oven thermometer, it’s a good idea to use it to verify that your oven is indeed reaching the target temperature, as oven thermostats can sometimes be inaccurate.
Proper preheating is a cornerstone of successful baking, ensuring that the cookies begin to bake immediately and evenly once placed in the oven. This consistent heat environment is what allows the dough to set properly, develop its structure, and achieve that perfect balance of chewy interior and slightly crisp edges that thumbprint cookies are known for.
Step 9: Bake the Cookies
Once the oven is preheated and the cookies have had sufficient chilling time, carefully arrange 8 cookies on your prepared baking sheet, ensuring they are not too crowded. Bake them for 9 to 11 minutes. The baking time can vary slightly depending on your oven, so keep a close eye on them. You are looking for the edges to appear set and slightly firm, while the centers should still look a little soft and fudgy.
As the cookies bake, the edges will firm up, and the chocolate dough will set. The warmth of the oven will also cause them to spread slightly. If you notice that the indents have puffed up a bit too much during baking, don’t worry; you can gently re-press them with the back of a spoon or a small measuring tool immediately after taking them out of the oven while they are still warm. This ensures that there’s a perfect little well ready to be filled.
Remove the cookies from the oven when they reach the desired stage of doneness. They should look matte on top, with no wet, unbaked dough visible. Overbaking will lead to dry, crumbly cookies, so err on the side of slightly underbaked for the best tender texture. The residual heat will continue to cook them slightly as they cool.
Step 10: Cool and Reshape
Immediately after removing the cookies from the oven, while they are still warm and pliable, you can use a round cookie cutter (slightly larger than the cookie itself) to gently reshape any cookies that may have lost their perfect circular form during baking. This step is optional but helps achieve a more uniform and aesthetically pleasing final product. After reshaping, let the cookies cool on the baking sheet for about 5 minutes. This brief resting period on the hot sheet allows them to firm up just enough to be moved without falling apart.
Following this initial cooling on the baking sheet, carefully transfer the cookies to a wire cooling rack using a spatula. Allow them to cool completely on the wire rack. Cooling on a rack permits air circulation around all sides of the cookies, preventing the bottoms from becoming soggy and ensuring they cool evenly. This is an essential step before filling them to prevent the ganache from melting prematurely or the cookie from becoming too soft.
Patience during the cooling process is key. Trying to fill warm cookies with ganache can lead to a messy outcome and a melted filling. Ensure they are entirely cool to the touch before proceeding to the filling stage. This patience will be rewarded with beautifully finished cookies that hold their shape and their delicious filling.
Step 11: Prepare the Chocolate Cherry Ganache
While the cookies are cooling, you can prepare the decadent chocolate cherry ganache that will fill their centers. Place the finely chopped dark chocolate into a heatproof medium bowl. Ensure the chocolate is chopped into small, uniform pieces for optimal melting. In a small saucepan, heat the heavy cream over medium heat until it just begins to simmer around the edges; do not let it come to a rolling boil, as this can scald the cream and affect the ganache’s texture.
Once the cream is hot, carefully pour it over the chopped chocolate in the bowl. Let the mixture sit undisturbed for about 3 to 5 minutes. This resting period allows the heat from the cream to gently melt the chocolate. After the resting time, gently stir the mixture with a whisk or spatula, starting from the center and working your way outwards. Continue stirring until the ganache is completely smooth, glossy, and all the chocolate has been fully melted and incorporated into the cream.
The ganache should have a thick, luxurious consistency. If it seems too thick, you can gently warm it for a few more seconds. If it seems too thin, allow it to sit at room temperature for a bit longer to thicken. This smooth, rich ganache is the perfect luxurious filling for your thumbprint cookies.
Step 12: Incorporate Cherry Preserves
Now, it’s time to infuse the chocolate ganache with the bright, tangy flavor of cherries. Add the cherry preserves to the warm, smooth chocolate ganache. Stir gently until the preserves are fully combined with the chocolate mixture. You want to achieve a uniform color and consistency, where the cherry flavor is evenly distributed throughout the ganache. If your cherry preserves have large chunks of fruit, you might want to gently mash them a bit before adding them to ensure a smoother texture within the filling.
The addition of cherry preserves not only adds flavor but also a beautiful visual marbling if you don’t stir too vigorously, or a uniform pinkish-red hue if stirred completely. This creates a delightful swirl of flavors and colors within the cookie’s center. The balance between the rich chocolate and the tart cherry is what makes these cookies so appealing and distinctive. Taste the mixture at this point and adjust if needed, though the preserves should provide ample sweetness and tang.
This step transforms a simple chocolate ganache into a signature filling that defines the Chocolate Cherry Thumbprint Cookie. The interplay of textures and tastes is about to be completed, bringing these cookies to their full delicious potential. This blend is ready to be spooned into the waiting cookie wells.
Step 13: Fill the Cookies
Once your Chocolate Cherry Thumbprint Cookies have completely cooled on the wire rack, it’s time for the most exciting part: filling them with the luscious chocolate cherry ganache. Using a small spoon or a piping bag fitted with a plain round tip, carefully fill the indentations in the center of each cookie with about 1 teaspoon of the ganache mixture. Aim to fill the wells generously but avoid overfilling to the point where the ganache spills over the sides.
The amount of filling can be adjusted based on your preference for a more or less intensely filled cookie. Ensure the ganache is spread evenly within the indentations. If you used a piping bag, this can help create a neater, more consistent fill. If using a spoon, take care to dollop the ganache smoothly into the center of each cookie’s well.
This is where the cookies truly come to life, transforming from simple chocolate doughs into decadent treats. The contrast between the dark cookie and the rich filling is visually appealing and promises a burst of flavor with every bite. Take your time with this step to ensure a beautiful presentation.
Step 14: Set the Ganache and Finalize
After filling the cookies, they need a little time for the ganache to set properly. Place the filled cookies back onto a baking sheet and transfer them to the refrigerator for about 10 to 15 minutes. This short chilling period will help the ganache firm up, making the cookies easier to handle and ensuring the filling stays perfectly in place. The cool temperature will give the ganache a delightful texture that complements the cookie.
Once the ganache has set, your Chocolate Cherry Thumbprint Cookies are ready to be enjoyed or stored. If you plan to serve them immediately, they are perfect as they are. For optimal freshness and to maintain their texture, store any leftover cookies in an airtight container at room temperature for up to 3 days. If the weather is particularly warm, or you prefer a firmer ganache, storing them in the refrigerator is also an option.
These cookies are a delightful testament to the magic that happens when simple ingredients are combined with care and attention. The final touch of chilling the ganache solidifies the perfect bite. Enjoy the fruits of your labor!
Pro Tips for Chocolate Cherry Thumbprint Cookies
- Use High-Quality Chocolate: For the ganache and any chocolate chips you might add, opt for good quality dark chocolate. It makes a significant difference in flavor and how smoothly it melts.
- Don’t Overmix the Dough: Overmixing develops gluten, leading to tough cookies. Mix the dry ingredients into the wet until *just* combined.
- Chill Time is Crucial: Resist the urge to skip chilling the dough. It prevents excessive spreading and helps maintain the signature thumbprint shape, ensuring a perfect cookie canvas.
- Gentle Re-pressing: If the cookie indents puff up during baking, gently re-press them with a spoon right after they come out of the oven while they are still warm and pliable.
- Room Temperature Ingredients: Ensure your butter and egg yolks are at room temperature. This is vital for achieving the proper dough consistency and a tender crumb.
Serving Suggestions for Chocolate Cherry Thumbprint Cookies
Decoration
Elevate the visual appeal of your Chocolate Cherry Thumbprint Cookies with simple yet elegant decorative touches. A delicate dusting of powdered sugar can add a touch of snowy festivity, reminiscent of winter landscapes. For a more sophisticated look, consider a fine drizzle of melted white chocolate or even a contrasting dark chocolate over the cookie’s edges. A single candied cherry or a small sliver of preserved cherry placed atop the ganache before it sets can also enhance their charming appearance.
Side Dishes
These cookies are a dessert in themselves, but they pair wonderfully with various accompaniments that enhance the overall tasting experience. A classic pairing is a rich, dark roast coffee or a robust espresso, whose slight bitterness cuts through the sweetness beautifully. For a more leisurely treat, a creamy vanilla bean ice cream or a scoop of cherry sorbet creates a delightful frozen complement to the cookie’s texture and flavor. Even a simple glass of cold milk provides a comforting and nostalgic pairing.
Creative Serving Ideas
Present these cookies on a tiered dessert stand for an impressive display at parties or holiday gatherings. Arrange them alongside other festive baked goods for a delightful cookie platter. They also make charming edible gifts; package them in decorative tins or cellophane bags tied with a ribbon. For a unique dessert experience, serve them as part of a build-your-own sundae bar, allowing guests to add them as a topping. They can also be a sophisticated addition to a cheese board, offering a sweet contrast to savory cheeses.
Preparation & Storage
Storing Leftovers
To keep your Chocolate Cherry Thumbprint Cookies fresh and delicious for as long as possible, proper storage is key. Once completely cooled, place them in an airtight container. Ensure there are no gaps for air to enter, as this can lead to staleness. Store the container at cool room temperature, away from direct sunlight or heat sources. Properly stored, these cookies will maintain their delightful texture and flavor for up to three days.
If you find that your cookies are sticking together, you can place layers of parchment paper between them before sealing the container. This prevents the ganache from smudging and the cookies from becoming overly moist or breaking. Always check for freshness before serving, though their delicious aroma usually gives them away.
Avoid storing them in humid environments, as this can make the cookies soft and lose their desired crispness. The goal is to maintain the perfect balance of tender cookie and set ganache. Air is the enemy of crisp cookies, so seal it out!
Freezing
Chocolate Cherry Thumbprint Cookies freeze beautifully, making them an excellent make-ahead treat. Once the cookies have completely cooled and the ganache has set firmly, you can freeze them. For best results, place the cookies in a single layer on a baking sheet and freeze until they are solid. This prevents them from sticking together in a clump.
Once frozen solid, transfer the cookies to a heavy-duty freezer-safe bag or an airtight container. Remove as much air as possible before sealing. Properly frozen, these cookies can be stored for up to 2 to 3 months. Label the container with the date for easy tracking.
When you’re ready to enjoy them, simply remove them from the freezer and let them thaw at room temperature. This typically takes about 30 to 60 minutes. You can also gently warm them in a low oven for a few minutes if you prefer a slightly warm cookie with a soft ganache.
Reheating
While these cookies are delightful at room temperature, a gentle reheat can revive their freshness or enhance the ganache’s texture. If your cookies have been stored in the refrigerator, allow them to come to room temperature for about 15-20 minutes first. This prevents them from becoming too hard if directly microwaved.
For a slightly warmed cookie, place them on a baking sheet and warm them in a preheated oven at a low temperature, around 150°C (300°F), for just 2-3 minutes. Watch them closely to avoid overbaking. Alternatively, you can microwave a single cookie for about 5-10 seconds on low power. This will soften the ganache slightly, making it wonderfully gooey, but be careful not to overheat, which can make the cookie tough.
Reheating is particularly useful if you’ve frozen the cookies and want to serve them warm. The low oven method is generally preferred for achieving a pleasant texture without compromising the cookie’s integrity. Enjoy them as if they were just baked!
Frequently Asked Questions
- Can I prepare the cookie dough ahead of time and store it before baking?
Yes, absolutely! The cookie dough for Chocolate Cherry Thumbprint Cookies can be prepared up to 3 days in advance and stored in the refrigerator. Once the dough is made and shaped into balls with the indents, place them on a parchment-lined baking sheet and cover them tightly with plastic wrap or place them in an airtight container. When you are ready to bake, you can bake them directly from the refrigerator, though they might require an extra minute or two in the oven. This make-ahead option is perfect for busy schedules or for preparing for holiday baking marathons.
- How long will the Chocolate Cherry Thumbprint Cookies last, and what is the best way to store them for optimal freshness?
When stored properly in an airtight container at room temperature, these cookies will remain fresh and delicious for approximately 3 to 4 days. The key is to ensure the container is well-sealed to prevent air from entering, which can cause them to become stale or lose their tender texture. If your kitchen is particularly warm or humid, or if you prefer the ganache to be firmer, storing them in the refrigerator is also an option. Just be sure to separate layers with parchment paper to prevent sticking, and allow them to come to room temperature for a few minutes before enjoying for the best texture.
- What are the best substitutions for the chocolate and cherry components if I have dietary restrictions or specific preferences?
For the chocolate, you can use a good quality semi-sweet or bittersweet chocolate if dark chocolate is too intense for your liking. For a dairy-free version, opt for dairy-free dark chocolate chips or bars and replace the heavy cream with full-fat coconut milk or a dairy-free creamer. If cherry preserves are unavailable or not to your taste, other fruit preserves like raspberry, strawberry, or even apricot can work wonderfully, offering a slightly different but equally delicious flavor profile. For a nut-free option, ensure your chocolate does not contain nuts and avoid adding any nuts to the dough.