Irresistible Chocolate Zucchini Cake Recipe You'll Adore

There’s nothing quite like the surprising delight of a moist Chocolate Zucchini Cake to awaken your taste buds! I first stumbled upon this unique combination when a friend shared her secret of sneaking veggies into dessert; it was a revelation that changed how I perceived baking forever. The rich, chocolaty flavors blend harmoniously with the subtle sweetness of zucchini, creating a cake that is not only delicious but also guilt-free.
Imagine slicing into a luscious, layered cake topped with velvety chocolate frosting, every bite leaving you wondering how it can be so indulgent yet packed with wholesome ingredients. Whether it’s a special occasion or a cozy family dinner, this cake impresses without the usual fuss—making it the perfect answer to your quest for homemade desserts that won’t dull your culinary creativity. Join me as we dive into this easy recipe that promises to turn anyone into a chocolate lover, one bite at a time!
Why You Will Love This Recipe
- Surprising Flavor Combination: You wouldn’t expect zucchini to be so tasty in dessert, but it adds incredible moisture and enhances the rich chocolate flavor beautifully. It’s a true culinary marvel that delights the senses.
- Effortless Preparation: This recipe simplifies the baking process with straightforward, easy-to-follow steps. It allows even beginner bakers to achieve a professional-looking and tasting cake with confidence.
- Guilt-Free Indulgence: Packed with wholesome ingredients, this cake offers a luxurious, indulgent experience without the associated guilt. It fits perfectly into a balanced lifestyle, proving that treats can be both delicious and nourishing.
- Unmatched Versatility: This cake is a true crowd-pleaser, perfect for any occasion—from birthdays and picnics to simple family gatherings. It consistently impresses guests with its delightful taste and moist texture.
- Kid-Friendly Secret: It’s a fantastic way to sneak in those essential veggies unnoticed! Watch your children enjoy a delicious dessert like never before, making it a win-win for everyone.
Ingredients You Need
The quality of your ingredients plays a pivotal role in the final outcome of any baked good, and this Chocolate Zucchini Cake is no exception. Opting for fresh, high-quality components will ensure a superior taste and texture that truly shines. Don’t hesitate to select ripe zucchini and good quality cocoa powder for the best possible results. The care you put into choosing each item will be rewarded with every delightful bite.
Deliciously Moist Chocolate Zucchini Cake
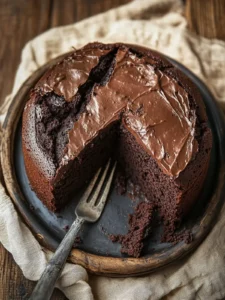
A rich, indulgent chocolate cake that hides nutritious zucchini for incredible moisture and a guilt-free texture. Perfect for any occasion and beginner-friendly.
- 1 cup Milk
- 1 tablespoon Vinegar
- 1 cup Oat Flour
- 2 tablespoons Arrowroot Powder
- 1 teaspoon Baking Soda
- 1 teaspoon Baking Powder
- 1 cup Brown Sugar
- 1 cup Unsweetened Applesauce
- 1 cup Zucchini (shredded)
- 1 cup Chocolate Frosting
- 1Preheat the oven to 180°C (350°F) and grease two 8-inch cake pans.
- 2Whisk together the milk and vinegar in a bowl and let sit for 5 minutes.
- 3In a large mixing bowl, combine oat flour, cocoa powder, arrowroot powder, baking soda, and baking powder.
- 4In a separate bowl, whisk the curdled milk mixture with brown sugar and applesauce.
- 5Fold the wet ingredients into the dry until just combined, then gently stir in the shredded zucchini.
- 6Divide batter between the pans and bake for 35-40 minutes.
- 7Cool in pans for 10 minutes before transferring to a wire rack to cool completely before frosting.
Keywords: Chocolate, Zucchini, Cake, Dessert, Vegetarian, Baking, Moist
- milk: a crucial liquid that adds moisture and richness, creating that divine, tender crumb.
- vinegar: a secret ingredient that reacts with baking soda to promote a beautiful, light, and fluffy rise.
- oat flour: a wonderful gluten-free option that contributes to a tender texture while offering a healthier profile.
- cocoa powder: the heart of the chocolate flavor, choose a good quality one for deep, rich taste; Dutch-processed offers a more intense experience.
- arrowroot powder: a fantastic thickener that helps achieve the perfect, moist consistency without adding heaviness.
- baking soda: an essential leavening agent that works in tandem with acidic ingredients for maximum lift.
- baking powder: works alongside baking soda to ensure the cake remains wonderfully airy and light throughout the baking process.
- brown sugar: adds a lovely moisture content and a subtle, comforting caramel undertone that beautifully complements the chocolate.
- unsweetened applesauce: a brilliant natural sweetener and fat replacer that keeps the cake exceptionally moist and tender.
- shredded zucchini: the star vegetable, providing natural moisture, nutrients, and a tender texture without an overpowering flavor.
- chocolate frosting: a generous, luscious topping to bring all the flavors together; feel free to use your favorite store-bought or homemade version.
The precise measurements for each ingredient are detailed within the recipe card provided for your convenience.
Variations
This Chocolate Zucchini Cake is a fantastic canvas for your culinary creativity, allowing for numerous delightful variations. You can easily adapt it to suit different dietary needs or flavor preferences, ensuring everyone can enjoy this delectable treat. Experimenting with these twists can lead to exciting new favorite versions of this already beloved recipe.
Vegan Delight: To transform this cake into a completely vegan masterpiece, simply substitute the milk with a plant-based alternative like almond, soy, or oat milk. For the frosting, use a vegan chocolate frosting or prepare one using plant-based butter and cocoa powder. Ensure all other ingredients, like sugar, are also confirmed vegan.
Low Carb Indulgence: For those watching their carbohydrate intake, swap the oat flour for almond flour or a keto-friendly flour blend. You can also replace the brown sugar with a sugar substitute like erythritol or xylitol, adjusting the quantity to your sweetness preference. The zucchini will still lend its moisture, creating a satisfying, low-carb chocolate cake experience.
Fruity Fusion: Elevate the cake by incorporating bursts of fruit into the batter. Fold in about half a cup of dark or semi-sweet chocolate chips for an extra chocolatey punch, or add dried cranberries or cherries for a delightful tartness and chew. These additions create wonderful pockets of flavor and texture throughout the cake, making each bite a surprise.
Spice It Up: Introduce a warm, complex flavor profile by adding a teaspoon of cinnamon to the dry ingredients. For a bolder kick, a tiny pinch of cayenne pepper can be added, which surprisingly enhances the chocolate flavor without making the cake spicy. This adds an unexpected depth that’s truly captivating and memorable.
Citrus Brightness: A little zest goes a long way in brightening flavors. Incorporate the zest of one orange or lemon into the wet ingredients. This subtle citrus note will cut through the richness of the chocolate, adding a refreshing dimension to the cake that’s both sophisticated and delightful. This adds a lovely aromatic quality as well.
How to Prepare Chocolate Zucchini Cake
Step 1: Gathering and Preparing Your Ingredients
Begin by preheating your oven to 180°C (350°F). This crucial first step ensures that your cake bakes evenly from the moment it enters the oven, achieving that perfect golden-brown crust. Simultaneously, prepare your two 8-inch cake pans by greasing them thoroughly with butter or cooking spray and lightly dusting them with flour or cocoa powder. This prevents the cake from sticking, allowing for easy removal and an intact, beautiful final product.
In a medium-sized bowl, gently whisk together the milk and vinegar. Allow this mixture to sit undisturbed for approximately 5 minutes. You’ll notice it begin to curdle slightly, resembling buttermilk; this reaction is key to creating a tender and moist cake structure. This simple step acts as a vegan buttermilk substitute, contributing significantly to the cake’s delicate texture and lightness.
In a separate, large mixing bowl, combine all your dry ingredients: the oat flour, cocoa powder, arrowroot powder, baking soda, and baking powder. Whisk these components together thoroughly, ensuring there are no clumps of flour or leavening agents. Proper aeration of the dry ingredients is vital for an even bake and a consistently fluffy cake. The aroma of the cocoa powder at this stage is always a wonderful olfactory treat, hinting at the deliciousness to come.
In yet another bowl, whisk together the wet ingredients. This includes the slightly curdled milk mixture, the brown sugar, and the unsweetened applesauce. Blend these until they are well combined and the sugar begins to dissolve into the liquid. This ensures that the sweetness and moisture are distributed evenly throughout the cake batter, contributing to a harmonious flavor profile in every slice.
The star ingredient, shredded zucchini, should be freshly shredded. Squeeze out any excess moisture by placing it in a clean kitchen towel and wringing it gently; this prevents the cake from becoming too watery. This step is crucial for achieving the perfect moistness without compromising the cake’s structure. The subtle vegetal notes of the zucchini are perfectly masked by the intense chocolate flavor, offering a secret nutritional boost.
Finally, gently fold the wet ingredients into the large bowl containing the dry ingredients. Mix until they are just combined, being careful not to overmix. Overworking the batter can develop the gluten too much, resulting in a dense cake. Once the batter is almost homogenous, carefully incorporate the freshly shredded zucchini. Fold it in gently until it is evenly distributed throughout the mixture.
Step 2: Combining Wet and Dry Ingredients
The art of combining wet and dry ingredients lies in achieving a perfect balance, ensuring all components are incorporated without overdeveloping the gluten structure. Begin by pouring the whisked wet ingredients into the large bowl that holds your thoroughly mixed dry ingredients. This is where patience and a gentle touch are your greatest allies in the baking process. Avoid the temptation to whisk vigorously; a rubber spatula or a large spoon is ideal for this stage.
Use a folding motion to marry the two mixtures. Start by scraping down the sides and bottom of the bowl, bringing the dry ingredients up and over the wet. Continue this gentle folding until you no longer see streaks of dry flour. The batter should be thick and luscious, with a rich chocolate hue. It’s okay if there are a few small lumps; these often resolve during baking.
Now, it’s time to introduce the shredded zucchini to the batter. Add the well-drained, finely shredded zucchini to the mixture. Again, employ the same gentle folding technique. You want to distribute the zucchini evenly throughout the batter so that each bite offers that delightful moisture and subtle sweetness. Be mindful not to stir or beat the batter at this point; continued aggressive mixing can toughen the cake.
The consistency of the batter should be thick but pourable, with the zucchini shreds beautifully integrated. It should look rich and inviting, a testament to the quality of the cocoa and the moisture-adding properties of the applesauce and zucchini. This stage is crucial for ensuring that the cake’s structure will be tender and its crumb will be wonderfully moist.
Once the zucchini is fully incorporated, give the batter one final gentle fold to ensure everything is cohesive. The goal is a uniform mixture that smells intensely of chocolate and hints at the earthy sweetness of the zucchini. This careful combining process is what sets the stage for a cake that is both deeply flavorful and satisfyingly tender.
The batter is now ready to be divided between the prepared cake pans. A well-mixed batter is the foundation for a beautifully baked cake. This mindful approach to combining ingredients prevents common baking pitfalls and guarantees a superior result.
Step 3: Baking the Cake to Perfection
With your batter meticulously combined and your cake pans prepared, it’s time to move on to the baking phase. Carefully divide the rich chocolate zucchini batter evenly between the two greased and floured 8-inch cake pans. Use a spatula to gently spread the batter, ensuring the tops are as level as possible. This even distribution is critical for ensuring that both layers bake at the same rate and emerge with uniform heights.
Once the batter is settled in its pans, carefully place them into the preheated oven. Position them in the center of the oven if possible, to promote even heat circulation. Baking time will typically range from 35 to 40 minutes. However, this can vary slightly depending on your oven’s calibration and the exact moisture content of your zucchini.
To check for doneness, the most reliable method is the skewer test. After about 35 minutes, gently insert a wooden skewer or a toothpick into the center of each cake. If it comes out clean, with no wet batter clinging to it, your cakes are perfectly baked. A few moist crumbs attached to the skewer are perfectly acceptable and indicate a moist cake, but raw batter means they need a few more minutes. Avoid overbaking, as this can lead to a dry cake.
When the cakes pass the skewer test, carefully remove the pans from the oven. Allow the cakes to cool in their pans on a wire rack for about 10 minutes. This brief cooling period in the pan helps the cakes to firm up slightly, making them easier to handle and reducing the risk of them breaking when you invert them. The aroma filling your kitchen at this point is simply divine, a true testament to the power of chocolate and zucchini.
After this initial cooling period, it’s time to release the cakes from their pans. Carefully invert each pan onto a wire cooling rack. The cakes should slide out easily if the pans were greased and floured properly. If a cake seems a bit stubborn, gently run a thin knife around the edge before inverting. Once out of the pans, allow the cakes to cool completely on the wire rack. This is a critical step before frosting, as a warm cake will melt the frosting into a messy puddle.
The fully cooled cakes should feel firm to the touch and spring back slightly when gently pressed. The exterior should have a beautiful, slightly matte finish, indicating they are baked through but still wonderfully moist inside. This careful baking and cooling process ensures the best possible texture and foundation for your delicious Chocolate Zucchini Cake.
Step 4: Cooling and Preparing for Frosting
Once your chocolate zucchini cakes have been successfully baked and have undergone their initial cooling period in the pans, the next crucial step is to allow them to cool completely on a wire rack. This might seem like a simple step, but it is absolutely vital for achieving a perfectly frosted cake. Placing warm cakes onto frosting would lead to a melty, sliding mess, undermining all your hard work and resulting in a less appealing presentation.
Ensure that the cakes are at room temperature before you even think about reaching for the frosting. This might take anywhere from an hour to several hours, depending on the ambient temperature of your kitchen. Resist the urge to rush this process; patience here will be greatly rewarded with a beautifully finished cake. The wire rack is essential as it allows air to circulate freely around the cakes, preventing condensation from forming on the bottom and sides, which could lead to a soggy texture.
As the cakes cool, you can prepare your frosting. If you are using a store-bought frosting, ensure it’s at the correct consistency for spreading; sometimes, a quick stir is all that’s needed. If you’re making your own, follow your recipe closely and allow it to reach the ideal temperature for application. The goal is a frosting that is spreadable but firm enough to hold its shape.
Take this time to also prepare any additional garnishes you might wish to add. This could include chopping nuts, zesting chocolate, or washing berries. Having everything ready before you start frosting streamlines the process and allows you to focus on achieving that smooth, even finish you desire. This attention to detail contributes to the overall professional look of your finished cake.
Once the cakes are completely cool to the touch, you can gently lift them off the wire rack and place them on your serving platter or cake stand. Some bakers prefer to place a few strips of parchment paper under the edges of the cake to keep the serving platter clean during frosting, removing them once done. This is a handy trick for maintaining a pristine presentation.
With the cakes cooled and ready, and your frosting prepared, you are now perfectly poised for the delightful task of assembling and frosting your magnificent Chocolate Zucchini Cake. This stage transforms the individual baked layers into the stunning, cohesive dessert that will be the centerpiece of any gathering.
Step 5: Frosting and Assembling the Layers
Now for the truly decadent part: frosting and assembling your glorious Chocolate Zucchini Cake! Take one completely cooled cake layer and place it on your serving plate or cake stand. If you’ve used the parchment paper trick, ensure it’s positioned correctly to catch any errant frosting drips.
Using an offset spatula or a butter knife, spread a generous, even layer of chocolate frosting over the top of the first cake layer. Aim for a smooth, consistent coating that extends almost to the edges. This layer of frosting acts as a delicious adhesive and flavor enhancer, binding the two layers together beautifully. Don’t be shy with the frosting; it’s part of what makes this cake so special and indulgent.
Carefully take the second cooled cake layer and gently place it on top of the frosted first layer. Align the edges as closely as possible to create a neat, stacked appearance. Lightly press down to ensure the layers are secure and the cake feels stable. This is where the meticulous cooling in the previous step truly pays off, preventing any sliding or shifting.
Once the second layer is in place, begin frosting the top and sides of the entire cake. Work from the center outwards on the top layer, spreading the frosting smoothly. Then, move to the sides, using an up-and-down motion with your spatula to cover the entire exterior. If you desire a perfectly smooth finish, you can use a bench scraper or the flat side of your offset spatula to smooth the frosting.
For an extra touch of flair, you can create decorative swirls or patterns on the frosting using the back of a spoon or a piping bag with a decorative tip. This is your chance to add a personal artistic touch to your creation. Think of it as the crowning glory of your baking efforts, transforming a delicious cake into a visual masterpiece.
Finally, add any optional garnishes you’ve prepared. This might include a dusting of cocoa powder, a sprinkle of chocolate shavings, a scattering of fresh berries like raspberries or strawberries, or even a drizzle of extra chocolate ganache. These additions not only enhance the visual appeal but also add complementary flavors and textures to the already rich cake. This assembled and frosted cake is now ready to be sliced and shared, a testament to your baking prowess and the irresistible allure of chocolate zucchini cake.
Step 6: Slicing and Serving
The moment of truth has arrived – it’s time to slice and serve your magnificent Chocolate Zucchini Cake! For the cleanest cuts, it’s recommended to use a sharp, long serrated knife. A gentle sawing motion works best, preventing the frosting from being pulled and the cake from crumbling.
Before slicing, ensure the cake has had sufficient time to set, especially if the frosting was slightly soft. Allowing it to sit for at least 15-30 minutes after frosting can make a significant difference in the neatness of your slices. This allows the frosting to firm up slightly, providing a stable base for the knife.
When you make your first cut, consider the size of your slices. This cake is rich and satisfying, so even modest slices are often ample. Aim for consistent thickness across all slices to ensure everyone receives a comparable portion of cake and frosting. A steady hand is your best friend here, guiding the knife with precision.
If you notice the knife picking up frosting between slices, wipe it clean with a damp cloth or paper towel before making the next cut. This simple step prevents frosting from smearing across subsequent slices, keeping each piece looking as pristine as the last. It’s a small detail that significantly elevates the presentation.
Serve each slice on a dessert plate, perhaps with a small dollop of whipped cream or a scoop of vanilla ice cream if desired. The visual appeal of a well-sliced cake, showcasing its moist layers and generous frosting, is a delight in itself. It’s a true celebration of baking and the wonderful flavors that can be achieved.
Your delicious, homemade Chocolate Zucchini Cake is now ready to be enjoyed by all. Each bite promises a delightful balance of rich chocolate flavor and incredible moisture, a perfect testament to the magic of using wholesome ingredients in unexpected ways. Savor this moment, as this cake is sure to become a favorite.
Pro Tips for Chocolate Zucchini Cake
Always Shred Finely: The key to a seamlessly moist cake without any discernible zucchini texture is to shred the zucchini very finely. A box grater with the smallest holes or a food processor attachment works best. This ensures the zucchini melts into the batter during baking, contributing only moisture and a subtle sweetness.
Don’t Overmix the Batter: Once you combine the wet and dry ingredients, mix only until they are just incorporated. Overmixing develops gluten, which can result in a tough, dense cake. A few small lumps in the batter are perfectly fine and often desirable for a tender crumb.
Measure Flour Correctly: For oat flour, or any flour, spoon it into your measuring cup and level it off with a straight edge. Scooping directly from the bag can compact the flour, leading to too much flour in your recipe and a drier cake. Accurate measurements are fundamental to baking success.
Cool Completely Before Frosting: This cannot be stressed enough! Ensure your cake layers are thoroughly cooled to room temperature before applying any frosting. Warm cakes will melt the frosting, creating a messy, unappealing finish and potentially causing the layers to slide apart.
Room Temperature Ingredients for Frosting: If you’re making your own chocolate frosting, ensure your butter and any other dairy components are at room temperature. This allows them to emulsify properly, creating a smooth, creamy, and easily spreadable frosting. Cold ingredients can lead to a grainy or separated frosting.
Zucchini Moisture Management: While you want the zucchini to add moisture, excessive water can make the cake too wet. After shredding, gently squeeze out some of the excess liquid by placing the shredded zucchini in a clean kitchen towel and wringing it. This step ensures you add moisture without adding unwanted liquid.
Serving Suggestions for Chocolate Zucchini Cake
Decoration
Elevate the visual appeal of your Chocolate Zucchini Cake with thoughtful decorations that complement its rich chocolate flavor. A smooth, even layer of chocolate frosting is a classic choice, but you can add texture and interest by creating elegant swirls with an offset spatula or a piping bag fitted with a star tip. For a touch of sophistication, consider a dusting of cocoa powder through a sieve, or a scattering of finely grated dark chocolate over the top, creating a beautiful, refined finish. Alternatively, a drizzle of glossy chocolate ganache can add a touch of decadence and a luxurious sheen that’s simply irresistible to chocolate lovers.
Side Dishes
While this cake is a magnificent standalone dessert, a few well-chosen accompaniments can enhance the overall tasting experience. A scoop of high-quality vanilla bean ice cream provides a delightful contrast in temperature and texture, its creamy sweetness perfectly balancing the rich chocolate. Alternatively, a dollop of freshly whipped cream, light and airy, offers a delicate counterpoint. For those who enjoy a more complex flavor pairing, a strong espresso or a robust cup of coffee cuts through the sweetness and deepens the appreciation of the chocolate notes, creating a sophisticated dessert pairing.
Creative Serving Ideas
Transform your Chocolate Zucchini Cake into a memorable dessert experience with creative serving ideas that delight the senses. Present individual slices artfully on dessert plates, perhaps garnished with a fresh mint sprig for a pop of color and an aromatic lift that complements the chocolate. For a truly indulgent presentation, consider serving a warm slice alongside a small ramekin of rich chocolate sauce or a light caramel drizzle, inviting guests to add an extra layer of decadence. Another delightful option is to crumble a small portion of the cake and serve it atop a parfait of chocolate mousse and whipped cream, offering a delightful textural variation on a classic dessert.
Preparation & Storage
Storing Leftovers
Proper storage is key to maintaining the delicious moisture and flavor of your Chocolate Zucchini Cake. Once cooled, any leftover cake should be kept in an airtight container. This prevents the cake from drying out and protects it from absorbing any unwanted odors from the refrigerator. If the cake is frosted, the frosting itself helps to seal in moisture, but an airtight container is still the best option for optimal freshness.
Store the cake in the refrigerator, especially if it is frosted with a frosting that contains dairy or cream cheese. Refrigeration helps to prevent spoilage and maintains the cake’s integrity. When stored correctly in the fridge, your Chocolate Zucchini Cake can stay wonderfully moist and delicious for up to 3 to 5 days. Always check for signs of spoilage before consuming, though it’s unlikely to last that long!
If your cake is unfrosted, you can also store it at room temperature for a day or two in a well-sealed cake carrier, provided your kitchen isn’t excessively warm or humid. However, refrigeration generally ensures longer-lasting freshness and is the safest bet for preserving the cake’s quality. Enjoying the leftovers is a delightful second act to this incredible dessert.
Freezing
For longer-term storage, freezing is an excellent option to preserve the deliciousness of your Chocolate Zucchini Cake. It’s best to freeze the cake before frosting it, if possible, as frosting can sometimes alter in texture after freezing and thawing. However, frosted cakes can also be frozen successfully.
If freezing unfrosted layers, wrap each completely cooled layer tightly in two layers of plastic wrap. Ensure there are no air gaps. Then, wrap the plastic-wrapped cake layers in a layer of aluminum foil for added protection against freezer burn. Place the wrapped cake layers in a freezer-safe airtight container or a heavy-duty freezer bag for the ultimate protection.
If freezing a frosted cake, you might want to chill it in the refrigerator for about 30 minutes to an hour until the frosting is firm. Then, wrap the entire cake in plastic wrap and foil as described above. Alternatively, slice the frosted cake and wrap individual slices. This allows you to thaw only what you need.
When stored properly, your Chocolate Zucchini Cake can maintain its quality in the freezer for up to 2 to 3 months. Label the container with the date so you can keep track of its freshness. The dense, moist nature of this cake makes it particularly well-suited for freezing without significant loss of quality.
Reheating
When you’re ready to enjoy your frozen Chocolate Zucchini Cake, proper thawing and reheating are essential to bring back its delightful texture and flavor. The best method for thawing is to remove the cake from the freezer and place it, still wrapped, in the refrigerator. Allow it to thaw overnight. This gradual thawing process helps prevent condensation from forming on the cake, which can lead to sogginess.
Once the cake has completely thawed in the refrigerator, you can bring it to room temperature before serving. This might take an hour or two, depending on the size of the cake or slices. Allowing it to reach room temperature allows the flavors to meld and the texture to return to its optimal state, making it taste as fresh as the day it was baked.
If you prefer your cake slightly warm, you can gently reheat individual slices. Place a slice on a microwave-safe plate and heat it in the microwave for approximately 15-20 seconds on a medium power setting. Be cautious not to overheat, as this can dry out the cake quickly. A gentle warmth is all that’s needed to enhance the chocolate aroma and create a cozy, comforting treat.
For an oven-reheating option, preheat your oven to a low temperature (around 150°C or 300°F). Place slices on a baking sheet lined with parchment paper and warm for about 5-8 minutes, or until heated through. This method can help maintain a slightly crisper exterior if desired. Enjoy your beautifully resurrected Chocolate Zucchini Cake!
Frequently Asked Questions
-
What type of zucchini should I use for the best flavor and texture in my Chocolate Zucchini Cake?
For the most delicious and texturally pleasing Chocolate Zucchini Cake, it’s best to select medium-sized zucchinis that are firm to the touch and free from any blemishes or soft spots. Look for zucchinis with a glossy, smooth skin, which is an indicator of freshness and tenderness. Avoid using very large zucchinis, as they tend to be more watery and can have a slightly more fibrous texture, which might not integrate as smoothly into your cake batter. Smaller to medium zucchinis typically have fewer seeds and a more desirable moisture content for baking, ensuring your cake remains perfectly moist without being too wet.
-
How long will my Chocolate Zucchini Cake stay fresh, and what are the best storage methods?
Your Chocolate Zucchini Cake, when stored properly, can maintain its delightful flavor and texture for several days. If kept in an airtight container in the refrigerator, it will typically stay fresh for up to 5 days. The frosting, if used, often helps to seal in moisture, keeping the cake moist and delicious. For optimal results, ensure the container is truly airtight to prevent the cake from drying out or absorbing refrigerator odors. If you prefer to store unfrosted cake, room temperature storage for 1-2 days is possible in a sealed container, provided your kitchen environment is cool and dry, but refrigeration is always recommended for longer freshness.
-
Can I freeze the Chocolate Zucchini Cake, and if so, what is the most effective way to do it?
Absolutely, freezing is an excellent method for preserving your delicious Chocolate Zucchini Cake for future enjoyment. To freeze it effectively, ensure the cake is completely cooled. If freezing unfrosted cake layers, wrap each layer tightly in two layers of plastic wrap, followed by a layer of aluminum foil for robust protection against freezer burn. If freezing a frosted cake, chilling it briefly in the refrigerator until the frosting is firm can help prevent smudging during the wrapping process. You can also freeze individual slices, wrapped similarly, for convenient portioning. Properly wrapped, your Chocolate Zucchini Cake can be stored in the freezer for up to 2 to 3 months, retaining its wonderful taste and texture.