Keto Coconut Cake Delight

This Keto Coconut Cake is a delightful journey into low-carb indulgence, offering a symphony of textures and a rich, satisfying coconut flavor. It’s a dessert that proves you don’t need sugar or traditional flours to create something truly special and decadent. The recipe is thoughtfully crafted to deliver a tender crumb, a luscious topping, and a hint of sweetness that perfectly complements the natural taste of coconut, making it an ideal treat for those following a ketogenic lifestyle or simply seeking a healthier dessert option.
Imagine slicing into a cake that’s both comforting and elegantly simple, a perfect end to any meal or a delightful afternoon pick-me-up. This cake is designed to impress, with its layered flavors and appealing presentation, all while keeping the carbohydrate count low. It’s a testament to how delicious and satisfying sugar-free baking can be, offering a taste of pure bliss without the guilt.
Why You Will Love This Recipe
- Effortless Elegance: This cake looks and tastes like a sophisticated dessert, yet it’s surprisingly straightforward to prepare, making it perfect for any occasion.
- Low-Carb Compliance: Crafted with keto-friendly ingredients, it allows you to enjoy a rich dessert without compromising your dietary goals.
- Superior Texture: The combination of moist cake, fluffy whipped topping, and crunchy toasted coconut creates an irresistible textural experience in every bite.
- Make-Ahead Marvel: This cake is designed to be even better the next day, thanks to its syrup soak and chilling time, making it ideal for busy schedules or entertaining.
- Intense Coconut Flavor: From the coconut flour base to the toasted coconut topping, every element highlights the delicious, tropical essence of coconut.
Ingredients You Need
The success of any great cake lies in the quality of its ingredients, and this Keto Coconut Cake is no exception. We’ve carefully selected components that not only contribute to the delightful flavor profile but also adhere to ketogenic principles. Using fresh, high-quality items will truly elevate your baking experience and the final taste of the cake. Remember that precision in measuring, especially with coconut flour, is key to achieving the perfect texture.
Keto Coconut Cake
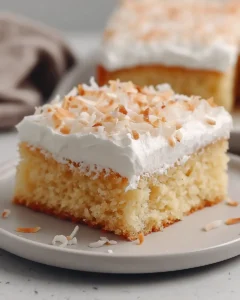
A rich, low-carb coconut cake finished with a light whipped cream topping, a delicate sugar-free syrup, and a layer of toasted coconut for added texture and flavor.
- 9 tablespoons coconut flour, sifted
- 2 tablespoons heavy cream
- 6 large eggs, at room temperature
- 1 teaspoon vanilla extract
- 1/2 teaspoon salt
- 9 tablespoons unsalted butter, melted and cooled
- 1/2 cup powdered monk fruit sweetener
- 2 teaspoons softened cream cheese
- 1 1/2 teaspoons baking powder
- For the syrup:
- 4 tablespoons powdered monk fruit sweetener
- 3/4 cup water
- For the topping:
- 1/2 teaspoon vanilla extract
- 3/4 cup heavy cream, well chilled
- 4 tablespoons powdered monk fruit sweetener
- 1 cup unsweetened coconut flakes, toasted
- 1Preheat oven to 350°F (175°C). Grease a 9x9 inch baking pan. Melt butter and let cool.
- 2In a mixing bowl, beat eggs with powdered sweetener, cream cheese, heavy cream, vanilla, salt, and baking powder until smooth and airy.
- 3Mix in cooled butter and sifted coconut flour until batter is fully combined.
- 4Spread batter into the pan and bake for 20-24 minutes, or until a toothpick comes out clean. Let cool slightly.
- 5For the syrup, simmer water and powdered sweetener until slightly reduced (about 6 minutes).
- 6Make small slits on top of the slightly cooled cake and pour syrup evenly over it. Let cake cool completely.
- 7Whip chilled heavy cream with powdered sweetener and vanilla until stiff peaks form.
- 8Spread whipped cream over cooled cake and sprinkle with toasted coconut flakes.
- 9Refrigerate overnight before serving.
The specific quantities for each ingredient are detailed within the recipe card, ensuring you have everything you need for this exceptional dessert.
Variations
While this Keto Coconut Cake is wonderfully satisfying as is, there’s always room for personalization and creative twists to suit different tastes and dietary needs. Experimenting with these variations can lead to new favorite versions of this already beloved dessert.
Vegan Delight: To make this cake entirely vegan, you can substitute the eggs with a flax egg (1 tablespoon ground flaxseed mixed with 3 tablespoons water, let sit for 5 minutes) or a commercial egg replacer. For the heavy cream in both the cake batter and the topping, consider using a full-fat canned coconut cream, ensuring it’s well chilled so the cream can be whipped effectively. The butter can be replaced with vegan butter or more coconut oil for a consistent coconut theme. This adaptation still yields a rich and moist cake, perfect for those avoiding animal products.
Citrus Zest Infusion: Elevate the tropical notes with the addition of citrus zest. A tablespoon or two of finely grated lemon or lime zest, incorporated into the cake batter along with the dry ingredients, can add a bright, refreshing counterpoint to the creamy coconut flavor. This citrusy hint cuts through the richness beautifully, making the cake taste even lighter and more nuanced. It’s a simple addition that can significantly enhance the overall sensory experience of the dessert.
Nutty Undertones: For those who enjoy a deeper, more complex flavor profile, incorporating finely ground nuts can be a wonderful addition. Almond flour or finely chopped pecans can be added in small quantities to the cake batter, lending a subtle nuttiness and an additional layer of texture. Alternatively, you could add toasted chopped nuts as a decorative element on top of the whipped cream, complementing the toasted coconut flakes for a delightful crunch and earthy flavor. Ensure any added nuts are unsweetened to maintain the keto-friendly nature of the cake.
How to Prepare Keto Coconut Cake
Step 1: Preparing the Baking Environment and Base Ingredients
Begin by preheating your oven to 350 degrees Fahrenheit (175 degrees Celsius), ensuring it reaches the optimal temperature for even baking. This step is crucial for achieving the desired cake structure and ensuring it cooks through properly. While the oven heats, prepare your 9×9 inch baking pan by lightly greasing it with butter or a keto-friendly non-stick spray; this prevents the cake from sticking and ensures clean removal after baking.
Next, you’ll want to melt the unsalted butter for the cake batter. Place the measured butter in a microwave-safe bowl or a small saucepan and heat it until it’s completely liquid. It’s important to let this melted butter cool down to a lukewarm temperature before adding it to the batter; this prevents it from cooking the eggs prematurely and helps in creating a smooth, well-emulsified batter. Setting it aside to cool ensures it’s ready when you need it in the next stages of preparation.
The initial preparation sets the stage for a successful baking process. A properly preheated oven and cooled melted butter are foundational elements that contribute to the cake’s final texture and consistency. These seemingly small details ensure that all the ingredients can be incorporated harmoniously, leading to a superior outcome. Taking these few moments to prepare your workspace and key ingredients properly will pay dividends in the final product.
Step 2: Creating the Wet Batter Foundation
In a large mixing bowl, crack the six large eggs. Ensure they are at room temperature, as this promotes better emulsification and allows for a lighter, airier batter. Add the powdered monk fruit sweetener to the bowl, which will provide the cake’s sweetness without the carbohydrates found in traditional sugar. Incorporate the softened cream cheese, which adds a subtle richness and helps create a smoother, more cohesive batter consistency. Lastly, add the two tablespoons of heavy cream, contributing to the cake’s moisture and tender crumb.
To this mixture, add the vanilla extract, which enhances all the flavors and adds a warm aromatic quality. Include the salt, which sharpens the sweetness and balances the other ingredients, making the overall taste more profound. Finally, add the baking powder, a leavening agent essential for giving the cake its rise and preventing it from becoming too dense. Beat these ingredients together vigorously with a whisk or an electric mixer until the mixture is exceptionally smooth and appears slightly airy or frothy.
The goal here is to thoroughly combine all the wet ingredients and sweeteners. This aeration process is key to achieving a lighter cake texture, as it incorporates air pockets that expand during baking. A well-beaten mixture ensures that the sweetener dissolves completely and that the cream cheese and eggs are fully integrated, creating a stable base for the dry ingredients that will be added next. This step is fundamental for the cake’s overall texture and flavor distribution.
Step 3: Incorporating Dry Elements and Final Batter Formation
Once the wet ingredients have been thoroughly mixed and are showing a bit of airy volume, it’s time to add the cooled melted butter. Pour the lukewarm butter into the egg and sweetener mixture. Gently whisk or beat it in until it is fully incorporated, ensuring there are no large pockets of oil. The butter adds essential moisture and richness to the cake batter, which is particularly important when working with absorbent flours like coconut flour. Its presence contributes to a softer, more tender crumb, preventing the cake from becoming dry or crumbly.
Next, it’s time to introduce the star dry ingredient: the sifted coconut flour. Carefully add the sifted coconut flour to the wet ingredients in the bowl. Sifting the coconut flour is a crucial step as it breaks up any clumps and ensures the flour distributes evenly throughout the batter, preventing pockets of uncooked flour and resulting in a finer, more consistent cake crumb. Add the sifted flour in one go, or in two additions if your mixer struggles with thick batters, and then stir or beat until the batter is just fully combined and uniform in consistency.
Be careful not to overmix the batter once the coconut flour is added; overmixing can develop gluten structures even in low-carb flours, potentially leading to a tougher cake. Stir just until you no longer see any dry streaks of flour. The batter will likely be quite thick due to the absorbent nature of coconut flour. Ensure you scrape down the sides and bottom of the bowl with a spatula to incorporate any hidden bits, guaranteeing a homogenous mixture ready for baking. This final blend creates the delicious keto coconut cake batter.
Step 4: Baking the Cake to Perfection
Pour the prepared cake batter into the greased 9×9 inch baking pan. Use a spatula to spread the batter evenly across the pan, ensuring it reaches all corners. Because coconut flour batter can be thick, gently tap the pan on the counter a few times to help settle the batter and remove any large air bubbles, which promotes an even surface and consistent baking. The batter will form a relatively flat layer, as coconut flour doesn’t rise as dramatically as wheat flour.
Place the pan in the preheated oven at 350 degrees Fahrenheit (175 degrees Celsius). Bake for approximately 20 to 24 minutes. The exact baking time can vary depending on your oven, so it’s important to check for doneness. The cake is ready when the center is set and appears lightly golden brown around the edges. To confirm it’s fully baked, insert a toothpick into the center of the cake; if it comes out clean with no wet batter clinging to it, the cake is done.
Once baked, carefully remove the pan from the oven. The top of the cake should feel springy to the touch, indicating that it’s not underbaked. Allow the cake to cool in the pan for about 10 to 15 minutes before proceeding to the next step. This brief cooling period in the pan helps the cake firm up slightly, making it easier to handle and reducing the risk of it breaking when you add the syrup. Properly baked, the cake will be tender yet hold its shape.
Step 5: Crafting the Sugar-Free Syrup
While the cake is baking or cooling slightly, it’s time to prepare the simple sugar-free syrup that will add crucial moisture and flavor to the finished cake. In a small saucepan, combine the powdered monk fruit sweetener with the water. The ratio of sweetener to water is designed to create a light, easily absorbable syrup, rather than a thick, syrupy consistency, which is ideal for soaking into a cake made with coconut flour. The powdered sweetener dissolves more easily than granular types, ensuring a smooth syrup.
Place the saucepan over medium-high heat. Bring the mixture to a gentle boil, stirring occasionally to help the sweetener dissolve completely. Allow the mixture to simmer and reduce slightly for about 6 minutes. You are not aiming for a heavy syrup like one used for pancakes; rather, you want a slightly concentrated liquid that will easily penetrate the cake. The simmering process allows the flavors to meld and slightly thickens the liquid without making it sticky or overly sweet.
Once the syrup has simmered for the allotted time and has reduced slightly, remove it from the heat. Let the syrup cool for a few minutes so it’s warm, not scalding hot, when it’s poured over the cake. This warm syrup will be gently absorbed by the cake, enhancing its moistness and contributing to its overall delightful texture. The subtle sweetness from this syrup is essential for balancing the coconut flavor and ensuring the cake remains tender even after chilling.
Step 6: Infusing the Cake with Syrup and Cooling
Once the cake has cooled in its pan for about 10-15 minutes, it’s ready to be infused with the sugar-free syrup. Using a fork or a skewer, gently make small slits or poke holes all over the surface of the warm cake. Be thorough but not too deep; you want to create channels for the syrup to penetrate into the cake crumb. These small perforations allow the syrup to seep into the interior, ensuring that every bite of the cake is moist and flavorful.
Slowly and evenly pour the warm sugar-free syrup over the entire surface of the cake. Work gradually, allowing the syrup to be absorbed into the slits you’ve made. Ensure you cover the entire cake top to distribute the moisture uniformly. The cake will soak up this liquid, which is a critical step in preventing a dry texture often associated with coconut flour baked goods. This syrup infusion is what gives the cake its signature tender and moist quality, even after it has been refrigerated.
After the syrup has been applied, allow the cake to cool completely in the pan. This cooling process is essential. As the cake cools, the syrup will continue to meld with the cake structure, and the cake will firm up. This complete cooling is vital before you apply the whipped cream topping; if the cake is still warm, the whipped cream will melt, compromising its fluffy texture and appearance. Patience during this stage ensures a beautifully finished and structurally sound dessert.
Step 7: Preparing and Applying the Whipped Topping and Garnish
While the cake is cooling completely, prepare the luscious whipped cream topping. Ensure that your heavy cream is very well chilled; this is essential for achieving stiff peaks when whipping. Pour the chilled heavy cream into a clean, dry mixing bowl. Add the powdered monk fruit sweetener and the remaining 1/2 teaspoon of vanilla extract. The sweetener adds just the right amount of sweetness to the topping without being overpowering, and the vanilla complements the coconut flavor.
Using an electric mixer, begin whipping the cream on medium speed. Gradually increase the speed to high as the cream starts to thicken. Continue whipping until stiff peaks form; this means that when you lift the beaters out of the cream, the peaks that form stand up straight and do not curl over. Be careful not to over-whip, as this can turn the cream into butter. The goal is a light, fluffy, and stable topping that holds its shape.
Once the cake is completely cool, carefully spread the whipped cream evenly over the top of the cake using an offset spatula or the back of a spoon. Aim for a smooth, uniform layer that covers the entire surface. Finally, sprinkle the toasted unsweetened coconut flakes generously over the whipped cream topping. The toasted flakes add a wonderful contrast in texture, a delightful crunch, and an intensified coconut aroma and flavor that beautifully crowns this decadent dessert.
Step 8: Chilling for Optimal Texture and Flavor
This step is arguably one of the most important for achieving the perfect texture and allowing the flavors to meld. Once the cake is assembled with the whipped topping and toasted coconut, cover the pan tightly with plastic wrap or transfer it to an airtight container. Place the cake in the refrigerator and let it chill for at least 4 to 6 hours, but ideally overnight. This extended chilling period allows the sugar-free syrup to fully penetrate and integrate into the cake, ensuring it remains incredibly moist and tender.
The refrigeration also allows the whipped cream topping to firm up considerably, giving it a stable and creamy consistency that contrasts beautifully with the cake. Furthermore, chilling gives the flavors time to develop and harmonize. The subtle sweetness of the syrup, the richness of the cake, and the aroma of the toasted coconut will become more pronounced and well-balanced. This resting period transforms the cake from simply baked to truly exquisite.
When the cake has chilled sufficiently, it will be ready to slice and serve. The texture will be superior to that of a cake served immediately. Each slice will hold its shape beautifully, showcasing the distinct layers and the overall professional finish. This make-ahead aspect makes it an ideal dessert for entertaining or for having a delicious, ready-to-eat treat available throughout the week. The overnight chill is the secret to its exceptional quality.
Pro Tips for Keto Coconut Cake
Sifted Flour for Smoothness: Always sift your coconut flour before measuring and incorporating it into the batter. This simple step prevents clumps and ensures a finer, more delicate crumb in your finished cake, avoiding any gritty texture that can sometimes occur with coconut flour.
Room Temperature Eggs are Key: Using eggs that are at room temperature helps them emulsify more effectively with the other wet ingredients. This results in a smoother, lighter batter and contributes to a better overall rise and texture in your keto coconut cake. Take them out of the fridge about 30 minutes before you plan to bake.
Mindful Toasting of Coconut: When toasting the unsweetened coconut flakes for the topping, watch them carefully. Toast them until they are lightly golden brown, not deeply brown or burnt. This stage brings out their maximum flavor and a pleasant crunch without introducing any bitter notes that can detract from the cake’s overall deliciousness.
The Power of Overnight Chilling: Don’t skip the overnight refrigeration! This period is essential for the syrup to fully permeate the cake and for the flavors to meld. It also firms up the whipped topping, ensuring the cake slices beautifully and offers the best possible texture and taste. It truly elevates the cake from good to exceptional.
Accurate Measurement Matters: Coconut flour is highly absorbent and can easily dry out a cake if too much is used. Always measure coconut flour accurately, using level tablespoons and ensuring you aren’t packing it into the measuring spoon. Using a kitchen scale for dry ingredients provides the most precise results.
Serving Suggestions for Keto Coconut Cake
Decoration
The toasted coconut flakes already provide a beautiful and flavorful garnish. For an extra touch of elegance, consider adding a few fresh berries, such as raspberries or blueberries, around the edges of the cake or on individual slices. A light dusting of powdered keto-friendly sweetener can also add a festive touch without altering the flavor profile significantly. You could also pipe small rosettes of the whipped cream around the perimeter for a classic bakery look.
Side Dishes
This cake is quite rich on its own, so simple pairings work best. A small bowl of fresh, mixed berries offers a refreshing contrast and a burst of natural sweetness. For a more substantial accompaniment, especially if serving as part of a brunch or a lighter dessert course, a dollop of sugar-free whipped cream or a spoonful of Greek yogurt can add another creamy element. A single, perfectly ripe strawberry atop a slice also adds a lovely visual and flavor accent.
Creative Serving Ideas
Serve individual slices with a warm cup of unsweetened tea or coffee; the slight bitterness of the beverage beautifully balances the cake’s sweetness and richness. For a more decadent presentation, consider serving a slice with a small drizzle of sugar-free caramel sauce or a dusting of cocoa powder. Another idea is to serve it as part of a dessert platter alongside other keto-friendly treats, allowing guests to sample a variety of low-carb delights. Cutting the cake into smaller, bite-sized portions can also make it perfect for parties or as a petit four.
Preparation & Storage
Storing Leftovers
Due to the whipped cream topping, this Keto Coconut Cake must be stored in the refrigerator. Cover the pan tightly with plastic wrap or transfer any remaining slices to an airtight container. Properly stored in the refrigerator, the cake should remain fresh and delicious for approximately 3 to 4 days. Ensure it’s well-covered to prevent it from absorbing any odors from other foods in the fridge and to maintain its moisture.
Freezing
Freezing this cake is possible, but it’s important to manage expectations regarding the texture of the whipped topping. For the best results, it’s advisable to freeze the cake base without the whipped cream and toasted coconut. Wrap the unfrosted cake tightly in plastic wrap, then in aluminum foil, and place it in a freezer-safe container. Thaw the cake in the refrigerator overnight, then prepare a fresh batch of whipped cream and toasted coconut to top it before serving. If freezing the entire cake with topping, the whipped cream may become slightly watery upon thawing.
Reheating
This Keto Coconut Cake is designed to be served chilled, so reheating is generally not necessary or recommended. The texture and flavors are at their best when the cake is cold, allowing the syrup to remain well-integrated and the whipped topping to stay firm and refreshing. If the cake has been refrigerated for an extended period and you prefer a slightly softer texture, you can allow individual slices to sit at room temperature for about 10 to 15 minutes before serving. Avoid any form of oven or microwave reheating, as this will compromise the delicate structure of the whipped cream.
Frequently Asked Questions
-
Can I make this Keto Coconut Cake ahead of time, and if so, how far in advance?
Absolutely, and it’s highly recommended! This cake actually benefits significantly from being made ahead. The overnight chilling period (at least 4-6 hours, ideally 12-24 hours) is crucial for allowing the sugar-free syrup to fully penetrate the coconut flour cake, ensuring it remains wonderfully moist and tender. This resting time also allows the flavors to meld together, resulting in a more complex and satisfying taste profile. Furthermore, chilling helps the whipped cream topping firm up, making the cake easier to slice neatly and present beautifully. Making it a day in advance is the best strategy for achieving optimal texture and flavor, making it an ideal dessert for entertaining or busy weeknights.
-
Why is the measurement of coconut flour so critical in this recipe, and what happens if I use too much or too little?
Coconut flour is exceptionally absorbent, absorbing liquid significantly more than traditional wheat flour. Therefore, precise measurement is paramount for achieving the correct cake consistency and texture. If you use too much coconut flour, the batter will become excessively dry and dense, resulting in a cake that is crumbly, tough, and unpleasantly dry, with a strong, overwhelming coconut flour flavor. Conversely, if you use too little coconut flour, the batter will be too thin and won’t set properly during baking, leading to a cake that is gummy, undercooked, and lacks structure, potentially falling apart when sliced. Always measure coconut flour using level tablespoons and consider sifting it to ensure even distribution and prevent clumping, which further aids in accurate measurement and batter consistency.
-
What are the best keto-friendly sweeteners to use for this cake, and can I substitute them with other types?
For this Keto Coconut Cake recipe, powdered (confectioners’ style) monk fruit or erythritol-based sweeteners are ideal, especially for the batter, syrup, and whipped topping. Powdered sweeteners dissolve more readily, preventing a grainy texture in the cake, syrup, and cream. You can generally substitute other keto-friendly powdered sweeteners like allulose or a blend of erythritol and stevia/monk fruit. However, be aware that different sweeteners have varying sweetness levels and can sometimes affect moisture and texture differently. If using a granular sweetener, consider pulsing it in a blender to create a powdered version for a smoother result. Always ensure your chosen sweetener is suitable for baking and does not contain added sugars or fillers.