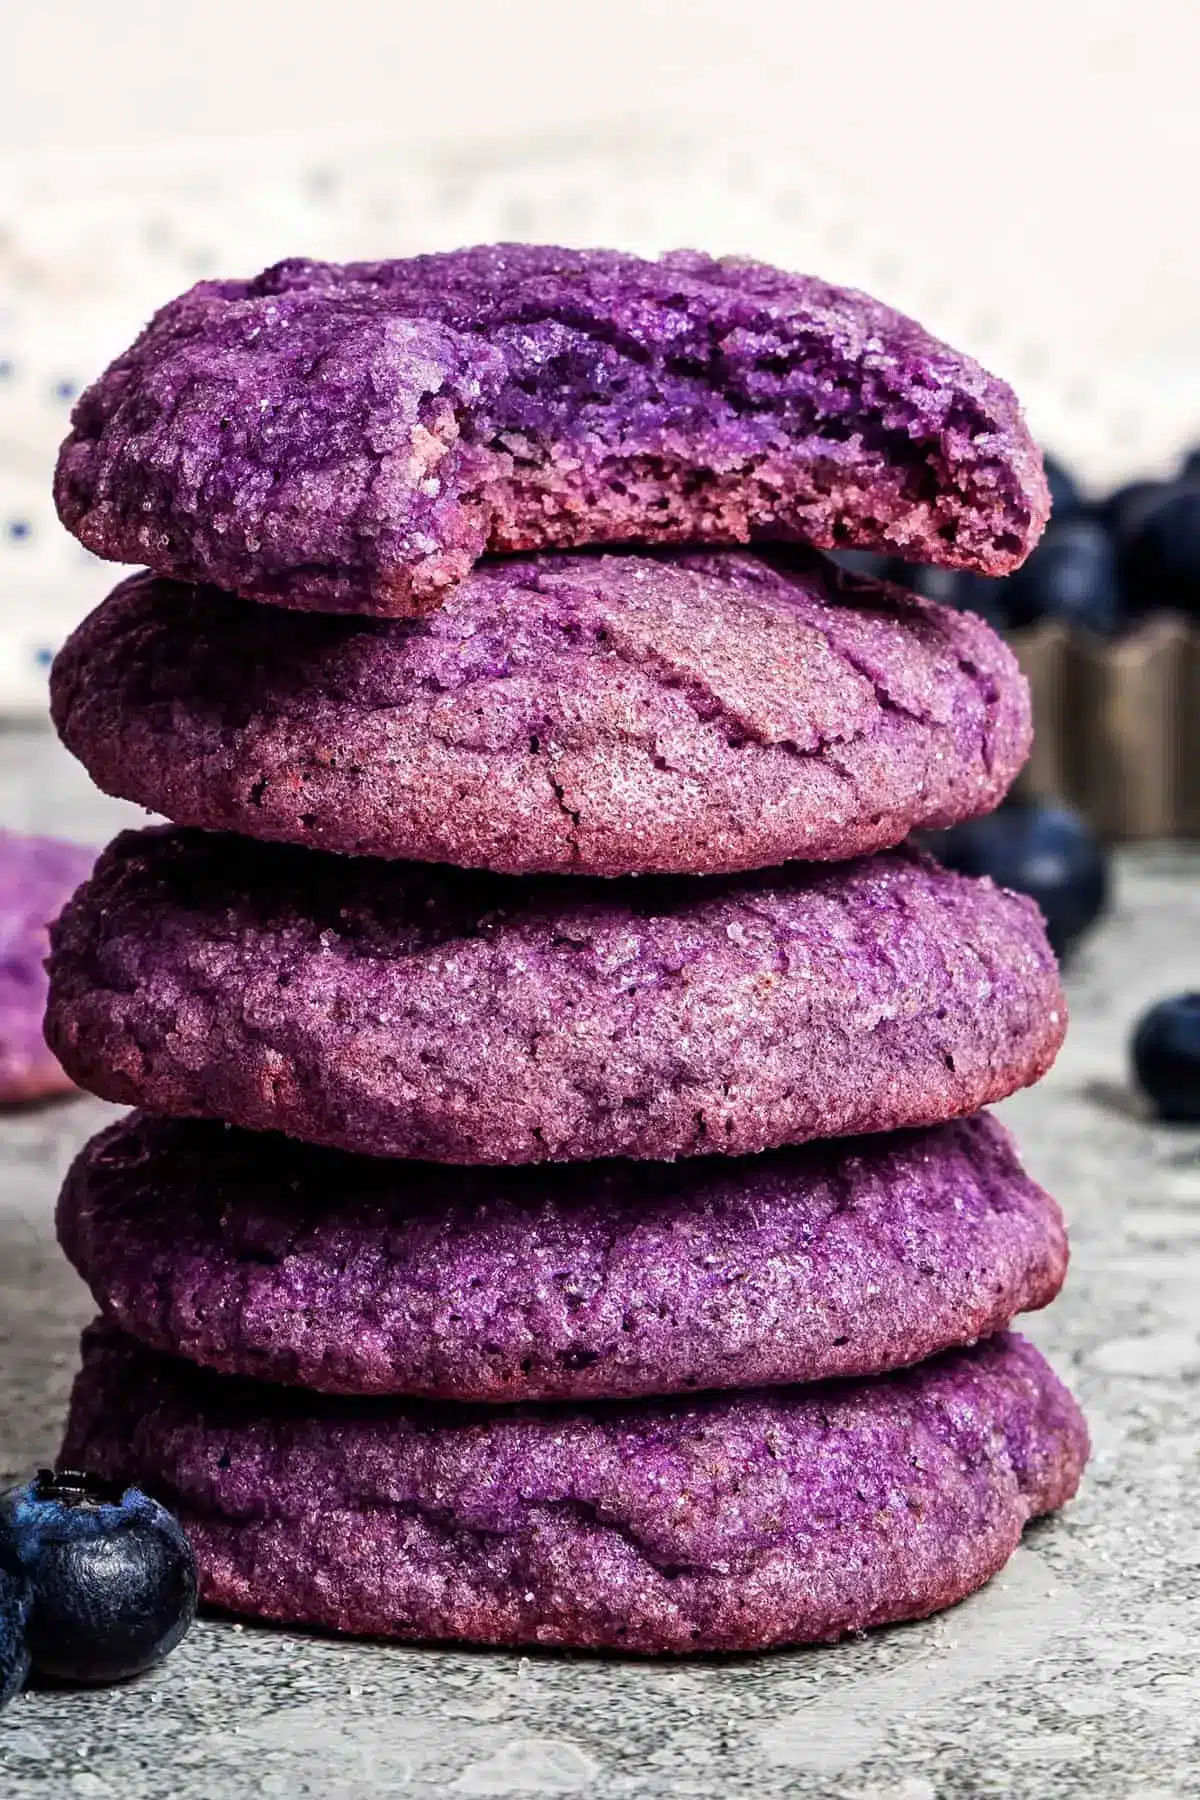
Blueberry Cookies – Soft & Chewy!
The aroma of freshly baked goods has a unique power to evoke feelings of comfort and nostalgia, transporting us back to cherished moments. There’s a particular magic in creating something delicious from scratch, a simple yet profound act of love and care. This recipe for blueberry cookies aims to capture that essence, offering a delightful treat that’s both comforting and impressively flavorful, perfect for any occasion.
Imagine biting into a cookie that’s perfectly soft and chewy, with pockets of sweet, slightly tart blueberry goodness bursting with every mouthful. These aren’t just any cookies; they are a carefully crafted experience designed to bring joy to your taste buds and warmth to your heart. Get ready to discover a new favorite that will undoubtedly become a staple in your baking repertoire.
Why You Will Love This Recipe
- Intense Blueberry Flavor: Unlike recipes that simply fold in whole berries, this method uses a concentrated blueberry sauce, infusing every part of the cookie with rich, authentic blueberry taste. This technique ensures a more consistent and delightful flavor profile in each bite, making the blueberries the undisputed star.
- Perfectly Soft and Chewy Texture: Through the strategic use of cornstarch and a precise baking method, these cookies achieve an exquisite soft-baked texture that remains wonderfully chewy for days. This balance of softness and chewiness is what elevates them beyond the ordinary, providing a satisfying mouthfeel.
- Visually Appealing: The subtle blue hue, enhanced by optional food coloring or natural ingredients like butterfly pea powder, makes these cookies incredibly attractive. Rolling them in granulated sugar before baking adds a delightful sparkle and a slight crunch, making them as beautiful as they are delicious.
- Simple Yet Sophisticated: While these cookies deliver a gourmet taste and appearance, they are surprisingly straightforward to prepare. The process is broken down into manageable steps, making them accessible even for beginner bakers, yet impressive enough to serve to guests.
- Versatile Enjoyment: These cookies are fantastic on their own, but they also serve as a wonderful base for creative dessert pairings. Whether enjoyed with a cup of coffee or transformed into ice cream sandwiches, their adaptability makes them a true crowd-pleaser for various settings and preferences.
Ingredients You Need
Crafting truly exceptional blueberry cookies begins with selecting the freshest, highest-quality ingredients you can find. The natural sweetness and vibrant flavor of ripe blueberries are paramount, so opt for plump, firm berries, whether you choose to use them fresh or frozen. A good quality all-purpose flour provides the necessary structure, while the right leavening agents, like baking powder, ensure a perfect lift. Don’t underestimate the power of room-temperature butter and eggs; they are crucial for achieving that ideal creamy texture and cohesive dough. The optional purple food coloring or butterfly pea powder can enhance the visual appeal, but the true magic lies in the balance of these core components working harmoniously together.
Blueberry Cookies

These blueberry cookies are irresistibly soft, chewy, and bursting with real blueberries. They stay soft for days and taste like blueberry pie!
- For the blueberry sauce:
- 1 cup fresh blueberries, stems removed
- 2 teaspoons granulated sugar
- 1 tablespoon fresh lemon juice, not bottled
- For the cookies:
- 2 cups all purpose flour
- 1½ tablespoons cornstarch
- 1½ teaspoons baking powder
- 1½ cups granulated sugar, divided
- 2 tablespoons milk
- 1 large egg
- 1Make the blueberry sauce: In a medium pot over medium-low heat, combine the fresh blueberries, sugar, and lemon juice. Cook, stirring frequently, until the blueberries break down and the mixture thickens. This will take about 5-8 minutes. Set aside to cool.
- 2Combine the dry ingredients: In a large bowl, combine the flour, cornstarch, baking powder, and salt. Set aside.
- 3Cream the butter and sugar: In another large bowl, cream the butter and 1¼ cups of white granulated sugar until light and fluffy.
- 4Add the blueberry sauce: Scoop 3 tablespoons of the cooled blueberry sauce out of the pot and mix it into the butter and sugar. (If you have extra sauce, put it in a mason jar for later. You can use it on pancakes.)
- 5Add remaining liquid ingredients: Add milk, egg, and dye. Mix until just combined.
- 6Add dry ingredients: Mix until everything is well combined and there are no dry bits of batter.
- 7Chill the dough: Cover your bowl with saran wrap and chill in the refrigerator for 3 hours.
- 8Prep your tools: Preheat your oven to 325°F. Line a baking sheet with parchment paper or a Silpat. Set aside.
- 9Pour sugar: Place the remaining 1/4 cup of sugar in a shallow plate. Set aside.
- 10Form the cookies: Scoop the chilled cookie dough and roll it into balls, using about 1 heaping tablespoon of dough per cookie.
- 11Roll in sugar: Place the rolled cookie dough into the sugar and roll it around to coat. Place the sugar cookie dough ball onto your prepared baking sheet. You will be able to fit 6 cookies on one standard baking sheet. (There needs to be space between the balls of dough.)
- 12Chill the extra dough: Once you have shaped your 6 cookies, place the cookie dough back in the fridge until you are ready to shape the next batch. Or, if you have two cookie sheets, you can start working on the next batch while the first one bakes. You just don’t want the cookie dough to sit on the counter and warm up.
- 13Bake: Place in the oven and bake for 15 minutes or until cracks form.
- 14Cool: Remove the cookies from the oven and allow them to cool for 10 minutes on the baking sheet before transferring them to a wire rack to finish cooling for another 20 minutes. If you try to move the cookies before 10 minutes, they will be too soft and will break.
Keywords: blueberry, cookies, soft, chewy, dessert, baked, fruit, homemade
The precise quantities and specific details for each ingredient are readily available in the recipe card, ensuring you have everything you need for baking success.
Variations
For those seeking a plant-based delight, transforming these blueberry cookies into a vegan masterpiece is wonderfully achievable. Begin by substituting the unsalted butter with a high-quality vegan butter alternative that offers a similar richness and fat content. When it comes to the egg, a flax egg (one tablespoon of ground flaxseed mixed with three tablespoons of water, left to sit for five minutes) or a commercial egg replacer will bind the ingredients effectively. Ensure your milk choice is a fortified non-dairy option, such as almond, soy, or oat milk, to maintain the dough’s ideal consistency.
If a low-carb or keto-friendly version is on your mind, the adjustments require a bit more culinary finesse. Swap the all-purpose flour for a blend of almond flour and coconut flour, carefully balancing the ratios to prevent a dry or crumbly texture. You will also need to replace the granulated sugar with a granular sugar substitute like erythritol or a monk fruit blend. The cornstarch, which aids in chewiness, can be replaced with a small amount of xanthan gum to help with binding and texture, though use it sparingly to avoid a gummy result. Be mindful that these substitutions may slightly alter the final texture and baking time.
Elevating these cookies with a touch of decadence is simple by incorporating white chocolate chips. Just before you fold in the dry ingredients, gently stir in a generous cup of good quality white chocolate chips. The creamy sweetness of the white chocolate pairs exquisitely with the tartness of the blueberries, creating a symphony of flavors and textures. For an extra layer of flavor, consider adding a teaspoon of vanilla bean paste or a hint of lemon zest to the dough. These additions can further enhance the overall sensory experience, making each cookie a miniature indulgence.
How to Prepare blueberry cookies
Step 1: Crafting the Concentrated Blueberry Sauce
The foundation of these exceptionally flavorful blueberry cookies lies in the creation of a rich, concentrated blueberry sauce. This isn’t just a simple mash-up; it’s a carefully simmered reduction that intensifies the natural sweetness and vibrant tang of the berries. Start by selecting about a cup of fresh, plump blueberries, ensuring you’ve meticulously removed any stray stems or bruised fruits that could detract from the sauce’s quality. In a medium-sized saucepan, combine these chosen blueberries with just two teaspoons of granulated sugar and a tablespoon of freshly squeezed lemon juice. The sugar will help to draw out the juices from the berries, while the lemon juice adds a crucial touch of acidity that balances the sweetness and brightens the overall flavor profile.
Place the saucepan over medium-low heat. It’s important not to rush this process; gentle heat is key to achieving a smooth, thickened sauce without scorching the delicate fruit. Stir the mixture frequently, using your spoon to gently break down the blueberries as they heat up. You’ll notice the berries beginning to burst and release their vibrant juices, gradually transforming the mixture into a glossy, syrupy consistency. This simmering process typically takes between five to eight minutes, depending on the juiciness of your berries and the intensity of your heat. Once the sauce has thickened noticeably and coats the back of your spoon, it’s ready.
Carefully remove the saucepan from the heat and set it aside to cool completely. It is absolutely vital that this blueberry sauce is fully cooled before you incorporate it into the cookie dough. Adding hot or even warm sauce can melt the butter in the dough prematurely, leading to cookies that spread too much and lose their desired thick, chewy texture. As the sauce cools, it will thicken further, developing that perfect consistency that will infuse your cookies with intense blueberry flavor and a beautiful subtle hue. While the sauce is cooling, you can proceed with preparing the other components of your cookie dough, making this a logical and efficient first step in your baking journey.
Step 2: Harmonizing the Dry Ingredients
While your flavorful blueberry sauce is diligently cooling, it’s time to bring together the dry constituents of your cookie dough. This step ensures that all the leavening agents and structural components are evenly distributed, which is critical for consistent cookie texture and rise. In a large, clean mixing bowl, meticulously measure out two cups of all-purpose flour. It’s always best practice to measure flour using the spoon-and-level method or, for ultimate accuracy, a kitchen scale, as scooping directly from the bag can lead to an over-measurement, resulting in denser cookies.
Next, add one and a half tablespoons of cornstarch to the flour. Cornstarch plays a vital role in achieving that signature soft and chewy cookie texture; it tenderizes the dough and helps prevent excessive spreading during baking, contributing to a thicker cookie. Following the cornstarch, measure in one and a half teaspoons of baking powder. Baking powder is a chemical leavener that will help the cookies puff up slightly during baking, contributing to their delightful thickness without making them cakey. Finally, add half a teaspoon of kosher salt to the mixture. Salt is not just for enhancing flavor; it balances the sweetness and can help to control the spread of the cookies.
Once all these dry ingredients are in the bowl, take a whisk or a fork and thoroughly combine them. You want to ensure that the cornstarch, baking powder, and salt are perfectly dispersed throughout the flour. This thorough mixing prevents pockets of unincorporated leavening or salt, which could lead to uneven baking or an unpleasant taste in certain parts of your cookie. Set this bowl of harmonized dry ingredients aside; it will be seamlessly integrated into the wet ingredients in a later step, forming the beautiful, flavorful dough for your blueberry cookies.
Step 3: Creaming Butter and Sugar for a Velvety Base
The journey to perfectly textured cookies continues with the crucial step of creaming together the softened butter and sugar. This process is where the magic of achieving that ideal light and fluffy cookie base truly begins. In a separate, spacious mixing bowl, place half a cup of unsalted butter that has been brought to room temperature. It’s imperative that the butter is soft but not melted; it should yield easily to gentle pressure from your finger. Overly cold butter will not cream properly, while melted butter will lead to a greasy, spread-out cookie.
To the softened butter, add one and a quarter cups of granulated sugar. Using a stand mixer with a paddle attachment or a hand mixer, begin creaming these two ingredients together on medium speed. Initially, the mixture might appear a bit coarse, but as you continue to beat them for approximately three to five minutes, a transformation will occur. The butter and sugar will emulsify, becoming noticeably lighter in color and fluffier in texture. This creaming process incorporates air into the dough, which is essential for the cookies’ structure, chewiness, and lift, preventing them from being dense or tough.
The goal is a pale yellow, creamy mixture that resembles fluffy whipped cream. Scrape down the sides of the bowl occasionally with a spatula to ensure all the butter and sugar are evenly incorporated and creaming effectively. This velvety base is the canvas upon which the rest of the cookie’s flavors and textures will be built. Properly creamed butter and sugar form the backbone of many baked goods, and for these blueberry cookies, it sets the stage for that delightful soft and chewy consistency that makes them so irresistible. This step is not to be rushed, as its thorough execution directly impacts the final outcome of your cookies.
Step 4: Marrying the Flavors: Sauce and Liquids
Now comes the exciting part where the vibrant blueberry flavor truly begins to meld with the creamy butter-sugar base. Take the cooled blueberry sauce that you prepared earlier. Carefully scoop out approximately three tablespoons of this thick, luscious sauce from its container. Gently add these three tablespoons of blueberry sauce directly into the bowl with your creamed butter and sugar mixture. The deep blue-purple hue of the sauce will immediately start to streak through the pale yellow mixture, creating an enticing visual preview of the cookie’s ultimate appearance and taste.
Once the blueberry sauce is incorporated, it’s time to introduce the remaining liquid ingredients that will bring the dough together. Add two tablespoons of milk to the bowl. The type of milk you use doesn’t critically impact the outcome; whole milk, 2%, or even a non-dairy alternative like almond or oat milk will work effectively here. Following the milk, crack one large egg into the bowl. It’s best practice to bring your egg to room temperature before adding it, as this helps it to emulsify more smoothly with the other ingredients, preventing the dough from becoming greasy or curdled. If you are using food coloring to enhance the blue hue, now is the time to add it.
Add about a quarter teaspoon of liquid purple food dye. The goal here is to achieve a soft, inviting blue color, not an overwhelmingly artificial shade. If you are using butterfly pea powder, a teaspoon is usually sufficient, but its color intensity can vary. Stir these newly added ingredients – the blueberry sauce, milk, egg, and optional food coloring – into the creamed mixture. Mix on a low speed until everything is just combined and the streaks of blue are starting to meld with the creamy base. Avoid overmixing at this stage; you want the ingredients to come together without developing the dough’s gluten structure excessively, which would lead to tougher cookies.
Step 5: Forming the Dough and Essential Chilling
With your wet ingredients beautifully combined and infused with blueberry essence, it’s time to integrate the harmonized dry ingredients. Gradually add the bowl of flour, cornstarch, baking powder, and salt mixture to the wet ingredients in the larger mixing bowl. Begin mixing on a low speed, allowing the flour to slowly incorporate into the butter, sugar, and blueberry sauce mixture. As the dry ingredients are introduced, the dough will start to thicken and come together, transforming from a creamy mixture into a cohesive dough. Continue mixing until everything is just well combined and there are no visible dry bits of batter remaining. Be careful not to overmix the dough at this stage, as excessive mixing can develop the gluten in the flour too much, resulting in tough cookies instead of soft and chewy ones.
Once the dough has just come together, cover the mixing bowl tightly with plastic wrap. It is absolutely critical for the success of these blueberry cookies that the dough undergoes a thorough chilling period. Place the covered bowl in the refrigerator for a minimum of three hours. This chilling time is not merely a suggestion; it’s a non-negotiable step for achieving the perfect cookie texture and shape. The cold temperature solidifies the butter within the dough, which is essential for preventing the cookies from spreading too much when they hit the heat of the oven, thus ensuring they remain thick and beautifully chewy.
While the dough is chilling, you can prepare your baking station. Preheat your oven to 325°F (160°C). Line one or two standard baking sheets with parchment paper or a Silpat baking mat. This will prevent the cookies from sticking and ensure easy cleanup. You’ll also want to prepare a shallow plate or bowl with the remaining quarter cup of granulated sugar; this is for rolling the cookie dough balls before baking, creating that delightful sparkly crust. Keeping the cookie dough chilled is paramount; if you are baking in batches, ensure the remaining dough stays in the refrigerator until you are ready to shape and bake it, preventing it from warming up on the counter.
Step 6: Shaping, Coating, and Baking to Perfection
With your cookie dough thoroughly chilled and your baking preparations complete, it’s time to bring these delicious creations to life. Take the cold, firm cookie dough out of the refrigerator. Using a cookie scoop that holds about one heaping tablespoon of dough, portion out the dough. Roll each portion into a smooth, round ball between your palms. The chilled dough will be firm and easy to handle, which is exactly what you want to maintain the cookie’s shape during baking. Aim for consistently sized balls so that they bake evenly.
Once you have shaped a ball of cookie dough, gently place it into the shallow plate or bowl containing the remaining granulated sugar. Roll the dough ball around in the sugar, ensuring it is evenly coated on all sides. This sugar coating not only adds a delightful sparkle and a subtle crunch to the finished cookie but also contributes to its overall sweetness and caramelized exterior. After coating the dough ball in sugar, carefully place it onto your prepared baking sheet. Leave ample space between each cookie dough ball, about 2-3 inches, as they will spread slightly during baking. A standard baking sheet can typically accommodate about six cookies.
If you are using only one baking sheet, immediately return the remaining cookie dough to the refrigerator while the first batch bakes. This is crucial to keep the dough cold and prevent spreading. If you have a second baking sheet, you can begin shaping the next batch while the first one is in the oven, but still keep the dough chilled. Place the baking sheet into the preheated 325°F (160°C) oven. Bake for approximately 15 minutes. You’ll know they’re ready when the edges are just beginning to set and appear slightly cracked, while the centers still look soft and slightly underbaked. Avoid the temptation to overbake; this is key to their chewy texture.
Step 7: The Cooling Process for Optimal Texture
As the timer buzzes and your beautifully baked blueberry cookies emerge from the oven, the crucial cooling process begins. It’s tempting to transfer them immediately to a wire rack, eager to taste your handiwork, but resist this urge. For the first ten minutes after removing them from the oven, allow the cookies to cool directly on the baking sheet. During this initial stage, the cookies are still very delicate and soft. The residual heat from the baking sheet will continue to gently cook the centers and allow the cookies to firm up just enough so they can be moved without falling apart. This period is vital for developing their final texture.
After the ten-minute rest on the baking sheet, it’s time to carefully transfer them to a wire cooling rack. Use a thin spatula to gently lift each cookie from the baking sheet and place it onto the rack. This allows air to circulate around the cookies, preventing the bottoms from becoming soggy and ensuring they cool evenly. Continue to let the cookies cool on the wire rack for at least another twenty minutes. During this time, they will fully set and achieve that perfect soft and chewy consistency that is the hallmark of this recipe. The aroma filling your kitchen at this stage is simply heavenly, a testament to the delightful treat you’ve created.
Once the cookies have completely cooled, they are ready to be enjoyed. The patience exercised during the cooling phase is rewarded with cookies that hold their shape, possess the ideal chewiness, and showcase the vibrant blueberry flavor beautifully. If you’ve managed to resist the urge to devour them all immediately, storing them properly will ensure they remain delightful for days to come. This methodical approach to cooling is a small but significant step that ensures the quality and texture of your homemade blueberry cookies are consistently excellent, making every bite a pure pleasure.
Pro Tips for blueberry cookies
Don’t Overmix the Dough: This is perhaps the most crucial tip for achieving the perfect soft and chewy texture. Once you add the dry ingredients to the wet, mix only until just combined. Overmixing develops the gluten in the flour, leading to tough, dense cookies rather than the tender ones you’re aiming for. Stop mixing as soon as you no longer see streaks of dry flour.
Chill the Dough Adequately: The recipe calls for a minimum of three hours of chilling time, and this should not be skipped. Chilling solidifies the fat in the dough, preventing the cookies from spreading too thin in the oven. This ensures they remain thick and chewy. If time is extremely limited, even a one-hour chill in the freezer can make a significant difference, though the full three hours in the fridge is optimal.
Master the Bake Time: Overbaking is the enemy of soft cookies. These blueberry cookies should be taken out of the oven when the edges are set and just beginning to show faint cracks, but the centers still appear slightly soft and underdone. They will continue to set as they cool on the baking sheet. It’s better to slightly underbake than overbake them to guarantee that lovely chewy interior.
Use Room Temperature Ingredients: For the butter and egg, ensure they are at room temperature. Room temperature butter creams much more effectively with sugar, incorporating air that contributes to the cookie’s texture. A room temperature egg emulsifies better into the dough, creating a smoother, more cohesive batter and preventing greasiness.
Embrace the Leftover Sauce: If your blueberry sauce yields a little extra after you’ve portioned out the three tablespoons for the dough, don’t discard it! This vibrant, homemade blueberry sauce is a fantastic topping for pancakes, waffles, or even stirred into yogurt. It’s a delightful bonus that extends the enjoyment of your blueberry creation.
Serving Suggestions for blueberry cookies
Decoration
For an added touch of elegance and sparkle, consider a light dusting of powdered sugar over the cooled cookies, mimicking a gentle snowfall. Another beautiful option is to drizzle a thin layer of melted white chocolate across the top of each cookie. This not only adds a visually appealing contrast but also complements the blueberry flavor wonderfully. You could also add a few fresh blueberries on top of each cookie right after they come out of the oven, pressing them gently into the still-soft surface for a decorative and fresh element.
Side Dishes
These blueberry cookies are delightful served alongside a warm beverage, such as a perfectly brewed cup of coffee or a soothing mug of herbal tea. For a more decadent experience, they pair exceptionally well with a scoop of creamy vanilla bean ice cream or even a complementary blueberry-flavored ice cream. Consider serving them as part of a dessert platter at a gathering, allowing guests to enjoy them with other sweet treats like lemon bars or chocolate brownies.
Creative Serving Ideas
Transform these cookies into delightful ice cream sandwiches by generously spreading your favorite vanilla or blueberry ice cream between two cookies. For a fun party favor, individually wrap each cookie in cellophane and tie with a ribbon, presenting a sweet token of appreciation. You can also crumble these cookies and use them as a topping for yogurt parfaits or as a base for a no-bake cheesecake crust, adding a delightful fruity crunch to your creations.
Preparation & Storage
Storing Leftovers
To keep these blueberry cookies at their delightful best, store them in an airtight container at room temperature. The cornstarch used in the recipe helps them maintain their softness for a longer period. For optimal freshness and flavor, it’s recommended to enjoy them within three to four days of baking. Ensure the container is properly sealed to prevent the cookies from drying out or absorbing any unwanted odors from other foods.
Freezing
Should you find yourself with more delicious blueberry cookies than you can enjoy within the first few days, freezing is an excellent option. Carefully place the cooled cookies into a freezer-safe bag or an airtight container. They can be stored in the freezer for up to one month. This allows you to have a batch of homemade cookies ready whenever a craving strikes, ensuring you always have a sweet treat on hand.
Reheating
When you’re ready to enjoy your frozen blueberry cookies, simply thaw them at room temperature for about 20-30 minutes. If you prefer them slightly warm, you can gently reheat them in a low oven (around 250°F or 120°C) for a few minutes until they are just warmed through. This quick reheating can revive their fresh-baked texture and aroma, making them taste as if they were just baked.
Frequently Asked Questions
-
Can I use frozen blueberries instead of fresh ones for the sauce?
Absolutely, you can use frozen blueberries for the sauce. If you opt for frozen berries, you have two main approaches. You can thaw them completely before starting the sauce-making process, treating them much like fresh berries. Alternatively, you can cook them directly from frozen, but be aware that this will likely increase the simmering time needed to reduce the moisture and thicken the sauce to the desired consistency. You might need to simmer for a few extra minutes to ensure excess liquid evaporates, maintaining the integrity of the cookie dough.
-
My cookies spread too much. What could have gone wrong?
Several factors can contribute to cookies spreading too much. The most common culprit is not chilling the dough adequately; cold dough prevents excessive spreading. Ensure your butter was properly softened but not melted when you creamed it with the sugar. Overmixing the dough after adding the dry ingredients can also lead to spreading because it develops the gluten too much. Finally, check your oven temperature; an oven that runs too hot can cause the butter to melt too quickly, resulting in premature spreading. Using an oven thermometer can help verify your oven’s accuracy.
-
How can I make these cookies dairy-free and gluten-free?
To make these cookies dairy-free, substitute the unsalted butter with a plant-based butter alternative that has a similar fat content. For the milk, use any non-dairy milk like almond, soy, or oat milk. To make them gluten-free, you’ll need to replace the all-purpose flour with a high-quality gluten-free all-purpose flour blend that contains xanthan gum. You might also need to slightly adjust the amount of liquid or add a bit more cornstarch (or a gluten-free binder like psyllium husk) to achieve the right dough consistency, as gluten-free flours can behave differently.