Irresistible No-Bake Almond Cherry Dream Bars

There’s something incredibly delightful about indulging in a dessert that doesn’t require a stove. The No-Bake Almond Cherry Dream Bars offer a unique combination of flavors and textures that makes it a beloved recipe for gatherings, parties, or simply a cozy evening at home. Imagine a creamy cheesecake filling layered over a nutty, buttery almond base, and topped with sweet, tangy cherry pie filling; it’s a dream come true for any dessert enthusiast!
What helps set this dessert apart is its sheer simplicity and adaptability. You can whip it up in no time without worrying about constant oven monitoring, making it perfect for those moments when guests are about to arrive. Have you ever been in a situation where you want to impress with something homemade but are short on time? These bars are your ultimate answer, offering a stunning contrast of flavors that appeals to everyone, from seasoned bakers to beginners.
Why You Will Love This Recipe
- Quick Preparation: These bars come together in a flash, requiring no oven time, making them ideal for busy weeknights or last-minute entertaining.
- Rich & Creamy Texture: The velvety smooth cream cheese filling perfectly complements the slightly crumbly almond base and the luscious cherry topping, creating a delightful mouthfeel.
- Nutty Almond Base: The foundation of these bars is a perfectly balanced blend of almond flour, butter, and sugar, providing a satisfying nutty crunch and a rich flavor profile.
- Tangy Cherry Delight: A generous layer of sweet and tart cherry pie filling adds a burst of fruity goodness that cuts through the richness of the cream cheese, creating a perfect flavor harmony.
- Effortless Assembly: With simple, straightforward steps, this recipe is accessible to bakers of all skill levels, ensuring success with every batch you create.
Ingredients You Need
The success of any great dessert lies in the quality of its ingredients, and the No-Bake Almond Cherry Dream Bars are no exception. We focus on simple, readily available components that come together to create something truly special. Ensuring your cream cheese is perfectly softened is key to achieving a luxuriously smooth filling that’s free from any lumps. The almond flour provides a wonderful nutty foundation, offering a depth of flavor that’s distinct from traditional graham cracker crusts.
No-Bake Almond Cherry Dream Bars
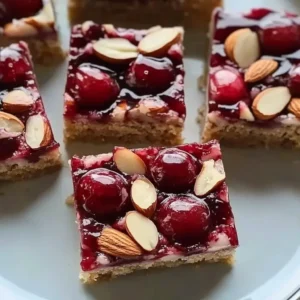
Delightful dessert bars featuring a creamy cheesecake filling, almond base, and a tangy cherry topping, perfect for gatherings or cozy evenings. These no-bake bars are incredibly easy to make and always a crowd-pleaser.
- 1 cup almond flour
- 1/2 cup butter, melted
- 1/4 cup sugar
- 1 cup cream cheese, softened
- 1/2 cup powdered sugar
- 1 teaspoon vanilla extract
- 1 cup whole almonds
- 1 cup cherry pie filling
- 1Prepare Ingredients: Gather all your ingredients, ensuring the cream cheese is softened.
- 2Cook the Base: In a mixing bowl, combine the almond flour, melted butter, and sugar. Stir until it forms a slightly crumbly mixture.
- 3Press the Base into the Pan: Press the almond mixture firmly into the bottom of a greased 8x8 inch pan. The crust should be compact and form a solid foundation.
- 4Prepare the Cream Cheese Filling: In a separate bowl, beat the cream cheese, powdered sugar, and vanilla extract until the mixture is smooth, creamy, and free of lumps.
- 5Spread the Cream Cheese Mixture: Pour the cream cheese mixture over the almond base. Using a spatula, spread it evenly.
- 6Add Whole Almonds: Sprinkle whole almonds on top of the cream cheese layer evenly.
- 7Layer the Cherry Pie Filling: Carefully pour the cherry pie filling over the almond nuts and cream cheese layer. Spread it gently with a spatula.
- 8Chill the Bars: Cover the pan with plastic wrap or foil and place it in the refrigerator. Chill for at least 4 hours or until set.
- 9Slice and Serve: Once the bars are set, remove them from the refrigerator. Cut into squares or rectangles.
Keywords: almond cherry bars, Cheesecake Bars, Easy Dessert, No-Bake Dessert, Party Dessert
- almond flour: a finely ground flour made from almonds, providing a nutty flavor and a tender crumb for the base.
- butter, melted: the binding agent for the almond flour base, adding richness and helping it to firm up.
- sugar: a touch of granulated sugar enhances the sweetness of the crust and helps it bind together.
- cream cheese, softened: the star of the filling, providing a creamy, tangy, and rich texture that’s irresistible.
- powdered sugar: sweetens the cream cheese filling and contributes to its smooth, velvety consistency.
- vanilla extract: a classic flavor enhancer that rounds out the sweetness and adds a warm aromatic note to the cream cheese filling.
- whole almonds: these add a delightful crunch and texture contrast to the smooth filling and fruit topping.
- cherry pie filling: a sweet and tangy fruit filling that provides a vibrant burst of flavor and color to the top layer.
The exact quantities for each ingredient are detailed within the provided recipe card, ensuring you have all the necessary measurements for a perfect bake.
Variations
The beauty of the No-Bake Almond Cherry Dream Bars lies not only in their delicious simplicity but also in their inherent adaptability. You can easily transform these delightful treats to suit different tastes and dietary needs, ensuring everyone can enjoy a slice of this dream. Experimenting with variations is part of the fun in the kitchen, allowing you to personalize this classic recipe.
For those seeking a vegan alternative, the transformation is quite achievable. You can substitute the cream cheese with a high-quality dairy-free cream cheese, often made from cashews or coconut, ensuring it has a good firm texture. Similarly, use vegan butter or coconut oil in place of dairy butter for the crust. The cherry pie filling is often naturally vegan, but it’s always good to check the ingredients to ensure no hidden animal products are present. This adaptation maintains the delicious layers and flavors you love.
If you’re focusing on a low-carb or keto-friendly lifestyle, this recipe offers a fantastic base for modification. Swap the granulated sugar in the crust and the powdered sugar in the filling for your preferred keto-friendly sweetener, such as erythritol or monk fruit. You might also consider using almond flour for the crust and perhaps a sugar-free cherry preserves or a homemade berry reduction seasoned with a touch of sweetener. This allows for a guilt-free indulgence that aligns with your dietary goals.
Expanding on the fruit aspect, consider introducing a medley of berries for a more complex flavor profile. Instead of solely relying on cherry pie filling, you could create a mixed berry topping using blueberries, raspberries, and strawberries. This variation, perhaps inspired by ideas from Pinterest, adds a vibrant visual appeal and a delightful tartness that beautifully complements the creamy filling. Each berry brings its unique sweetness and acidity, making for a truly dynamic dessert experience.
How to Prepare No Bake Almond Cherry Dream Bars
Step 1: Preparing the Almond Crust Foundation
The initial step in creating these delightful bars involves meticulously preparing the base, which sets the stage for the creamy layers to come. This involves combining the dry ingredients for the crust with melted butter to form a slightly crumbly yet cohesive mixture. Precision in measuring the almond flour is important; too much can lead to a dry crust, while too little might not hold together properly. The butter should be melted but not hot, ensuring it coats the almond flour evenly without cooking it prematurely. A gentle stirring motion is recommended to avoid overworking the mixture.
Once the ingredients are well combined, the next crucial action is to press this mixture firmly into the bottom of your prepared baking dish. A standard 8×8 inch pan is ideal, and it’s essential to grease it beforehand to prevent sticking, ensuring easy removal of the bars later. Using the back of a spoon or your fingers, press the almond mixture down evenly across the entire surface. The goal is to create a compact, solid layer that won’t crumble when sliced. Ensure the edges are also well-formed, providing a neat boundary for the filling.
The importance of pressing firmly cannot be overstated; this compact base is what provides the structural integrity for the entire bar. A loosely pressed crust will inevitably lead to a messy dessert when it’s time to serve. Imagine trying to lift a slice and having the bottom fall apart – a disappointing outcome indeed. Take your time with this step, ensuring that every inch of the pan is covered with a uniform thickness. This foundational layer is key to the overall success and presentation of your No-Bake Almond Cherry Dream Bars.
Step 2: Crafting the Velvety Cream Cheese Filling
Transitioning from the base, the next paramount stage is the creation of the luscious cream cheese filling, the heart of these dream bars. This requires having your cream cheese at the perfect room temperature – soft enough to blend smoothly but not so soft that it becomes runny. If your cream cheese is too cold, it will result in a lumpy filling, which detracts from the desired velvety texture. Allow it ample time to soften at room temperature, typically around 30-60 minutes, depending on your kitchen’s climate.
In a medium-sized mixing bowl, combine the softened cream cheese with the powdered sugar and vanilla extract. It’s often beneficial to sift the powdered sugar to prevent any small lumps from forming in the filling. Begin mixing on a low speed to incorporate the ingredients, gradually increasing the speed as the mixture becomes smoother. The goal here is to achieve a consistency that is light, airy, and completely free from any graininess or lumps. A stand mixer with a whisk attachment or a hand mixer works wonderfully for this purpose.
The resulting filling should be incredibly smooth and spreadable, with a delightful sheen. Avoid overmixing, as this can incorporate too much air, leading to a filling that’s too fluffy rather than luxuriously creamy. The essence of this layer is its richness and subtle tang, perfectly balanced by the sweetness. This smooth, decadent mixture will provide a luscious contrast to the nutty crust and the fruity topping, creating a harmonious flavor and texture experience with every bite.
Step 3: Assembling the Dream Bar Layers
With your crust pressed and your filling prepared, it’s time to bring these components together in a harmonious assembly. Carefully spoon the smooth cream cheese filling over the prepared almond crust. It’s crucial to distribute the filling evenly across the entire surface of the base. Using an offset spatula or the back of a spoon, gently spread the cream cheese mixture outwards towards the edges of the pan. Ensure there are no gaps or thin spots, guaranteeing that every bar will have a generous portion of this delightful filling.
Once the cream cheese layer is uniformly spread, it’s time to introduce the crunchy element – the whole almonds. Sprinkle the whole almonds evenly over the top of the cream cheese layer. This step not only adds a delightful textural contrast but also provides visual interest. Ensure the almonds are spread out so that they are relatively evenly distributed across the surface. They will become embedded in the cherry topping, providing a satisfying crunch with each bite. This is an opportunity to truly elevate the bar’s sensory appeal.
The final layer of assembly involves the vibrant cherry pie filling. Carefully spoon the cherry pie filling over the almonds. Gently spread it using your spatula to cover the entire surface of the cream cheese and almond layer. Try to create an even layer of fruit, ensuring there are no large gaps. The bright red color of the cherries will create a stunning visual contrast against the pale cream cheese and the nutty crust. This careful layering is what makes these bars a true “dream” to behold and to eat.
Step 4: The Crucial Chilling Period
Once all the layers have been meticulously assembled, the most critical, yet passive, step begins: the chilling process. This is where the magic truly happens, allowing the distinct layers to meld together and firm up properly. Cover the pan tightly with plastic wrap or aluminum foil. This prevents any odors from the refrigerator from permeating the dessert and also keeps the surface from drying out. Proper sealing is paramount for maintaining the freshness and texture of the bars.
Place the covered pan into the refrigerator. The minimum chilling time required is at least 4 hours, but for optimal results, allowing them to chill overnight is highly recommended. During this chilling period, the butter in the crust will solidify, the cream cheese filling will firm up considerably, and the cherry topping will set. This process allows the flavors to deepen and harmonize, creating a cohesive dessert rather than a collection of separate components. Patience during this stage is key to achieving those clean, distinct slices.
Imagine the anticipation of waiting for these bars to set; it’s a testament to the fact that some of the best things in life require a little bit of waiting. Rushing this step will result in bars that are soft, difficult to cut, and may fall apart. The cold temperature is essential for transforming the semi-liquid ingredients into a firm, sliceable dessert. This patient approach ensures that when you finally cut into your No-Bake Almond Cherry Dream Bars, you are rewarded with perfect, beautiful layers.
Step 5: Slicing and Presentation
After the required chilling period, it’s time to reveal the finished product and prepare it for serving. Remove the pan from the refrigerator. Gently peel back the plastic wrap or foil to expose the beautifully set layers. The bars should feel firm to the touch, indicating that the chilling process has been successful. A clean slice is the mark of a well-made no-bake dessert, and this step is where that visual appeal is realized.
To achieve the cleanest cuts, it is highly advisable to use a large, sharp knife. For exceptionally neat slices, dip the knife into hot water and then wipe it dry before each cut. This simple trick helps the knife glide through the chilled layers without dragging or smearing the filling or topping. Make your initial cuts down the center of the pan, then cut each half into equal sections. Aim for uniform squares or rectangles, ensuring that each piece contains a satisfying portion of the almond crust, creamy filling, and cherry topping.
Carefully lift the bars from the pan, either by gently prying them with a spatula or by lifting the entire base if you lined it with parchment paper. Arrange the sliced bars on a serving platter. The visual appeal of the distinct layers, the rich red of the cherry filling, and the texture of the almonds all contribute to an enticing presentation. These bars are now ready to be enjoyed, offering a delightful combination of flavors and textures in every single bite.
Step 6: Garnish and Enhance (Optional)
While the No-Bake Almond Cherry Dream Bars are perfectly delicious as they are, a few optional touches can elevate their presentation and flavor even further. Consider adding a final decorative flourish before serving to make them truly spectacular for any occasion. These small additions can transform a delightful dessert into a showstopper, impressing your guests with your culinary attention to detail.
One simple yet effective enhancement is to add a sprinkle of additional chopped almonds over the top, complementing the almonds already embedded within the bars. Another appealing garnish could be a few fresh cherries, perhaps with their stems still attached, artfully placed on each bar or in the center of the serving platter. A light dusting of powdered sugar can also add a touch of elegance, mimicking a gentle snowfall over the vibrant red topping. These garnishes provide both visual appeal and an extra layer of texture and flavor.
For an added touch of indulgence, a dollop of freshly whipped cream or a small scoop of vanilla bean ice cream served alongside the bars can be a wonderful accompaniment. This extra step, though not essential, takes the dessert experience to another level, offering a decadent contrast to the chilled bars. It transforms a simple no-bake treat into something truly special, perfect for celebrations or when you simply want to spoil yourself and your loved ones. These optional garnishes allow for personalization and can adapt the bars to various themes or preferences.
Pro Tips for No Bake Almond Cherry Dream Bars
Ensure Cream Cheese is Properly Softened: This is non-negotiable for a smooth, lump-free filling. Cold cream cheese will result in a gritty texture, no matter how vigorously you mix. Let it sit at room temperature for at least an hour, or use a gentle microwave defrost function in very short intervals, being careful not to melt it.
Press the Crust Firmly: A sturdy base is essential for sliceable bars. Use the bottom of a measuring cup or glass to pack the almond mixture tightly into the pan. Pay special attention to the edges to create a well-defined border.
Don’t Over-Mix the Filling: While you want it smooth, over-beating the cream cheese mixture can incorporate too much air, leading to a foamier texture instead of a dense, creamy one. Mix just until combined and smooth.
Allow Ample Chilling Time: Resist the urge to slice the bars too early. The chilling process is vital for the bars to set properly, ensuring clean cuts and a cohesive dessert. Overnight is best for firm bars.
Use a Sharp, Warm Knife for Slicing: A sharp knife, warmed in hot water and dried between cuts, will make slicing through the chilled bars remarkably easy and clean. This prevents smudging and ensures beautiful presentation.
Serving Suggestions for No Bake Almond Cherry Dream Bars
Decoration
To enhance the visual appeal of your No-Bake Almond Cherry Dream Bars, consider a few elegant decorative touches. A light dusting of powdered sugar can create a snowy effect, particularly charming for holiday gatherings. Alternatively, a scattering of toasted slivered almonds over the top adds a lovely crunch and reinforces the nutty flavor profile. A few fresh maraschino cherries or even some fresh raspberries placed strategically can add vibrant pops of color and freshness, making each bar a miniature work of art.
Side Dishes
These bars are a delightful dessert on their own, but they also pair wonderfully with other complementary items. A simple scoop of vanilla bean ice cream or a swirl of freshly whipped cream offers a classic indulgence that enhances the creamy texture of the bars. For a lighter touch, a fresh fruit salad featuring berries and melon can provide a refreshing counterpoint to the sweetness. Coffee or a mild herbal tea also makes for a sophisticated pairing, cleansing the palate between bites.
Creative Serving Ideas
Move beyond simply slicing and serving by getting creative with presentation. Consider cutting the bars into smaller, bite-sized pieces and arranging them on a tiered stand for a party dessert buffet. For a more individual presentation, place each bar on a small dessert plate and garnish with a sprig of mint or a drizzle of chocolate sauce. You could even serve them alongside a small shot glass of cherry liqueur for an adult twist, offering a layered sensory experience that truly embodies the “dream” aspect of these bars.
Preparation & Storage
Storing Leftovers
Leftover No-Bake Almond Cherry Dream Bars can be stored in an airtight container in the refrigerator for up to 5-7 days. Ensuring the container is truly airtight is crucial to prevent the bars from drying out or absorbing any unwanted odors from other foods in your refrigerator. If you’ve cut them into individual portions, you can wrap each piece tightly in plastic wrap before placing them in the container, which can make them even easier to grab and serve.
The chilling temperature is essential for maintaining the structural integrity and desirable texture of the bars. As they are no-bake, they rely on the cold to remain firm. If left at room temperature for extended periods, the cream cheese filling can soften significantly, potentially affecting the overall consistency and making them messier to handle. Always opt for refrigeration for optimal freshness and to prolong their shelf life.
When ready to serve leftovers, simply remove them from the refrigerator and allow them to sit for a few minutes if they feel too firm; however, they are generally best served chilled. The flavors often meld even further after a day or two, making them potentially even more delicious on subsequent servings. This makes them an excellent choice for make-ahead entertaining.
Freezing
These No-Bake Almond Cherry Dream Bars freeze exceptionally well, making them a fantastic option for preparing far in advance. To freeze, it’s best to slice the bars into individual portions first. Then, wrap each slice tightly in plastic wrap, ensuring there are no gaps for air to penetrate. After wrapping, place the individual portions into a freezer-safe container or a heavy-duty freezer bag. This double-layer of protection is key to preventing freezer burn and maintaining the quality of the bars.
When properly stored, these bars can remain frozen for up to 2-3 months. The almond base and the cream cheese filling are quite stable when frozen. The cherry topping might slightly alter in texture upon thawing, but it will still be delicious. Labeling the container with the date of freezing will help you keep track of how long they have been stored. Thawing them is as simple as transferring the desired number of bars from the freezer to the refrigerator.
Allow the bars to thaw completely in the refrigerator, which typically takes several hours, or preferably overnight. Avoid thawing them at room temperature, as this can cause condensation and affect the texture. Once thawed, they are ready to be enjoyed, tasting almost as fresh as the day they were made. This freezing capability makes them a convenient dessert for any occasion that might arise unexpectedly.
Reheating
It is important to note that these No-Bake Almond Cherry Dream Bars are specifically designed to be served cold and do not require or benefit from reheating. The delicate balance of creamy filling and firm crust relies on refrigeration to maintain its intended structure and texture. Attempting to reheat them would likely cause the cream cheese filling to melt, resulting in a liquid or overly soft consistency that would completely alter the dessert.
Therefore, if you find your bars are too cold or firm straight from the refrigerator, the best approach is simply to let them sit at room temperature for about 10-15 minutes. This brief period will allow them to soften slightly, making them more palatable and easier to cut without compromising their structural integrity. This gentle tempering is the only form of “reheating” that is recommended for this particular recipe.
The intended enjoyment of these bars is rooted in their cool, refreshing nature. They offer a delightful contrast to warmer dishes and are perfect for warmer weather or as a palate cleanser after a rich meal. Focusing on proper chilling and avoiding any form of heat application will ensure you experience these bars as they were meant to be – a cool, creamy, and utterly delightful dream.
Frequently Asked Questions
-
How long can you store No-Bake Almond Cherry Dream Bars?
You can store these delightful bars in an airtight container in the refrigerator for up to 5 to 7 days. This extended storage period makes them an excellent choice for make-ahead desserts, ensuring you have a tasty treat readily available for several days. Proper refrigeration is key to maintaining their texture and flavor, preventing them from becoming soggy or developing off-flavors. Always use a container that seals tightly to protect the bars from air and other strong food odors within your fridge.
-
Can you freeze No-Bake Almond Cherry Dream Bars?
Yes, these bars freeze wonderfully, making them a convenient option for stocking up your freezer for future cravings or unexpected guests. For the best results, slice the bars into individual portions and wrap each piece tightly in plastic wrap. Then, place the wrapped portions into a freezer-safe container or a heavy-duty freezer bag to provide an extra layer of protection against freezer burn. Properly frozen, they can last for up to 2-3 months, retaining much of their original deliciousness.
-
What can I use instead of almond flour?
If you need to substitute almond flour, a common and effective alternative is oat flour, which can be made by simply grinding rolled oats in a food processor until fine. All-purpose flour can also be used, though it will result in a slightly different texture and flavor profile for the crust. For those looking for a gluten-free option beyond almond flour, a blend of rice flour and tapioca starch can also work, though it may require some experimentation with moisture levels. For a keto-friendly alternative, finely ground sunflower seeds or a blend of coconut flour and flaxseed meal can be considered, but these will significantly alter the taste and texture.