Grilled Lemon Chicken Recipe – The Best Lemon Marinade!
This juicy grilled lemon chicken has always been my family’s go-to grilled chicken recipe for summer, a true testament to simple yet incredibly flavorful cooking. Bursting with the bright essence of fresh lemon and fragrant herbs, the garlicky lemon chicken marinade is both quick and remarkably easy to prepare, making it a weeknight winner or a weekend star.
Inspired by cherished holiday traditions, this recipe evokes memories of vibrant May Day picnics in Macedonia, where the aroma of this marinated chicken would waft through the air alongside kebapi and grilled eggplant. It’s a dish that carries the warmth of family gatherings and the simple joy of delicious, home-cooked food, perfect for any occasion that calls for a taste of sunshine.
Why You Will Love This Recipe
- Effortless Preparation: With minimal chopping and simple mixing, the marinade comes together in just minutes, setting the stage for a stress-free cooking experience.
- Bright, Zesty Flavor: The combination of fresh lemon zest, juice, and garlic creates a vibrant marinade that infuses the chicken with an irresistible tang and depth.
- Versatile Cooking Methods: Whether you prefer grilling outdoors, using a stovetop grill pan, or even finishing in the oven, this recipe adapts beautifully to your available kitchen equipment.
- Quick Cooking Time: Once marinated, the chicken cooks relatively quickly, ensuring you can enjoy a delicious and satisfying meal without a lengthy wait.
- Family Favorite: This recipe is a proven hit, consistently bringing smiles to the table with its crowd-pleasing taste and wholesome ingredients, making it perfect for gatherings.
Ingredients You Need
Crafting this exquisite grilled lemon chicken relies on the freshness and quality of a few key ingredients, each playing a vital role in building its signature flavor profile. Prioritizing fresh lemons and vibrant herbs will elevate the marinade from good to absolutely spectacular, ensuring every bite is a burst of sunshine.
Grilled Lemon Chicken

This juicy lemon chicken is a go-to grilled chicken recipe for summer! The garlicky lemon marinade is bursting with fresh flavor and needs only 5 ingredients.
- 2 pounds boneless, skinless chicken breasts
- ⅓ cup olive oil
- zest of 2 lemons
- ⅓ cup fresh lemon juice (zest the lemons before juicing)
- 4 cloves garlic, minced
- ¼ cup chopped fresh parsley
- salt and fresh ground pepper, to taste
- 1 whole lemon, cut into slices
- 1Marinate the chicken: In a large ziploc bag, combine chicken, olive oil, lemon zest, lemon juice, garlic, parsley, salt, and pepper. Seal the bag and shake it all up until well combined. Place the bag in the refrigerator and marinate for about 4 hours or overnight.
- 2Prepare the grill: Preheat the grill to about 375°F to 400°F. Brush the grill grates with olive oil.
- 3Grill the chicken: Remove the chicken breasts from the marinade and place them on the hot grill; cook without touching the grill until they start to get grill marks, about 5 minutes.
- 4Flip: Turn the chicken breasts over, cover the grill, and let them finish cooking, about 7 more minutes, depending on the thickness of the chicken. The chicken is done when a meat thermometer registers 165 degrees Fahrenheit.
- 5Rest the chicken: Remove chicken from grill; cover and let rest for 5 minutes before cutting and serving.
- 6Grill Pan Instructions:
- 7Prep: Preheat oven to 350°F. Grease a grill pan with cooking spray and set it over medium-high heat.
- 8Sear the chicken: Add the chicken and cook for 4 minutes; flip, and continue to cook for 2 more minutes, or until lightly browned.
- 9Finish in the oven: Place the grill pan in the oven and cook for 18 to 20 minutes or until the chicken is cooked through. Remove from oven and let rest for 5 to 8 minutes before cutting and serving.
Keywords: grilled lemon chicken, lemon chicken marinade, easy grilled chicken, summer grilling, chicken recipe
- olive oil: a foundational element for a rich marinade, allowing flavors to meld beautifully.
- lemons: fresh is absolutely essential, providing both the zesty brightness of the peel and the tangy depth of the juice.
- garlic: freshly minced garlic is unparalleled, offering a pungent punch that complements the citrus.
- parsley: fresh, finely chopped parsley adds a herbaceous freshness and a lovely green fleck to the marinade.
- salt and pepper: the timeless duo to enhance and balance all the other flavors.
- whole lemon: sliced to be grilled alongside the chicken, adding an extra layer of aroma and visual appeal.
The exact quantities for these delightful ingredients are thoughtfully detailed within the accompanying recipe card for your convenience.
Variations
This grilled lemon chicken is wonderfully adaptable, offering a fantastic base for culinary creativity and catering to various dietary preferences. Its inherent simplicity allows for easy modifications, ensuring everyone can enjoy a delicious version of this favorite dish.
Vegan Delight: For a completely plant-based meal, consider using firm or extra-firm tofu, pressed thoroughly to remove excess water, or even large portobello mushroom caps. Marinate them using the same lemon and herb mixture, ensuring they are well-coated. Grill or pan-sear them until golden brown and tender. Serve them over a vibrant salad or alongside roasted vegetables for a satisfying vegan main course that captures the essence of the original dish.
Low-Carb & Keto Friendly: This recipe is naturally quite low in carbohydrates, especially if you serve it without a carb-heavy side. To enhance its keto-friendliness further, focus on serving it with non-starchy vegetables like steamed broccoli, grilled asparagus, or a fresh green salad with a light vinaigrette. You can also incorporate healthy fats by drizzling a little extra olive oil or a creamy avocado sauce over the top.
Spicy Kick: If you enjoy a bit of heat, easily transform this recipe by adding a pinch of red pepper flakes to the marinade. You could also incorporate a finely diced jalapeño or serrano pepper for a more pronounced spicy element. This addition brings a delightful warmth that beautifully contrasts with the bright lemon and savory chicken, creating a more complex and exciting flavor profile that’s perfect for those who love a little heat.
How to Prepare grilled lemon chicken
Step 1: Marinate the Chicken
Begin by preparing the flavorful marinade, the heart of this delightful dish. In a large resealable plastic bag or a non-reactive bowl, combine the olive oil, the zest of two fresh lemons, and the freshly squeezed juice from those same lemons. This dual use of the lemon ensures a robust citrus flavor that permeates the chicken.
Next, add the minced garlic and the finely chopped fresh parsley to the lemon and oil mixture. Season generously with salt and freshly ground black pepper to your personal preference. It’s crucial to taste and adjust the seasoning at this stage, as it will significantly influence the final taste of the chicken. Don’t be shy with the salt and pepper; they are essential for bringing out all the other wonderful flavors.
Now, place the boneless, skinless chicken breasts into the bag or bowl with the marinade. Seal the bag tightly, or cover the bowl, ensuring all the chicken pieces are thoroughly coated in the aromatic mixture. For the best results and maximum flavor infusion, refrigerate the chicken to marinate for at least 4 hours, or ideally, overnight. This extended marination time allows the flavors to penetrate deeply, resulting in incredibly tender and succulent chicken.
Step 2: Prepare the Grill
As your chicken reaches the end of its marination period and is ready for grilling, it’s time to prepare your outdoor grill. Preheat your grill to a medium-high heat, aiming for a temperature between 375°F and 400°F. Achieving this precise temperature ensures that the chicken will cook evenly and develop those desirable grill marks without burning too quickly.
Once the grill is preheated, it’s essential to clean the grates thoroughly. Use a sturdy grill brush to remove any residual debris from previous cooking sessions. This not only prevents sticking but also ensures a cleaner flavor for your lemon chicken. After cleaning, liberally brush the grill grates with a high-heat cooking oil, such as canola or vegetable oil, using a paper towel or a grill brush with a reservoir.
This oiling step is critical for preventing the marinated chicken from sticking to the hot grates, which can mar its appearance and make it difficult to flip. A well-oiled grill ensures that the chicken releases cleanly, allowing you to achieve beautiful char marks and a perfectly cooked exterior. If you’re using a grill pan indoors, follow similar preheating and greasing steps.
Step 3: Grill the Chicken
Carefully remove the marinated chicken breasts from the refrigerator and discard the used marinade; it should not be reused for safety reasons. Place the chicken pieces directly onto the hot, oiled grill grates. Ensure there is a little space between each piece to allow for even cooking and proper circulation of heat.
Now, resist the urge to move or press down on the chicken immediately. Let the chicken cook undisturbed for approximately 5 minutes. This initial period allows a beautiful crust to form and the grill marks to develop, which are characteristic of perfectly grilled chicken. The heat will work its magic, searing the exterior and creating a flavorful base.
After about 5 minutes, you should see distinct grill marks appearing. Carefully flip each chicken breast using long-handled tongs. Ensure you get a good grip and flip them cleanly to avoid breaking them apart. This action exposes the other side to the direct heat, continuing the cooking process and ensuring even doneness.
Step 4: Finish Cooking and Rest
Once the chicken has been flipped, close the grill lid. This traps the heat and allows the chicken to cook through evenly from both sides, essentially creating a convection cooking environment. Continue to cook for an additional 7 to 10 minutes, or until the chicken is cooked through to a safe internal temperature.
The most reliable way to determine doneness is by using an instant-read meat thermometer. Insert the thermometer into the thickest part of the chicken breast, avoiding any bones if present. The chicken is safely cooked when it reaches an internal temperature of 165°F (74°C). Juices should run clear, and the meat should be opaque throughout.
Once the chicken reaches the target temperature, carefully remove it from the grill using your tongs. Transfer the cooked chicken to a clean plate or cutting board. It is crucial to let the chicken rest for at least 5 to 10 minutes before slicing and serving. This resting period allows the juices to redistribute throughout the meat, ensuring it remains incredibly moist and tender. Skipping this step can lead to dry chicken as the juices will escape when cut.
Step 5: Grill Pan Instructions (Alternative Method)
For those who prefer indoor cooking or lack an outdoor grill, a cast-iron grill pan offers a fantastic alternative for achieving a similar char and flavor. Preheat your oven to 350°F (175°C) while you prepare the grill pan. This preheating of the oven is essential for the second stage of cooking.
Grease your oven-safe grill pan generously with cooking spray or a bit of oil, and place it over medium-high heat on your stovetop. The pan needs to be smoking hot before you add the chicken; this is key to achieving a good sear. If the chicken doesn’t sizzle immediately upon contact, the pan isn’t hot enough, and you’ll miss out on developing those crucial grill marks.
Add the marinated chicken breasts to the scorching hot grill pan. Sear them for about 4 minutes per side, until they develop a beautiful golden-brown color and those signature grill marks. This initial searing locks in moisture and builds flavor on the exterior of the chicken. Be mindful not to overcrowd the pan; cook in batches if necessary to ensure even searing.
After searing, carefully transfer the entire grill pan (if oven-safe) into the preheated oven. Continue to cook for an additional 18 to 20 minutes, or until the internal temperature of the chicken reaches 165°F (74°C) when tested with an instant-read thermometer. Remove the pan from the oven and let the chicken rest in the pan for 5 to 8 minutes before slicing and serving. This resting period is just as important indoors as it is outdoors for juicy results.
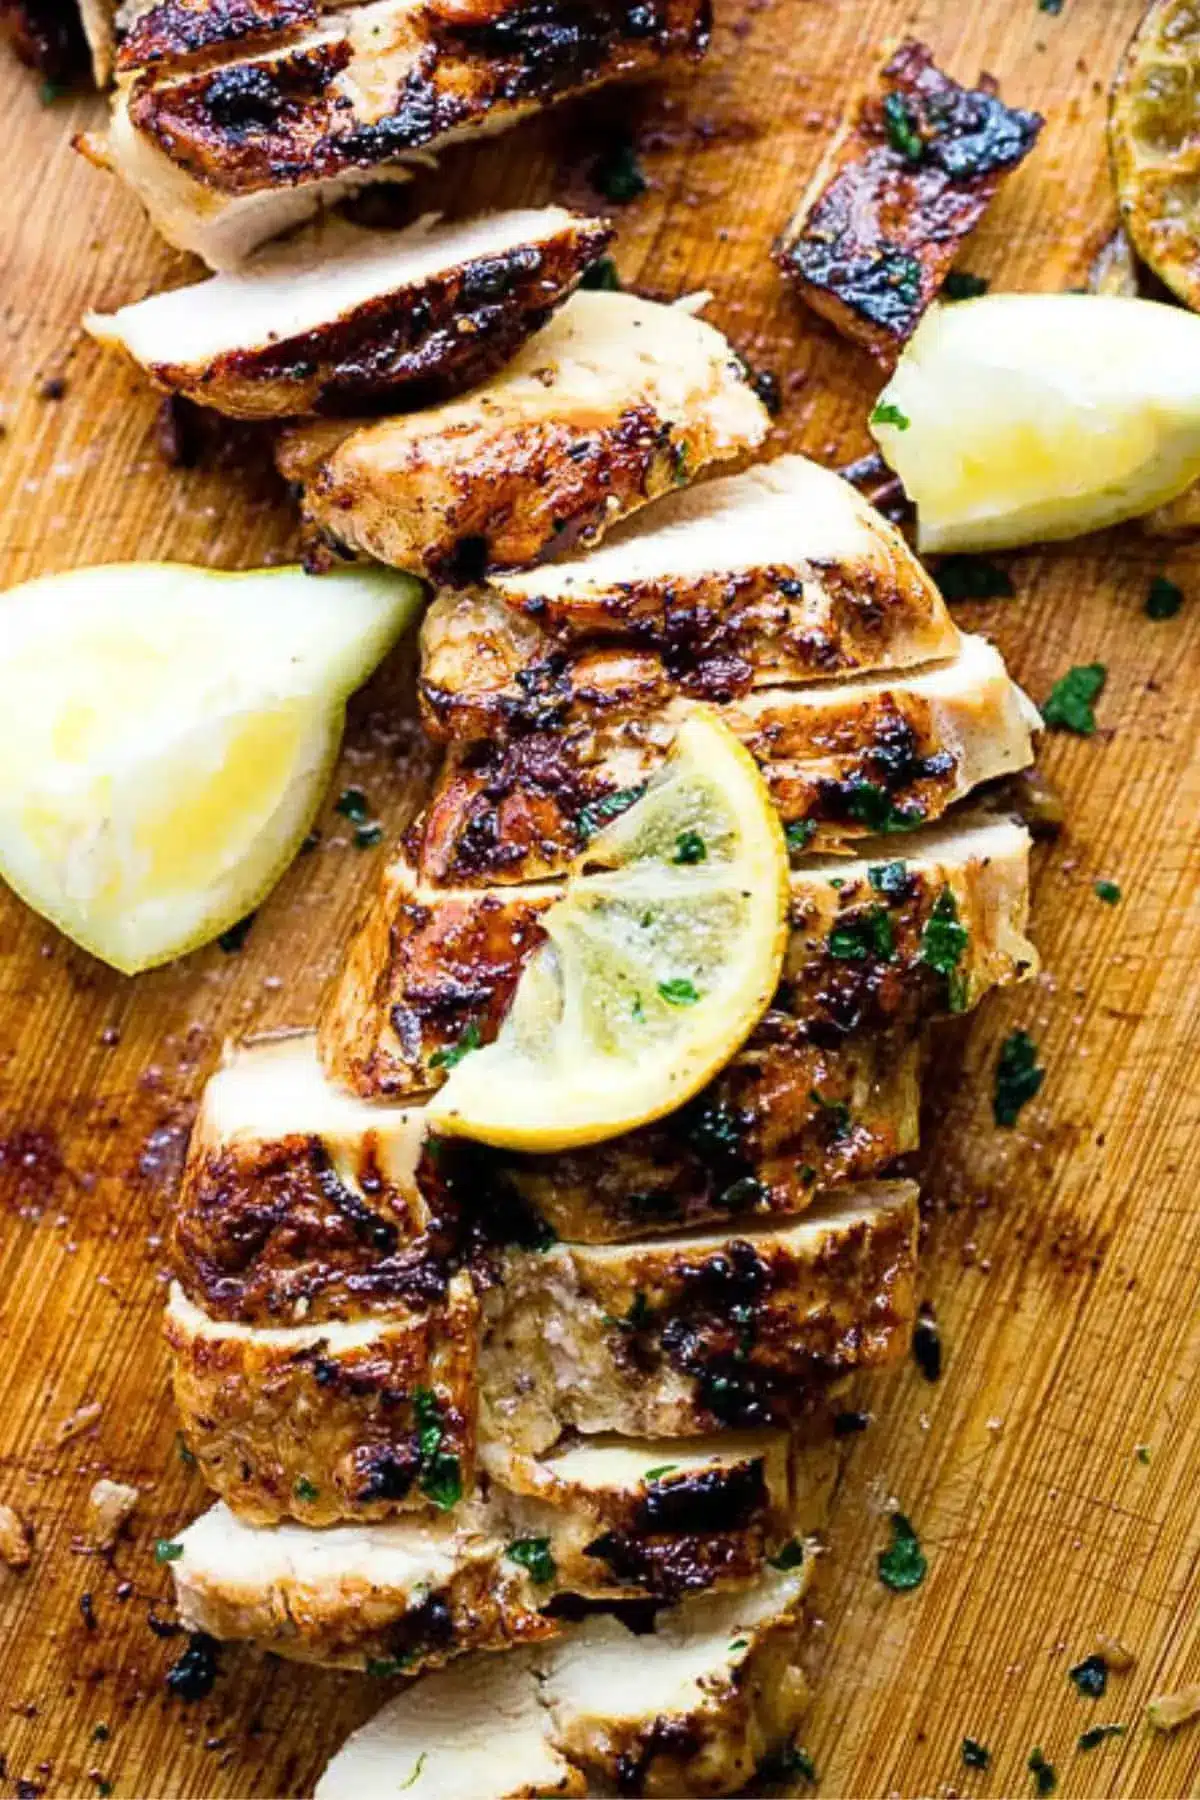
Step 6: Slicing and Serving
After the chicken has had adequate time to rest, it’s ready to be presented and enjoyed. The resting period is not just a suggestion; it’s a critical step that allows the muscle fibers to relax and reabsorb the delicious juices. This prevents all that wonderful moisture from escaping when you slice into the chicken, ensuring each piece is tender and succulent.
Using a sharp knife, carefully slice the grilled lemon chicken against the grain. Slicing against the grain shortens the muscle fibers, making the chicken easier to chew and enhancing its tenderness. You can slice it into thick strips, bite-sized pieces, or even leave the breasts whole, depending on how you plan to serve it. The beautiful char marks and the infused lemony aroma should be evident as you cut.
Present the sliced chicken attractively on a platter. You can garnish it with a little extra fresh parsley, a few lemon slices, or even a drizzle of the pan juices if you made a quick sauce. This visual appeal enhances the dining experience and showcases the vibrant flavors of the dish. This perfectly cooked grilled lemon chicken is now ready to be savored, a testament to simple ingredients and skillful preparation.
Pro Tips for grilled lemon chicken
Marinade Magic: For the most profound flavor, marinate the chicken for at least 4 hours, but overnight is truly optimal. This extended time allows the lemon juice to tenderize the meat while the herbs and garlic infuse every fiber. Don’t skimp on this crucial step; it’s where the magic happens.
Don’t Fear the Flames: When grilling, ensure your grill is properly preheated and the grates are well-oiled. The initial sear is key to developing those coveted grill marks and a delicious crust. Resist the urge to move the chicken too soon; let it cook undisturbed for those first few minutes.
Temperature is Key: Always use an instant-read thermometer to check for doneness. Chicken is perfectly cooked and safe to eat at an internal temperature of 165°F (74°C). Overcooking will result in dry, tough meat, while undercooking poses a health risk.
The Art of the Rest: Never skip the resting period after cooking. Allowing the chicken to rest for 5-10 minutes before slicing lets the juices redistribute evenly throughout the meat. This simple step makes a world of difference in achieving incredibly moist and tender chicken.
Embrace the Grill Pan: If outdoor grilling isn’t an option, a cast-iron grill pan is your best friend. Preheat it thoroughly, sear the chicken well, and then finish it in a hot oven. This method mimics the outdoor grilling experience remarkably well, delivering a delicious result every time.
Serving Suggestions for grilled lemon chicken
Decoration
Elevate the visual appeal of your grilled lemon chicken by adding a flourish of fresh garnishes. A scattering of vibrant, finely chopped fresh parsley over the top provides a pop of color and a hint of herbaceous freshness. Thinly sliced lemon wheels, artfully arranged around the chicken, not only look appealing but also reinforce the bright citrus theme of the dish.
For an extra touch of elegance, consider adding a few sprigs of fresh rosemary or thyme, especially if those herbs were prominent in your marinade. A sprinkle of smoked paprika can add a subtle smoky visual element and a touch of warmth. These simple decorative touches transform a delicious meal into a feast for the eyes, making it perfect for entertaining guests.
Side Dishes
This versatile grilled lemon chicken pairs beautifully with a wide array of side dishes, making it suitable for any meal. For a light and refreshing accompaniment, a crisp Greek salad or a simple mixed greens salad with a lemon vinaigrette complements the chicken’s bright flavors wonderfully. Mediterranean rice pilaf, infused with herbs and perhaps some toasted nuts, provides a satisfying and flavorful base to soak up any delicious juices.
Roasted vegetables are another excellent choice; think tender asparagus, crisp broccoli florets, or hearty roasted root vegetables like potatoes and carrots, all of which pair harmoniously with the lemony chicken. Creamy mashed potatoes or a light quinoa salad can also offer a delightful textural contrast and added substance to the meal. For a more complete dinner experience, consider serving it alongside a crusty bread to mop up any remaining marinade.
Creative Serving Ideas
Move beyond the traditional plate by incorporating this grilled lemon chicken into more dynamic culinary creations. Slice the cooked chicken and toss it into a vibrant pasta salad with sun-dried tomatoes, olives, and a light lemon-herb dressing for a delightful lunch option. It’s also fantastic shredded or cubed and added to wraps or pita pockets with crisp lettuce, tomatoes, and a dollop of tzatziki sauce.
Consider serving it over a bed of fluffy couscous or farro, perhaps mixed with roasted bell peppers and zucchini, for a more substantial and visually appealing grain bowl. You can also thread chunks of the grilled chicken onto skewers with colorful vegetables like cherry tomatoes, bell peppers, and red onion for delightful chicken kabobs. This method is perfect for parties or a fun, interactive meal that guests of all ages will enjoy.
Preparation & Storage
Storing Leftovers
Once your delicious grilled lemon chicken has cooled completely to room temperature, it’s time to store any leftovers properly to maintain their quality and safety. Transfer the cooled chicken into an airtight container. This prevents the chicken from drying out in the refrigerator and also protects it from absorbing any unwanted odors from other foods.
Properly stored in the refrigerator, grilled lemon chicken will retain its best quality for up to 4 days. It’s a versatile leftover, perfect for quick lunches or to be incorporated into other meals throughout the week. The flavors often meld and deepen slightly overnight, making leftovers just as enjoyable as when freshly made.
Freezing
While fresh is always best, grilled lemon chicken can be frozen for longer-term storage if you find yourself with an abundance of leftovers. Ensure the chicken is completely cooled before proceeding with the freezing process. This prevents the formation of ice crystals that can degrade the texture and flavor upon thawing.
To freeze, wrap individual portions of the chicken tightly in plastic wrap, then place them in a freezer-safe bag or container. Remove as much air as possible from the packaging before sealing. Frozen grilled lemon chicken can be stored for up to 2-3 months, though its quality is best within the first month. Thawing it in the refrigerator overnight is the safest and most effective method.
Reheating
When you’re ready to enjoy your refrigerated or thawed grilled lemon chicken, reheating it properly is key to restoring its deliciousness without drying it out. For refrigerated leftovers, the microwave is a convenient option. Reheat the chicken in short, 30-second to 1-minute intervals, stirring or turning the pieces in between, until it’s heated through evenly.
Alternatively, for a more consistent and often preferred reheating method that helps maintain moisture, use the oven. Place the chicken in an oven-safe dish and warm it at a moderate temperature, around 350°F (175°C), for about 10-15 minutes, or until the chicken is hot throughout. Covering the dish loosely with foil can help prevent the chicken from drying out during this process. Enjoy your revitalized lemon chicken!
Frequently Asked Questions
-
Can I use chicken thighs instead of breasts for this recipe?
Absolutely! Chicken thighs, whether boneless, skinless, or bone-in, are an excellent alternative to chicken breasts for this grilled lemon chicken recipe. They tend to be more forgiving and can withstand longer cooking times without drying out, often resulting in an even juicier final product. If using bone-in thighs, you may need to adjust the cooking time slightly longer than boneless, skinless breasts, always ensuring they reach an internal temperature of 165°F (74°C) for safety. The lemon marinade will infuse them beautifully, just as it does the breasts.
-
How can I ensure my chicken doesn’t stick to the grill?
Preventing chicken from sticking to the grill is a common concern, but easily managed with a few key steps. Firstly, ensure your grill grates are thoroughly cleaned before cooking. Secondly, and perhaps most importantly, oil the grates generously just before adding the chicken; a high-heat oil like canola or vegetable oil works best. You can apply it using a paper towel held with tongs or a dedicated grill brush. Lastly, allow the chicken to cook undisturbed for the first few minutes on each side until a nice crust forms; this allows it to release naturally from the grates rather than tearing if you try to move it too soon.
-
Can I make the marinade ahead of time?
Yes, you can certainly make the lemon chicken marinade ahead of time, which can be a great time-saver. The marinade can be prepared up to 24 hours in advance and stored in an airtight container in the refrigerator. This allows the flavors to meld even further, potentially creating a more robust marinade. When you’re ready to marinate the chicken, simply combine the chicken with the pre-made marinade and proceed with the recipe as instructed, refrigerating it for the recommended marination period.