Grilled Lemon Chicken Recipe – The Best Lemon Marinade!

This juicy grilled lemon chicken has always been my family’s go-to grilled chicken recipe for summer. Bursting with fresh flavor and herbs, the garlicky lemon chicken marinade is quick and easy to make, promising a delightful culinary experience.
In honor of May Day, I’m marinating juicy chicken with plenty of lemon and tossing it onto the grill. May Day is basically European Labor Day, and one whiff of this garlicky lemon chicken on the grill takes me right back to our cherished holiday picnics in Macedonia, creating a wave of nostalgic flavors and memories.
Why You Will Love This Recipe
- Incredibly Zesty Flavor: The vibrant combination of fresh lemon juice, zest, and garlic creates a bright, irresistible taste that awakens the palate and makes every bite exciting.
- Simple Marinade: With just a handful of fresh ingredients, this marinade comes together in minutes, allowing you to spend less time preparing and more time enjoying the cooking process.
- Versatile Cooking Methods: Whether you prefer the smoky char of an outdoor grill or the convenience of a stovetop grill pan, this recipe adapts beautifully, ensuring delicious results no matter your setup.
- Perfect for Any Occasion: From casual family dinners to festive summer barbecues, this lemon chicken is a crowd-pleaser that brings a touch of sunshine to any meal.
- Healthier Choice: Grilling is a fantastic way to cook chicken, keeping it lean and flavorful without the need for heavy sauces or excess oils, making it a satisfying and guilt-free option.
Ingredients You Need
The success of this grilled lemon chicken lies in the quality of its simple, fresh ingredients. Using ripe, juicy lemons and fragrant fresh herbs elevates the marinade from good to absolutely spectacular, ensuring a depth of flavor that is truly memorable. The balance of acidity, aromatics, and herbaceous notes creates a harmonious blend that perfectly complements the chicken.
Grilled Lemon Chicken
This juicy lemon chicken is a go-to grilled chicken recipe for summer! The garlicky lemon marinade is bursting with fresh flavor and needs only 5 ingredients.
- 2 pounds boneless, skinless chicken breasts
- zest of 2 lemons
- 4 cloves garlic, minced
- salt and fresh ground pepper, to taste
- 1 whole lemon, cut into slices
- 1Marinate the chicken: In a large ziploc bag, combine chicken, olive oil, lemon zest, lemon juice, garlic, parsley, salt, and pepper. Seal the bag and shake it all up until well combined. Place the bag in the refrigerator and marinate for about 4 hours or overnight.
- 2Prepare the grill: Preheat the grill to about 375ºF to 400ºF. Brush the grill grates with olive oil.
- 3Grill the chicken: Remove the chicken breasts from the marinade and place them on the hot grill; cook without touching the grill until they start to get grill marks, about 5 minutes.
- 4Flip: Turn the chicken breasts over, cover the grill, and let them finish cooking, about 7 more minutes, depending on the thickness of the chicken. The chicken is done when a meat thermometer registers 165 degrees Fahrenheit.
- 5Rest the chicken: Remove chicken from grill; cover and let rest for 5 minutes before cutting and serving.
- 6Grill Pan Instructions: Prep. Preheat oven to 350ºF. Grease a grill pan with cooking spray and set it over medium-high heat.
- 7Sear the chicken: Add the chicken and cook for 4 minutes; flip, and continue to cook for 2 more minutes, or until lightly browned.
- 8Finish in the oven: Place the grill pan in the oven and cook for 18 to 20 minutes or until the chicken is cooked through. Remove from oven and let rest 5 to 8 minutes before cutting and serving.
Keywords: grilled chicken, lemon chicken, summer recipe, easy recipe, marinade, grill pan, Katerina Petrovska
The exact quantities for each ingredient are detailed within the recipe card at the end of this article, ensuring you have all the precise measurements needed for culinary perfection.
Variations
For those seeking a plant-based delight, transform this recipe into a sensational vegan main by substituting the chicken with firm tofu or thick slices of halloumi cheese. Marinate these alternatives in the same zesty lemon mixture, ensuring they absorb all the wonderful flavors before grilling. The tofu will develop a delightful crisp exterior, while the halloumi will achieve a satisfyingly chewy texture, offering a robust and flavorful meat-free option.
If you’re following a low-carb lifestyle, this lemon chicken is already a fantastic choice, but you can enhance its low-carb appeal further. Serve the grilled chicken alongside a generous portion of roasted or steamed non-starchy vegetables like broccoli, asparagus, or zucchini. A simple side of cauliflower rice or a crisp green salad with a light vinaigrette also complements the bright lemon chicken beautifully, keeping your meal satisfyingly low in carbohydrates.
For an international twist, consider infusing the marinade with a touch of Mediterranean flair. Add a tablespoon of finely chopped fresh oregano or a pinch of red pepper flakes for a subtle heat. You could also incorporate a teaspoon of Dijon mustard into the marinade for a tangy undertone. These small additions can dramatically shift the flavor profile, making your grilled lemon chicken reminiscent of Greek or Italian coastal cuisine.
How to Prepare grilled lemon chicken
Step 1: Marinate the Chicken
Begin by gathering all your ingredients and preparing your workspace. In a large, resealable plastic bag or a non-reactive bowl, combine the boneless, skinless chicken pieces. This ensures that every surface of the chicken will be coated evenly in the flavorful marinade, which is crucial for infusing it with taste.
Add the olive oil, the finely grated zest of two fresh lemons, and the juice of those same lemons to the bag or bowl. Follow this with four minced cloves of garlic and a quarter cup of freshly chopped parsley. Season generously with salt and freshly ground black pepper to your personal preference, ensuring a well-balanced flavor profile from the outset.
Seal the bag tightly, ensuring no air escapes, or cover the bowl securely. Gently shake the bag or toss the chicken in the bowl to ensure every piece is thoroughly coated with the marinade. Place the marinating chicken in the refrigerator for at least four hours, or ideally, overnight. This extended marinating time allows the lemon juice to tenderize the chicken while the other ingredients deeply penetrate the meat, creating maximum flavor.
Step 2: Prepare the Grill
When you are ready to cook the chicken, it’s time to prepare your grill for optimal performance. For an outdoor grill, preheat it to a medium-high heat, aiming for a temperature range of approximately 375°F to 400°F. This consistent heat is essential for achieving those desirable grill marks and ensuring the chicken cooks through evenly without burning.
Once the grill has reached the desired temperature, it’s crucial to clean the grates thoroughly. Use a stiff grill brush to remove any residual debris from previous cooking sessions. Following the cleaning, lightly brush the grill grates with a high-heat cooking oil, such as canola or vegetable oil, using a paper towel held with tongs. This step prevents the chicken from sticking to the grates, which can lead to tearing and an uneven cook.
If you’re using a stovetop grill pan, preheat it over medium-high heat. Ensure the pan is properly heated before adding any food; a good test is to flick a few drops of water onto the surface – they should sizzle and evaporate immediately. Lightly grease the grill pan with cooking spray or a little oil to further prevent sticking and promote even searing.
Step 3: Grill the Chicken
Carefully remove the marinated chicken pieces from the bag or bowl, allowing any excess marinade to drip back. Discard the used marinade, as it should not be reused for safety reasons. Place the chicken breasts onto the preheated grill grates in a single layer, ensuring they are not overcrowded, which can lower the grill’s temperature and lead to steaming rather than searing.
Now, for the critical part: resist the urge to move or flip the chicken for the first five minutes. This allows a beautiful crust to form and those coveted grill marks to develop. You should start to see the edges of the chicken firming up and charring slightly, indicating a perfect sear is in progress.
After approximately five minutes of searing on the first side, it’s time to flip the chicken. Use a pair of tongs or a spatula to carefully turn each piece over. Once flipped, cover the grill lid if your grill has one, and allow the chicken to finish cooking. This covered cooking period helps to ensure that the heat circulates evenly around the chicken, cooking it through to the center.
Step 4: Finish Cooking and Check for Doneness
Continue to cook the chicken on the second side for an additional seven to ten minutes. The exact cooking time will depend on the thickness of your chicken breasts. Thicker pieces will require a little longer to cook through completely, while thinner pieces will be done sooner. It’s always better to err on the side of caution and cook slightly longer to ensure the chicken is fully cooked.
The most reliable way to determine if the chicken is perfectly cooked is by using an instant-read meat thermometer. Insert the thermometer into the thickest part of the chicken breast, ensuring it does not touch any bone if you were using bone-in cuts. The chicken is considered safely cooked when the internal temperature reaches 165°F (74°C). This temperature ensures that any harmful bacteria have been eliminated, making the chicken safe and enjoyable to eat.
If you are using the grill pan method, after searing both sides, transfer the grill pan with the chicken into a preheated oven set at 350°F (175°C). Allow the chicken to finish cooking in the oven for approximately 18 to 20 minutes, or until the internal temperature reaches 165°F (74°C). This combination of stovetop searing and oven finishing ensures a beautiful exterior and a perfectly cooked, juicy interior.
Step 5: Rest the Chicken
Once the chicken has reached the target internal temperature of 165°F (74°C), carefully remove it from the grill or the oven. Transfer the cooked chicken breasts to a clean cutting board or a plate. Do not be tempted to cut into it immediately, as this is a crucial step for ensuring maximum juiciness and flavor.
Cover the chicken loosely with aluminum foil or a clean kitchen towel. This allows the juices, which have been pushed to the center during cooking, to redistribute throughout the meat. Letting the chicken rest for at least five to ten minutes is essential. This resting period allows the muscle fibers to relax, resulting in a more tender and moist chicken breast.
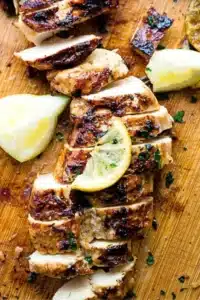
After the resting period, the chicken is ready to be served. You can slice it against the grain into strips or serve the whole breasts. The juices that have collected on the plate can be spooned over the chicken for an extra burst of flavor and moisture. Enjoy the fruits of your labor with this perfectly grilled, zesty lemon chicken.
Step 6: Prepare the Lemon Slices for Serving
While the chicken is resting, you can prepare the lemon slices that will add a final touch of brightness and visual appeal. If you haven’t already, take one whole lemon and slice it into thin rounds. These slices can be grilled briefly alongside the chicken during the last few minutes of cooking, or they can be served fresh.
Grilling the lemon slices briefly will soften them and bring out their natural sweetness, reducing their tartness. Place them on the grill for about 1-2 minutes per side, just until they develop light grill marks and become slightly softened. Be careful not to overcook them, as they can become bitter.
These grilled or fresh lemon slices serve as a beautiful garnish for the finished dish. They can be placed on top of the chicken or served on the side, allowing diners to squeeze additional fresh lemon juice over their portion if they desire an even more intense lemon flavor. They also add a wonderful aromatic quality to the presentation.
Pro Tips for grilled lemon chicken
Quality Ingredients Matter: Always opt for fresh lemons rather than bottled juice for the most vibrant and authentic flavor. Similarly, use fresh garlic and parsley for the best aromatic punch. The difference in taste is significant.
Don’t Overcrowd the Grill: Giving each piece of chicken enough space on the grill allows for even cooking and proper searing. Overcrowding leads to steaming and prevents the development of a beautiful, flavorful crust. This is a fundamental rule for successful grilling.
Marinating Time is Key: While four hours is a good minimum, marinating overnight is highly recommended for deeply flavored, tender chicken. The acid in the lemon juice works to tenderize the meat, so don’t marinate for too long, as it can make the chicken mushy. Aim for 4-12 hours for best results.
Achieve Perfect Grill Marks: Ensure your grill is sufficiently hot before placing the chicken on it. Let the chicken sear undisturbed for the initial cooking time on each side to create those appealing crosshatch grill marks that are a hallmark of well-grilled food. Patience here pays off visually and texturally.
Resting is Non-Negotiable: Do not skip the resting period after cooking. This allows the juices to redistribute throughout the chicken, resulting in a significantly more tender and moist final product. Cutting too soon will cause all those delicious juices to escape onto the cutting board.
Serving Suggestions for grilled lemon chicken
Decoration
Garnish the grilled lemon chicken generously with freshly chopped parsley for a pop of green and added freshness. A few extra grilled lemon slices placed artfully on top can enhance the dish’s visual appeal and aroma. You can also add a sprinkle of finely grated lemon zest over the finished dish for an extra burst of citrus fragrance.
Side Dishes
This chicken pairs beautifully with a variety of side dishes. Consider serving it over fluffy Mediterranean rice or a savory brown rice pilaf to absorb the delicious marinade juices. Roasted vegetables like asparagus, broccoli florets, or colorful bell peppers are also excellent companions, providing a healthy and vibrant contrast.
For a heartier meal, classic roasted potatoes or a creamy potato salad offer a comforting element. Pasta dishes, such as a simple lemon garlic pasta or a creamy tortellini alfredo, also benefit from the addition of this flavorful grilled chicken. The bright lemon notes cut through richer pasta sauces beautifully.
To complement the zesty flavors, a fresh, crisp salad is always a winner. A Greek salad with cucumbers, tomatoes, and olives, or a simple mixed greens salad with a light vinaigrette, provides a refreshing counterpoint. Consider a Southwest quinoa salad for a protein-packed, flavorful option that travels well to picnics.
Creative Serving Ideas
Shred or thinly slice the leftover grilled lemon chicken and use it as a vibrant filling for tacos or fajitas. The tangy chicken adds an unexpected but delightful twist to these Mexican favorites. Serve it in warm tortillas with your favorite toppings like salsa, avocado, and a dollop of sour cream.
Another creative idea is to chop the chicken and toss it into a pasta salad or a grain bowl. It adds a substantial protein element and a bright, fresh flavor that elevates simple salads into a complete meal. This is perfect for packed lunches or light summer dinners, easily found under lunch options.
Consider serving the grilled lemon chicken alongside a selection of dips and spreads. It can be served cubed or sliced with hummus, tzatziki, or a smoky baba ghanoush, accompanied by warm pita bread or vegetable sticks. This makes for an excellent appetizer platter or a relaxed mezze-style meal, perfect for sharing with friends.
Preparation & Storage
Storing Leftovers
Once the grilled lemon chicken has cooled completely to room temperature, store it in an airtight container in the refrigerator. Properly stored, the leftovers should remain fresh and delicious for up to 4 days. Ensure the container is sealed tightly to prevent the chicken from drying out and to maintain its flavor.
It’s best to store the chicken whole or in larger pieces if possible, as slicing it beforehand can sometimes lead to a drier texture upon reheating. However, if you’ve already sliced it for serving, it will still be perfectly enjoyable, just be mindful of the reheating process to avoid overcooking.
Many people enjoy leftover lemon chicken cold, especially over salads or in sandwiches. The flavors tend to meld and deepen overnight, making it a versatile ingredient for subsequent meals. This makes it an ideal choice for meal prepping lunches for the week.
Freezing
While this grilled lemon chicken is best enjoyed fresh, it can be frozen for longer storage. Ensure the chicken is completely cooled before packaging it for the freezer. Wrap individual portions tightly in plastic wrap or aluminum foil, then place them inside a heavy-duty freezer bag, squeezing out as much air as possible.
Label the bag with the date and contents. Properly frozen chicken can maintain good quality for up to 2-3 months. Keep in mind that freezing and thawing can slightly alter the texture, potentially making it a bit softer than when it was freshly grilled.
When you’re ready to use frozen chicken, thaw it overnight in the refrigerator for the best and safest results. Avoid thawing at room temperature, as this can promote bacterial growth. Once thawed, it can be reheated as described below.
Reheating
To reheat leftover grilled lemon chicken and maintain its moisture, avoid microwaving it for too long in one go. Instead, heat it in short, 30-second intervals, stirring or flipping the chicken between each interval, until it is heated through. This method helps to prevent it from becoming tough or dry.
Alternatively, you can reheat the chicken in a preheated oven. Place the chicken in a baking dish and warm it in an oven set to 350°F (175°C) for about 10-15 minutes, or until it reaches your desired serving temperature. You can add a tablespoon of chicken broth or water to the dish to help keep the chicken moist during reheating.
If the chicken has been frozen and thawed, reheating might require a slightly longer time. Always ensure the chicken is steaming hot throughout before serving to guarantee it’s safe to consume. The goal is to warm it through without overcooking it, which can compromise its tenderness.
Frequently Asked Questions
-
Can I use different cuts of chicken for this recipe?
Absolutely! While the recipe is written for boneless, skinless chicken breasts, you can easily adapt it for other cuts. Grilled chicken thighs are a fantastic alternative, offering a richer flavor and staying exceptionally moist. If using bone-in chicken pieces or a whole spatchcock chicken, you will need to adjust the marinating time and grilling duration significantly, as bone-in cuts and larger pieces take longer to cook through. Always use a meat thermometer to ensure all chicken reaches an internal temperature of 165°F (74°C).
-
What can I do if I don’t have an outdoor grill?
Don’t worry if you don’t have an outdoor grill! This recipe is very forgiving and can be successfully prepared indoors using a cast-iron grill pan or even a regular non-stick skillet. Preheat the pan over medium-high heat, sear the chicken for a few minutes on each side until browned, and then finish cooking it in a preheated oven at 350°F (175°C) for about 15-20 minutes, or until cooked through. You’ll still achieve a lovely char and delicious flavor, similar to outdoor grilling, making it a convenient option for any kitchen, perfect for a weeknight dinner.
-
How can I make the chicken even more flavorful or add a spicy kick?
To enhance the flavor, consider adding a teaspoon of Dijon mustard to the marinade for a little tanginess, or a pinch of smoked paprika for depth. For a spicy kick, incorporate red pepper flakes into the marinade or a finely chopped fresh chili pepper. You can also experiment with different fresh herbs like thyme or rosemary alongside the parsley. Another great way to add complexity is by adding a tablespoon of Worcestershire sauce or a splash of soy sauce to the marinade for an umami boost.