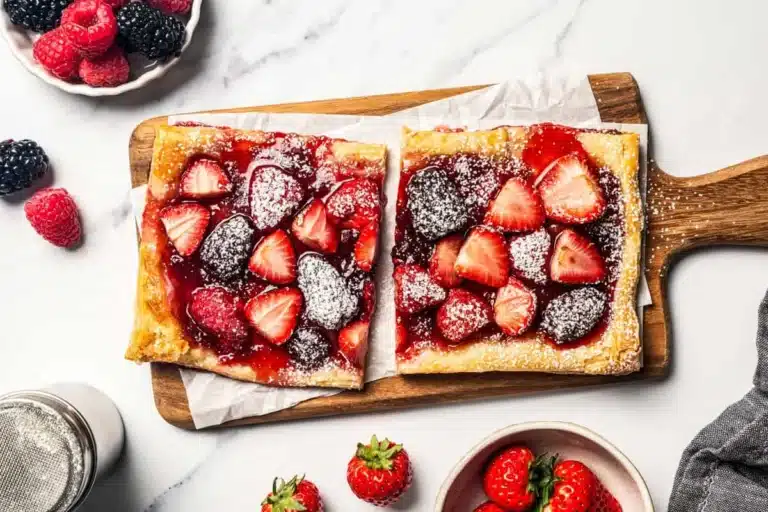
Erdbeer Törtchen mit weißer Schokolade – Ein leckerer Genuss für jeden Anlass – Muma’s Kitchen

Imagine a delicate, sweet treat that perfectly captures the essence of spring and summer. These Strawberry and White Chocolate Tarts, or “Erdbeer Törtchen mit weißer Schokolade” as they are known in Germany, are just that – a symphony of vibrant fruit and luscious cream.
They are more than just a dessert; they are a miniature work of art, designed to delight both the eyes and the palate. With their light texture and balanced sweetness, they offer a sophisticated yet incredibly approachable indulgence for any occasion.
Why You Will Love This Recipe
- Effortless Elegance: Despite their beautiful presentation, these tarts are surprisingly simple to assemble, making them perfect for both beginner bakers and seasoned pros looking for a quick yet impressive dessert.
- Seasonal Delight: Bursting with the fresh, juicy flavor of ripe strawberries, these tarts are a quintessential celebration of strawberry season, bringing the taste of sunshine to your table.
- Creamy Dream: The luscious white chocolate cream provides a rich, velvety counterpoint to the bright strawberry flavor, creating a harmonious and irresistible combination that melts in your mouth.
- Light and Airy Texture: Built upon a base of delicate ladyfingers, these tarts are wonderfully light, ensuring they won’t weigh you down, making them an ideal dessert even after a substantial meal.
- Customizable Charm: This recipe serves as a fantastic canvas for your creativity, allowing for easy adjustments and additions to suit your personal preferences or dietary needs.
Ingredients You Need
Crafting these exquisite Strawberry and White Chocolate Tarts begins with selecting the finest ingredients to ensure a truly memorable flavor experience. Quality matters when it comes to showcasing the natural sweetness of strawberries and the subtle richness of white chocolate. Each component plays a vital role in the final texture and taste, from the crisp base to the silken filling.
Strawberry and White Chocolate Mini Cakes
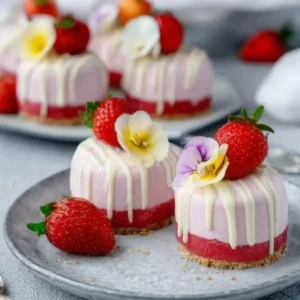
Delicate strawberry and white chocolate mini cakes on a ladyfinger base. These small masterpieces combine the fresh sweetness of strawberries and the creamy texture of white chocolate on a tender ladyfinger base. They are easy to prepare and offer an unparalleled taste that impresses both visually and culinarily. Ideal for special occasions, as a sweet dessert after a festive dinner, or as a treat for a relaxed afternoon – these mini cakes are a true delight.
- 200 g ladyfingers
- 100 g butter
- 300 g strawberries
- 75 g sour cream
- 200 g yogurt (3.5%)
- 75 g sugar
- 2 tbsp Limoncello
- 150 g cold whipping cream (32%)
- 5 sheets white gelatin or plant-based alternative
- 250 g yogurt
- 125 g sour cream
- 100 g white couverture
- 1 packet vanilla sugar
- 2 tbsp sugar
- 150 g cold whipping cream (32%)
- 5 sheets white gelatin or plant-based alternative
- Strawberries and edible flowers for decoration
- Some butter and powdered sugar for the dessert rings
- 1Grease the dessert rings with butter and sprinkle with powdered sugar.
- 2Finely grind the ladyfingers in a food processor and mix with the melted butter. Press the mixture firmly into the dessert rings to form an even base.
- 3For the white chocolate cream, mix yogurt, sour cream, vanilla sugar, and sugar.
- 4Melt the white couverture in a water bath, let it cool slightly, then stir it into the yogurt mixture.
- 5Soak the gelatin in cold water, squeeze it out, and dissolve it over low heat. Stir slowly into the yogurt mixture and mix well. Let the mixture rest in the refrigerator for about 10 minutes.
- 6Whip the cold whipping cream until stiff and gently fold it into the white chocolate cream.
- 7Fill the dessert rings with the white chocolate cream and place them in the refrigerator for 30 minutes.
- 8For the strawberry cream, puree the strawberries and strain the mixture through a sieve.
- 9Mix the strawberry puree with yogurt, sour cream, Limoncello, and sugar.
- 10Soak the gelatin for the strawberry cream in cold water and dissolve it in a small pot.
- 11Whip the cream until stiff and gently fold it into the strawberry cream.
- 12Fill the dessert rings with the strawberry cream and let the mini cakes set overnight in the refrigerator.
- 13Carefully remove the finished strawberry mini cakes from the dessert rings and decorate with fresh strawberries and edible flowers.
Keywords: strawberry, white chocolate, mini cake, dessert, no-bake, German cuisine, vegetarian, elegant
- ladyfingers: the foundation for a light and airy base, providing a delicate crunch.
- butter: melted to bind the ladyfinger crumbs into a cohesive and satisfying crust.
- strawberries: the star of the show, offering vibrant color and a burst of fresh, fruity flavor.
- sour cream: adds a subtle tang and creamy richness to the strawberry layer, balancing the sweetness.
- yogurt (3.5%): contributes to the smooth texture of both the strawberry and white chocolate creams, keeping them light.
- sugar: enhances the natural sweetness of the fruits and balances the richness of the chocolate.
- limoncello: an optional but highly recommended liqueur that adds a sophisticated citrus note to the strawberry layer.
- cold whipping cream (32%): whipped to perfection, it provides the essential fluffy and decadent texture to the creams.
- white gelatin sheets or vegan alternative: crucial for setting the creams to a perfect, sliceable consistency.
- white couverture chocolate: the premium choice for melting, it ensures a superior smooth texture and rich white chocolate flavor.
- vanilla sugar: infuses a classic, comforting sweetness into the white chocolate cream.
- butter and powdered sugar: used for preparing the dessert rings, ensuring easy release of the finished tarts.
- edible flowers: for a beautiful and elegant final flourish, adding a touch of natural artistry.
The precise quantities for each ingredient are detailed within the accompanying recipe card, ensuring you have all the information needed for perfect execution.
Variations
The beauty of these Erdbeer Törtchen mit weißer Schokolade lies in their inherent versatility. They are a delightful base for culinary creativity, allowing you to tailor them to various tastes and dietary requirements. Consider transforming them into a truly vegan delight by swapping out the dairy and gelatin.
For a vegan rendition, opt for a plant-based yogurt and sour cream alternative, and use vegan white chocolate. Agar-agar can effectively replace the gelatin, providing the necessary structure. This approach ensures that everyone can enjoy a slice of this delightful dessert, irrespective of dietary choices.
If you’re seeking a lower-carbohydrate option, modifying the base is key. Instead of a traditional ladyfinger crust, consider a base made from almond flour, a touch of coconut flour, and a sweetener like erythritol or stevia, bound together with melted butter or coconut oil. This adaptation significantly reduces the sugar and carbohydrate content while maintaining a satisfying texture.
Another exciting variation involves infusing the white chocolate cream with complementary flavors. A hint of lemon zest can add a brighter, more zesty profile that cuts through the richness of the chocolate beautifully. Alternatively, a whisper of mint extract can bring a refreshing coolness, perfect for a warm summer’s day. These subtle additions can elevate the tarts to new levels of sophisticated flavor complexity.
How to Prepare Erdbeer Törtchen mit weißer Schokolade
Step 1: Preparing the Base for Success
Begin by meticulously preparing your dessert rings. A light coating of butter, followed by a dusting of powdered sugar, ensures that your beautiful tarts will release cleanly from their molds without any sticking. This small but crucial step guarantees a professional finish to your creations.
Next, transform the ladyfingers into fine crumbs. A food processor or a quick blitz in a blender works wonders for this task. Once you have your ladyfinger dust, it’s time to bind it together. Melt the butter until it’s just liquid and then thoroughly combine it with the ladyfinger crumbs. This mixture will form the sturdy yet delicate foundation for your tarts.
Press this buttery crumb mixture firmly and evenly into the bottom of your prepared dessert rings. Aim for a compact, uniform layer that will hold its shape. This process is where the structure of your tart begins to take form, creating a delightful contrast to the smooth creams that will follow. Ensure the base is solid and well-compacted for the best results.
Step 2: Crafting the Luscious White Chocolate Cream
In a bowl, combine the yogurt and sour cream until smooth. Add the vanilla sugar and regular sugar, stirring until well incorporated. This forms the creamy base for your white chocolate infusion, setting the stage for its delightful richness.
Gently melt the white couverture chocolate in a double boiler or a heatproof bowl set over simmering water. Stir continuously until it’s completely smooth and glossy. Allow the melted chocolate to cool slightly; this is crucial to prevent it from seizing when added to the cooler dairy mixture. Once tempered, slowly whisk the slightly cooled white chocolate into the yogurt and sour cream mixture until you achieve a perfectly homogenous and velvety consistency.
Meanwhile, prepare the gelatin. Submerge the gelatin sheets in cold water and let them soak for about five minutes until softened. Squeeze out any excess water from the bloomed gelatin. In a small saucepan over very low heat, gently dissolve the gelatin, stirring constantly until it’s completely liquid and clear. Be careful not to overheat the gelatin, as this can diminish its setting power.
Slowly and steadily, drizzle the dissolved gelatin into the white chocolate and yogurt mixture while whisking continuously. Ensure it’s thoroughly combined, creating a smooth and stable base for your cream. Allow this mixture to rest in the refrigerator for approximately 10 minutes to begin to thicken slightly, which will help it set evenly.
In a separate, chilled bowl, whip the cold heavy cream until stiff peaks form. Be careful not to over-whip, as this can result in a grainy texture. Gently fold the whipped cream into the white chocolate mixture in two or three additions. This technique preserves the airiness of the cream, ensuring a light and fluffy final product. Fold until just combined, avoiding overmixing.
Carefully spoon or pipe this luscious white chocolate cream into your prepared dessert rings, filling them evenly over the ladyfinger base. Smooth the tops with a spatula for a neat finish. Place these filled rings into the refrigerator and chill for at least 30 minutes. This initial chilling period allows the white chocolate cream to set partially, creating a stable layer for the subsequent strawberry cream.
Step 3: Preparing the Vibrant Strawberry Cream
While the white chocolate layer is chilling, it’s time to create the vibrant strawberry cream. Start by pureeing the fresh strawberries until they are completely smooth. For an exceptionally silky texture, pass the strawberry puree through a fine-mesh sieve. This removes any seeds or fibrous bits, ensuring a flawless creaminess.
In a clean bowl, combine the sieved strawberry puree with yogurt, sour cream, Limoncello (if using), and sugar. Stir everything together until the mixture is well-blended and the sugar has dissolved. The Limoncello adds a delightful hint of citrus that perfectly complements the strawberries, but feel free to omit it if you prefer.
Now, prepare the gelatin for the strawberry layer using the same method as before. Soak the gelatin sheets in cold water until softened, then squeeze out the excess moisture. Gently dissolve the bloomed gelatin in a small saucepan over low heat until it’s completely liquid. Again, avoid overheating the gelatin.
Gradually whisk the dissolved gelatin into the strawberry mixture. Ensure it is thoroughly incorporated to guarantee an even set throughout the cream. This step is critical for achieving the perfect texture for your strawberry layer, making it stable yet delightfully yielding.
In a separate chilled bowl, whip the remaining cold heavy cream until stiff peaks form. As with the white chocolate cream, be careful not to over-whip. Gently fold the whipped cream into the strawberry mixture. Incorporate it in stages, using a spatula to delicately lift and fold the cream into the strawberry base. This careful folding preserves the airy quality of the whipped cream, contributing to the overall lightness of the tart.
Once the white chocolate layer has had its initial chilling period, carefully spoon or pipe the strawberry cream over the set white chocolate layer within the dessert rings. Fill them to the top, creating a beautiful two-toned effect. Gently smooth the surface of the strawberry cream for a polished appearance.
Step 4: Allowing Time for Perfection
This is perhaps the most crucial step in achieving perfectly set tarts: patience. Once the dessert rings are filled with both layers, it’s imperative to allow them adequate time to set. Place the filled rings back into the refrigerator.
For the best results, and to ensure the creams are firm and the flavors have melded beautifully, it is highly recommended to chill the tarts overnight. This extended chilling period allows the gelatin to work its magic, transforming the liquid creams into luscious, sliceable desserts. A minimum of six hours is usually sufficient if time is short, but overnight is truly ideal.
During this time, the delicate flavors of strawberry and white chocolate will fully develop and harmonize. The textures will firm up, allowing for clean cuts and a satisfying mouthfeel when served. This patient approach is what elevates a good tart to an exceptional one, ensuring it holds its shape and offers a delightful sensory experience.
Step 5: The Grand Finale – Decoration and Presentation
Once the tarts have achieved their perfect set, it’s time for the artful presentation. Gently remove the tarts from their dessert rings. If you prepared them correctly with butter and powdered sugar, they should slide out effortlessly.
Arrange fresh, ripe strawberries atop each tart. You can halve them, quarter them, or slice them thinly, depending on your aesthetic preference. Consider adding a few delicate edible flowers, such as pansies or violas, for an extra touch of natural beauty and color. These decorative elements not only enhance the visual appeal but also hint at the fresh, fruity flavors within.
The goal is to create a visually stunning dessert that hints at the deliciousness contained within. A few strategically placed berries and a sprinkle of edible flowers can transform a simple tart into a masterpiece. Step back and admire your handiwork – these little treasures are ready to be savored.
Step 6: Serving Your Masterpieces
These Strawberry and White Chocolate Tarts are best served chilled, allowing their refreshing flavors and creamy textures to be fully appreciated. They are perfect as a stand-alone dessert, offering a light and elegant conclusion to any meal. The interplay of sweet strawberries and rich white chocolate provides a sophisticated taste experience.
Consider pairing them with a delicate beverage that complements their flavors without overpowering them. A crisp white wine, a glass of sparkling rosé, or even a simple cup of good quality coffee or tea can enhance the tasting experience. The slight tang from the Limoncello or a hint of citrus from lemon zest variations can also be beautifully highlighted by these accompaniments.
For a truly special occasion, these tarts can be part of a larger dessert spread. They offer a lighter alternative to heavier cakes or pastries and provide a beautiful burst of color. Their individual portion size makes them ideal for elegant dinner parties or intimate gatherings, ensuring each guest receives a perfectly formed and exquisitely flavored treat.
Pro Tips for Erdbeer Törtchen mit weißer Schokolade
Optimal Gelatin Handling: When dissolving your gelatin, remember that low and slow is the key. Overheating gelatin can denature its proteins, reducing its ability to set the creams properly. Ensure it melts smoothly into a clear liquid without boiling. This careful approach is vital for achieving the perfect, wobble-free texture.
Strawberry Selection: The quality of your strawberries directly impacts the final flavor. Always opt for the ripest, most fragrant berries you can find, ideally in season. Their natural sweetness will reduce the need for added sugar and provide a more intense, authentic strawberry taste. If using frozen strawberries, ensure they are thoroughly thawed and drained to avoid excess water diluting your puree.
Chilling is Crucial: Do not rush the chilling process. The overnight refrigeration is not just a suggestion; it’s essential for the tarts to set properly. This extended period allows the gelatin to fully hydrate and firm up the creams, resulting in clean slices and a satisfying mouthfeel. Impatience here will lead to a softer, less structured tart.
Base Texture Control: For a crisper base, you can lightly toast the ladyfinger crumbs mixed with butter in a preheated oven for about 5-7 minutes before pressing them into the rings. Allow them to cool completely before proceeding. This step adds an extra layer of texture and prevents the base from becoming soggy, especially if preparing the tarts a day in advance.
Cream Folding Technique: When folding the whipped cream into your base mixtures, use a gentle, deliberate motion. Start by lightening the base mixture with about a third of the whipped cream, then fold in the remaining cream in two stages. This prevents deflating the whipped cream and ensures a light, airy texture in your final tarts. Overmixing will result in a denser, less appealing cream.
Serving Suggestions for Erdbeer Törtchen mit weißer Schokolade
Decoration
The aesthetic appeal of these tarts can be significantly enhanced with thoughtful decoration. Fresh, vibrant strawberries are the natural choice, and they can be arranged in various ways – halved, quartered, sliced into elegant fans, or even small strawberry rosettes. For an extra touch of gourmet elegance, consider garnishing with a few carefully selected edible flowers, such as pansies, violets, or borage blossoms, which add a splash of color and a delicate visual flourish.
A light dusting of powdered sugar can mimic a gentle snowfall, adding a classic finish. For a richer look, a few curls of white chocolate or a drizzle of strawberry coulis can provide visual depth and hint at the flavors within. The key is to complement, not overwhelm, the natural beauty of the tarts themselves.
Side Dishes
These individual tarts are often served as a complete dessert, but they pair wonderfully with certain accompaniments. A dollop of unsweetened whipped cream or a spoonful of vanilla bean crème fraîche can add a lovely textural contrast and a subtle richness. For those who enjoy a bit of crunch, a small scattering of toasted slivered almonds or finely chopped pistachios can provide a delightful counterpoint to the soft creams and fruits.
A light, refreshing mint sprig can also add a pop of color and a hint of cooling aroma. Consider serving alongside a small fruit salad composed of complementary berries like raspberries or blueberries, allowing guests to enjoy a medley of fresh fruit flavors. The goal is to enhance, not compete with, the delicate profile of the tart.
Creative Serving Ideas
Elevate the serving experience by presenting these tarts on elegant dessert plates or mini cake stands. For a whimsical touch, serve them on small individual platters, perhaps with a tiny sugar cookie nestled beside each one. They can also be incorporated into a larger dessert buffet, offering a lighter, fruit-focused option among richer pastries and cakes. Imagine a dessert table adorned with these vibrant little jewels, creating a stunning centerpiece.
For a more interactive experience, consider a “build-your-own” tart station where guests can add their own decorative elements. Offer a selection of berries, chocolate shavings, mint leaves, and perhaps a small pitcher of berry coulis for drizzling. This adds a fun, personalized element that guests of all ages will enjoy. They are also perfect for afternoon tea, offering a sophisticated bite-sized indulgence alongside a pot of fragrant tea.
Preparation & Storage
Storing Leftovers
Should you be fortunate enough to have any leftover Erdbeer Törtchen mit weißer Schokolade, proper storage is key to maintaining their delightful texture and flavor. It is best to store them in an airtight container in the refrigerator. This prevents them from drying out and absorbing unwanted odors from other foods in your fridge.
The delicate balance of creams and the ladyfinger base mean these tarts are best enjoyed within two to three days of preparation. While they will remain safe to eat for longer, their texture may begin to degrade. The ladyfinger base might become softer, and the creams could lose some of their initial firmness. For optimal enjoyment, aim to consume them within this timeframe.
Freezing
Due to the dairy and gelatin components, these Strawberry and White Chocolate Tarts are not ideal candidates for freezing. Freezing can significantly alter the texture of the creams, leading to a watery or grainy consistency upon thawing. The gelatin structure can also be compromised by the freezing and thawing process, resulting in a loss of firmness.
The ladyfinger base may also become soggy after being frozen and thawed. For the best possible outcome and to maintain the intended quality and taste of these delicate desserts, it is strongly advised to consume them fresh or store them properly in the refrigerator as outlined above. Freezing is best reserved for baked goods that are more resilient to temperature changes.
Reheating
Reheating is generally not recommended or necessary for these chilled tarts. They are designed to be served cold to best enjoy the refreshing contrast between the cool creams and the fresh strawberries. If the tarts have become too firm in the refrigerator, a brief period at room temperature (about 15-20 minutes) is sufficient to soften them slightly to the desired consistency.
Attempting to heat them in an oven or microwave would melt the creams and destroy their structure, turning them into a liquid mess. The purpose of the gelatin is to set the creams at a chilled temperature, and applying heat would reverse this process. Enjoy them straight from the refrigerator for the intended delightful experience.
Frequently Asked Questions
-
Can I make these Erdbeer Törtchen mit weißer Schokolade ahead of time, and if so, how long do they keep?
Absolutely, these tarts are ideal for making ahead, which is a great advantage for entertaining. For the best texture and flavor, it is highly recommended to prepare them at least the day before serving. This allows the gelatin to fully set the creams, ensuring they are firm and slice beautifully, and also gives the flavors time to meld together harmoniously. As mentioned in the storage section, they will keep well in an airtight container in the refrigerator for up to three days. However, the ladyfinger base may soften slightly over time, so consuming them within the first two days is optimal for the crispiest base experience.
-
What are the best alternatives to gelatin for this recipe, especially if I want to make it vegetarian or vegan?
There are several excellent alternatives to gelatin that work wonderfully for setting creams and mousses, making your Erdbeer Törtchen suitable for vegetarian and vegan diets. The most popular and effective is agar-agar, a seaweed-derived gelling agent. You will typically need to use about 1 teaspoon of agar-agar powder for every cup (240ml) of liquid to achieve a similar set to gelatin. Agar-agar needs to be boiled for a minute or two to activate its gelling properties before being incorporated into your mixture. Another option is a commercial vegan gelling agent specifically designed for desserts, which often provides a straightforward 1:1 substitution for gelatin. Ensure you follow the package instructions carefully, as strengths can vary. Both methods will help create a stable, delightful cream for your tarts.
-
How can I ensure my white chocolate cream is perfectly smooth and not grainy or seized?
Achieving a smooth white chocolate cream relies on a few key techniques. Firstly, always use good quality white chocolate, preferably a couverture chocolate, as it contains a higher percentage of cocoa butter and melts more smoothly. When melting, use a gentle method like a double boiler or microwave on low power in short bursts, stirring frequently. Crucially, allow the melted chocolate to cool slightly before incorporating it into the dairy mixture. If the chocolate is too hot, it can cause the dairy to split or the chocolate to seize, resulting in a grainy texture. Whisking the melted chocolate gently but continuously into the base mixture until fully combined is also important. If your chocolate does seize slightly, you can sometimes rescue it by whisking in a tablespoon or two of warm milk or a neutral oil until it smooths out, though this is not always successful.