Christmas Coconut Layer Cake
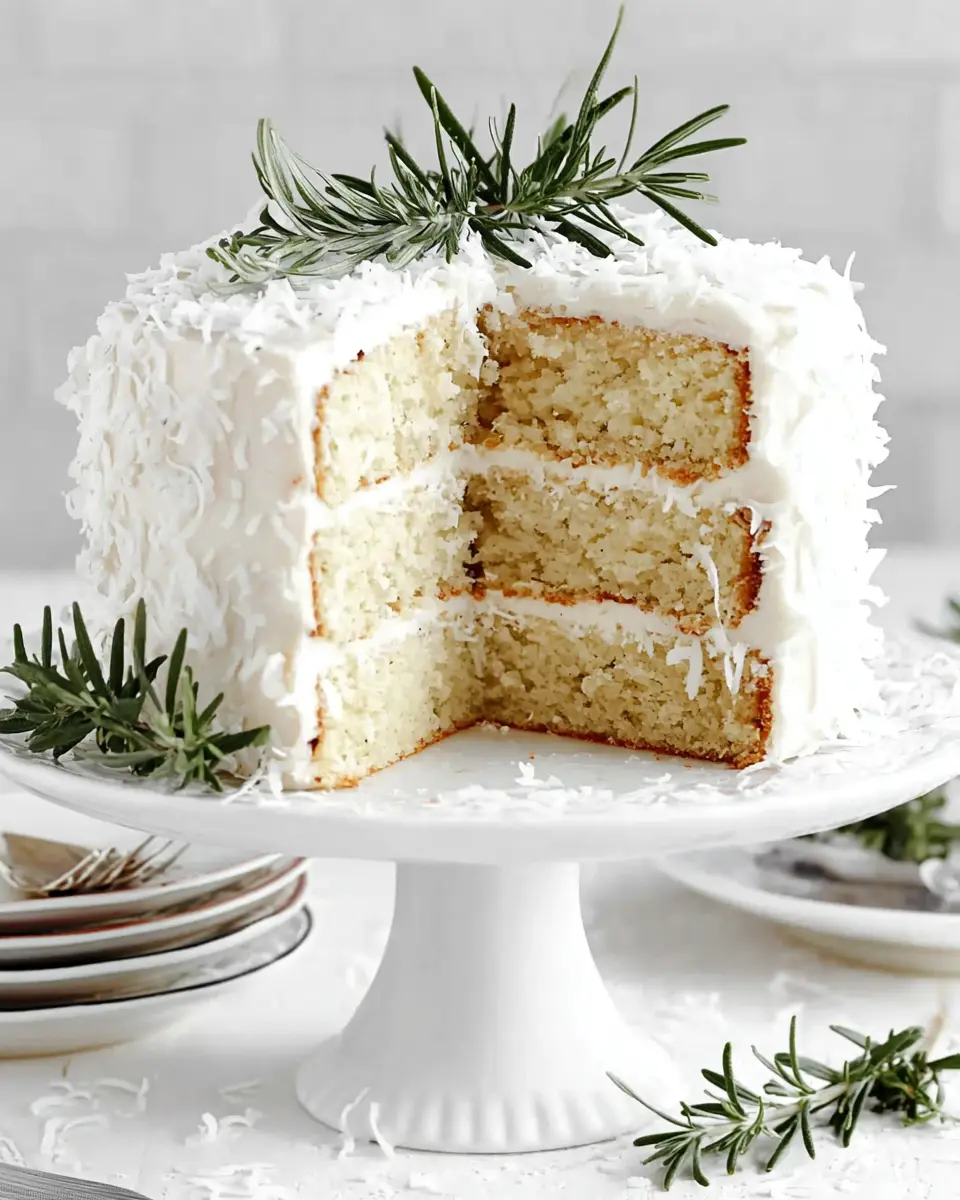
Christmas Coconut Cake is a festive, make-ahead friendly holiday dessert with a soft buttery crumb, rich coconut flavor, and a creamy coconut-cream cheese frosting that feels special without being fussy. It is the kind of showpiece cake that looks beautiful on a holiday table and still tastes even better the next day.
This is a lovely choice when you want something classic, cozy, and a little more elegant than a standard frosted cake. The coconut keeps everything feeling rich and celebratory, while the tang from the cream cheese frosting balances the sweetness.
Why You Will Love This Recipe
- Festive Appeal: The snowy coconut exterior and optional rosemary garnish give this cake a truly magical holiday look, perfect for any Christmas gathering.
- Incredible Flavor: A delightful balance of rich coconut, tender cake, and tangy cream cheese frosting makes every bite a celebration.
- Make-Ahead Friendly: Bake the layers in advance, frost later, and even freeze for stress-free entertaining during the busy holiday season.
- Moist & Tender Crumb: The combination of buttermilk, coconut cream, and carefully whipped egg whites ensures a wonderfully light and moist texture that melts in your mouth.
- Elegant Simplicity: While it looks sophisticated, this cake is surprisingly straightforward to make, offering a beautiful centerpiece without demanding complex decorating skills.
Ingredients You Need
Crafting this exquisite Christmas Coconut Cake begins with selecting the finest ingredients. Using quality components ensures a superior flavor and texture, transforming simple elements into a festive masterpiece. Quality butter contributes to a rich, tender crumb, while fresh eggs provide structure and lift.
Christmas Coconut Cake
A festive and make-ahead friendly holiday dessert with a soft, buttery crumb, rich coconut flavor, and a creamy coconut-cream cheese frosting. This showpiece cake looks beautiful on a holiday table and tastes even better the next day. It's a classic, cozy, and elegant choice for celebrations.
- For the cake: 1 cup softened unsalted butter
- 1 cup buttermilk
- 1 teaspoon baking powder
- 1 3/4 cups granulated sugar
- 1/2 teaspoon bicarbonate of soda
- 4 large eggs (yolks and whites separated)
- 2 teaspoons vanilla essence
- 1/2 teaspoon salt
- 1 cup sweetened coconut cream
- 2 3/4 cups all-purpose flour
- 1 teaspoon coconut flavoring
- For the frosting: 2 pounds icing sugar
- 8 ounces cream cheese (softened)
- 1/2 cup unsalted butter (at room temperature)
- 1/4 teaspoon salt
- 1 teaspoon vanilla essence
- 1/2 cup sweetened coconut cream
- For the garnish: 4 cups unsweetened shredded coconut
- 4 sprigs rosemary (optional)
- 1Preheat oven to 350°F (175°C). Grease and flour two 9-inch or three 6-inch cake pans.
- 2Beat egg whites until stiff peaks form. Set aside.
- 3Cream butter and sugar until pale and fluffy. Add coconut cream, egg yolks, coconut flavoring, and vanilla essence; beat until smooth.
- 4Whisk together flour, baking powder, bicarbonate of soda, and salt in a separate bowl.
- 5Alternately add dry ingredients and buttermilk to the butter mixture, mixing on low speed until just combined. Gently fold in the beaten egg whites.
- 6Divide batter evenly between prepared pans. Bake for about 45 minutes, or until a toothpick inserted into the center comes out clean. Let cakes cool completely.
- 7To make frosting: Beat butter and cream cheese until light and fluffy. Add coconut cream, vanilla essence, salt, and icing sugar; beat until smooth and airy.
- 8Assemble the cake by spreading frosting between layers and then covering the top and sides.
- 9Press shredded coconut all over the outside of the cake.
- 10Optionally, arrange rosemary sprigs on top for a festive holiday look.
Keywords: Christmas Coconut Cake, Coconut Cake, Holiday Cake, Festive Dessert, Make-Ahead Dessert, Cream Cheese Frosting, Layer Cake, German Baking
- unsalted butter: provides the cake with a rich base and helps create that soft, classic holiday crumb.
- granulated sugar: sweetens the layers and supports the light texture when creamed with the butter.
- eggs, separated: the yolks enrich the batter, and the whipped whites are crucial for an airy cake.
- sweetened coconut cream: imparts the primary coconut flavor and adds extra richness to both the cake and the frosting.
- vanilla essence and coconut flavoring: these enhance the overall flavor profile, making the cake fragrant and dessert-shop worthy.
- all-purpose flour: provides the necessary structure for the cake layers without making them feel dense or heavy.
- baking powder and bicarbonate of soda: these leavening agents work in tandem to give the cake a beautiful lift and a tender rise.
- salt: balances the sweetness and amplifies the distinct coconut flavor.
- buttermilk: adds moisture and a gentle tang, resulting in a softer and more flavorful crumb.
- cream cheese: lends the frosting a wonderfully creamy, slightly tangy finish that perfectly complements the coconut.
- icing sugar: transforms the frosting into a smooth, fluffy, and perfectly sweet topping that enhances the simple cake layers.
- unsweetened shredded coconut: creates the cake’s signature snowy finish and adds delightful visual texture.
- rosemary sprigs: an optional garnish that provides a beautiful, woodland-style holiday aesthetic to the finished cake.
The precise quantities for each ingredient are detailed within the provided recipe card, ensuring you have all the information needed for baking success.
Variations
This classic Christmas Coconut Cake serves as a fantastic base for culinary creativity, allowing for delightful variations to suit different tastes and dietary needs. Imagine adapting it into a vegan delight.
To achieve a vegan version, the key is substituting animal products with plant-based alternatives. Unsalted butter can be replaced with a high-quality vegan butter or coconut oil, ensuring a similar richness. For the eggs, a flax egg (one tablespoon of ground flaxseed mixed with three tablespoons of water, left to sit for five minutes) or a commercial egg replacer can be used for binding and structure. The buttermilk can be swapped for a plant-based milk mixed with a tablespoon of apple cider vinegar or lemon juice, allowed to curdle for a few minutes. Ensure your frosting also uses vegan cream cheese and vegan butter, and confirm that the sweetened coconut cream is dairy-free.
For those following a low-carb lifestyle, this cake offers an exciting challenge. Substituting traditional flour with almond flour or coconut flour is the primary step. Almond flour will yield a slightly denser, moister cake, while coconut flour requires more liquid due to its absorbent nature. Granulated sugar can be replaced with a low-carb sweetener like erythritol, xylitol (use with caution if you have pets, as it’s toxic to dogs), or a blend of stevia and monk fruit. Be mindful that sugar substitutes can sometimes alter the texture, so a small amount of psyllium husk might be beneficial to improve binding and structure. For the frosting, opt for a low-carb sweetener in place of icing sugar, and ensure your cream cheese and coconut cream are free of added sugars.
Another delightful adaptation could be a gluten-free version. This involves replacing all-purpose flour with a good quality gluten-free flour blend that contains xanthan gum. Alternatively, a combination of rice flour, almond flour, and tapioca starch can create a well-balanced gluten-free crumb. Ensure all other ingredients, particularly any pre-made flavorings or extracts, are certified gluten-free to avoid cross-contamination. This ensures everyone can enjoy a slice of festive cheer, regardless of dietary preferences.
How to Prepare Christmas Coconut Cake
Step 1: Preparing Your Pans and Preheating the Oven
The foundation of any great cake lies in proper preparation, and this festive creation is no exception. Begin by preheating your oven to the specified temperature of 350°F (175°C). This ensures a consistent and even baking environment from the moment the cake batter enters the oven, crucial for achieving that perfect rise and tender crumb.
Next, focus on your cake pans. You will need either two 9-inch round cake pans or three 6-inch round cake pans, depending on your desired presentation and cake height. Generously grease the interior of each pan with softened butter or non-stick baking spray. Follow this with a light dusting of all-purpose flour, tapping out any excess. This dual method of greasing and flouring creates a non-stick barrier that prevents the delicate cake layers from adhering to the pan.
For an added layer of insurance against sticking, and to facilitate easier removal of the cooled cake layers, consider lining the bottom of each pan with a circle of parchment paper. Trace the bottom of the pan onto parchment paper, cut out the circle, and place it inside the greased and floured pan. This extra step is particularly beneficial for soft, delicate cakes like this Christmas Coconut Cake, guaranteeing clean, intact layers ready for frosting. The pans are now perfectly prepared to receive the batter.
Step 2: Whipping the Egg Whites for an Airy Structure
The secret to this cake’s incredibly light and airy crumb lies in the meticulously whipped egg whites. Carefully separate the yolks from the whites of your four large eggs. It’s vital that no trace of yolk contaminates the egg whites, as fat from the yolk can inhibit the whites from whipping to their full potential and achieving stiff peaks. Place the egg whites into a meticulously clean, grease-free bowl, ideally a glass or metal one, as plastic bowls can sometimes retain grease.
Using a stand mixer fitted with the whisk attachment, or a hand mixer, begin beating the egg whites on medium speed. As they start to froth and become opaque, gradually increase the speed to high. Continue beating until the egg whites hold stiff, glossy peaks. This means that when you lift the whisk out of the bowl, the peaks of the egg whites stand straight up without curling over. Be careful not to overbeat, as this can cause the whites to become dry and grainy, which will negatively impact the cake’s texture.
Once your egg whites have achieved stiff peaks, carefully transfer them to a separate, clean bowl. Set them aside. These whipped egg whites will be gently folded into the cake batter later in the process. Their incorporation is what provides the significant lift and delicate texture that makes this coconut cake so special. Treat them gently from this point forward to preserve the airiness you’ve just created.
Step 3: Creaming the Butter and Sugar, Then Incorporating Wet Ingredients
Now, let’s build the rich base of your cake batter. In the bowl of your stand mixer, fitted with the paddle attachment, or using a large mixing bowl and a hand mixer, cream together the softened unsalted butter and the granulated sugar. This process is known as creaming, and it’s essential for incorporating air into the batter, contributing to the cake’s overall lightness and tender texture. Beat these ingredients together on medium-high speed for approximately 3 to 5 minutes, or until the mixture becomes visibly pale yellow and wonderfully fluffy, resembling a light, airy mousse.
Once the butter and sugar are perfectly creamed, it’s time to introduce the moist, flavorful components. Add the sweetened coconut cream, the reserved egg yolks (from Step 2), the coconut flavoring, and the vanilla essence to the creamed butter and sugar mixture. Continue to beat these ingredients together for another 2 minutes, or until the entire mixture is thoroughly blended, smooth, and possesses a rich, creamy appearance. This step ensures that all the liquid and fat elements are harmoniously combined, forming a cohesive and luscious batter base.
The resulting mixture should be smooth, homogenous, and have a delightful aroma from the coconut and vanilla. This rich, golden emulsion is the heart of your cake’s flavor and texture. Ensure you scrape down the sides and bottom of the bowl periodically during mixing to guarantee that all ingredients are evenly incorporated, preventing any pockets of unmixed butter or sugar. This thorough blending is a key step towards achieving that melt-in-your-mouth quality in your finished cake.
Step 4: Combining Dry and Wet Ingredients Alternately
With the wet ingredients well combined, it’s time to introduce the dry components to create the cake’s structure. In a separate medium-sized bowl, whisk together the all-purpose flour, the baking powder, the bicarbonate of soda, and the salt. Whisking these dry ingredients together thoroughly ensures that the leavening agents (baking powder and bicarbonate of soda) and the salt are evenly distributed throughout the flour. This even distribution is critical for a uniform rise and consistent flavor in the baked cake.
Now, you will add the dry ingredients and the buttermilk to the creamed butter mixture in alternating additions. This technique helps to create a tender crumb by preventing the gluten in the flour from developing too much. Start by adding about one-third of the dry ingredients to the butter mixture. Mix on low speed until just combined. Then, add about half of the buttermilk and mix again until just incorporated. Continue this process by adding another third of the dry ingredients, then the remaining buttermilk, and finally the last third of the dry ingredients.
After the final addition of dry ingredients, mix on low speed only until the batter just comes together and no dry streaks of flour remain. It is extremely important not to overmix at this stage. Overmixing can develop the gluten in the flour excessively, leading to a tough or dense cake. The batter should be thick but pourable. The goal here is to combine everything just enough to create a cohesive batter without overworking the gluten, which is essential for that light and tender Christmas Coconut Cake.
Step 5: Gently Folding in the Whipped Egg Whites
This is a crucial step for achieving the cake’s signature ethereal lightness. Take the bowl containing your beautifully whipped egg whites, which you set aside in Step 2. You want to incorporate these air-filled whites into the thick batter you’ve prepared in Step 4 without deflating the precious air that makes the cake so fluffy.
Begin by adding about one-third of the whipped egg whites to the cake batter. Using a large rubber spatula, gently fold them in. Use broad, sweeping strokes, cutting down through the center of the batter, across the bottom, and up the side of the bowl. Imagine you are turning the batter over itself. The initial folding is to lighten the batter and make it easier to incorporate the remaining whites.
Once that first portion is partially incorporated, add the remaining two-thirds of the whipped egg whites. Continue folding with the same gentle, deliberate motions. Fold just until no streaks of white remain and the batter is evenly combined. You should still see some volume in the batter; it should not look heavy or dense. This careful folding is what ensures the cake bakes up with a soft, airy, and incredibly tender texture, rather than a heavy or dense one. Patience and a gentle hand are key here.
Step 6: Baking and Cooling the Cake Layers
Now it’s time to bake your beautiful Christmas Coconut Cake layers. Carefully divide the prepared batter evenly between your prepared cake pans. If using two 9-inch pans, fill each about two-thirds full. If using three 6-inch pans, divide the batter as equally as possible among them. Gently spread the batter to the edges of the pans to ensure even baking and a relatively flat top, though a slight dome is common.
Place the filled cake pans into your preheated oven, ideally on the middle rack to ensure even heat distribution. Bake for approximately 45 minutes. The exact baking time can vary depending on your oven and the size of your pans. You’ll know the cakes are done when the centers are set and a toothpick or cake tester inserted into the thickest part of the cake comes out clean, with no wet batter clinging to it. The edges of the cakes should also start to pull away slightly from the sides of the pans.
Once baked to perfection, remove the cakes from the oven and let them cool in their pans on a wire rack for about 15 to 20 minutes. This initial cooling period in the pan allows the cakes to firm up slightly, making them easier to handle. After this initial cooling, carefully invert the cakes onto the wire rack to cool completely. It is absolutely essential that the cake layers are fully cooled before you attempt to frost them. Even a slight warmth will cause the frosting to melt and slide off, ruining the beautiful layers and the frosting’s structure. Patience here is rewarded with a perfectly frosted cake.
Pro Tips for Christmas Coconut Cake
The Importance of Room Temperature Ingredients: For both the cake and the frosting, ensure your butter, eggs, and buttermilk are at room temperature. This allows them to emulsify properly, creating a smoother batter and a lighter, more consistent frosting. Cold ingredients can lead to a lumpy texture and an uneven bake. Embracing room temperature is a simple but highly effective technique for superior results.
Sifting Your Dry Ingredients: Before combining your flour, baking powder, bicarbonate of soda, and salt, consider sifting them. Sifting aerates the dry ingredients, removes any lumps, and ensures they are thoroughly combined. This results in a lighter cake texture and prevents pockets of unmixed baking soda or powder, which can affect both the rise and the taste. It’s an extra step that makes a noticeable difference.
Don’t Overmix the Batter: As mentioned in the preparation steps, overmixing is the enemy of tender cakes. Once the flour is added, mix only until the ingredients are just combined. Overdeveloping the gluten in the flour will result in a tough, chewy cake rather than the desired light and fluffy crumb. Gentle folding of the egg whites is also paramount here to retain that crucial airiness.
Frosting Consistency is Key: For the most visually appealing and delicious finish, your frosting should be perfectly spreadable. If it’s too soft, chill it in the refrigerator for 15-20 minutes, stirring occasionally, until it reaches a good piping or spreading consistency. Conversely, if it becomes too stiff, you can gently warm it by microwaving for very short intervals (5-10 seconds) and stirring, or by adding a tablespoon of coconut cream at a time until it loosens up. Aim for a smooth, luxurious texture that holds its shape.
Pressing the Coconut: When applying the shredded coconut to coat the cake, work over a large tray or baking sheet. This will catch any excess coconut, making for easier cleanup and allowing you to press the fallen coconut back onto the cake for a fuller coating. Ensure the frosting is evenly applied to all surfaces of the cake before pressing the coconut on. A spatula or offset spatula is ideal for this task, ensuring a smooth canvas.
Serving Suggestions for Christmas Coconut Cake
Decoration
The Christmas Coconut Cake is a visual delight even before any extra adornments. Its primary decoration comes from the generous coating of unsweetened shredded coconut, creating a snowy, festive appearance reminiscent of a winter wonderland. For an enhanced holiday charm, consider adding sprigs of fresh rosemary strategically placed on top. The deep green of the rosemary provides a beautiful contrast against the white coconut, evoking a classic woodland or natural Christmas theme.
A delicate dusting of icing sugar over the rosemary and coconut can further enhance the snowy effect, making it look as though a light frost has settled upon the cake. You might also consider adding a few edible silver or gold dragees, or even some candied cranberries, for pops of festive color and sparkle. These small touches can elevate the cake from a beautiful dessert to a stunning centerpiece that truly captures the spirit of the season.
Side Dishes
This rich and decadent coconut cake pairs wonderfully with a variety of simple yet complementary side dishes that enhance the overall dessert experience without overpowering the cake’s delicate flavors. A small bowl of fresh, vibrant berries, such as raspberries, strawberries, or blueberries, provides a refreshing burst of tartness that cuts through the sweetness and creaminess of the cake and frosting. Their bright colors also add a cheerful visual element to the dessert plate.
Hot beverages are also excellent companions. A steaming mug of freshly brewed coffee, particularly a dark roast or a coffee with hints of cinnamon or cardamom, complements the cake’s richness. Similarly, a robust black tea or an herbal infusion like peppermint or chamomile can offer a soothing contrast. For a more indulgent option, consider a warm glass of milk or a spiced apple cider, which align perfectly with the cozy, festive theme of a Christmas celebration.
Creative Serving Ideas
Beyond the traditional slice, consider serving the Christmas Coconut Cake in creative ways to make your holiday gathering even more memorable. For a more informal event, you could transform individual slices into “coconut cake parfaits.” Layer crumbled pieces of cake with some of the coconut cream frosting and fresh berries in small glasses or jars. This offers a delightful textural contrast and an elegant presentation.
Another fun idea is to serve mini coconut cake trifles. Prepare the cake in small ramekins or individual dessert cups, layering it with frosting, a drizzle of coconut cream, and perhaps some toasted coconut flakes or slivered almonds for crunch. For an interactive dessert bar, offer a selection of toppings such as whipped cream, more fresh berries, chocolate shavings, or even a small pitcher of warm caramel sauce, allowing guests to customize their own dessert experience. This adds an element of fun and personalization to your festive spread, ensuring everyone creates their perfect slice of Christmas joy.
Preparation & Storage
Storing Leftovers
Proper storage is key to maintaining the freshness and delightful texture of your Christmas Coconut Cake. Due to the cream cheese frosting, it is essential to store any leftover cake in the refrigerator. Cover the cake loosely with plastic wrap or transfer it to an airtight cake keeper or container to prevent it from drying out and to protect it from absorbing odors from other foods in the refrigerator.
The cake typically keeps well for up to 4 days when stored correctly. Interestingly, many find that the flavors of this coconut cake deepen and meld beautifully after the first day. This means that leftovers can often taste even better than when they were first served, making it a perfect make-ahead dessert. For the best eating experience after refrigeration, allow individual slices to sit at room temperature for about 20 to 30 minutes before serving. This allows the frosting to soften slightly and the cake’s flavors to become more pronounced and fragrant.
Freezing
This festive cake is an excellent candidate for freezing, making it a convenient make-ahead option for busy holiday periods. You have a couple of options when it comes to freezing. You can freeze individual slices of the fully assembled and frosted cake, or you can freeze the unfrosted cake layers. For the best results, ensure the cake is completely cool if freezing unfrosted layers, and fully frosted and firm if freezing the whole cake.
When freezing, it’s crucial to wrap the cake or slices very well to protect them from freezer burn. First, wrap them tightly in plastic wrap, ensuring there are no air gaps. Then, add a second layer of protection by wrapping them in aluminum foil or placing them inside a freezer-safe airtight container. Properly wrapped, the Christmas Coconut Cake can be frozen for up to 2 months. The quality is best when consumed within this timeframe.
Reheating
If you choose to freeze your Christmas Coconut Cake or its layers, proper thawing and reheating are essential to bring it back to its delicious best. To thaw, transfer the frozen cake or slices from the freezer to the refrigerator. Allow them to thaw slowly overnight. This gradual thawing process helps to prevent condensation from forming on the cake’s surface, which can affect the texture of the frosting and the cake itself.
Once thawed in the refrigerator, remove the cake from its packaging and place it on a serving plate. Allow it to come to room temperature for about 20 to 30 minutes before serving. This step is critical as it allows the cake’s flavors to develop fully and the texture to become soft and moist again. The frosting will also reach a pleasant, spreadable consistency. Avoid the temptation to microwave slices to speed up the process, as this can often result in a dry or rubbery texture, compromising the cake’s delightful crumb.
Frequently Asked Questions
-
Can I make this Christmas Coconut Cake ahead of time?
Yes, this cake is exceptionally well-suited for making ahead, which is a significant advantage during the bustling holiday season. You can bake the cake layers one to two days in advance. Once completely cooled, wrap them tightly in plastic wrap and store them at room temperature if you plan to frost them within 24-48 hours, or refrigerate them if you need to store them for a longer period before frosting. The frosting can also be made a day ahead and stored in an airtight container in the refrigerator; simply allow it to soften slightly at room temperature before using, or whip it again briefly to restore its creamy consistency. Assembling and decorating the cake the day before your event ensures it is ready to impress without last-minute stress.
-
Why are the egg whites whipped separately for this cake, and what is the benefit?
Whipping the egg whites separately and then folding them into the batter is a classic baking technique that introduces a significant amount of air into the cake. This aeration process is what contributes to a lighter, softer, and more tender crumb, transforming what could otherwise be a dense cake due to the richness of the coconut cream and butter into something wonderfully airy and delicate. It’s akin to creating a génoise or chiffon cake structure, providing lift and volume without relying solely on chemical leaveners. This method is particularly important in recipes with heavier ingredients, like those found in this rich coconut cake, as it ensures a balanced texture that is both moist and exceptionally light.
-
Is the rosemary garnish essential for the Christmas Coconut Cake, and can I substitute it?
The rosemary garnish is entirely optional and is purely for aesthetic purposes, designed to enhance the cake’s festive holiday appearance. It provides a beautiful, natural visual element that complements the snowy white coconut coating, evoking images of winter forests and holiday decorations. If you choose not to use rosemary, or if it’s unavailable, the cake will still be absolutely delicious and visually appealing with just the coconut coating. You could substitute it with other edible garnishes like small holly leaves (ensure they are edible varieties if using), sugar-dusted cranberries, or even a few strategically placed edible silver stars for a touch of sparkle. The primary goal is to add a touch of festive flair to the already beautiful cake.