Irresistible Chocolate Pistachio Cream Pie Bars
When you think of dessert, what comes to mind? Is it a warm chocolate cake, a slice of pie, or perhaps a decadent cream bar? If you’ve never tried Chocolate Pistachio Cream Pie Bars, it’s time to elevate your dessert game. This recipe brings together rich flavors and smooth textures that create an utterly delightful treat. Imagine biting into a luscious layer of dark chocolate, followed by the creamy goodness of pistachio pudding, all nestled in a crispy cookie crust. Sounds tempting, doesn’t it?
What makes Chocolate Pistachio Cream Pie Bars so special? First off, the combination of flavors is nothing short of heavenly. Each layer adds its unique taste and texture—rich chocolate, creamy pistachio, and crunchy cookie. These bars are not just delicious but relatively easy to make, requiring simple ingredients and straightforward steps. You don’t need to be a gourmet chef to whip up a batch that will wow your family or guests.
Why You Will Love This Recipe
- Decadent Flavor: The rich chocolate and nutty pistachio combination is a crowd-pleaser, offering a sophisticated taste profile that appeals to many palates and is perfect for special occasions or just a treat.
- Easy to Make: Simple steps and readily available ingredients make this dessert accessible for bakers of all skill levels, ensuring a successful and enjoyable baking experience for everyone.
- Versatile Presentation: Dress them up with elaborate garnishes or keep them casual with a simple dusting of nuts; these bars fit any occasion, from elegant dinner parties to relaxed family gatherings.
- Make-Ahead Friendly: Prepare these delicious bars in advance and enjoy them later, making entertaining a breeze and freeing up your time on the day of your event.
- Customizable: Easily swap ingredients or add extra elements to cater to personal preferences or dietary needs without sacrificing the core deliciousness of the bars.
Ingredients You Need
Crafting these exquisite Chocolate Pistachio Cream Pie Bars begins with selecting high-quality ingredients, as this is paramount to achieving the best possible flavor and texture. Each component plays a vital role in the final symphony of tastes and sensations. From the base to the topping, using fresh, good-quality items will truly make a difference in the outcome of your dessert, ensuring it’s a memorable culinary experience for all who partake. You will find the specific measurements and details within the accompanying recipe card for your convenience.
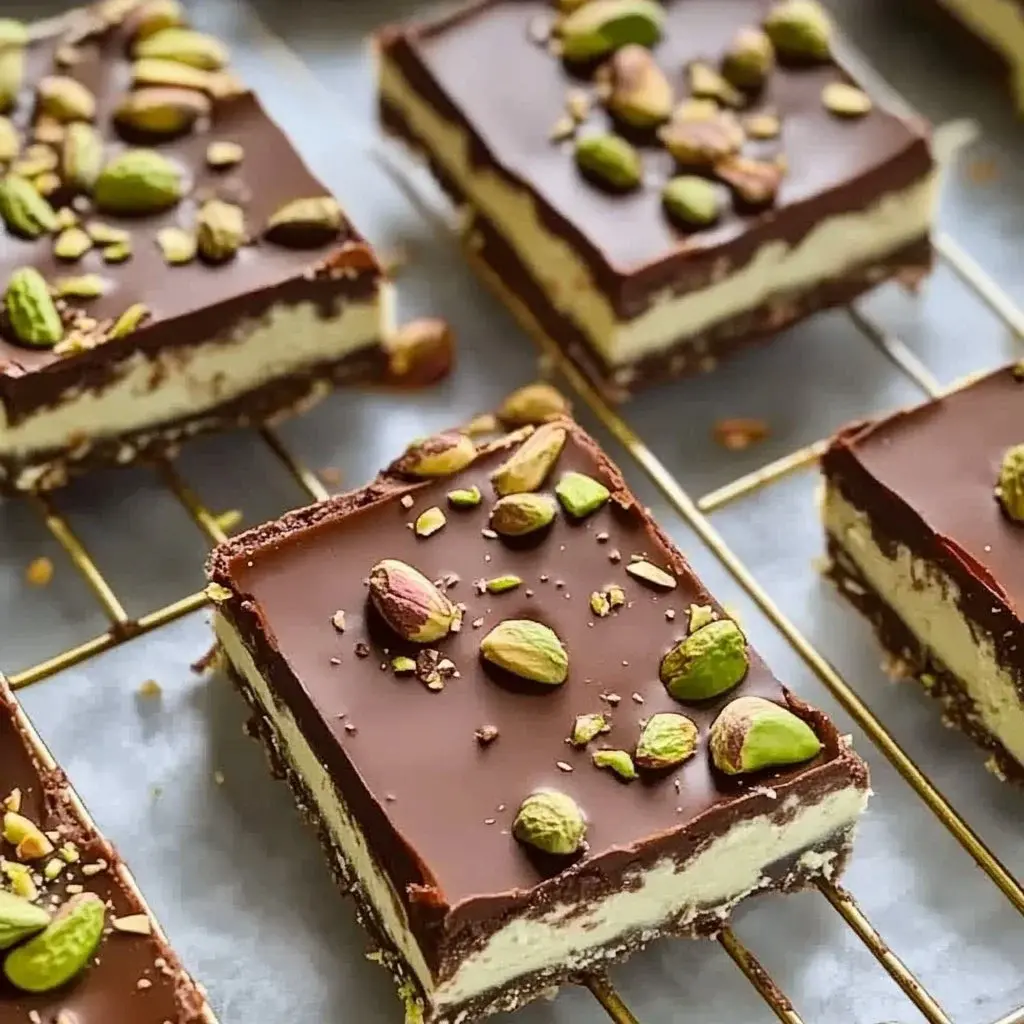
Chocolate Pistachio Cream Pie Bars

These Chocolate Pistachio Cream Pie Bars are a delightful dessert that combines rich dark chocolate, creamy pistachio pudding, and a crispy cookie crust, all topped with a decadent chocolate ganache and crunchy pistachios. They are easy to make, versatile, and perfect for any occasion.
- For the crust and chocolate layer
- 1 package Chocolate cookie crust (Store-bought or homemade)
- 8 oz Dark chocolate (Choose high-quality chocolate)
- ½ cup Heavy cream (For both chocolate base and ganache)
- For the pistachio layer
- 1 package Pistachio pudding mix (The key to that yummy flavor)
- 2 cups Milk (For preparing pistachio pudding)
- 1 cup Whipped topping (Or whipped cream for a lighter texture)
- ½ cup Chopped pistachios (For garnish and added crunch)
- For the ganache
- ½ cup Heavy cream (For chocolate ganache)
- 4 oz Dark chocolate (Finely chopped for ganache)
- 1Preparation: Gather all ingredients. If using homemade, prepare cookie crust first. Set store-bought crust aside. Preheat oven according to cookie crust instructions. Prepare baking dish with cooking spray and bake cookie crust until firm, about 8-10 minutes. Allow to cool completely.
- 2Assembling the Layers: Chop dark chocolate and melt with ½ cup heavy cream over low heat until smooth. Pour over cooled cookie crust. Whisk pistachio pudding mix and milk together following package instructions, then gently fold in whipped topping for a fluffy consistency. Spread pistachio mixture evenly over the chocolate layer and refrigerate until set.
- 3Creating the Ganache: Heat ½ cup heavy cream until it simmers, then pour it over finely chopped dark chocolate. Stir until smooth and velvety.
- 4Final Touches: Cool ganache slightly before pouring it over the chilled pistachio layer, spreading evenly. Sprinkle chopped pistachios on top. Return bars to the fridge to chill for at least one more hour. Once set, slice into squares or rectangles and serve cold.
Keywords: Chocolate Dessert, Chocolate Pistachio Cream Pie Bars, Dessert Bars, Easy Dessert, pistachio recipe
- chocolate cookie crust: store-bought or homemade, providing a sturdy and flavorful foundation for your bars.
- dark chocolate: choose high-quality chocolate for both the base and the ganache, as its richness will be a dominant flavor note.
- heavy cream: essential for creating both the luscious chocolate base and the glossy, decadent ganache topping.
- pistachio pudding mix: the key ingredient for that unmistakable and delightful pistachio flavor.
- milk: used for preparing the pistachio pudding according to package directions.
- whipped topping: or heavy cream whipped to stiff peaks for a lighter, airier pistachio cream layer.
- chopped pistachios: for garnish and an added satisfying crunch that complements the creamy layers.
- chocolate ganache: a final touch of pure indulgence, made from additional heavy cream and dark chocolate.
These are the foundational elements that will transform into a stunning dessert. Remember that precise quantities are detailed within the comprehensive recipe card, ensuring you have everything you need.
Variations
To truly personalize these delightful Chocolate Pistachio Cream Pie Bars, consider a few creative twists. For a more intense nutty experience, you could incorporate finely ground almonds or hazelnuts into the cookie crust, or even experiment with a layer of toasted almond paste nestled beneath the pistachio pudding. This enhances the overall nutty profile and adds another dimension of flavor that complements the chocolate beautifully.
Another exciting variation involves a touch of fruit, which can cut through the richness and add a burst of freshness. Try adding a thin layer of raspberry preserves or even a layer of thinly sliced ripe bananas between the chocolate base and the pistachio pudding. The tartness of raspberries or the sweetness of bananas can create a wonderful counterpoint to the chocolate and pistachio, making each bite even more complex and satisfying.
For those seeking a truly unique flavor combination, consider infusing the pistachio layer with a subtle hint of citrus or spice. A teaspoon of orange zest or a pinch of cardamom folded into the pistachio pudding can create an unexpected yet delightful pairing. These small additions can transform the bars into something truly remarkable, offering a sophisticated flavor profile that will leave your guests impressed and asking for the recipe.
How to Prepare Chocolate Pistachio Cream Pie Bars
Step 1: Prepare the Base Ingredients
Begin by ensuring all your ingredients are measured and ready for assembly, a crucial step for a smooth baking process. If you are making your cookie crust from scratch, this is the time to prepare it according to your preferred recipe, ensuring it bakes to a perfect crispness. For those using a store-bought crust, simply unwrap it and set it aside, ready to be filled.
Preheat your oven to the temperature specified by your cookie crust recipe or the package instructions. A properly preheated oven ensures even baking, preventing a soggy bottom crust. Lightly greasing your baking dish with cooking spray will make the bars easier to remove later, preserving their beautiful presentation.
Bake the cookie crust until it is firm to the touch, typically around 8 to 10 minutes. The goal is to achieve a sturdy base that can hold the creamy layers without collapsing. Once baked, allow the crust to cool completely on a wire rack before proceeding; this is vital to prevent the chocolate from melting prematurely when you add it.
Step 2: Create the Rich Chocolate Layer
To craft the decadent chocolate layer, start by finely chopping your chosen dark chocolate. Smaller pieces will melt more evenly and quickly, ensuring a smooth, lump-free mixture. Using a high-quality chocolate will significantly enhance the depth of flavor in this foundational layer of your bars.
In a small saucepan, combine the chopped dark chocolate with the specified amount of heavy cream. Heat this mixture gently over low heat, stirring continuously. The key is to melt the chocolate slowly and evenly, preventing it from scorching or becoming greasy. Continue stirring until the chocolate is completely melted and the mixture achieves a smooth, glossy, and uniform consistency, resembling a thick ganache.
Carefully pour this luscious chocolate mixture over the completely cooled cookie crust. Use a spatula or the back of a spoon to spread the chocolate evenly across the entire surface of the crust, ensuring an unbroken layer. This creates the rich, dark foundation upon which the subsequent layers will be built, promising a delightful chocolatey bite in every bar.
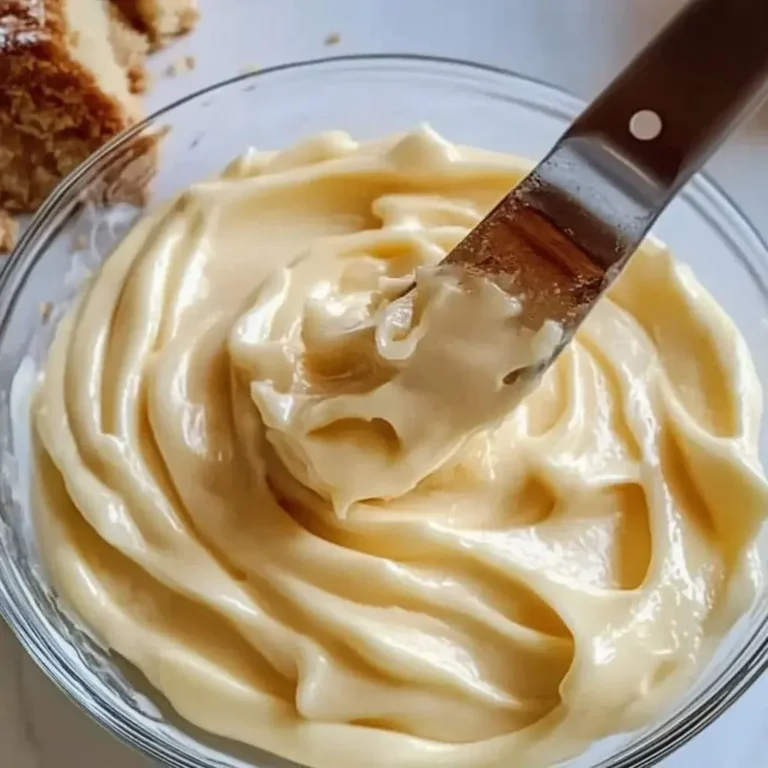
Step 3: Prepare the Creamy Pistachio Pudding
Now, it’s time to prepare the vibrant and creamy pistachio layer that will provide a delightful contrast to the chocolate. In a medium-sized mixing bowl, combine the pistachio pudding mix with the specified amount of milk. It is essential to follow the instructions on the pudding mix package precisely to ensure the correct consistency is achieved.
Whisk these two ingredients together vigorously until the mixture is smooth and there are no lumps of pudding powder remaining. The color should be a beautiful, appetizing green. This step is critical for developing the smooth texture and the characteristic pistachio flavor of the bars.
Once the pudding is smooth, gently fold in the whipped topping or whipped cream. Be careful not to overmix; the goal is to incorporate the whipped cream without deflating its airy volume. This folding technique helps maintain a light and fluffy texture for the pistachio layer, making the bars delightfully creamy and melt-in-your-mouth delicious.
Step 4: Assemble the Layers
With your chocolate base cooled and your pistachio pudding mixture ready, it’s time for the assembly. Carefully spoon the pistachio pudding mixture over the smooth chocolate layer that you spread on the cookie crust. Ensure you distribute it as evenly as possible across the entire surface.
Use a spatula or the back of a spoon to gently smooth the top of the pistachio layer. A uniform surface will make the final ganache layer easier to spread and will contribute to a more visually appealing final product. The contrast between the dark chocolate and the pale green pistachio layer is already quite striking.
Once the pistachio layer is smoothly spread, cover the baking dish securely with plastic wrap. Place the entire dish into the refrigerator. You will need to let it chill for at least a few hours, or until the pistachio layer is firm to the touch and has set properly. This chilling period is crucial for the bars to hold their shape when cut.
Step 5: Create the Glossy Chocolate Ganache Topping
While your pie bars are chilling, you can prepare the luxurious chocolate ganache that will crown your creation. In a small saucepan, gently heat the additional heavy cream until it just begins to simmer around the edges. Be careful not to let it boil vigorously, as this can affect the texture of the ganache.
Place your finely chopped dark chocolate into a heatproof bowl. Once the cream is simmering, carefully pour it over the chopped chocolate. Allow the hot cream to sit on the chocolate for about one to two minutes without stirring. This resting period allows the heat from the cream to begin melting the chocolate evenly.
After the resting period, gently stir the mixture with a whisk or spatula. Continue stirring until all the chocolate is completely melted and the mixture is smooth, glossy, and has a uniform, velvety texture. This is your decadent ganache, ready to be applied.
Step 6: Apply the Ganache and Garnish
Once the pistachio layer of your pie bars has set firmly in the refrigerator, it’s time to add the final touch of indulgence. Remove the dish from the refrigerator. Allow the prepared chocolate ganache to cool for a few minutes at room temperature. Pouring the ganache while it’s still very hot could cause the pistachio layer underneath to soften or melt, compromising the integrity of the bars.
Pour the slightly cooled ganache evenly over the chilled pistachio layer. Use a spatula to gently spread it out, creating a smooth and glossy surface that covers the entire top of the bars. This rich chocolate topping adds an extra layer of flavor and visual appeal, making the bars look truly professional.
Before the ganache sets completely, sprinkle the chopped pistachios generously over the top. This garnishing step not only adds a beautiful visual contrast and a pleasing texture but also reinforces the pistachio flavor profile of the dessert. Finally, return the bars to the refrigerator for at least another hour to allow the ganache to set properly. This final chill ensures that the bars will slice cleanly.
Step 7: Chill and Serve
After the ganache has set and the bars are perfectly chilled, they are ready to be transformed into individual servings. It’s important that the bars are thoroughly set before you attempt to cut them, otherwise, they may become messy and lose their distinct layers. The cold temperature solidifies the creamy fillings and the ganache topping.
Using a sharp knife, cut the Chocolate Pistachio Cream Pie Bars into your desired serving size. Squares are traditional, but rectangles also work well. For the cleanest cuts, you can run your knife under hot water and wipe it dry between each slice, which helps prevent sticking and ensures neat edges.
Serve these delicious bars chilled. The combination of the crisp cookie crust, rich chocolate layer, creamy pistachio filling, and decadent ganache topping creates a truly satisfying dessert experience. Enjoy the delightful harmony of flavors and textures in every bite.
Pro Tips for Chocolate Pistachio Cream Pie Bars
- The Importance of Chilling: Don’t rush the chilling process; allowing adequate time for each layer to set is crucial for clean slicing and maintaining the integrity of the bars. A minimum of several hours for the main chilling and an additional hour after adding the ganache is recommended for the best results.
- Ingredient Quality Matters: Using good quality dark chocolate and fresh pistachios will significantly elevate the flavor profile of your bars. The better the ingredients, the more decadent and satisfying the final dessert will be.
- Gentle Folding Technique: When incorporating whipped topping into the pistachio pudding, use a gentle folding motion rather than vigorous stirring. This preserves the airiness of the whipped topping, resulting in a lighter and creamier pistachio layer.
- Clean Slicing: For perfectly neat squares, warm your knife under hot water and dry it before each cut. This simple trick ensures clean edges and makes your bars look professionally made.
- Flavor Boosters: Consider adding a splash of almond extract to the pistachio pudding for an even more pronounced nutty flavor, or a pinch of sea salt to the chocolate ganache to enhance its richness and balance the sweetness.
Serving Suggestions for Chocolate Pistachio Cream Pie Bars
Decoration
For an elegant presentation, consider dusting the top of the ganache with a fine layer of cocoa powder or powdered sugar using a sieve. This adds a subtle visual sophistication. Another beautiful option is to pipe a few small rosettes of whipped cream around the edges of the bars or in the center of each piece. You can also finely chop some extra pistachios and sprinkle them artfully over the ganache before it sets completely for a textural and visual accent.
Side Dishes
These bars are wonderfully indulgent on their own, but they also pair beautifully with a few simple additions. A small scoop of high-quality vanilla bean ice cream alongside a bar can provide a delightful temperature and flavor contrast. Fresh berries, such as raspberries or sliced strawberries, offer a bright, tart counterpoint that cuts through the richness of the chocolate and pistachio. A dollop of unsweetened whipped cream can add a cloud-like lightness to each serving.
Creative Serving Ideas
For a more festive presentation, serve these bars on a tiered dessert stand, allowing their distinct layers to be admired. You could also present them individually on small dessert plates with a dusting of edible gold flakes for a touch of luxury, perfect for a special celebration. Another idea is to cut them into smaller, bite-sized squares and arrange them on a platter for a sophisticated dessert buffet or as part of a larger selection of sweets.
Preparation & Storage
Storing Leftovers
To keep your Chocolate Pistachio Cream Pie Bars fresh and delicious, proper storage is key. Always cover the dish tightly with plastic wrap or an airtight lid before placing it in the refrigerator. This prevents the bars from drying out and from absorbing any unwanted odors from other foods. Stored correctly, these bars will maintain their delightful texture and flavor for up to 5 days.
For easier access to a quick sweet treat, consider slicing the bars into individual portions before storing them. This way, you can simply grab a pre-portioned bar from the refrigerator without needing to cut into the larger block each time. This also helps maintain the overall structure of the remaining bars by minimizing exposure when you take one out.
Ensure that the bars are completely chilled before covering and storing them. Warm bars can create condensation inside the container, which can lead to a soggy crust or affect the texture of the creamy layers. Allowing them to cool fully before storage is a simple yet important step for preserving their quality.
Freezing
Chocolate Pistachio Cream Pie Bars freeze exceptionally well, making them a perfect make-ahead dessert option. To freeze them, it’s best to slice the bars into individual servings first. This allows for easy thawing and serving of just what you need without thawing the entire batch.
Wrap each individual bar tightly in plastic wrap, ensuring there are no gaps where air can enter. Then, place the individually wrapped bars into a freezer-safe container or a heavy-duty freezer bag. This double layer of protection helps prevent freezer burn and preserves the quality of the bars during their time in the freezer.
When stored properly in the freezer, these delicious bars can last for up to 2 to 3 months. Make sure to label the container with the date of freezing so you can keep track of their freshness, although their decadent nature means they likely won’t last that long!
Reheating
Reheating isn’t typically necessary for these bars as they are best served chilled or at room temperature after thawing. However, if you are thawing frozen bars, the best method is to transfer them from the freezer to the refrigerator the night before you plan to serve them. This slow thawing process allows them to gradually return to their ideal texture without becoming watery or mushy.
If you find yourself short on time and need to thaw the bars more quickly, you can let them sit at room temperature for about 30 minutes to an hour. Keep an eye on them, as the ambient temperature will affect how quickly they thaw. The goal is to have them firm but not frozen solid, ready to be enjoyed.
Avoid microwaving these bars, as the heat can cause the chocolate to melt unevenly and the creamy layers to become unpleasantly soft or separated. The chilled or gently thawed state is what allows the distinct layers and textures to be best appreciated, offering a delightful contrast in every bite.
Frequently Asked Questions
-
How should I store Chocolate Pistachio Cream Pie Bars?
To ensure maximum freshness and delightful texture, store your Chocolate Pistachio Cream Pie Bars in an airtight container in the refrigerator. This method will keep them wonderfully preserved for up to 5 days. Ensuring the container is tightly sealed is key to preventing them from drying out or absorbing any unwanted flavors from other foods in your fridge.
-
Can I make Chocolate Pistachio Cream Pie Bars ahead of time?
Yes, these bars are exceptionally make-ahead friendly, making them perfect for busy schedules and entertaining. You can prepare them a day in advance, and they will only improve in flavor as the ingredients meld together in the refrigerator. This allows you to have a delicious dessert ready to go without last-minute stress.
-
Is there a gluten-free version of this recipe?
Absolutely! Adapting this recipe for a gluten-free diet is quite straightforward. Simply ensure you use a certified gluten-free chocolate cookie crust or prepare your own using crushed gluten-free cookies and a binder. All other ingredients are typically gluten-free, making this an easy modification for those with gluten sensitivities.