Pesto Chicken Sliders
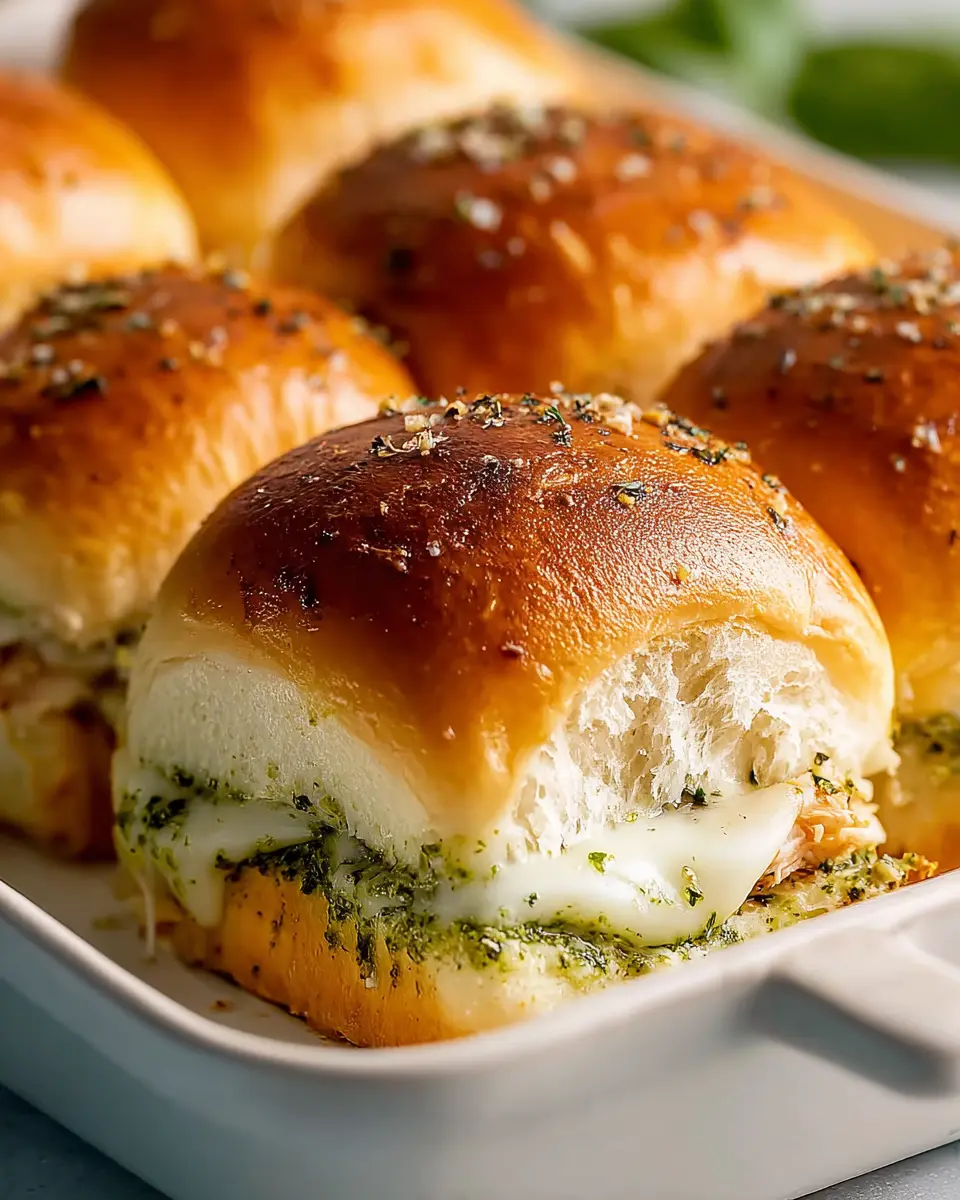
These pesto chicken sliders are a delightful culinary creation, perfect for any occasion that calls for something both comforting and incredibly flavorful. Imagine soft, pillowy slider rolls enveloping tender shredded chicken, all brought together by the vibrant, herbaceous notes of basil pesto and the irresistible pull of melted mozzarella cheese.
They represent the ultimate in effortless entertaining, transforming simple ingredients into a dish that’s sure to be a hit with a crowd. Whether you’re planning a relaxed weeknight dinner, a lively game day spread, or a more formal gathering, these sliders offer a convenient and delicious solution that requires minimal fuss and delivers maximum satisfaction.
Why You Will Love This Recipe
- Quick & Easy Preparation: These sliders come together in a flash, especially when using pre-cooked chicken, making them ideal for busy schedules and last-minute entertaining.
- Flavor Explosion: The combination of savory chicken, aromatic basil pesto, and creamy melted mozzarella creates a taste profile that is both classic and exciting, appealing to a wide range of palates.
- One-Pan Wonder: With minimal prep and cleanup, this recipe is baked all in one dish, streamlining the cooking process and making post-meal tidying a breeze.
- Crowd-Pleasing Appeal: The compact size and universally loved ingredients make these sliders a guaranteed hit for parties, potlucks, or any event where you need to feed a hungry group.
- Make-Ahead Convenience: Assemble these sliders ahead of time and bake when ready, offering a fantastic make-ahead option for effortless entertaining and meal planning.
Ingredients You Need
The success of these pesto chicken sliders hinges on the quality of the ingredients you choose; opting for fresh, vibrant components will elevate the final dish considerably. Using a good quality basil pesto, for instance, will impart a more complex and authentic flavor to the chicken filling and the topping. Ensuring your slider rolls are fresh and soft will provide the perfect canvas for the rich fillings.
Pesto Chicken Sliders

Quick, cheesy, and crowd-friendly, pesto chicken sliders deliver soft baked rolls layered with shredded chicken, melty mozzarella, and herby basil pesto in one easy pan. They are great for party trays, weeknight dinners, game day spreads, and make-ahead entertaining.
- 18 slider rolls, separated into top and bottom halves
- 15 slices mozzarella cheese
- 2 cups cooked chicken, shredded
- 11 ounces basil pesto, divided
- 2 tablespoons butter, melted
- 1/3 cup mayonnaise, optional
- 1Preheat the oven to 400°F (204°C). Lightly grease a 9x13-inch baking dish.
- 2Arrange the bottom halves of the slider rolls in the baking dish. Spread with mayonnaise if using.
- 3Distribute the shredded chicken evenly over the rolls. Spoon most of the pesto over the chicken and spread gently.
- 4Layer the mozzarella over the pesto-covered chicken. Place the top halves of the rolls on top.
- 5In a small bowl, combine the melted butter with 2 tablespoons of the pesto and stir. Brush this mixture generously over the tops of the rolls.
- 6Bake uncovered for 10 minutes, then cover with foil and continue baking for 10 to 15 minutes more, until the cheese is fully melted and the sliders are heated through.
- 7Let the sliders rest briefly before cutting or pulling them apart. Serve warm.
Keywords: Pesto Chicken Sliders, sliders, chicken, pesto, mozzarella, baked sandwiches, party food, weeknight dinner
The quantities for all these delicious ingredients can be found within the recipe card for your convenience.
Variations
For those seeking a plant-based alternative, transforming these sliders into a vegan delight is surprisingly straightforward. Simply substitute the shredded chicken with a hearty plant-based protein, such as seasoned and shredded jackfruit or a mixture of mashed chickpeas and finely chopped vegetables. Ensure your basil pesto is made without cheese, utilizing nutritional yeast for a cheesy undertone and plenty of garlic and fresh basil.
If you’re focusing on a low-carbohydrate lifestyle, the slider rolls can be artfully replaced. Consider using large portobello mushroom caps, halved and hollowed out, or even thick slices of grilled zucchini as the base for your pesto chicken mixture. This adaptation still allows for all the wonderful flavors of the pesto and chicken to shine through while adhering to stricter carbohydrate goals.
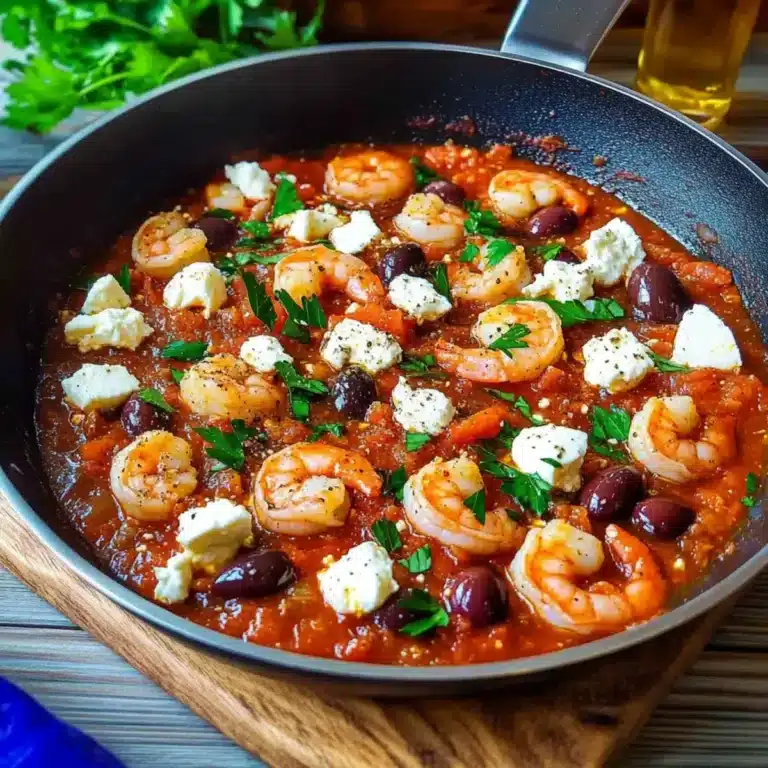
Another creative avenue is to infuse a Mediterranean twist into the sliders. Alongside the traditional pesto and mozzarella, you could incorporate finely diced sun-dried tomatoes, Kalamata olives, and a sprinkle of crumbled feta cheese. This addition brings a salty, tangy, and slightly briny dimension that complements the basil and chicken beautifully, offering a delightful regional variation.
How to Prepare pesto chicken sliders
Step 1: Preheat and Prepare the Baking Dish
Begin by preheating your oven to a temperature of 400 degrees Fahrenheit (204 degrees Celsius). This ensures the oven is at the optimal temperature for achieving a perfectly golden and gooey result. While the oven heats, take a 9×13-inch baking dish, or one of similar dimensions that can snugly hold all your slider rolls, and lightly grease its interior surface with a bit of cooking spray or a thin layer of butter or oil. This essential step prevents the rolls from sticking to the dish during baking, ensuring each slider can be easily separated and enjoyed without any damage.
The snug arrangement of the rolls within the baking dish plays a crucial role in the final texture of the sliders. When they are packed closely together, the edges of the rolls that touch each other steam slightly as they bake, helping them to remain soft and moist. This contrasts beautifully with the tops of the sliders, which will become lightly golden and slightly crisp from the pesto-butter topping, creating a delightful textural interplay in every bite.
This initial preparation is key to setting the stage for a successful batch of sliders. A well-greased dish and an evenly heated oven are foundational elements that contribute to the overall deliciousness and presentation of your pesto chicken sliders, ensuring a smooth and enjoyable cooking experience from start to finish.
Step 2: Arrange the Bottoms and Add Optional Mayonnaise
Carefully arrange the bottom halves of your slider rolls in the prepared baking dish. You want them to lie flat in a single layer, ensuring that they will all receive an even amount of the delicious filling. If your slider rolls come pre-sliced, gently separate them and place each bottom half cut-side up in the dish, making sure they are nestled closely together to achieve that desirable soft texture during baking.
For those who enjoy an extra layer of richness and moisture, this is the moment to add a thin spread of mayonnaise to the cut sides of the bottom rolls. This optional step acts as a flavor enhancer and a moisture barrier, keeping the bread from becoming saturated too quickly by the fillings while adding a subtle tanginess. Use about 1/3 cup of mayonnaise, spreading it evenly across the surface of each bottom roll half with a small spatula or the back of a spoon.
If mayonnaise is not your preference or you are aiming for a lighter slider, you can certainly skip this step. The sliders will still be incredibly flavorful and moist thanks to the other ingredients. The key is to ensure the bottom halves are uniformly placed and ready to receive the generous amount of chicken and pesto that will follow, setting the foundation for the perfectly layered sliders.
Step 3: Layer the Chicken and Pesto
Now it’s time to add the hearty core of your pesto chicken sliders: the shredded chicken. Take your 2 cups of cooked and shredded chicken and distribute it as evenly as possible over the bottom halves of the slider rolls. Aim for a generous and consistent layer across all the rolls, ensuring that each slider will have a substantial portion of chicken for a satisfying bite. If your chicken is slightly dry, you can toss it with a tablespoon of olive oil or a bit of chicken broth to moisten it before adding it to the rolls.
Next, spoon the basil pesto over the layer of chicken. It’s best to use about two-thirds of your total pesto amount at this stage, reserving some for the topping. Gently spread the pesto over the chicken, ensuring it coats the shredded meat evenly. The vibrant green of the pesto will start to visually promise the burst of flavor that awaits. Take your time with this step to ensure good coverage, as the pesto is a primary flavor driver for these sliders.
The distribution of the pesto is crucial for achieving a harmonious flavor balance. You want every bite to have that unmistakable basil and garlic essence. Ensure the pesto is spread from edge to edge on each roll to maximize the flavor impact. This layer is what truly unifies the chicken and prepares the sliders for the cheesy goodness that will follow, creating a cohesive and delectable filling.
Step 4: Add Cheese and Top the Rolls
With the chicken and pesto layer in place, it’s time to introduce the melty magic: the mozzarella cheese. Carefully lay approximately 15 slices of mozzarella cheese over the pesto-coated chicken. Try to arrange the cheese slices so they cover the chicken filling as uniformly as possible. This ensures that the cheese will melt evenly across all the sliders, creating that irresistible gooey texture that makes these sandwiches so appealing. If your mozzarella is not pre-sliced, you can use about 1.5 cups of shredded mozzarella, distributing it evenly over the chicken.
Once the cheese is perfectly positioned, it’s time to crown your creation. Take the top halves of the slider rolls and place them gently over the cheese-covered chicken. Line them up carefully so that the finished sliders bake together as one cohesive, pull-apart slab. Ensure all the tops are aligned with their respective bottoms to create neat and attractive sliders. This unified structure makes them easier to handle and serve once they are baked to perfection.
The way these layers come together is fundamental to the success of the pesto chicken sliders. The chicken and pesto provide the savory depth, the mozzarella brings the creamy indulgence, and the top rolls act as the perfect vessel. This precise layering ensures that when you bite into a slider, you get a delightful combination of all these elements working in harmony.
Step 5: Prepare and Apply the Pesto-Butter Topping
In a small bowl, combine the 2 tablespoons of melted butter with the remaining basil pesto. You’ll want to reserve about 2 tablespoons of the pesto for this finishing touch. Stir these two ingredients together thoroughly until they are well blended into a fragrant, emulsified mixture. This pesto-butter topping is a secret weapon for achieving that desirable golden-brown crust on the tops of the slider rolls while infusing them with even more basil goodness.
Using a pastry brush or a small spoon, generously brush this pesto-butter mixture over the entire top surface of the assembled sliders. Ensure you cover each roll completely, allowing the flavorful liquid to seep slightly into the bread. This step is crucial for both flavor and appearance, as it gives the sliders a glossy finish and helps them develop a delightful, lightly crisped exterior as they bake. Don’t be shy with the application; a good coating ensures maximum flavor distribution.
The aroma that fills your kitchen as you apply this topping is simply divine. It’s a preview of the deliciousness to come, a promise of warm, buttery bread infused with the bright, garlicky notes of fresh basil. This simple yet impactful step elevates the humble slider into something truly special, contributing significantly to the overall sensory experience of these delightful sandwiches.
Step 6: Bake the Sliders
Place the prepared baking dish into the preheated oven. Initially, bake the sliders uncovered for approximately 10 minutes. This initial uncovered baking period is important because it allows the tops of the rolls to begin toasting and turning a light golden brown, preventing them from becoming overly soft from the steam generated by the filling. It helps to set the structure of the bread.
After the initial 10 minutes, carefully remove the baking dish from the oven. Cover the entire pan tightly with aluminum foil. This foil tent will trap the heat and steam, ensuring that the cheese melts completely and the internal temperature of the chicken and rolls reaches a piping hot state. Return the covered dish to the oven and continue baking for another 10 to 15 minutes, or until the cheese is fully melted, bubbly, and the centers of the sliders are heated through.
The total baking time will be around 20 to 25 minutes, depending on your oven. It’s important to keep an eye on them, especially towards the end of the covered baking period, to ensure the cheese doesn’t burn. The goal is perfectly melted cheese and warm, delicious sliders ready to be devoured. The combination of uncovered and covered baking ensures both a golden exterior and a perfectly cooked, gooey interior.
Step 7: Rest and Serve
Once the pesto chicken sliders have finished baking, carefully remove the baking dish from the oven. It is essential to allow the sliders to rest for a few minutes, typically about 5 to 10 minutes, before attempting to cut or pull them apart. This resting period is crucial for allowing the melted cheese to slightly set and the internal juices to redistribute. If you cut them immediately, the hot, molten cheese may slide out too readily, making them messy to serve and potentially less cohesive.
During this short rest, the sliders will firm up just enough to hold their shape when separated, making the serving process much cleaner and more enjoyable. The residual heat will continue to keep them wonderfully warm and the cheese perfectly gooey. This small but significant step ensures that each slider is presented beautifully and remains intact as you serve it to your eager guests or family members.
After the brief resting period, you can either carefully cut the slab of sliders into individual portions using a sharp knife, or simply allow individuals to pull them apart by hand along the natural lines between the rolls. They are best served warm, showcasing the melted cheese, the flavorful chicken and pesto, and the tender bread. Enjoy the delightful aroma and the anticipation of the first delicious bite of these crowd-pleasing pesto chicken sliders.
Pro Tips for pesto chicken sliders
Use Rotisserie Chicken: For ultimate convenience, opt for pre-cooked rotisserie chicken. It’s already tender and flavorful, saving you a significant amount of prep time and making these sliders incredibly weeknight-friendly. Simply shred the meat and you’re ready to go.
Don’t Overstuff: While it’s tempting to load up on filling, avoid overstuffing the rolls too much. Too much filling can make the sliders difficult to handle and can cause the bread to become soggy. A balanced amount ensures each slider is perfectly proportioned.
Fresh Pesto is Key: The quality of your basil pesto will significantly impact the flavor. If possible, use homemade pesto or a high-quality store-bought version made with fresh basil, pine nuts, garlic, Parmesan cheese, and good olive oil for the best taste experience.
Adjust Cheese to Your Liking: While mozzarella is classic for its meltability and mild flavor, feel free to experiment with other cheeses. Provolone, a mild Monterey Jack, or even a touch of grated Parmesan mixed in can add delightful variations to the cheesy layer.
Toast the Topping Slightly: If you prefer a slightly crispier topping, you can place the finished sliders under the broiler for the last minute or two of baking, keeping a very close eye on them to prevent burning. This will give the pesto-butter brushed tops an extra touch of golden crispness.
Serving Suggestions for pesto chicken sliders
Decoration
While these sliders are already visually appealing with their golden tops and hint of green pesto peeking through, a few decorative touches can elevate their presentation. A light garnish of fresh basil leaves, finely chopped, sprinkled over the finished sliders just before serving adds a pop of color and reinforces the fresh basil aroma. You could also consider a light dusting of red pepper flakes for a touch of visual intrigue and a hint of spice, or even a few small sprigs of fresh parsley for added vibrancy.
Side Dishes
These pesto chicken sliders pair exceptionally well with a variety of side dishes that complement their rich flavors without overpowering them. A crisp, fresh green salad with a light vinaigrette, perhaps a lemon-herb dressing, offers a refreshing contrast to the cheesy and saucy sliders. Roasted vegetables, such as asparagus, broccoli, or cherry tomatoes, provide a healthy and colorful accompaniment. For a more casual, appetizer-style spread, a bowl of marinated olives, cornichons, or a simple caprese salad would be delightful additions.
Creative Serving Ideas
Beyond simply serving them on a platter, consider some creative ways to present these sliders for different occasions. For a party, arrange them artfully on a rustic wooden board or a decorative serving tray. You could also serve them alongside small bowls of complementary dipping sauces, such as a ranch dressing, a mild marinara, or even a garlic aioli, for guests to customize their sliders. For a fun, interactive experience, present them as a build-your-own slider bar, offering various toppings like extra cheese, sautéed mushrooms, or caramelized onions.
Preparation & Storage
Storing Leftovers
Once cooled, leftover pesto chicken sliders should be stored in an airtight container or tightly wrapped in plastic wrap and aluminum foil. They can be kept in the refrigerator for up to 3 days. While they are best enjoyed fresh, they do hold up reasonably well for a couple of days, especially if the filling wasn’t overly moist to begin with. Ensure the container is truly airtight to prevent the bread from drying out too quickly.
Freezing
While it is possible to freeze these sliders, their texture is best when consumed fresh or within a day or two of baking. If you do choose to freeze them, allow them to cool completely, then wrap them individually or in small batches very tightly in plastic wrap, followed by a layer of aluminum foil or a freezer-safe bag. They can be stored in the freezer for up to 1-2 months. Thawing them in the refrigerator overnight is recommended before reheating.
Reheating
To reheat refrigerated sliders, place them in a covered baking dish and warm them in a preheated oven at around 300-325 degrees Fahrenheit (150-160 degrees Celsius) until they are heated through. For the last few minutes, you can remove the foil cover to help crisp up the tops again if desired. For a quicker reheating method, individual sliders can be microwaved, but be aware that this will result in a softer, less crisp bread texture.
Frequently Asked Questions
-
Can I use pre-made slider buns or do I need to bake them myself?
You can absolutely use pre-made slider buns, which is highly recommended for ease and convenience. The recipe is designed to work with store-bought slider rolls. Ensure they are fresh and soft; you will separate them into top and bottom halves before assembling the sliders in the baking dish. If you prefer, you could certainly make your own favorite soft dinner roll dough and shape it into smaller buns suitable for sliders, but using ready-made ones simplifies the process considerably and aligns with the quick nature of this recipe.
-
What is the best way to shred chicken for these sliders, and what types of chicken work well?
For shredding chicken, the easiest method is to use pre-cooked chicken, such as rotisserie chicken, which is already tender and flavorful. You can also cook chicken breasts or thighs by boiling, baking, or poaching them until cooked through, then shredding them with two forks. Slow cooker chicken is another excellent option for achieving tender, easily shreddable meat. Chicken breast tends to be leaner, while thigh meat offers a richer flavor and can be more moist. Any fully cooked, tender chicken meat will work wonderfully in these sliders, making it a versatile way to utilize leftovers or meal-prepped chicken.
-
How can I make these pesto chicken sliders spicier, or add other flavor dimensions beyond the standard ingredients?
To add heat, you can incorporate a pinch of red pepper flakes into the chicken and pesto mixture or even mix a little sriracha or hot sauce into the pesto-butter topping. For other flavor dimensions, consider adding finely chopped sun-dried tomatoes for a tangy, concentrated tomato flavor, or a handful of chopped Kalamata olives for a briny kick. A sprinkle of caramelized onions over the chicken layer can add a sweet depth, or a mix of Italian herbs like oregano and thyme along with the pesto can introduce a more robust herby profile. You could also add a layer of roasted red peppers for sweetness and a touch of smokiness.