Irresistible Fruity Yogurt Pops – A Guilt-Free Refreshing Treat
As the sun blazes down, there is nothing quite like savoring a cool treat to quench your thirst and brighten your spirits. These Fruity Yogurt Pops are your new go-to for staying refreshed throughout the entire summer season.
These delightful, vibrant pops not only bring a rainbow of fruity flavors to your palate, but they also pack a nutritious punch. They are incredibly easy to whip up and cater to both vegan and gluten-free lifestyles, making them a perfect dessert for everyone.
Why You Will Love This Recipe
- Quick Preparation: You can prepare the base in just a few minutes using a standard blender, making this a stress-free activity for busy days.
- Customizable Flavors: You have complete control over the fruit combinations, allowing you to use whatever is currently in season or in your refrigerator.
- Nutritious Choice: Unlike store-bought ice creams that are packed with artificial additives, these pops utilize fresh fruit and wholesome yogurt for a natural energy boost.
- Dietary Friendly: This recipe is naturally flexible, easily adapting to vegan, dairy-free, or low-sugar preferences without sacrificing the creamy texture you love.
- Family Engagement: Kids love helping to pour the mixture into the molds and choosing their own unique fruit layers, making it a fun kitchen project.
Ingredients You Need
Creating the perfect frozen treat starts with selecting high-quality, fresh components that provide both flavor and nutritional value. Using seasonal produce ensures that your pops are naturally sweet, reducing the need for excessive added sugars. Quantities for every item listed below are conveniently located in the recipe summary area.
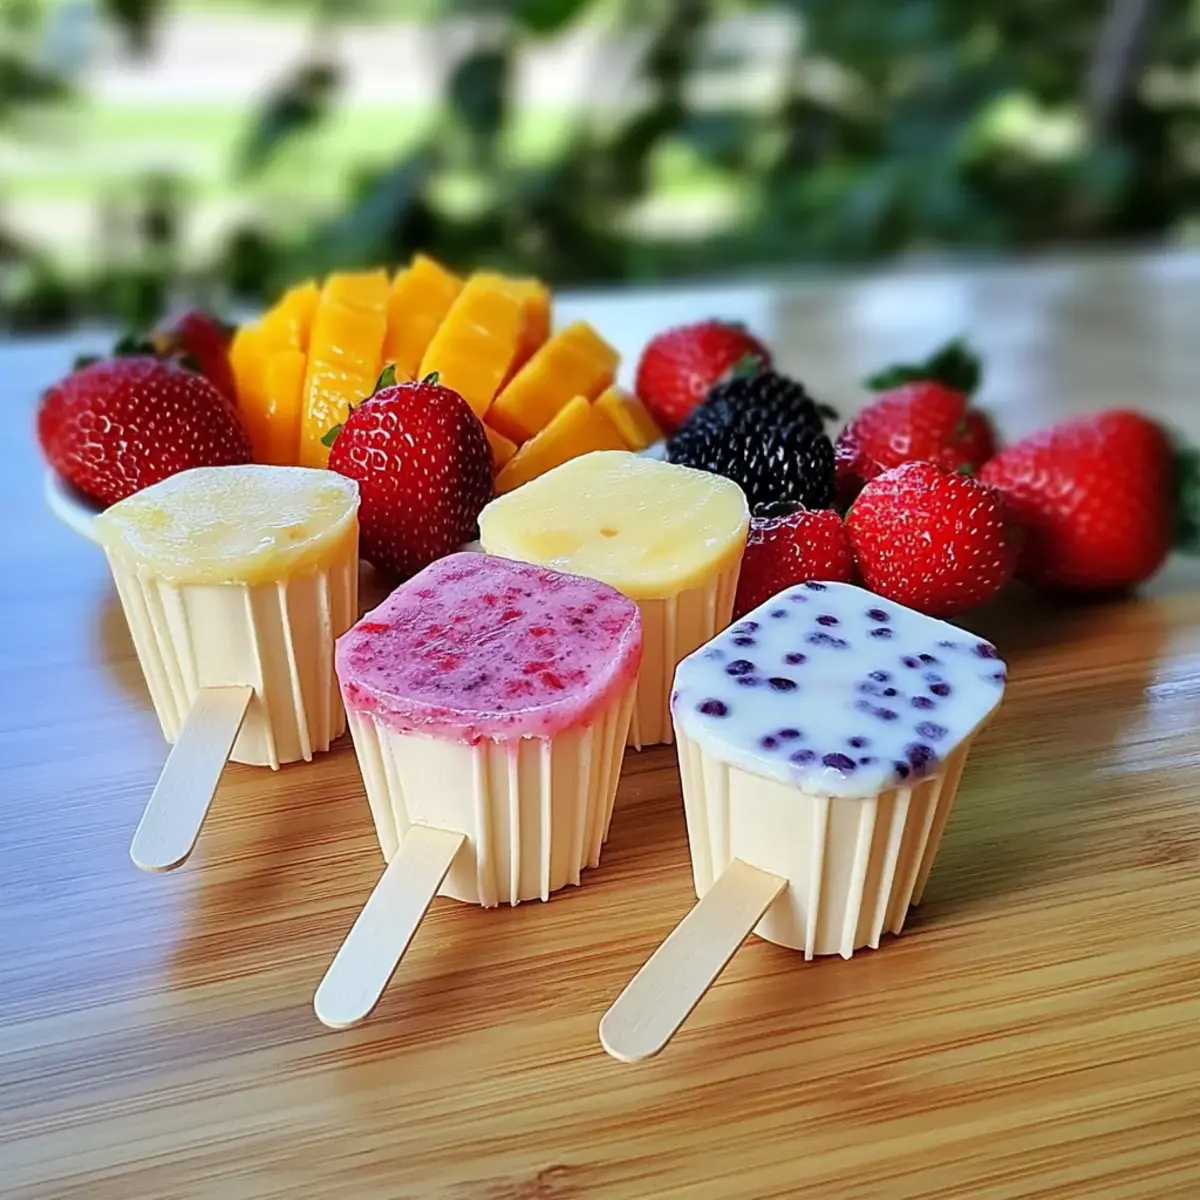
Fruity Yogurt Pops

These delightful, vibrant pops bring a rainbow of fruity flavors to your palate and pack a nutritious punch. They are incredibly easy to whip up, vegan, and gluten-free, making them a guilt-free indulgence for hot summer days.
- 2 cups Fresh Fruit (peaches, berries, or mangoes)
- 1 cup Yogurt (coconut or almond for a vegan twist)
- 1 tablespoon Liquid Sweetener (Agave, honey, or maple syrup)
- 1 tablespoon Mint or Basil (optional)
- 1/4 cup Chopped Nuts or Seeds (optional)
- 2 tablespoons Melted Dark Chocolate (optional)
- 1Chop fresh fruits and lightly grease popsicle molds with coconut oil.
- 2Blend fruits, yogurt, and sweetener on high for 30–60 seconds until smooth.
- 3Pour mixture into molds, leaving space at the top.
- 4Freeze for 1 hour to slightly firm up.
- 5Insert popsicle sticks into the center of each pop.
- 6Freeze for an additional 4 to 5 hours until solid.
- 7Run warm water over molds to release the pops.
- 8Serve immediately and enjoy.
Keywords: popsicles, fruity, yogurt, vegan, gluten-free, summer treat, dessert, healthy
- fresh fruit: seasonal favorites like peaches, berries, or mangoes work perfectly to provide a natural, bright sweetness.
- yogurt: a creamy base is essential, so opt for coconut or almond yogurt for a smooth, dairy-free vegan twist.
- liquid sweetener: agave, honey, or maple syrup can be used depending on your specific fruit ripeness and flavor preferences.
- mint or basil: these fresh herbs add an unexpected, delightful herbal freshness that elevates the profile of your homemade pops.
- chopped nuts or seeds: these are optional but highly recommended if you want to introduce extra texture and a satisfying crunch.
- melted dark chocolate: a small drizzle of chocolate over the finished, frozen pops adds a sophisticated and decadent final touch.
Variations
The Tropical Escape: Use a combination of fresh pineapple, diced mango, and creamy coconut yogurt to capture the essence of a beach vacation. This variation is particularly refreshing when served during the peak of the summer heat.
The Antioxidant Berry Blend: Mix strawberries, blueberries, and raspberries to create a vibrant, color-rich pop that is as healthy as it is delicious. You can serve this with a side of easy berry tart inspiration for a full fruit-focused menu.
The Protein-Packed Power: If you are looking for a post-workout treat, blend in a scoop of your favorite vanilla protein powder along with the fruit. This provides a satisfying, low-carb boost that helps you recover while staying cool and hydrated.
How to Prepare Fruity Yogurt Pops
Step 1: Gather and Prepare Ingredients
The Preparation: Start by selecting the freshest fruits you can find at your local market, as quality ingredients define the final result. Chop your larger pieces of fruit into uniform, smaller chunks to ensure they blend evenly without leaving large, icy fragments.
Herbal Infusions: If you plan to use fresh mint or basil, give them a fine chop to distribute their flavor evenly throughout the mixture. Proper preparation at this early stage prevents any bitterness and ensures a clean, herbal aroma in every single bite.
Mold Maintenance: Prepare your popsicle molds by lightly greasing the interior surfaces with a tiny amount of coconut oil. This simple trick makes removing the frozen pops much easier later on, preventing them from sticking or breaking when you try to serve them.
Step 2: Blend Ingredients
Creamy Texture: Combine your prepared fruit chunks, chosen yogurt, and your liquid sweetener of choice inside your high-speed blender. Blend these ingredients on a high setting for at least 30 to 60 seconds until the mixture is perfectly smooth and velvety.
Visual Appeal: You are aiming for a uniform, vibrant blend that reflects the beautiful colors of the fresh produce you selected. If the mixture looks too thick, you can add a tiny splash of almond milk or water to reach your desired consistency before pouring.
Tasting Note: Before moving to the next phase, do a quick taste test to ensure the sweetness level matches your personal preferences. You can always add an extra teaspoon of honey or agave if you feel the fruit needs a little more enhancement.
Step 3: Pour Mixture into Molds
Precise Pouring: Carefully pour the blended yogurt mixture into your prepared molds, making sure to distribute the liquid evenly between them. It is helpful to use a small pitcher with a spout to keep the process clean and avoid any messy drips on the mold edges.
Expansion Room: Always leave about a quarter-inch of space at the top of each mold to account for the natural expansion that occurs during the freezing process. Failing to leave this room can lead to the pops overflowing, which creates a messy freezer and unevenly shaped treats.
Final Check: Once filled, tap the molds gently against your kitchen counter to release any trapped air bubbles. This ensures that your final pops have a smooth, professional appearance without unsightly gaps or air pockets inside.
Step 4: Initial Freezing
Setting the Base: Place the filled molds into the freezer for approximately one hour to begin the firming process. This initial chilling stage is critical because it creates a semi-solid texture that keeps the sticks perfectly upright during the final freeze.
Avoid Impatience: While it may be tempting to skip this step or insert the sticks immediately, the sticks will likely fall over if the mixture is still completely liquid. Giving it that first hour ensures the stability of the entire construction of your dessert.
Temperature Matters: Ensure your freezer is set to a consistent, cold temperature during this time to promote even freezing. If you have an overcrowded freezer, make sure there is enough airflow around the molds to allow for a steady, uniform drop in temperature.
Step 5: Insert Sticks
Perfect Alignment: After the hour has passed, remove the molds from the freezer and carefully insert your popsicle sticks into the center of each pop. Push them down deep enough so that they are securely anchored but leave enough length for a comfortable grip.
Structural Integrity: By inserting the sticks now, they will freeze firmly in place as the center of the pop solidifies. This guarantees that your popsicle won’t pull out of the stick while someone is trying to enjoy it later.
Centering Technique: If you find that a stick is leaning, you can often use a piece of aluminum foil over the top of the mold to act as a stabilizer. This simple DIY hack ensures the sticks stay upright throughout the rest of the freezing time.
Step 6: Final Freezing
Patience Pays Off: Return the molds to the freezer and let them sit undisturbed for an additional four to five hours, or until they are completely solid. During this time, the mixture will reach a firm, icy state that is ideal for long-term storage.
Confirming Readiness: You will know they are ready when you touch the top of the pop and feel absolutely no give or liquid beneath the surface. The vibrant colors of the fruit will often look slightly deeper once they have reached the peak of the freezing process.
Long-Term Prep: If you want to prepare these for a future party, you can leave them in the freezer overnight. A longer freeze time does not hurt the quality, but it does make the pops much more robust and resistant to melting once you take them out to serve.
Pro Tips for Fruity Yogurt Pops
Avoid Overripe Fruit: Always choose fruit that is slightly firm; using overripe fruit can result in a mushy, granular texture once it turns to ice. Fresh, seasonal produce offers the best color and flavor for this breakfast-inspired snack.
Blend Smoothly: Take the time to blend your ingredients thoroughly for at least a full minute to remove all fruit skins or large fibrous pieces. A silky, smooth base creates the most luxurious mouthfeel, which is the hallmark of a high-quality popsicle.
Grease Your Molds: A light coating of coconut oil inside the molds is a game-changer for effortless removal. This expert step ensures you don’t break your hard work while trying to coax the pops out of their containers.
Monitor Freezer Temperature: Ensure your freezer is performing efficiently; incomplete freezing leads to a watery center rather than a creamy one. If you struggle with ice crystals, consider using a higher fat content yogurt, which stabilizes the mixture better than non-fat options.
Serving Suggestions for Fruity Yogurt Pops
Decoration
For a beautiful presentation, you can dip the top of your frozen pops into a shallow dish of chopped nuts, shredded coconut, or even rainbow sprinkles. A light drizzle of melted dark chocolate also adds a sophisticated look that pairs perfectly with the tartness of berries. Placing them on a decorative platter with fresh fruit garnishes elevates them from a simple snack to a stunning dessert.
Side Dishes
These pops pair wonderfully with a light german pancake recipe or a small fruit salad if you are hosting a brunch. For a more savory contrast, a bowl of lightly salted nuts or even a small cup of chilled herbal tea provides a lovely balance to the sweet, creamy nature of the yogurt.
Creative Serving Ideas
Try placing a single pop into a glass of sparkling water or lemonade for a fun, bubbly “float” experience. This is especially popular at summer gatherings where you want to offer a unique, interactive drink option. You can also serve them alongside a bowl of coconut whipped cream for an extra layer of indulgence that your guests will absolutely adore.
Preparation & Storage
Storing Leftovers
If you have any leftover yogurt mixture that didn’t fit into the molds, store it in an airtight glass container in the refrigerator for up to three days. Always give it a vigorous whisk or a quick re-blend before pouring it into molds for the next batch, as some separation is natural.
Freezing
Once your pops are fully frozen and removed from the molds, store them in a heavy-duty freezer bag or an airtight container to prevent freezer burn. They will maintain their quality and flavor profile for up to two weeks when stored correctly. Be sure to check out our [Pinterest page](https://www.pinterest.com/easycookfeed/) for more visual storage ideas and summer inspiration.
Reheating
While you should never “reheat” a popsicle, you can soften them slightly if they have been in the freezer for a very long time. Simply let them sit at room temperature for about two minutes before serving, which allows the texture to return to that perfect, creamy state that everyone loves.
Frequently Asked Questions
- What is the best way to remove these from the molds without breaking them?
Run the outside of the mold under warm—not hot—water for about 10 to 15 seconds. This creates a tiny layer of melted ice around the edges, allowing the pop to slide out effortlessly without applying excessive pressure to the stick. - Can I use frozen fruit instead of fresh fruit for this recipe?
Yes, frozen fruit works quite well in this recipe, especially if you are out of season for your favorite berries or mangoes. Just ensure you allow the fruit to thaw slightly before blending, as using rock-hard frozen fruit can strain your blender and affect the final texture of the yogurt base. - Are these pops suitable for a low-carb or keto diet plan?
These can easily be made keto-friendly by using a sugar-free yogurt base and a low-carb sweetener like stevia or erythritol instead of honey. Be mindful of your fruit choices, as berries like raspberries and blackberries are lower in carbohydrates than fruits like peaches or mangoes, making them better suited for a low-carb lifestyle.