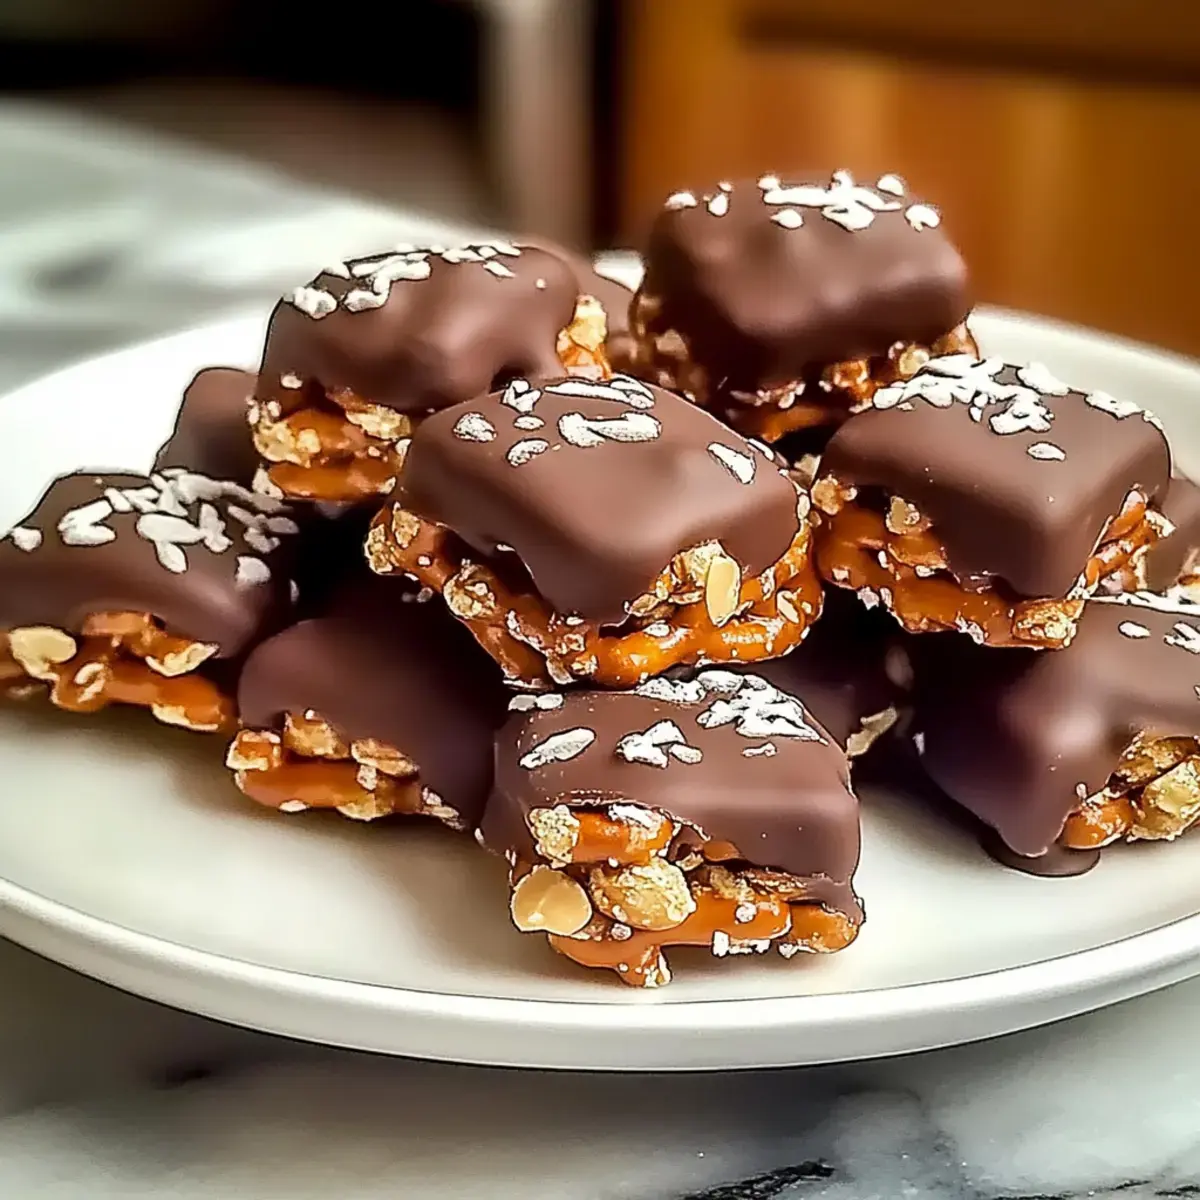
Easy Peanut Butter Pretzel Clusters: Irresistible No-Bake Treats
Have you ever found yourself in need of a quick and fun snack that everyone will love? These Easy No-Bake Peanut Butter Pretzel Clusters are your answer! In just 15 minutes, you can whip up a delightful treat that perfectly balances salty pretzels with the creamy sweetness of peanut butter.
Not only are they a big hit with kids—making them a great family activity—but they’re also a hassle-free option for unexpected gatherings. Plus, the optional chocolate drizzle adds a touch of indulgence. Ready to create some irresistible clusters that will have everyone asking for seconds?
Why You Will Love This Recipe
- Quick Preparation: Dinner is on the table in less than 30 minutes, making these clusters a perfect go-to for busy weeknights or spontaneous cravings.
- Kid-Friendly Fun: Involve the little ones in the kitchen! They’ll have a blast helping to mix and shape these treats, creating cherished family memories along the way.
- Irresistible Flavors: The classic combination of salty pretzels and creamy peanut butter creates a delightful taste sensation that leaves everyone wanting more with every single bite.
- Versatile Treats: Customize with your favorite nuts, seeds, or extra chocolate to suit your personal taste and make these clusters uniquely your own.
- Perfect for Any Occasion: Whether it’s a simple snack for movie night, a last-minute dessert for a gathering, or a delightful school treat, these clusters are sure to be a crowd-pleaser.
Ingredients You Need
The beauty of these Peanut Butter Pretzel Clusters lies in their simplicity and the use of pantry staples that most kitchens already have on hand. Using high-quality ingredients will ensure the best flavor and texture, so opt for fresh peanut butter and crisp pretzels.
Easy No-Bake Peanut Butter Pretzel Clusters
Whip up these irresistible No-Bake Peanut Butter Pretzel Clusters in just 15 minutes! A perfect blend of salty pretzels and creamy peanut butter, these clusters are a hit with kids and adults alike. Customize with your favorite toppings like chocolate drizzle, nuts, or candies for a truly unique treat. Ideal for snacks, parties, or a quick dessert.
- 2 cups Pretzel Sticks (Can substitute with gluten-free pretzels.)
- 1 cup Creamy Peanut Butter (Almond or sunflower seed butter can be used for nut-free.)
- 1/2 cup Powdered Sugar (Measure carefully for texture.)
- 1/2 cup Chocolate Chips (Choose white or dark chocolate.)
- 1Begin by breaking the pretzel sticks into bite-sized pieces, aiming for chunks that are about one to two inches long. Place these pieces into a large mixing bowl.
- 2In a separate medium bowl, combine about one cup of creamy peanut butter with half a cup of powdered sugar. Using a spatula, mix these two ingredients vigorously until you achieve a smooth and thick consistency.
- 3Pour the peanut butter mixture over the pretzel pieces in the mixing bowl. Gently fold the pretzels into the peanut butter mixture, using a spatula to make sure every piece is evenly coated.
- 4Using a spoon or your hands, scoop portions of the mixture and form them into bite-sized clusters. Place each cluster on a parchment-lined baking sheet, ensuring they are spaced apart.
- 5If desired, melt about half a cup of chocolate chips in a microwave-safe bowl. Microwave in 30-second increments, stirring in between, until smooth. Drizzle or dip each cluster in the melted chocolate.
- 6Place the baking sheet in the refrigerator and chill for about 30 minutes, or until the clusters are firm and set.
- 7Once firm, transfer your Peanut Butter Pretzel Clusters to an airtight container and store them in the fridge.
Keywords: Peanut Butter, Pretzel, No-Bake, Clusters, Snack, Dessert, Easy, Kid-Friendly, Quick
- pretzel sticks: Provides the essential crunchy, salty base for each cluster; consider using gluten-free pretzels for those with dietary restrictions.
- creamy peanut butter: Acts as the delicious binder that holds everything together, offering a smooth and rich flavor profile.
- powdered sugar: Adds just the right amount of sweetness and helps to create the perfect chewy texture of the binding mixture.
- chocolate chips: Enhance the sweetness and add a beautiful visual appeal when drizzled over the finished clusters.
The exact quantities for these ingredients can be found within the recipe card, ensuring precision for perfect results every time.
Variations
For those seeking a delightful vegan alternative, simply ensure your chocolate chips are dairy-free and use a plant-based peanut butter. You can also experiment with different nut or seed butters like almond, cashew, or sunflower seed butter for a unique flavor profile that caters to various preferences.
If you’re watching your carbohydrate intake, consider reducing the amount of powdered sugar slightly or opting for a sugar substitute that is suitable for low-carb diets. You might also want to incorporate more of the crunchy pretzels and fewer binder elements to keep the carb count lower per serving.
Another exciting variation involves adding a touch of spice. A pinch of cayenne pepper or a dash of chili powder mixed into the peanut butter mixture can create a fascinating sweet and spicy contrast that is surprisingly addictive and incredibly satisfying. This adds an unexpected yet welcome kick to the familiar flavors.
For an extra layer of texture and flavor, consider adding finely chopped nuts like peanuts, almonds, or walnuts directly into the pretzel and peanut butter mixture. These additions will provide a delightful crunch and an even richer nutty taste, elevating the clusters to a new level of snack perfection.
You can also introduce a fruity element by adding dried cranberries, raisins, or chopped dates to the mix. These ingredients offer a chewy texture and a natural sweetness that beautifully complements the saltiness of the pretzels and the creaminess of the peanut butter, creating a complex flavor profile.
For a touch of decadence, consider adding mini M&M’s or other small candies to the mixture. This not only adds extra bursts of flavor but also makes the clusters incredibly visually appealing, especially for children’s parties or fun gatherings. The pop of color is always a hit.
How to Prepare Peanut Butter Pretzel Clusters
Step 1: Prepare the Pretzel Base
Begin by gathering your pretzel sticks and a large, sturdy mixing bowl. The goal here is to break the pretzel sticks into manageable, bite-sized pieces that will form the crunchy foundation of your clusters. Aim for chunks that are roughly one to two inches in length, ensuring a good balance of pretzel to binder in each bite.
Gently break the pretzel sticks by hand, or if you prefer a more uniform size, you can place them in a zip-top bag and lightly tap them with a rolling pin or the bottom of a heavy pan. This method allows for more control over the size of the pretzel pieces. Once broken, place all these pretzel fragments directly into your large mixing bowl, ready for the next stage of assembly.
It’s important to have enough space in the bowl to thoroughly mix the pretzels with the peanut butter mixture without spilling. Having the pretzels prepped and ready in the main mixing bowl streamlines the entire process, making the subsequent steps much smoother and more efficient.
Step 2: Create the Luscious Peanut Butter Binder
In a separate medium-sized bowl, combine approximately one cup of creamy peanut butter with half a cup of finely sifted powdered sugar. This ratio is crucial for achieving the right texture – a binder that is both sticky enough to hold the pretzels together and sweet enough to complement the salty crunch.
Using a strong spatula or a wooden spoon, mix these two ingredients vigorously. You are looking for a smooth, thick, and cohesive consistency. Ensure there are absolutely no lumps of peanut butter or powdered sugar remaining; a well-combined mixture is the key to well-formed clusters. This mixture is the heart of your no-bake treat, so invest a little effort here.
The resulting peanut butter mixture should be thick enough to cling to a spoon but still pliable enough to be easily incorporated with the pretzels. If it seems too dry and crumbly, you can add a tiny splash more peanut butter; if it’s too oily, a touch more powdered sugar might help absorb some of that excess oil.
Step 3: Marry the Pretzel and Peanut Butter
Now it’s time to unite the two components. Pour the silky, smooth peanut butter and powdered sugar mixture directly over the prepared pretzel pieces in the large mixing bowl. The sight of this rich mixture blanketing the crunchy pretzels is a promising sign of deliciousness to come.
Using your spatula, gently fold the pretzels into the peanut butter mixture. The aim is to coat every single pretzel piece evenly with the binder. Work carefully to avoid crushing the pretzel pieces too much; you want to maintain some of their original structure and crunch. This step requires a bit of finesse to ensure uniform coverage.
Continue folding until all the pretzel fragments are glistening with the creamy peanut butter goodness. You should see a cohesive mass forming, with pretzels well-integrated into the peanut butter binder. This thorough coating ensures that each cluster will hold its shape and deliver that perfect sweet and salty bite.
Step 4: Shape Your Irresistible Clusters
With the pretzel and peanut butter mixture thoroughly combined, it’s time to shape these delightful clusters. Using a tablespoon or your hands (lightly greased with a little oil or peanut butter to prevent sticking), scoop portions of the mixture. Form each portion into a bite-sized cluster shape, pressing gently to help it hold together.
Arrange each formed cluster on a baking sheet that has been lined with parchment paper or wax paper. This lining is essential to prevent the clusters from sticking to the baking sheet as they set. Ensure you leave a little space between each cluster, as they will be handled again, especially if you opt for the chocolate drizzle.
As you shape, focus on creating a good balance of pretzels to peanut butter in each cluster. You want to capture that signature chewiness from the peanut butter alongside the satisfying crunch of the pretzels. This is where the visual appeal begins to take shape, setting the stage for a truly tempting treat.
Step 5: Add the Decadent Chocolate Drizzle (Optional but Recommended)
For an elevated experience and an extra touch of indulgence, consider adding a chocolate drizzle. Melt approximately half a cup of your favorite chocolate chips—whether it’s semi-sweet, milk, or dark chocolate—in a microwave-safe bowl.
Microwave the chocolate chips in 30-second intervals, stirring thoroughly between each interval, until the chocolate is completely smooth and melted. Be careful not to overheat the chocolate, as this can cause it to seize and become unusable. A double boiler method on the stovetop also works beautifully if you prefer.
Once melted and smooth, use a spoon or a piping bag with a small tip to drizzle the chocolate artfully over each pretzel cluster. You can create random lines, zig-zags, or even dip the bottoms of the clusters for a more substantial chocolate coating. This step transforms simple clusters into something truly special and visually stunning.
Step 6: Chill and Set the Flavors
After all your delicious clusters have been shaped and, if desired, drizzled with chocolate, it’s time to let them set. Place the entire baking sheet carefully into the refrigerator. Allow the clusters to chill for at least 30 minutes, or until they are firm to the touch and hold their shape securely.
This chilling phase is crucial for several reasons. It allows the peanut butter mixture to firm up, giving the clusters that characteristic chewy texture that makes them so appealing. It also solidifies the chocolate drizzle, ensuring it doesn’t smudge when you handle the finished treats. Patience here yields perfect results.
As the clusters chill, the flavors begin to meld together beautifully. The salty pretzels, sweet peanut butter, and rich chocolate create a harmonious symphony of tastes and textures. Resist the urge to sample them too early; the final set is well worth the wait for the optimal eating experience.
Step 7: Perfect Storage for Lasting Enjoyment
Once your Peanut Butter Pretzel Clusters are completely firm and set, it’s time to think about storage. Transfer the cooled and hardened clusters from the baking sheet into an airtight container. Using an airtight container is paramount to maintaining their freshness and preventing them from becoming stale or absorbing unwanted odors from the refrigerator.
Store the container in the refrigerator. This is the ideal environment for keeping these no-bake treats at their best. The cool temperature helps to maintain the firm texture of the peanut butter binder and the crispness of the pretzels, ensuring every bite is as delightful as the first. Properly stored, they can last for a good amount of time.
Enjoy these delightful clusters as a satisfying snack, a sweet ending to a meal, or a welcome addition to any gathering. Their ease of preparation and delicious flavor profile make them a versatile treat that’s always a hit, ensuring you have a delightful homemade option readily available.
Pro Tips for Peanut Butter Pretzel Clusters
Smooth Peanut Butter is Key: Always opt for creamy peanut butter that is well-stirred. An oily or overly dry consistency can negatively impact how well the mixture binds the pretzels, potentially leading to crumbly clusters.
Achieving the Right Binding: If your pretzel pieces aren’t sticking together easily, don’t despair. Gradually add a bit more powdered sugar to the peanut butter mixture, a tablespoon at a time, until you achieve a thicker, more cohesive texture that holds its form.
The Importance of Chilling: Don’t be tempted to skip the chilling step, as it is absolutely vital for setting the clusters perfectly. If they remain soft and don’t harden properly, they might not hold their intended shape when handled or served.
Embrace Customization: Feel free to get creative! Adding finely chopped nuts like peanuts or walnuts, seeds, or even a sprinkle of sea salt on top can introduce exciting new dimensions of flavor and texture to your clusters.
Storage Savvy: Use an airtight container to keep your clusters fresh in the refrigerator for up to a week. For even longer enjoyment, they can be frozen, retaining their deliciousness for a much extended period.
Serving Suggestions for Peanut Butter Pretzel Clusters
Decoration
Elevate the visual appeal of your Peanut Butter Pretzel Clusters with a final flourish. A generous drizzle of melted chocolate, whether white, dark, or milk chocolate, adds a beautiful contrast and an extra layer of sweetness. You can also sprinkle a few flaky sea salt crystals on top of the wet chocolate for a gourmet touch and a delightful sweet-and-salty interplay.
Side Dishes
These clusters pair wonderfully with a tall glass of cold milk, a creamy chocolate milkshake, or a refreshing glass of iced coffee for an indulgent treat. For a slightly healthier pairing, consider serving them alongside a fresh fruit salad, where the bright, zesty flavors of berries and citrus can cut through the richness of the clusters.
Creative Serving Ideas
Arrange the clusters artfully on a tiered dessert stand for a party, or package them in small cellophane bags tied with ribbon as charming homemade gifts. They also make a fantastic addition to a dessert charcuterie board, nestled amongst other sweet and savory delights, creating a visually stunning and delicious centerpiece.
Preparation & Storage
Storing Leftovers
To keep your Peanut Butter Pretzel Clusters fresh and delicious, store them in an airtight container in the refrigerator. This method helps maintain their firm texture and prevents them from becoming stale. Properly stored, they can remain a delightful snack for up to one week.
Freezing
For longer-term enjoyment, these clusters freeze exceptionally well. Arrange them in a single layer on a baking sheet and freeze until solid. Once frozen, transfer them to an airtight freezer-safe container or a heavy-duty freezer bag. They can be stored in the freezer for up to three months.
Reheating
There is typically no need to reheat these delightful clusters. They are best enjoyed straight from the refrigerator or freezer, as the chilling process is essential for their characteristic chewy yet firm texture. Enjoy them at their intended delightful consistency.
Frequently Asked Questions
-
What is the best way to select pretzels for my clusters?
Absolutely! Look for pretzel sticks that are sturdy and have no visible cracks or chips, as this ensures they will hold their shape well. Ideally, they should have a nice, satisfying crunch when bitten into. If you’re opting for gluten-free, many brands offer delicious alternatives that will fit perfectly in this recipe, so don’t hesitate to explore those options for your dietary needs.
-
How should I store my Peanut Butter Pretzel Clusters?
You can store your clusters in an airtight container in the refrigerator for up to one week. This will keep them fresh and allow you to enjoy them anytime you crave a perfect sweet and salty snack. For longer storage, consider freezing them as detailed in the storage section of this article.
-
Can I freeze the Peanut Butter Pretzel Clusters?
Yes, indeed! For longer-lasting treats, freeze your Peanut Butter Pretzel Clusters. First, place them in a single layer on a baking sheet until firm, which prevents them from clumping together. Then, transfer them to an airtight container or freezer bag. They can be stored in the freezer for up to three months. When you’re ready to enjoy, just take them out and eat them straight away—no need for thawing, as they are designed to be enjoyed cold!