Coconut Flour Keto Mug Cake
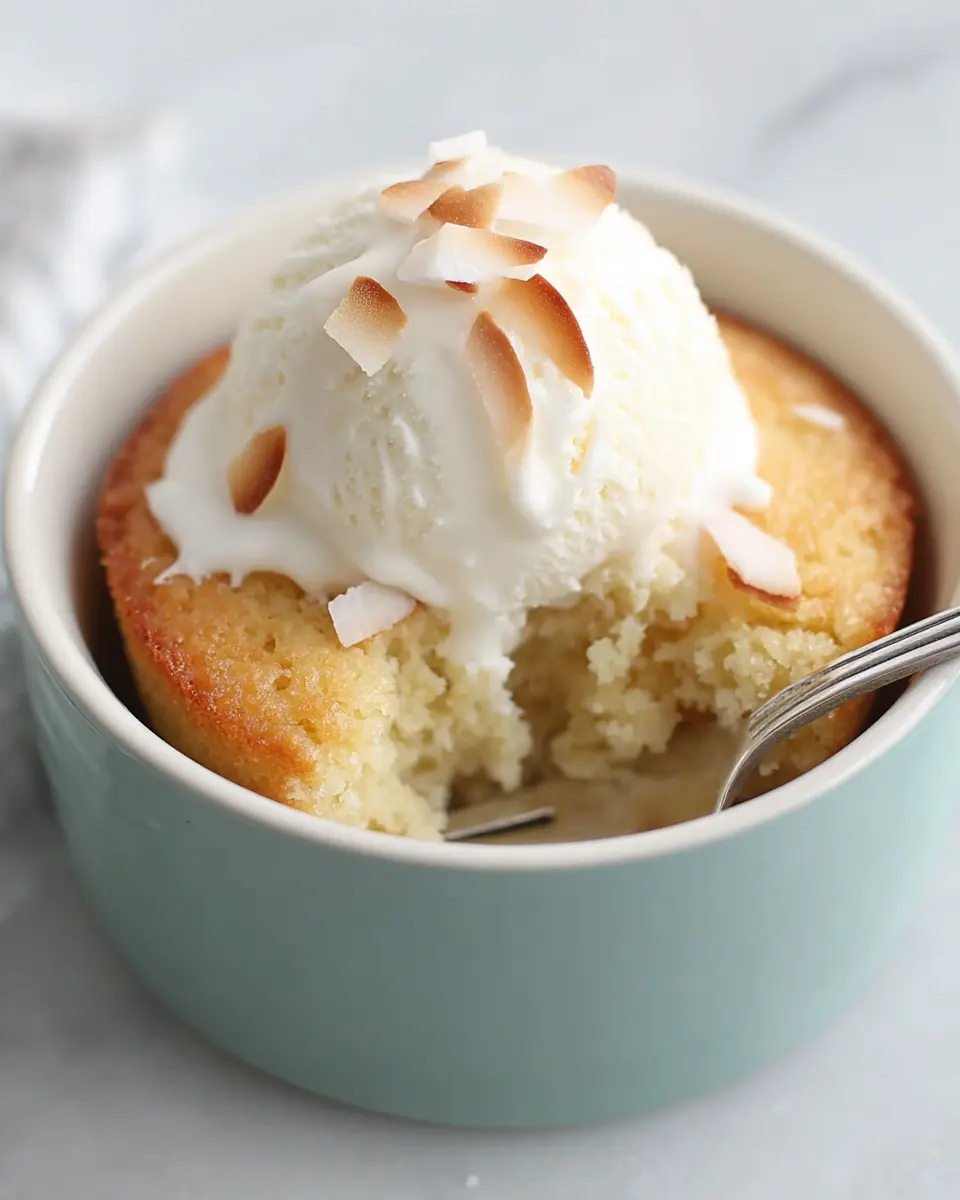
The allure of a warm, freshly baked dessert is undeniable, yet the commitment to a full-sized cake can often feel overwhelming, especially on a busy weeknight. Imagine having the ability to conjure a delectable, single-serving treat in mere minutes, right from your microwave, without compromising on flavor or texture. This Keto Coconut Flour Mug Cake delivers precisely that promise: a quick, low-carb indulgence that satisfies sweet cravings efficiently and deliciously.
This isn’t just any microwave cake; it’s a carefully balanced concoction designed for keto dieters and anyone seeking a speedy dessert solution. The magic lies in its simplicity and the thoughtful selection of ingredients, each playing a crucial role in achieving a tender crumb and rich vanilla flavor. It’s the perfect companion for those moments when only a comforting, homemade-tasting dessert will do, but time is a luxury.
Why You Will Love This Recipe
- Instant Gratification: Enjoy a warm, satisfying dessert in under two minutes of microwave time, perfect for immediate cravings.
- Keto-Friendly: Crafted with coconut flour and low-carb sweeteners, this mug cake fits seamlessly into a ketogenic lifestyle.
- Minimal Effort: A single mug is your mixing bowl and baking vessel, streamlining cleanup significantly.
- Portion Control: Perfectly sized for a single serving, eliminating the temptation of leftovers and reducing waste.
- Versatile Flavor: While delicious as is, it serves as an excellent base for various flavor enhancements and toppings.
Ingredients You Need
The success of this mug cake hinges on the quality and proper measurement of each ingredient, ensuring a tender, moist crumb that avoids the common pitfalls of dry, crumbly microwave cakes. Using fresh, high-quality components will elevate your dessert experience significantly. Remember that precise measurements are key, especially with coconut flour, which is highly absorbent.
Keto Coconut Flour Mug Cake

A quick, low-carb single-serving cake prepared in the microwave with coconut flour, egg, butter, and sour cream for a soft, tender crumb and rich flavor.
- 1 large egg
- 2 tablespoons coconut flour
- 1 tablespoon full-fat sour cream
- 1 tablespoon butter, softened to room temperature
- 1 1/2 tablespoons sweetener (such as monk fruit or erythritol)
- 1 teaspoon vanilla essence
- 1/4 teaspoon baking powder
- 1Add the egg, coconut flour, sour cream, softened butter, sweetener, vanilla essence, and baking powder to a microwave-safe mug.
- 2Mix thoroughly until the batter is smooth and evenly blended, making sure all ingredients are fully incorporated and the mixture is uniform throughout.
- 3Place the mug in the microwave and cook for approximately 1 1/2 minutes.
- 4Check that the cake is cooked through with a fluffy, moist texture. It should not remain overly wet, but it should also not be microwaved too long, as overcooking may cause it to become dry.
Keywords: Keto Coconut Flour Mug Cake, Low-carb, Microwave dessert, Quick dessert, Single-serving cake
- egg: This provides the essential structure and binding for the cake batter, helping it to puff up and become airy.
- coconut flour: The star low-carb flour, it absorbs moisture effectively to create a cake-like texture with minimal carbohydrates.
- full-fat sour cream: Adds crucial moisture and richness, counteracting the dryness sometimes associated with coconut flour.
- butter, softened to room temperature: Contributes to the cake’s tender texture and adds a desirable buttery flavor.
- sweetener, such as monk fruit or erythritol: Provides sweetness without the sugar content, perfect for a keto diet.
- vanilla essence: Enhances the overall flavor profile, giving the cake a classic, comforting dessert taste.
- baking powder: Works to leaven the batter, ensuring a lighter and fluffier final product.
The precise quantities for these ingredients are detailed within the recipe card for your convenience and accuracy.
Variations
While the classic vanilla Keto Coconut Flour Mug Cake is a delightful treat on its own, its potential for customization is vast, allowing you to tailor it to your specific dietary needs or flavor preferences.
For a decadent chocolate version, simply incorporate a tablespoon of unsweetened cocoa powder along with the dry ingredients. You can also add a few sugar-free chocolate chips to the batter before microwaving for little pockets of melted chocolate goodness. This simple alteration transforms the vanilla cake into a rich chocolate dessert, perfect for satisfying those deeper cocoa cravings.
If you’re aiming for an even lower-carb or dairy-free option, consider substituting the sour cream with full-fat unsweetened coconut cream or a dairy-free yogurt alternative. Ensure the alternative is unsweetened to maintain the low-carb integrity of the recipe. This swap can slightly alter the flavor profile but will still yield a wonderfully moist and satisfying mug cake.
Another exciting variation involves infusing spices or extracts into the batter. A pinch of cinnamon can add warmth, while a drop of almond extract can offer a nutty undertone. You could even swirl in a small amount of sugar-free jam or a dollop of nut butter before microwaving for an extra layer of flavor and texture. These small additions can make a significant difference in creating unique and exciting mug cake experiences.
How to Prepare Keto Coconut Flour Mug Cake
Step 1: Gather and Combine Wet Ingredients
Begin by selecting a microwave-safe mug that is adequately sized, typically around 10-12 ounces, to prevent overflow as the cake rises. This ample space is crucial for achieving an even cook and a pleasant texture. Into this chosen mug, carefully crack one large egg, ensuring no shell fragments fall into the mixture. Add one tablespoon of softened butter, which should be pliable enough to mix easily without leaving oily streaks or lumps. Follow this with one tablespoon of full-fat sour cream; its richness is vital for moisture and tenderization.
The next crucial action is to thoroughly whisk these wet ingredients together directly in the mug. Use a small whisk or a fork to beat the egg, cream, and butter until they are completely homogenous and the mixture appears smooth and uniformly yellow. Ensure there are no distinct streaks of butter or unincorporated egg yolk. This initial blending step ensures that the wet components are well-integrated, setting a solid foundation for the subsequent addition of dry ingredients. A well-emulsified wet base will contribute significantly to the final texture of your mug cake, making it light and tender rather than dense or oily.
It’s important that the butter is softened, not melted. Melted butter can sometimes lead to a greasier texture in microwave cakes, whereas softened butter incorporates more smoothly and contributes to a more cake-like crumb. If your butter is too hard, you can briefly microwave it for a few seconds, but be cautious not to fully melt it. The goal is a pliable consistency that blends seamlessly with the egg and sour cream, creating a unified, creamy base ready for the dry ingredients.
Step 2: Incorporate Dry Ingredients
Once the wet ingredients are perfectly blended, it’s time to introduce the dry components that will form the cake’s structure and flavor. Add two tablespoons of coconut flour to the mug. Coconut flour is exceptionally absorbent, so it’s important to measure it accurately. Follow this with one and a half tablespoons of your chosen keto-friendly sweetener, such as erythritol or monk fruit blend, ensuring it dissolves well into the batter. Finally, add one-quarter teaspoon of baking powder, which acts as a leavening agent to help the cake rise and achieve a lighter texture.
Now, carefully stir all the dry ingredients into the wet mixture already in the mug. Use a fork or a small spatula to gently combine everything. It’s essential to scrape the bottom and sides of the mug thoroughly to ensure no dry pockets of coconut flour or sweetener remain. The batter will start to thicken noticeably as the coconut flour begins to absorb moisture from the wet ingredients. Continue mixing until you achieve a smooth, consistent batter with no visible lumps or dry patches. The consistency should be thick but pourable, similar to a very thick pancake batter.
Be patient during this mixing stage. Coconut flour can sometimes clump, so persistent, gentle stirring is key to a uniform batter. Ensure every bit of flour is incorporated to prevent dry, chalky spots in your finished cake. A well-mixed batter is fundamental to an evenly cooked and texturally pleasing mug cake. This step also allows the baking powder to begin its work, promising a lovely rise in the microwave.
Step 3: Allow the Batter to Rest
After thoroughly mixing all the ingredients into a smooth batter, grant it a brief resting period directly in the mug. This short pause, typically for about 30 to 60 seconds, is a critical yet often overlooked step when working with coconut flour. During this time, the coconut flour continues to absorb the available moisture from the other ingredients, allowing the batter to thicken further and achieve a more uniform consistency. This absorption process is what helps prevent the cake from feeling dry or gritty after cooking.
This resting phase allows the coconut flour’s natural absorbent properties to fully engage, ensuring that the cake doesn’t require excessive liquid, which could otherwise lead to sogginess. It’s the subtle science behind achieving that sought-after tender crumb in a keto mug cake. Rushing this step might result in a batter that is too loose, leading to an undercooked center or an uneven texture when microwaved.
The batter’s consistency will visibly change during this short rest; it will become noticeably thicker and more cake-like. This pre-cooking hydration ensures that when the mug cake hits the heat of the microwave, it bakes evenly and achieves the desired fluffy texture without becoming dense or rubbery. It’s a simple step that profoundly impacts the final outcome, making your mug cake a true delight.
Step 4: Microwave to Perfection
Once the batter has rested and thickened slightly, it’s time to introduce it to the microwave. Place the mug containing the batter onto the center of your microwave turntable. Set your microwave to high power and cook for approximately 1 minute and 30 seconds. The exact cooking time can vary significantly depending on the wattage of your microwave, so this duration is a guideline rather than a strict rule.
The goal is for the top of the mug cake to appear set and springy to the touch, rather than wet or glossy. You should see the cake rise significantly during the cooking process. Keep a close eye on it, especially during the last 30 seconds, as overcooking can quickly turn a perfectly moist cake into a dry, rubbery one. If the center still looks visibly wet after 1 minute and 30 seconds, you will need to add more time, but do so cautiously.
When checking for doneness, gently press the top of the cake. If it springs back slightly and looks cooked through, it’s ready. If it still feels soft and leaves an indentation, it needs more time. Avoid the temptation to cook it for the full recommended time if it appears done earlier, as microwave cooking is an art that requires observation and adjustment for optimal results.
Step 5: Check and Adjust Cooking Time
After the initial microwave cycle, it’s crucial to assess the doneness of your mug cake before concluding the cooking process. Carefully remove the mug from the microwave – it will be hot. Gently touch the center of the cake with your fingertip. The cake should feel firm and slightly springy, indicating that it has cooked through. If the center still appears wet, glossy, or leaves a significant indentation when pressed, it requires additional microwaving.
If further cooking is needed, return the mug to the microwave and heat in very short intervals, such as 10 to 15-second bursts. This incremental approach is far more effective than adding a full minute, as it allows you to precisely control the cooking and prevents overcooking. Continuously check the cake after each short burst until the center is just cooked through. The aim is a moist, tender crumb, not a dry, hard puck.
Remember that microwave ovens vary greatly in power. A lower-wattage microwave might require slightly more time, while a higher-wattage one might cook it faster. Trust your visual cues and the touch test rather than strictly adhering to a timer. Overcooking is the primary culprit for a rubbery or dry mug cake, so vigilance during this final stage is key to achieving success.
Step 6: Rest and Enjoy
Once you’ve determined that your Keto Coconut Flour Mug Cake is perfectly cooked, resist the urge to dig in immediately. Allow the mug cake to rest for one to two minutes directly in the mug. This brief cooling period is essential for the cake’s texture to fully set and develop. During this rest, the residual heat continues to gently cook the interior, allowing the crumb to become more tender and less dense.
This resting phase is particularly important for coconut flour baked goods, as it allows the moisture to distribute evenly throughout the cake. It transforms the cake from being slightly moist from microwaving to having a truly pleasant, soft cake-like consistency. Think of it as the final crucial step in achieving that delicate balance of flavor and texture that makes this mug cake so satisfying.
After the short rest, your Keto Coconut Flour Mug Cake is ready to be enjoyed. You can eat it directly from the mug, which is part of its charm and convenience. This simple, quick dessert offers a moment of sweet indulgence without the fuss of traditional baking, making it a perfect treat any time of day.
Pro Tips for Keto Coconut Flour Mug Cake
Measure Coconut Flour Precisely: Coconut flour is incredibly absorbent, far more so than wheat flour. Even a small excess can lead to a dry, crumbly cake. Always use measuring spoons and level off the flour carefully. Too much flour is the most common reason for a less-than-ideal texture in coconut flour baking.
Use Softened Butter: Ensure your butter is softened to room temperature. This allows it to blend seamlessly into the batter without leaving oily pockets or streaks. If the butter is too cold, it won’t incorporate well, and if it’s melted, it can make the cake greasy. Aim for a consistency where it’s pliable and easy to mix.
Avoid Overcooking at All Costs: Microwaves can transform a perfectly moist cake into a rubbery disaster in seconds. It is always better to err on the side of undercooking slightly and adding a few more seconds if needed. Watch the cake closely towards the end of the cooking time; the top should look set and springy, not wet.
Enhance with Flavor Extracts: While vanilla essence is standard, don’t hesitate to experiment with other extracts like almond, lemon, or even a touch of peppermint for different flavor profiles. A tiny amount goes a long way and can drastically change the cake’s character without altering its core structure. Ensure they are pure extracts for the best flavor.
Don’t Skip the Rest Time: That short resting period after microwaving isn’t just for cooling; it’s essential for the cake’s texture to set. Coconut flour continues to absorb moisture and firm up as it cools slightly. Giving it a minute or two allows the crumb to become perfectly tender and less dense, vastly improving the eating experience.
Serving Suggestions for Keto Coconut Flour Mug Cake
Decoration
To elevate your Keto Coconut Flour Mug Cake from a simple treat to a miniature masterpiece, consider a few elegant decorative touches. A dollop of lightly sweetened whipped cream provides a cloud-like topping that contrasts beautifully with the warm cake. For a touch more decadence, a sprinkle of sugar-free chocolate shavings or a few fresh berries, such as raspberries or blueberries, can add both visual appeal and a burst of freshness.
A dusting of powdered keto-friendly sweetener or a light drizzle of sugar-free caramel or chocolate sauce can also add a professional finish. Even a few toasted nuts, like slivered almonds or chopped pecans, can provide a delightful crunch and visual texture. These simple garnishes transform the mug cake into a more sophisticated dessert, perfect for impressing yourself or a guest.
Remember to keep the decorations keto-compliant if you are strictly following the diet. Opt for sugar-free alternatives and use natural ingredients like berries and nuts. The goal is to enhance the visual appeal and flavor without adding unwanted carbs or sugars.
Side Dishes
While the mug cake is a complete dessert on its own, pairing it with certain sides can create a more elaborate dessert experience. A small serving of full-fat Greek yogurt or coconut yogurt can add a creamy, tangy element that balances the cake’s sweetness. This is especially delightful if you’ve opted for a richer cake variation or a more intense flavor profile.
For a truly decadent pairing, consider a scoop of keto-friendly ice cream or a simple sorbet made from berries. The contrast in temperature and texture between the warm cake and a cold scoop of ice cream is a classic dessert combination that’s hard to beat. Ensure the ice cream or sorbet is low in sugar and carbohydrates.
Another excellent side is a small bowl of fresh fruit. While berries are a popular choice for their lower sugar content, a few slices of kiwi or a small portion of unsweetened apple slices can also complement the cake beautifully. The natural sweetness and slight tartness of the fruit offer a refreshing counterpoint to the rich, buttery cake.
Creative Serving Ideas
Take your mug cake experience to the next level with some imaginative serving ideas that add flair and fun. Try incorporating a spoonful of your favorite nut butter, such as almond or peanut butter, into the batter before microwaving. This creates a delightful surprise of gooey, melted nut butter in the center of the cake. Ensure the nut butter is natural and unsweetened for the best keto results.
For a more interactive dessert, serve the mug cake with a selection of toppings on the side, allowing individuals to customize their creation. Think sugar-free whipped cream, various berries, sugar-free chocolate chips, chopped nuts, or even a small ramekin of melted sugar-free chocolate for dipping. This turns the simple mug cake into a mini dessert bar.
Consider serving the mug cake not just in a mug, but perhaps carefully inverted onto a small plate, garnished with a swirl of cream and a berry. This presentation makes it feel more like a traditional dessert, even though it was prepared in the microwave. A dusting of cinnamon or cocoa powder around the plate can add an extra touch of elegance. These creative touches elevate the humble mug cake into something truly special.
Preparation & Storage
Storing Leftovers
This Keto Coconut Flour Mug Cake is undeniably best enjoyed fresh and warm, straight from the microwave. The texture and flavor are at their peak when the cake is freshly baked, offering a soft, tender crumb. However, if you happen to have leftovers, they can be stored with reasonable success for a short period.
To store any remaining mug cake, allow it to cool completely to room temperature. Once cooled, transfer the cake from the mug to an airtight container. Alternatively, you can cover the mug tightly with plastic wrap or a lid and refrigerate it. This will help to prevent it from drying out and absorbing odors from other foods in the refrigerator.
Properly stored in an airtight container in the refrigerator, the mug cake should remain palatable for up to two days. Keep in mind that the texture might become slightly firmer or denser due to the nature of coconut flour; however, it will still be a satisfying treat. Avoid leaving it at room temperature for extended periods, as this can affect its texture and safety.
Freezing
Freezing this mug cake is a convenient option for ensuring you always have a quick, low-carb dessert on hand. It allows you to prepare a batch of these individual treats and keep them ready for whenever a craving strikes, without the need for immediate consumption.
Once the mug cake has been fully baked and has cooled down completely, it’s time to prepare it for the freezer. Wrap each mug cake individually and tightly in plastic wrap, ensuring there are no air pockets. Then, place the wrapped cakes into a freezer-safe container or a heavy-duty freezer bag. This double-layer of protection helps to prevent freezer burn.
When stored correctly, your Keto Coconut Flour Mug Cake can be kept in the freezer for up to one month. The quality will be best within this timeframe. Freezing is an excellent strategy for meal preppers or those who like to have quick dessert options available without the hassle of last-minute preparation. It’s a practical way to enjoy this simple indulgence.
Reheating
Reheating a Keto Coconut Flour Mug Cake requires a gentle touch to restore its warm, tender texture without drying it out. The microwave is the most effective tool for this purpose, but it’s crucial to use short intervals to avoid overcooking.
If reheating from the refrigerator, place the mug cake (if still in the mug) or the thawed frozen cake onto a microwave-safe plate. Microwave on medium power for about 10-second intervals. Check the cake after each interval to gauge its warmth and texture. Continue heating until it is just warmed through; it should be warm to the touch but not piping hot, which can indicate overcooking.
If reheating from frozen, it’s best to thaw the mug cake in the refrigerator overnight first. If you are short on time and need to reheat directly from frozen, expect the microwave time to be longer. Start with 30-second intervals, checking frequently, as frozen items can cook unevenly. The goal is to warm it through gently, preserving the moist, cake-like consistency that makes this treat so enjoyable. Be patient, as rapid reheating can lead to a tough texture.
Frequently Asked Questions
-
Can I make this mug cake in advance and store it for later?
While this mug cake is designed for immediate enjoyment and is at its absolute best when freshly made, it can be prepared in advance. For best results, allow the cake to cool completely after microwaving. You can then store it in an airtight container in the refrigerator for up to two days. Be aware that the texture might become slightly firmer when refrigerated. For longer storage, you can freeze individual mug cakes after they have cooled. Wrap them tightly to prevent freezer burn and store for up to a month. Reheating is best done in short microwave bursts to maintain a tender crumb.
-
Why is coconut flour sometimes tricky to work with in mug cakes, and what if mine comes out rubbery?
Coconut flour is notoriously absorbent, meaning it soaks up significantly more liquid than traditional flours. This characteristic is what makes it excellent for low-carb baking but also challenging if not measured or balanced correctly. If your mug cake comes out rubbery, the most common culprit is overcooking. Microwaves can be intense, and it’s easy to go from perfectly cooked to rubbery in a matter of seconds. To avoid this, always err on the side of undercooking slightly and add more time in very short increments (10-15 seconds) if needed, checking frequently. Ensure you also have adequate fat and moisture from ingredients like egg, butter, and sour cream to keep the texture tender.
-
Can I substitute the sweetener or other ingredients in this recipe without affecting the outcome?
While this recipe is formulated for a specific texture and flavor profile, some substitutions are possible with careful consideration. For the sweetener, most granulated keto-friendly options like erythritol, xylitol (be cautious if you have pets as it’s toxic to them), or monk fruit blends can be used interchangeably, though slight adjustments to quantity might be needed based on their sweetness intensity. Swapping the sour cream can be done with full-fat unsweetened coconut cream or a thick, unsweetened dairy-free yogurt, but this may slightly alter the flavor and moisture content. Replacing the egg is more challenging, as it’s crucial for structure; a flax egg might work in a pinch, but the texture will likely change significantly. Substituting coconut flour with almond flour or another low-carb flour will definitely require a complete re-evaluation of liquid and fat ratios due to their different absorption properties.