The Best Healthy Cheesecake Recipe – Irresistibly Easy Delight
Indulging in a decadent dessert doesn’t have to mean derailing your health goals. The Best Healthy Cheesecake Recipe offers a delightful compromise, bringing you all the creamy, rich satisfaction of classic cheesecake with a significantly lighter footprint. It’s a testament to the fact that healthy eating can indeed be incredibly delicious and deeply satisfying.
This meticulously crafted recipe is designed for both the seasoned baker and the novice looking to impress, ensuring a stress-free journey from preparation to perfect presentation. You’ll discover how simple ingredients can be transformed into a show-stopping dessert that’s ideal for any occasion, proving that healthier choices can be both accessible and exceptionally rewarding.
Why You Will Love This Recipe
- Guilt-Free Indulgence: Enjoy the luxurious taste and texture of traditional cheesecake without the heavy calories and fat, making it a treat you can truly savor.
- Simple Preparation: This recipe is streamlined for ease, featuring clear steps that minimize complexity, perfect for bakers of all skill levels.
- Versatile Serving Options: Adapt the cheesecake to your personal taste with a wide array of suggested toppings, from fresh fruits to decadent sauces.
- Diet-Friendly Ingredients: Carefully selected ingredients like low-fat cream cheese and Greek yogurt contribute to a lighter, yet incredibly satisfying, dessert experience.
- Meal Prep Friendly: Prepare this cheesecake in advance and enjoy its delightful flavor for days, making it an excellent option for busy schedules.
Ingredients You Need
The foundation of any exceptional dish lies in the quality of its ingredients, and this healthy cheesecake is no exception. By selecting fresh, wholesome components, you elevate the final product, ensuring a superior taste and texture that truly shines through. This recipe emphasizes smart choices that contribute to its delightful flavor profile while keeping it on the healthier side.
The Best Healthy Cheesecake Recipe
This easy healthy cheesecake recipe is ideal for those seeking a guilt-free dessert that maintains all the rich, creamy flavors of traditional cheesecake. With its low fat and sugar content, it caters to various dietary preferences and occasions, making it a versatile choice for parties, family gatherings, or even a quiet night in. Get ready to enjoy The Best Healthy Cheesecake Recipe, which features wholesome ingredients without sacrificing taste.
- 1½ Cups Graham Crackers (can use gluten-free)
- 7 Large Medjool Dates (or 14 Deglet Noor Dates)
- 2 Blocks (16 oz) Low Fat Cream Cheese, softened
- 1 Cup Plain Nonfat Greek Yogurt
- 2 Eggs
- 1 Tbs Lemon Juice (fresh)
- 2 tsp Vanilla Extract
- 1 Tbs Cornstarch (Arrowroot or Tapioca Flour should also work)
- 1Soak dates in boiling water about 10 minutes to get them soft.
- 2Grease a 9-inch springform pan. Preheat your oven to 350°F.
- 3Once soft, drain the water off the dates. In a high-speed blender or food processor, add graham crackers and softened dates. Pulse until a dough forms; stop to scrape down sides as needed (about 3–5 times). The dough should be crumbly but stick together when pressed.
- 4Transfer crust mixture into the springform pan. Press down into an even layer and up the sides slightly.
- 5Bake crust for 5–7 minutes at 350°F until fragrant and slightly golden. After baking, reduce oven temperature to 325°F. Set aside while you make the filling.
- 6Beat softened cream cheese and yogurt until smooth. Make sure your cream cheese is very soft for a smooth texture.
- 7Add maple syrup, eggs, lemon juice, vanilla extract, and cornstarch. Mix until very smooth.
- 8Pour cheesecake batter onto crust. Smooth top with a spatula or back of a spoon. Drop on counter gently 4–6 times to remove air bubbles.
- 9Fill a large baking dish halfway with water and place on lower oven rack.
- 10Place cheesecake on middle rack and bake for 55–60 minutes at 325°F until middle is just set and sides are slightly puffed. The center should jiggle slightly like jello.
- 11Turn off oven, open door, and leave cheesecake inside until slightly cooled (about an hour).
- 12Chill cheesecake in refrigerator for at least 4–6 hours or preferably overnight to allow it to set completely.
Keywords: cheesecake, healthy dessert, low fat, low sugar, guilt-free, vegetarian, baked cheesecake, easy recipe
You’ll find the precise measurements for each ingredient within the accompanying recipe card, ensuring perfect results every time you bake this delightful dessert.
Variations
The beauty of this healthy cheesecake lies in its adaptability, allowing you to tailor it to various dietary needs and flavor preferences with minimal effort. Imagine creating a vibrant vegan version by substituting the cream cheese with a rich cashew-based alternative and using a plant-based yogurt. This swap ensures that even those following a strictly vegan diet can revel in the creamy delight of cheesecake, often enhanced with a touch of agave nectar for sweetness.
For those mindful of carbohydrate intake, a low-carb variation is wonderfully achievable. Opting for a crust made from almond flour and a sugar substitute like erythritol or stevia significantly reduces the carbohydrate count. The filling can also be sweetened with these alternatives, providing a delicious dessert that aligns perfectly with a low-carbohydrate lifestyle without compromising on the classic cheesecake appeal.
Furthermore, consider infusing your cheesecake with unique flavor profiles. A swirl of pureed berries, such as raspberries or blueberries, can add a burst of antioxidants and a beautiful visual appeal, creating a delightful berry-infused cheesecake. Alternatively, a hint of citrus zest, perhaps from an orange or lime, can introduce a refreshing zing that beautifully complements the creamy base, offering a brighter, more complex flavor experience for your guests to enjoy.
How to Prepare The Best Healthy Cheesecake Recipe
Step 1: Soak the Dates
The initial step in crafting this exquisite cheesecake involves preparing the natural sweetener for the crust. This involves placing the pitted Medjool dates into a heatproof bowl and generously covering them with boiling water. Allowing them to steep for approximately ten minutes is crucial; this process rehydrates the dates, softening them considerably.
This softening is essential for achieving the right consistency in your crust, ensuring it’s pliable enough to press into the pan. Properly softened dates will blend more readily, contributing to a smooth and cohesive base for your cheesecake. It’s a simple yet vital step for a perfectly textured crust.
Step 2: Preheat the Oven and Prepare the Pan
Before you begin assembling the components of your cheesecake, it’s imperative to preheat your oven and prepare the baking vessel. Set your oven temperature to 350°F (175°C) and adjust the oven racks so that one is positioned in the middle and another on the lower rack. This dual rack placement is key for ensuring even heat distribution during the baking process.
Simultaneously, prepare your 9-inch springform pan. A light greasing of the pan’s interior, using a bit of cooking spray or butter, will prevent the crust and the cheesecake from adhering to the sides. This step is crucial for easy removal of the cheesecake once it has set and cooled, preserving its beautiful shape.
Step 3: Create the Crust
Once the dates have achieved the perfect softness after their soak, carefully drain away the hot water. It’s important to remove as much excess moisture as possible before proceeding to the blending stage. This ensures that the crust mixture doesn’t become too wet, which could affect its texture and baking properties.
In the vessel of a high-speed blender or a food processor, combine the graham crackers and the now-softened, drained dates. Pulse the ingredients together until a cohesive dough begins to form. You may need to stop the machine periodically to scrape down the sides of the blender or processor bowl, ensuring all ingredients are thoroughly incorporated. Continue this process, pulsing and scraping, for about 3 to 5 times until the mixture resembles a crumbly yet cohesive dough that sticks together when pressed.
Step 4: Press the Crust into the Pan
With your crust mixture ready and boasting the ideal crumbly-yet-sticky texture, it’s time to transfer it to the prepared springform pan. Carefully spoon the mixture into the bottom of the greased pan. Using the back of a spoon or your fingertips, press the mixture down firmly and evenly across the entire base.
It’s also beneficial to press the crust mixture slightly up the sides of the pan, creating a subtle rim. This rim helps to contain the cheesecake filling during baking and also provides a beautiful visual edge to the finished dessert. Ensure the layer is as uniform as possible for consistent baking and a professional appearance.
Step 5: Bake the Crust
Once the crust has been evenly pressed into the springform pan, it’s ready for its initial bake. Place the pan onto the middle oven rack and bake at the preheated 350°F (175°C) for approximately 5 to 7 minutes. The goal here is to lightly toast the crust, releasing its fragrant aroma and setting its structure.
After this brief baking period, carefully remove the crust from the oven. Reduce the oven temperature significantly to 325°F (160°C); this lower temperature is essential for the gentle baking of the cheesecake filling. Set the crust aside to cool slightly while you proceed with preparing the creamy filling, ensuring it’s ready for the next stage.
Step 6: Prepare the Filling
The heart of any cheesecake is its luscious filling, and creating a smooth, creamy texture is paramount. Begin by taking your softened cream cheese and plain nonfat Greek yogurt and place them in a mixing bowl. Beat these ingredients together using an electric mixer or a sturdy whisk until the mixture is exceptionally smooth and free of any lumps. Ensuring the cream cheese is truly at room temperature is critical for achieving this velvety consistency.
Once the cream cheese and yogurt base is perfectly smooth, it’s time to incorporate the remaining components. Add the pure maple syrup, which provides a natural sweetness, along with the eggs, which act as a binder. Include the fresh lemon juice for a touch of brightness and the vanilla extract for that classic, comforting cheesecake aroma. Finally, whisk in the cornstarch; this acts as a thickener, ensuring the cheesecake sets up beautifully. Mix everything together thoroughly until the filling is uniformly smooth and well combined, ready to be poured over the crust.
Step 7: Pour and Smooth the Cheesecake Batter
With the crust lightly baked and the filling perfectly blended, the next step is to combine them. Carefully pour the smooth cheesecake batter over the prepared crust in the springform pan. If the springform pan is still warm from its initial baking, use oven mitts to handle it safely. Take your time to ensure an even distribution of the batter across the entire surface of the crust.
Once the batter is in the pan, use a rubber spatula or the back of a spoon to gently smooth the top of the filling. This step not only creates a visually appealing surface but also helps to ensure the cheesecake bakes evenly. For an extra measure to remove any trapped air bubbles that could lead to cracks, carefully drop the filled pan onto the counter gently, about 4 to 6 times. This action will help release larger air pockets, contributing to a denser, more consistent texture.
Step 8: Prepare the Water Bath
Implementing a water bath, also known as a bain-marie, is a critical technique for achieving a perfectly creamy and crack-free cheesecake. This method provides a humid environment and ensures gentle, even heat distribution, preventing the edges from overcooking while the center remains unset. To set up your water bath, find a large baking dish or roasting pan that is significantly larger than your springform pan.
Carefully place the springform pan containing the cheesecake batter into this larger baking dish. Then, fill the larger dish with hot water, ensuring the water comes halfway up the sides of the springform pan. This creates a protective buffer of steam that surrounds the cheesecake as it bakes. Place this entire assembly onto the lower oven rack to ensure the water bath is positioned correctly for optimal baking.
Step 9: Bake the Cheesecake
Now it’s time to bake your masterpiece. Carefully place the prepared cheesecake assembly, with the water bath filled, onto the middle oven rack of your preheated 325°F (160°C) oven. The baking time for this healthy cheesecake typically ranges from 55 to 60 minutes. During this time, the cheesecake will gradually set, with the edges becoming slightly puffed and the center still retaining a slight jiggle.
The key indicator that your cheesecake is ready is this gentle jiggle in the center; it should move slightly like Jell-O when the pan is nudged. Overbaking can lead to a dry texture and cracks, so it’s important to remove it when the center is just set. The residual heat will continue to cook it as it cools.
Step 10: Cool the Cheesecake in the Oven
Once the baking time is complete and your cheesecake exhibits that characteristic slight jiggle, it’s time for the crucial cooling phase. To prevent drastic temperature changes that can cause cracking, turn off the oven completely. Prop the oven door open slightly, perhaps by inserting a wooden spoon handle between the door and the oven frame.
Leave the cheesecake inside this warm, slightly ajar oven for approximately one hour. This gradual cooling process allows the cheesecake to continue setting gently without the shock of rapidly dropping temperatures. This patience is rewarded with a smoother texture and a reduced likelihood of surface cracks, ensuring a beautiful presentation.
Step 11: Chill Before Serving
After the cheesecake has undergone its initial cooling period in the turned-off oven, it’s time for its final, essential chilling phase. Carefully remove the springform pan from the water bath and place it on a wire rack to cool to room temperature. Once it has reached room temperature, cover the pan loosely with plastic wrap or aluminum foil, ensuring it doesn’t touch the surface of the cheesecake.
Transfer the covered cheesecake to the refrigerator. For the best results, allow it to chill for a minimum of 4 to 6 hours, though chilling it overnight is highly recommended. This extended chilling period is vital for the cheesecake to fully set, allowing the flavors to meld and deepen, resulting in that perfect, dense, and creamy texture that defines an exceptional cheesecake. A well-chilled cheesecake is also much easier to slice cleanly.
Pro Tips for The Best Healthy Cheesecake Recipe
Room Temperature is Key: Always ensure your cream cheese and Greek yogurt are brought to room temperature before you begin mixing the filling. Cold ingredients will not emulsify properly, leading to a lumpy and uneven texture in your cheesecake filling. Letting them sit out for about an hour or gently warming them can make a significant difference.
Don’t Overmix the Filling: While you want a smooth filling, overmixing can incorporate too much air into the batter. This excess air can cause the cheesecake to puff up excessively during baking and then collapse or crack as it cools. Mix just until the ingredients are combined and smooth to maintain a denser, richer texture.
Embrace the Water Bath: The water bath is your best friend for preventing cheesecake cracks. It creates a steamy, humid environment in the oven, ensuring that the cheesecake bakes gently and evenly. This consistent temperature gradient prevents the edges from cooking faster than the center, a common cause of cracking.
Patience During Chilling: While the temptation to dive in immediately is strong, allowing your cheesecake to chill for at least 4-6 hours, and ideally overnight, is non-negotiable. This extended chilling period is when the cheesecake truly sets and develops its signature dense, creamy texture and allows the flavors to fully mature.
Gentle Handling for a Smooth Finish: After baking, allowing the cheesecake to cool gradually in the oven with the door ajar prevents rapid temperature changes, a major culprit for cracks. Following this with a complete cool-down to room temperature before refrigerating further aids in achieving a perfectly smooth, unblemished surface.
Serving Suggestions for The Best Healthy Cheesecake Recipe
Decoration
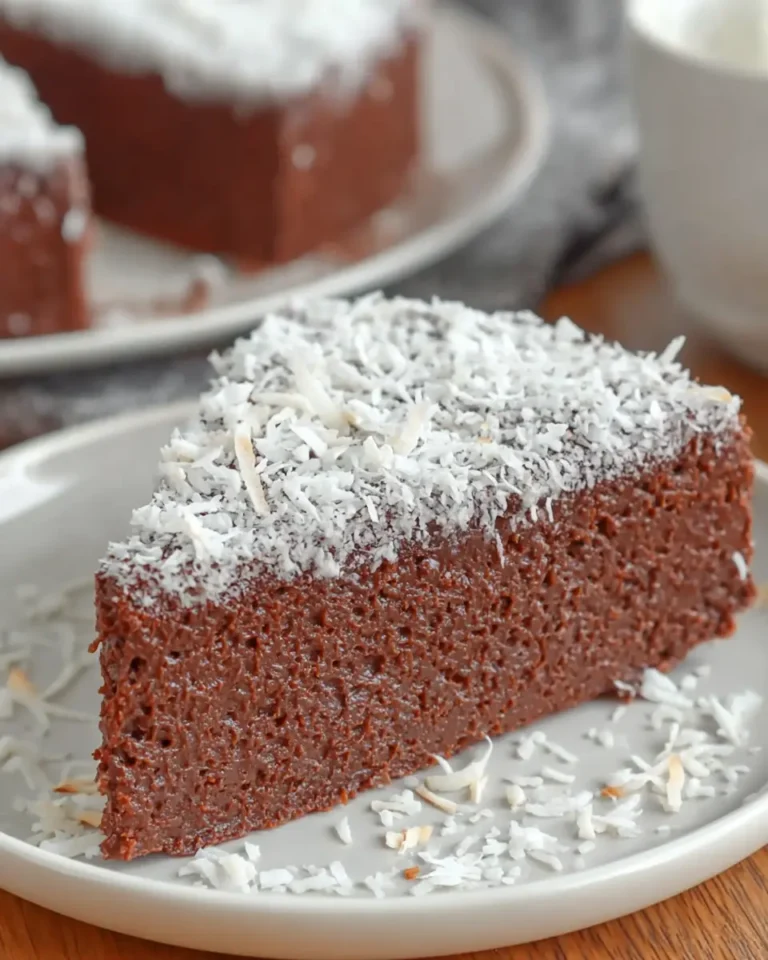
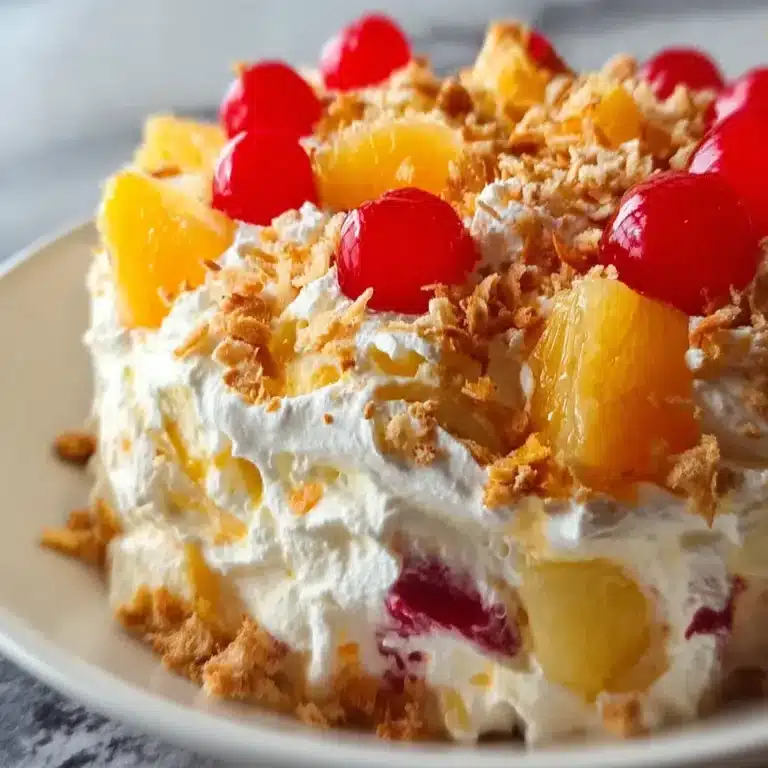
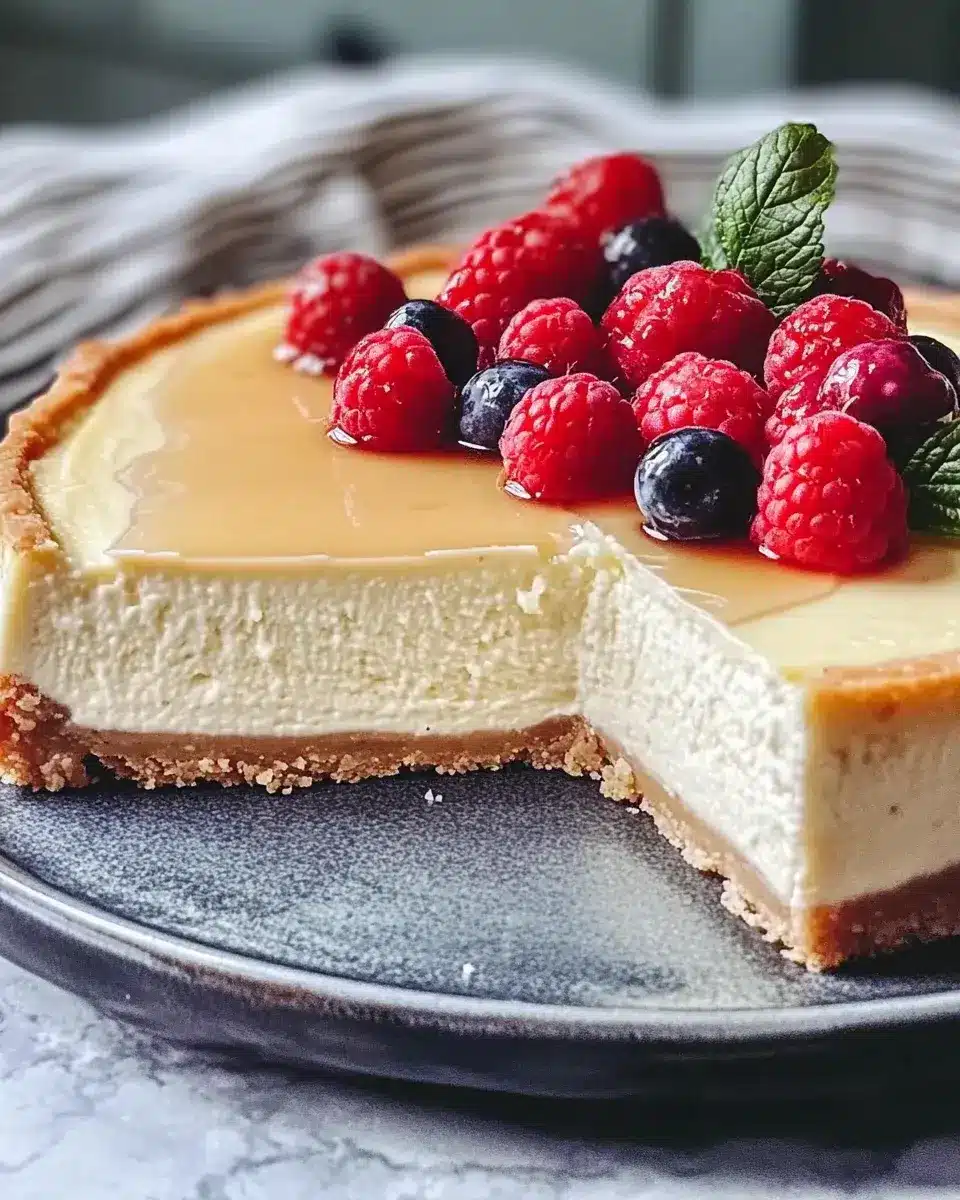
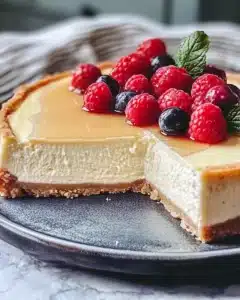
Elevate your healthy cheesecake with vibrant and fresh decorations that enhance both its visual appeal and its flavor profile. A generous scattering of mixed fresh berries, such as plump strawberries, juicy blueberries, and tart raspberries, offers a delightful contrast in color and taste. The natural sweetness and slight acidity of the fruits perfectly complement the creamy richness of the cheesecake.
For a touch of elegance and a hint of tropical flavor, consider topping your cheesecake with thinly sliced kiwi or mango. A light dusting of powdered erythritol can add a subtle sweetness without significantly impacting the health factor. Fresh mint leaves, artfully placed, provide a refreshing aroma and a pop of green that makes the dessert look even more appetizing and inviting.
Side Dishes
Complement your healthy cheesecake with side dishes that echo its freshness or offer a pleasing textural contrast, making the dessert course a well-rounded experience. A simple, light fruit salad featuring seasonal fruits like melon, grapes, and peaches provides a refreshing and hydrating accompaniment. This bright medley ensures that the palate remains cleansed and ready for each bite of cheesecake.
Consider serving small glasses of a homemade berry compote or a light, unsweetened whipped coconut cream alongside. These offer additional layers of flavor and a different creamy texture without being overly heavy. For a more sophisticated pairing, a small selection of artisanal dark chocolates or a few chocolate-dipped strawberries can add a touch of indulgence while still being relatively healthy, especially when using high-cocoa content chocolate.
Creative Serving Ideas
Transform your healthy cheesecake into a delightful dessert centerpiece with a few creative serving ideas that add an element of surprise and delight. Instead of serving a whole cake, consider individual mini cheesecakes baked in muffin tins; these are perfect for portion control and elegant presentation at parties. You can even press the crust into the bottom of small ramekins or jars for a charming, deconstructed presentation.
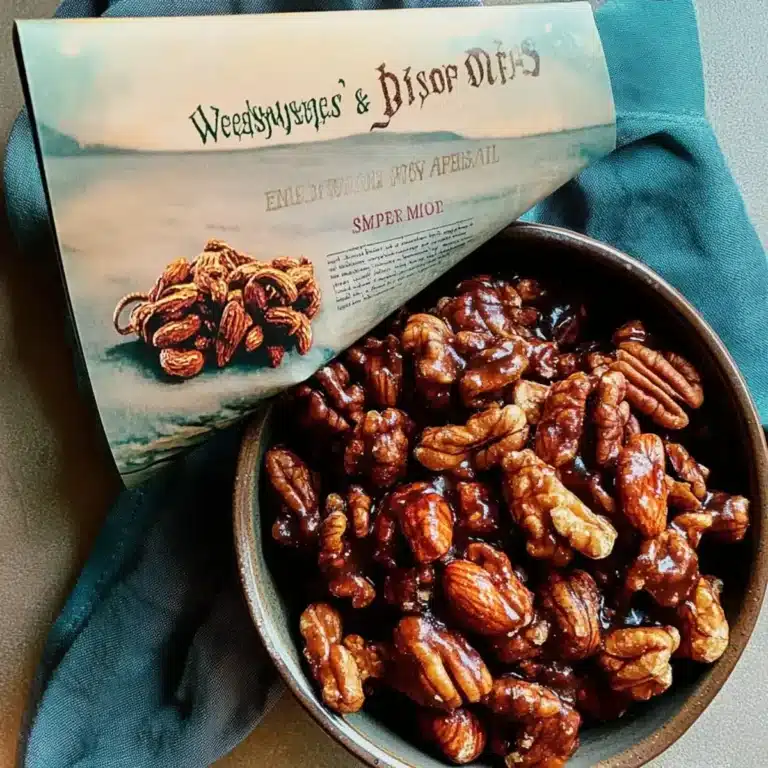
Another fun idea is to create a “cheesecake bar” where guests can customize their own slices with an array of toppings. Offer bowls of fresh fruit, various nut crumbles (like toasted almonds or pecans), a selection of sugar-free syrups (caramel, chocolate, or fruit flavors), and even edible flowers for a truly bespoke dessert experience. This interactive approach ensures everyone gets exactly what they desire, making your healthy cheesecake a memorable talking point.
Preparation & Storage
Storing Leftovers
To keep your delicious healthy cheesecake fresh and delightful for days, proper storage is essential. After the cheesecake has been fully chilled and sliced, cover any remaining portions tightly. You can use plastic wrap, ensuring it’s pressed gently against the cut surface to minimize air exposure, or transfer slices to an airtight container. Storing in the refrigerator will maintain its optimal texture and flavor for up to 10 days.
If you have an un-sliced portion, ensure the entire cheesecake is well-covered with plastic wrap before refrigerating. This prevents it from absorbing other odors in the refrigerator and keeps the surface from drying out. Always ensure the cheesecake is completely cooled before attempting to wrap and store it to avoid condensation.
Freezing
Freezing this healthy cheesecake is a fantastic option for enjoying its delightful taste at a later date, especially if you’ve made a larger batch. The best way to freeze cheesecake is to do so in individual slices, which allows for easy thawing and serving. Wrap each slice thoroughly and tightly in plastic wrap, ensuring there are no gaps where air can penetrate.
Once individually wrapped, place the slices into a freezer-safe bag or an airtight container. This double layer of protection will prevent freezer burn and preserve the quality of the cheesecake for up to 2 months. Label the bag or container with the date of freezing for easy reference. Properly frozen cheesecake will retain its delicious flavor and texture when thawed.
Reheating
Should you choose to reheat your frozen or refrigerated cheesecake, gentle methods are best to preserve its delicate texture. For thawed slices that were previously frozen, a brief reheating can be pleasant if you prefer a slightly warm dessert. You can gently warm individual slices in a microwave on a low power setting in 10-second intervals, checking frequently until just warmed through.
Alternatively, a very low oven temperature can also be used. Preheat your oven to a low 350°F (175°C), cover the slices with foil, and warm them for about 10-15 minutes, or until they reach your desired temperature. Avoid overheating, as this can cause the cheesecake to become mushy or dry. Stovetop reheating is also possible by placing slices in a skillet over very low heat for a few minutes.
Frequently Asked Questions
-
How do I make this cheesecake dairy-free?
To create a dairy-free version of this delicious healthy cheesecake, you can effectively substitute the dairy components with plant-based alternatives. Use a high-quality vegan cream cheese as a direct replacement for the low-fat cream cheese, ensuring it’s at room temperature for optimal blending. Similarly, opt for a plain, unsweetened non-dairy yogurt, such as coconut or almond-based yogurt, to replace the Greek yogurt. These substitutions will result in a wonderfully creamy and satisfying dairy-free cheesecake that doesn’t compromise on flavor or texture, making it suitable for those with lactose intolerance or following a vegan diet.
-
Can I use a different sweetener instead of maple syrup?
Absolutely! The beauty of this recipe lies in its adaptability, and sweeteners are no exception. While pure maple syrup offers a distinct flavor and liquid consistency that works well, you can certainly experiment with other liquid sweeteners. Honey is a popular alternative that provides a slightly different, rich sweetness profile. Agave nectar is another excellent choice, offering a neutral sweetness that allows the other cheesecake flavors to shine through. Be mindful that different sweeteners may have slightly different densities and flavors, so a small taste test of the filling before baking is always a good idea to adjust sweetness levels to your preference.
-
How do I prevent my cheesecake from cracking?
Preventing cheesecake cracks is primarily about managing temperature and moisture during the baking and cooling process. The most effective method is utilizing a water bath (bain-marie) as described in the preparation steps; this creates a humid environment and ensures gentle, even heating, preventing the edges from cooking too quickly and causing the center to puff and crack. Additionally, avoid overmixing the batter, as this incorporates air that expands and contracts, leading to cracks. Finally, a slow, gradual cooling process—first in the turned-off oven with the door ajar, and then at room temperature before chilling—is crucial for minimizing temperature shock and ensuring a smooth, unblemished surface.