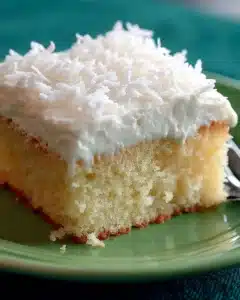
Creamy Chilled Coconut Cake

Coconut cake is a creamy, make-ahead dessert that boasts a wonderfully soft, moist crumb. Its rich coconut flavor is complemented by a cool whipped topping, making it an ideal choice for gatherings or a delightful treat any time.
This cake is a testament to simplicity without sacrificing impressiveness. Utilizing a cake mix for the base ensures ease of preparation, while the infusion of coconut milk and cream of coconut delivers an intensely satisfying coconut experience.
Why You Will Love This Recipe
- Effortless Preparation: Designed for ease, this recipe uses a convenient cake mix as its foundation, making it accessible even for novice bakers. The straightforward steps ensure a stress-free baking process from start to finish.
- Intense Coconut Flavor: Through the strategic use of coconut milk and cream of coconut, this cake delivers a deep, authentic coconut taste that permeates every bite. It’s a flavor explosion for any coconut enthusiast.
- Incredibly Moist Texture: The signature feature of this cake is its exceptionally moist crumb, achieved by a luscious soak that seeps into the warm cake. This process creates a tender, melt-in-your-mouth sensation.
- Make-Ahead Convenience: This dessert is perfect for planning ahead, as it can be prepared the day before serving. The chilling time not only allows flavors to meld but also improves the cake’s structure for slicing.
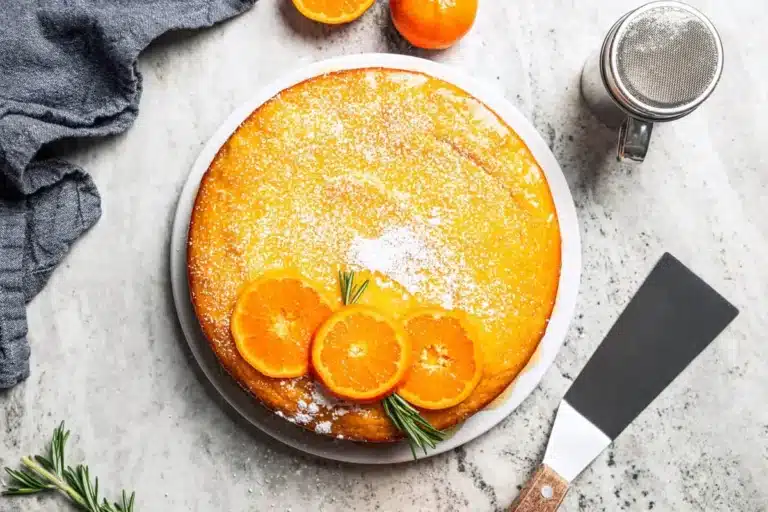
- Visually Appealing Finish: Crowned with a fluffy whipped topping and a generous sprinkle of shredded coconut, this cake is as beautiful to look at as it is delicious to eat. It’s sure to be a centerpiece at any occasion.
Ingredients You Need
The success of this coconut cake hinges on the quality of its ingredients, especially those that impart that distinct coconut essence. Using fresh, high-quality components will elevate the flavor profile and ensure a superior texture that truly shines. Each element plays a crucial role in creating the perfect balance of sweetness and coconut richness.
Creamy Coconut Cake
This creamy Coconut Cake is a make-ahead dessert with a soft moist crumb, rich coconut flavor, and a cool whipped finish. It is simple to assemble, great for gatherings, and even better after a long chill in the fridge. Using a cake mix keeps the base simple, while coconut milk and cream of coconut give it a much fuller flavor.
- 1 cup sweetened shredded coconut for the finishing layer
- 1 box white cake mix
- 8 ounces whipped topping
- 1 1/4 cups coconut milk to replace the water listed on the cake mix package
- 1 15-ounce can cream of coconut for soaking
- 1Prepare the white cake mix according to the package instructions, using 1 1/4 cups of coconut milk in place of the water specified. Mix thoroughly, preferably with a stand mixer, until the batter is smooth and well aerated.
- 2Transfer the batter to a 9 x 13-inch baking dish and bake as directed on the package. Begin checking for doneness about 5 minutes before the suggested baking time, as a slightly less baked surface will better absorb the soaking liquid without becoming dry.
- 3Remove the cake from the oven and, while it is still warm, pierce the top all over with a skewer, toothpick, chopstick, or fork.
- 4Place the cream of coconut in the microwave and heat on HIGH for 1 1/2 minutes. Pour the warmed cream of coconut evenly over the cake, allowing it to flow into the holes and soak into the crumb.
- 5Refrigerate the cake for several hours, or ideally overnight, so the coconut flavor can fully develop and the cake can set properly.
- 6Once chilled, spread the whipped topping evenly across the surface of the cake.
- 7Scatter the shredded coconut evenly over the whipped topping. Keep the cake refrigerated until serving.
Keywords: Coconut Cake, Dessert, Make-ahead, Tropical, Easy
Quantities for all these essential ingredients can be found within the detailed recipe card provided.
Variations
This delightful coconut cake is wonderfully adaptable, allowing for creative twists to suit various dietary needs and flavor preferences. Experimenting with these variations can unlock new dimensions of taste and texture, making the cake even more versatile for different occasions and guests.
For those seeking a vegan option, the approach is elegantly simple. Swap the white cake mix for a vegan-friendly alternative and ensure your whipped topping is plant-based, perhaps using a coconut cream whip for an extra layer of flavor. The cream of coconut and shredded coconut are typically vegan, but it’s always wise to check the labels to be absolutely certain no animal products have been used.
To craft a low-carb version, a sugar-free white cake mix would be the primary substitution. For the soaking liquid, a blend of sugar-free sweetened condensed milk or a sugar-free syrup infused with coconut extract can be used in place of the traditional cream of coconut. Sweetened shredded coconut can be replaced with unsweetened shredded coconut, perhaps lightly toasted for added flavor, and a sugar-free whipped topping would complete this lighter adaptation.
Another exciting avenue for variation involves enhancing the tropical theme further. Consider adding a tablespoon or two of lime zest to the cake batter for a zesty, refreshing contrast to the sweet coconut. Alternatively, a finely chopped cup of fresh pineapple, drained very well, can be folded into the batter before baking to introduce delightful pockets of juicy fruitiness.
How to Prepare coconut cake
Step 1: Preparing the Cake Base
Begin by preheating your oven to the temperature specified on your white cake mix package, typically around 350°F (175°C). This ensures the oven is at the optimal temperature for even baking, which is critical for achieving a tender crumb.
In a large mixing bowl, or the bowl of your stand mixer, combine the contents of the white cake mix. Carefully measure out 1 1/4 cups of creamy coconut milk and add it to the dry cake mix. This coconut milk replaces the water called for on the cake mix box, infusing the batter with a foundational coconut flavor right from the start.
Mix the ingredients on low speed initially to combine them, then increase to medium-high speed and beat for the duration recommended on the cake mix instructions, usually about two minutes. The goal is to achieve a smooth, well-aerated batter. A well-mixed batter leads to a cake that bakes up evenly with a consistently soft texture.
Step 2: Baking the Cake
Once the batter is smooth and ready, carefully pour it into a greased and floured 9×13-inch baking dish. Ensure the batter is spread evenly across the bottom of the dish to promote uniform baking. This size dish is perfect for creating a cake that has enough surface area to absorb the soaking liquid effectively.
Place the baking dish into the preheated oven. Bake the cake for the time indicated on the cake mix package. However, it’s crucial to start checking for doneness a few minutes before the suggested time is up, perhaps around the 20-25 minute mark for a standard 9×13 cake.
To check if the cake is baked through, insert a toothpick or a thin skewer into the center. It should come out clean, indicating that the cake is fully cooked. You are looking for a cake that is set but not dry; a slightly moist crumb surface will absorb the upcoming soak much better than an overbaked, dry one.
Step 3: Creating the Soak Holes
As soon as the cake is removed from the oven, while it is still warm and in its baking dish, it’s time to prepare it for the flavorful soak. The warmth of the cake is essential for its ability to absorb the liquid effectively. Do not let it cool significantly before proceeding with this step.
Using a skewer, a sturdy toothpick, a chopstick, or even the tines of a fork, carefully poke holes all over the entire surface of the warm cake. Aim to create a dense pattern of holes, reaching down into the cake but not all the way through to the bottom of the dish. These perforations are the conduits that will allow the rich cream of coconut to penetrate deep into the cake’s interior.
This step is absolutely vital for ensuring the cake achieves its signature moist and tender texture. Without these holes, the soaking liquid would largely remain on the surface, leading to a sticky top rather than an evenly saturated crumb that feels like it melts in your mouth. This technique is key to a truly exceptional coconut cake.
Step 4: Applying the Coconut Soak
Next, prepare the cream of coconut for its crucial role. If the cream of coconut is thick and difficult to pour, a brief warming can make it more manageable. You can gently warm it in a microwave-safe bowl for about 30 seconds to 1 minute, or until it is fluid enough to pour easily, taking care not to overheat it.
Once warmed, slowly and methodically spoon or pour the cream of coconut over the surface of the warm, hole-poked cake. Take your time with this process, ensuring that the liquid flows into all the holes you’ve created. Distribute it as evenly as possible across the entire top of the cake.
The warm cake will begin to absorb the cream of coconut immediately. Allow it to sit and soak for a while before moving on to the next step. This patient application ensures that the rich, sweet liquid is fully integrated into the cake’s structure, promising that incredibly moist and flavorful outcome.
Step 5: The Crucial Chilling Period
Once the cream of coconut has been generously applied, the cake needs time to rest and absorb all that wonderful flavor. This is where the magic truly happens, transforming a baked cake into a truly decadent dessert. Cover the baking dish tightly with plastic wrap or a lid to prevent the surface from drying out.
Place the covered cake into the refrigerator. For the best possible texture and flavor development, it is highly recommended to chill the cake for several hours. An overnight chill is ideal, allowing the cream of coconut to fully permeate the crumb and the flavors to meld together beautifully.
During this chilling period, the cake’s structure will also firm up slightly, making it much easier to slice cleanly without the toppings or crumb collapsing. This patient waiting is a non-negotiable step for achieving that signature melt-in-your-mouth consistency that makes this coconut cake so beloved.
Step 6: Finishing Touches and Serving
After the cake has had ample time to chill and absorb the soak, it’s time for the final, delightful adornments. Remove the cake from the refrigerator and take off the plastic wrap or lid.
Gently spread the 8 ounces of whipped topping evenly over the entire surface of the chilled cake. Ensure a smooth, consistent layer that covers the cake from edge to edge. This creates a cool, creamy contrast to the dense, moist cake underneath.
Finally, sprinkle the 1 cup of sweetened shredded coconut generously over the whipped topping. Cover the entire surface for a beautiful, snowy finish that enhances both the flavor and the visual appeal. Return the cake to the refrigerator until you are ready to serve it, keeping it chilled for optimal taste and texture.
Pro Tips for coconut cake
Poke While Warm: Ensure you poke the holes into the cake immediately after it comes out of the oven. The residual heat allows the cream of coconut to be absorbed more efficiently and distribute more evenly throughout the crumb, maximizing moisture.
Patience is Key for Chilling: Do not underestimate the importance of the chilling time. While a few hours will yield a good result, allowing the cake to chill overnight makes a significant difference. The texture becomes noticeably smoother, and the flavor integration is far more profound, leading to cleaner slices and a superior eating experience.
Monitor Baking Closely: Begin checking the cake for doneness approximately five minutes before the package instructions suggest. This vigilance helps prevent the cake from developing a dry top crust, which is crucial because the surface needs to be receptive to soaking up the cream of coconut. A slightly underbaked surface is preferable here.
Use Full-Fat Coconut Milk: For the richest flavor and the most tender crumb, opt for full-fat canned coconut milk when substituting for water. Light coconut milk or coconut-flavored beverages may not provide the same level of richness and moisture that makes this cake so special.
Toast the Shredded Coconut: If you desire an extra layer of toasted coconut flavor, you can lightly toast the sweetened shredded coconut before sprinkling it over the finished cake. Spread it in a single layer on a baking sheet and toast in a 300°F (150°C) oven for 5-8 minutes, watching closely to prevent burning. Let it cool completely before using.
Serving Suggestions for coconut cake
Decoration
The classic decoration for this coconut cake is a generous blanket of sweetened shredded coconut, which provides a lovely texture and reinforces the coconut flavor. For an added touch of elegance, consider piping the whipped topping around the edges before adding the shredded coconut. You could also add a few toasted coconut flakes for a beautiful contrast in color and crunch.
Side Dishes
This cake pairs wonderfully with fresh, vibrant fruits. A side of sliced fresh berries, such as strawberries or raspberries, offers a bright, tangy contrast to the cake’s sweetness. Fresh pineapple chunks also complement the tropical theme beautifully, providing a juicy counterpoint.
Creative Serving Ideas
For a more indulgent experience, serve a slice of this coconut cake alongside a scoop of vanilla bean or coconut ice cream. A drizzle of raspberry or passion fruit coulis can add an extra layer of fruity sophistication. For a warm beverage pairing, a hot cup of coffee or a soothing herbal tea provides a comforting contrast to the chilled cake.
Preparation & Storage
Storing Leftovers
Leftover coconut cake should be stored tightly covered in the refrigerator. Due to the whipped topping and the moist, soaked crumb, it is best kept cold to maintain its texture and flavor. Properly stored, the cake will remain delicious for up to 3 to 4 days.
Freezing
Freezing this cake is possible, though the texture of the whipped topping may change slightly upon thawing. If you choose to freeze it, it is best to wrap individual slices securely in plastic wrap, then place them in an airtight container or freezer bag. Freeze for up to 1 month for optimal quality.
Reheating
This cake is best served chilled, so reheating is generally not required. If you have frozen individual portions, the best way to thaw them is in the refrigerator overnight. This gradual thawing helps the cake maintain its intended texture and allows moisture to redistribute evenly.
Frequently Asked Questions
-
Can I make this coconut cake completely from scratch without using a cake mix?
Absolutely, you can create this coconut cake entirely from scratch. You would substitute the cake mix with your favorite white cake recipe, ensuring it has a tender crumb. When preparing the scratch recipe, incorporate coconut milk in place of the liquid typically called for, and adjust other ingredients as needed to complement the coconut flavor. The process of poking holes and soaking with cream of coconut would remain the same, as would the chilling and topping stages.
-
What is the best way to ensure the cake is perfectly moist and not dry?
The key to a perfectly moist coconut cake lies in several factors: using coconut milk in the batter instead of water, not over-baking the cake (start checking early!), poking generous holes while the cake is still warm, and ensuring the cream of coconut soak is thoroughly applied. The extended chilling time is also crucial, as it allows the moisture to fully permeate the cake crumb. Avoid letting the cake sit out at room temperature for prolonged periods once prepared, as this can affect its intended texture.
-
How can I achieve clean slices when serving this very moist cake?
Achieving clean slices with a very moist cake like this involves a few strategic moves. Ensure the cake is thoroughly chilled; slicing it directly from the refrigerator is ideal. Use a long, sharp knife that has been warmed slightly by running it under hot water and then dried thoroughly. Wipe the knife clean between each cut to prevent crumbs and moisture from accumulating, which can make subsequent slices messy. Serving the cake with a fork also helps manage the soft texture.