Irresistible Pistachio Thumbprint Cookies to Savor

The aroma of freshly baked cookies has a way of wrapping around you, instantly transporting you to a cozy kitchen moment. Today, I am thrilled to share my recipe for Pistachio Thumbprint Cookies, a delightful twist on traditional favorites that combines creamy pistachio goodness with a buttery cookie base.
Not only are these cookies a stunning centerpiece for any gathering, but they also offer a melt-in-your-mouth texture that will make every bite unforgettable. Whether you are hosting a festive party or just craving a homemade dessert, these treats are the perfect solution for your sweet cravings.
Why You Will Love This Recipe
- Unique Flavor Profile: These cookies are a gorgeous fusion of buttery sweetness and nutty richness, setting them apart from ordinary treats.
- Versatile Options: With simple ingredient substitutions, you can easily craft a gluten-free version or try hazelnut butter for a fun flavor twist.
- Melt-in-Your-Mouth Delight: Every bite is an indulgent experience, combining a tender, sandy cookie base with a creamy, dreamy pistachio filling.
- Crowd-Pleaser Potential: Perfect for special occasions or casual get-togethers, they appeal to all ages, especially when paired with a warm beverage.
- Efficient Preparation: The straightforward steps make baking these cookies a total breeze, allowing you to whip up a beautiful batch in very little time.
Ingredients You Need
Quality Matters: Using high-quality ingredients like unsalted, premium pistachios and real butter will significantly enhance the final taste and texture of your cookies. Please ensure your pantry is stocked with these simple, fresh items to guarantee the best possible outcome for your baking project.
Pistachio Thumbprint Cookies
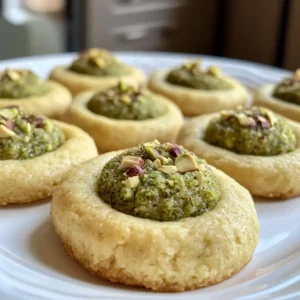
These Pistachio Thumbprint Cookies are a delightful twist on traditional favorites, combining creamy pistachio goodness with a buttery, melt-in-your-mouth cookie base.
- 1 cup Unsalted butter, softened
- 2 cups Powdered sugar
- 1 teaspoon Vanilla extract
- 1 teaspoon Almond extract
- 2 cups All-purpose flour
- 1 cup Finely ground pistachios, unsalted and shelled
- 1 cup Pistachio cream or pistachio butter
- 1In a large mixing bowl, beat 1 cup softened butter and 2 cups powdered sugar for 2–3 minutes until light and fluffy.
- 2Mix in 1 teaspoon vanilla extract and 1 teaspoon almond extract.
- 3In a separate bowl, whisk together 2 cups flour, 1 cup ground pistachios, and ½ teaspoon salt. Gradually mix into the butter mixture until combined.
- 4Scoop dough into balls, place on a baking sheet, and press your thumb into the center to create an indent. Chill in the fridge for 30 minutes.
- 5Preheat oven to 350°F (175°C). Bake for 12–14 minutes until edges are lightly golden.
- 6Cool completely, then fill indents with pistachio cream and top with chopped pistachios.
Keywords: pistachio, cookies, thumbprint, dessert, baking, vegetarian, nut-based
- unsalted butter: provides essential richness and moisture; make sure it is softened to room temperature for the best creaming results.
- powdered sugar: adds a delicate sweetness and contributes to the smooth, melt-in-your-mouth texture of the cookie dough.
- vanilla extract: enhances the overall aromatic profile with a classic, warm touch that complements the nuts perfectly.
- almond extract: offers a wonderful nutty aroma, though you can easily swap this for fresh lemon zest if you prefer a brighter note.
- all-purpose flour: forms the essential structure of the cookies while keeping them tender and light.
- finely ground pistachios: introduces an earthy flavor and beautiful green color; always opt for unsalted, shelled nuts for the best results.
- salt: balances the sugars and helps to elevate the complex nutty undertones of the pistachio base.
- pistachio cream or butter: fills the thumbprint center with intense, creamy goodness; choose a smooth variety that isn’t overly sweetened.
- chopped pistachios: adds a delightful crunchy finish that perfectly complements the soft, buttery cookie center.
Please note that the specific quantities for these ingredients are clearly outlined in the recipe card provided above for your convenience.
Variations
The Gluten-Free Route: You can easily adapt this recipe to fit dietary needs by substituting the standard all-purpose flour with a high-quality 1-to-1 gluten-free baking blend. This ensures that everyone at your table can enjoy these delicious nutty cookies without any worry.
A Citrus Twist: If you prefer a brighter, more zesty cookie, simply replace the almond extract with freshly grated lemon zest. This adds a refreshing citrus note that beautifully cuts through the richness of the pistachio cream, creating a sophisticated flavor balance.
Indulgent Chocolate Pairing: For those who love a bit of decadence, consider drizzling melted dark chocolate over the finished cookies. The combination of deep cocoa and earthy pistachio is truly a match made in heaven for any chocolate lover.
How to Prepare Pistachio Thumbprint Cookies
Step 1: Cream Butter and Sugar
The Foundation: In a large mixing bowl, combine one cup of softened unsalted butter and two cups of powdered sugar. Using an electric mixer, beat the mixture for about two to three minutes until it reaches a light and fluffy consistency that resembles a creamy cloud.
Visual Cues: You will notice the color of the mixture lighten significantly, which is a clear indication that the ingredients are well incorporated. This rich, aerated base is the secret to ensuring your Pistachio Thumbprint Cookies have that signature melt-in-your-mouth quality.
Pro Consistency: Taking the time to properly cream the butter and sugar allows for a better distribution of air. This process contributes to the overall tender crumb of the cookies, making them feel light rather than heavy or overly dense.
Step 2: Add Extracts
Infusing Flavor: Next, gently mix in one teaspoon of vanilla extract and one teaspoon of almond extract into your creamed butter mixture. Continue to beat the batter for about thirty seconds until the liquids are fully absorbed into the fat.
Aromatic Delight: You will immediately notice an inviting, nutty aroma filling your kitchen, which hints at the incredible flavor that will come through in every bite. Proper mixing here ensures that the extracts are distributed evenly throughout the entire batch of dough.
Balanced Notes: The almond extract acts as a perfect bridge between the buttery base and the earthy pistachios, creating a cohesive flavor profile. Once incorporated, scrape down the sides of the bowl to ensure no butter is left behind.
Step 3: Mix Dry Ingredients
Combining Solids: In a separate medium-sized bowl, whisk together two cups of all-purpose flour, one cup of finely ground pistachios, and half a teaspoon of salt. Ensure these are thoroughly combined so the salt is evenly distributed throughout the flour mixture.
Gentle Folding: Gradually add this dry mixture into your wet ingredients while mixing on a low speed setting. It is crucial to stop as soon as the flour streaks disappear to avoid overworking the dough, which could lead to tough cookies.
Texture Check: The final dough should be thick and slightly crumbly to the touch, which is exactly what we want for a shortbread-style thumbprint cookie. If it seems too dry, a tiny splash of milk can help bring it together, but avoid adding too much moisture.
Step 4: Shape and Chill
Portioning: Using a tablespoon or a small cookie scoop, scoop out uniform portions of the dough and gently roll them into smooth balls. Place these balls on a baking sheet that has been lined with parchment paper, ensuring they are spaced about two inches apart to allow for airflow.
The Thumbprint: Gently press your thumb or the back of a small round spoon into the center of each dough ball to create a distinct indent. Be careful not to press all the way through to the baking sheet, as you want a nice cup to hold the cream.
Essential Chilling: Place the entire baking sheet into the refrigerator for at least thirty minutes before moving to the oven. Chilling is a vital step because it helps the cookies hold their shape, preventing them from spreading or losing their thumbprint indent during the baking process.
Step 5: Bake
Preheating: Ensure your oven is fully preheated to 350°F (175°C) before taking the dough out of the fridge. Consistent oven temperatures are essential for achieving the perfect golden-brown finish on the edges of your cookies.
The Process: Bake the chilled dough for twelve to fourteen minutes, keeping a close eye on them as they near the end of the time. You want the edges to look lightly golden, but it is important that the centers remain soft and pale.
The Scent: As they bake, the aroma of toasted pistachios and butter will fill your home, signaling that they are nearly ready. Remember that cookies continue to cook slightly on the hot baking sheet even after you pull them out of the oven.
Step 6: Fill and Finish
Cooling Down: After removing the cookies from the oven, allow them to cool completely on the baking sheet for at least ten minutes. Filling them while they are still hot will cause the delicate pistachio cream to melt and potentially run off the edges.
The Filling: Once the cookies are cool, use a small spoon or a piping bag to carefully fill each thumbprint with your chosen pistachio cream or butter. This creamy center provides a luxurious contrast to the crumbly, nutty cookie base.
Finishing Touches: Sprinkle your reserved chopped pistachios over the top of the cream filling for a delightful textural crunch. These final touches not only enhance the presentation but also provide a fresh, nutty bite that makes these cookies look like they came straight from a gourmet bakery.
Pro Tips for Pistachio Thumbprint Cookies
Chill the Dough: Always prioritize the 30-minute chill time in the refrigerator before baking. This simple step is the best way to prevent your cookies from turning into flat puddles in the oven, ensuring they maintain their beautiful, intentional shape.
Room Temperature Butter: Ensure your unsalted butter is soft enough to indent with your finger but not melted. Using butter that is too cold will result in a difficult mixing process, while melted butter can lead to overly dense, greasy cookies.
Fine Pistachio Grind: For the most consistent texture, use a food processor to grind your pistachios into a fine meal. A coarse grind can create structural weak points in the dough, causing the cookies to crack or crumble unexpectedly while baking.
Cool Before Filling: Patience is key when it comes to the filling stage of this recipe. Filling warm cookies will inevitably cause your beautiful pistachio cream to liquefy, which ruins the elegant appearance and texture of the finished treat.
Serving Suggestions for Pistachio Thumbprint Cookies
Decoration
For a truly elegant presentation, consider adding a light dusting of powdered sugar over the finished cookies just before serving. You can also place a single, vibrant green whole pistachio right in the center of the cream filling for an added visual pop.
Side Dishes
These cookies pair wonderfully with a warm beverage, such as a rich, dark roast espresso that highlights the nutty notes of the pistachio. If you prefer tea, a delicate cup of Earl Grey offers citrus undertones that perfectly complement the buttery nature of the cookie.
Creative Serving Ideas
Consider arranging these cookies on a tiered dessert stand alongside fresh raspberries or strawberries for a beautiful color contrast. The tartness of the berries serves as a perfect palate cleanser between each rich, nutty bite, making for a sophisticated breakfast or brunch addition.
Preparation & Storage
Storing Leftovers
Store your cookies in an airtight container at room temperature for up to four days to maintain their optimal freshness and flavor. If your kitchen is particularly warm, it is best to move them to a cooler location to ensure the pistachio cream stays stable.
Freezing
For longer storage, freeze the unfilled cookies for up to two months in a freezer-safe bag or container. When you are ready to serve, simply thaw them at room temperature and add the pistachio cream fresh to ensure the best texture and taste.
Reheating
If you prefer your cookies slightly warm, place them in a preheated oven at a low temperature for just a few minutes. This light warming helps to soften the cookie base slightly, providing that “fresh-out-of-the-oven” experience that is so incredibly satisfying.
Frequently Asked Questions
- How do I ensure my pistachios are high quality?
When selecting nuts, look for bright green color and avoid any that appear shriveled or have dark spots. Fresh pistachios should smell pleasant and earthy, and tasting one is the best way to ensure they haven’t gone rancid or stale before you commit them to the dough. - Why is my cookie dough crumbling while I try to roll it?
If your dough feels too dry or crumbly, it may lack a tiny bit of moisture due to flour measurement variations. Simply add a teaspoon of milk or water, mixing gently until the dough reaches a pliable consistency that holds together when squeezed. - Can I substitute the pistachio cream?
Absolutely, you can get creative by swapping the center for hazelnut spread, almond butter, or even a thick fruit preserve like raspberry or apricot. Each of these variations offers a unique profile while maintaining the structural integrity of the base cookie, allowing you to personalize the treat for different preferences.
You can find more inspiration for your next sweet project on my Pinterest page. If you enjoy baking, you might also want to try making funfetti cookies or a delicious easy berry tart to keep your dessert repertoire exciting and fresh.