Classic Mimosa Recipe – Made In a Pitcher!

No Sunday brunch is truly complete without the effervescent charm of a perfectly crafted mimosa, and this classic recipe is designed to be the star of your next gathering. It’s a delightful concoction of vibrant orange juice and crisp Prosecco, elevated with simple yet impactful additions that transform it into something truly special.
This pitcher-style mimosa is ideal for serving a crowd, ensuring everyone gets to enjoy the celebratory spirit without constant individual mixing. It’s the perfect companion to your favorite brunch dishes, adding a touch of elegance and festivity to any occasion, from casual weekend brunches to special holidays.
Why You Will Love This Recipe
- Effortless Elegance: This recipe transforms a simple two-ingredient cocktail into a sophisticated pitcher drink, perfect for impressing guests with minimal fuss.
- Crowd-Pleasing: Designed for convenience, mixing in a pitcher means you can prepare enough for a whole brunch party in one go, saving precious time and effort.
- Customizable Charm: While classic in its core, this recipe offers delightful opportunities for personalization, allowing you to tailor the flavors and presentation to your unique taste.
- Speedy Preparation: With just a few minutes of active prep time, you can have a delightful pitcher of mimosas ready to serve, making it ideal for busy hosts.
- Versatile Appeal: Whether for a holiday brunch, a weekend get-together, or just a treat, this mimosa recipe is a versatile choice that always garners rave reviews.
Ingredients You Need
The beauty of a mimosa lies in its simplicity, but the quality of your ingredients directly impacts the final taste. Opting for chilled components is paramount to achieving that refreshing sparkle and ensuring the cocktail remains perfectly balanced. The interplay of fruit and fizz creates a delightful sensory experience that is both invigorating and satisfying.
Mimosa Recipe
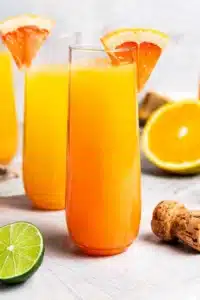
This classic mimosa recipe is made for a brunch crowd! It's a simple cocktail made with orange juice and Prosecco. Mix it in a pitcher with fresh citrus for your next party!
- 1 bottle (750 mL) Prosecco
- 3-4 cups orange juice (I use 50% less sugar, or you can use freshly squeezed)
- citrus slices (grapefruits, oranges, lemons, limes)
- cranberry Juice (for serving)
- 1Add citrus slices. Fill a pitcher with your choice of sliced citrus.
- 2Add sparkle. Pour the bottle of Prosecco over the fruit.
- 3Add orange juice. Slowly pour in the orange juice to combine with the Prosecco.
- 4Serve. Pour the mimosas into champagne flutes and add a splash of cranberry juice to each. Cheers!
Keywords: mimosa, brunch, cocktail, Prosecco, orange juice, party drink, crowd-pleaser
- prosecco: a 750ml bottle of dry Prosecco is the foundation of your mimosa, providing essential fizz and a sophisticated base flavor.
- orange juice: 3-4 cups of orange juice, preferably 50% less sugar or freshly squeezed, adds sweetness and that iconic citrusy tang.
- citrus slices: a colorful assortment of grapefruit, orange, lemon, and lime slices to infuse the pitcher with extra fruity aroma and visual appeal.
- cranberry juice: a splash for serving to enhance the visual appeal and add a subtle layer of tartness that complements the orange and sparkling wine.
The precise quantities for each component can be found within the detailed recipe card, ensuring you have all the necessary measurements for perfect execution.
Variations
While the classic mimosa is undeniably delicious, there are countless ways to put your own spin on this beloved brunch cocktail. These variations cater to different tastes and dietary preferences, ensuring everyone can enjoy a delightful bubbly drink.
For those seeking a non-alcoholic option, the transition is remarkably simple. You can achieve a similar effervescent feel by substituting the Prosecco with chilled soda water or a dealcoholized sparkling wine. Alternatively, a lemon-lime soda like Sprite can offer a touch of sweetness and bubbles, creating a refreshing and family-friendly version of the mimosa.
Low-carb enthusiasts can also enjoy this delightful drink with a few smart substitutions. Opt for a brut or extra-brut sparkling wine, which inherently contains less sugar, and pair it with a low-sugar or sugar-free orange-flavored beverage. Freshly squeezed orange juice with a touch of stevia or a sugar-free orange syrup can also work wonders in minimizing carbohydrate content.
Seasonal variations offer a fantastic way to embrace the flavors of different times of the year. During the fall, consider an apple cider mimosa, where the crispness of apple cider beautifully complements the sparkling wine. For a festive holiday touch, a pomegranate mimosa, with its jewel-toned hue and tart-sweet flavor, is simply stunning and perfectly captures the spirit of the season.
How to Prepare mimosa recipe
Step 1: Gather Your Citrus Companions
Begin by selecting a vibrant array of fresh citrus fruits for your mimosa pitcher. Oranges are essential for that classic sweet and tangy base, but don’t hesitate to include other members of the citrus family for added complexity and visual appeal. Thin slices of grapefruit can introduce a pleasant bitterness, while lemon and lime wedges will lend a bright, zesty counterpoint.
Wash your chosen fruits thoroughly under cool running water to remove any surface impurities. Then, using a sharp knife, slice them thinly, aiming for rounds or half-moons that will easily infuse their flavors into the liquid. The goal here is to create an aromatic and visually appealing foundation for your pitcher of mimosas, setting the stage for a truly delightful beverage experience.
Step 2: The Art of the Citrus Infusion
Once your citrus slices are prepped and ready, carefully arrange them at the bottom of your chosen serving pitcher. You want a generous layer of fruit to maximize the infusion of flavors and create a beautiful visual presentation when the drink is served. Don’t be shy; a good amount of citrus will impart a subtle yet significant depth to the final cocktail.
This step is where the magic truly begins to happen, as the natural oils and juices from the citrus start to mingle. Allow the fruit to sit in the pitcher for a short while, perhaps 10-15 minutes if you have the time, to begin releasing their aromatic essences. This brief period of steeping can elevate the overall flavor profile of your mimosas, making them even more refreshing.
Step 3: Introducing the Bubbly Foundation
With your citrus artfully arranged in the pitcher, it’s time to introduce the effervescent star of the show: the Prosecco. Carefully open the chilled bottle, making sure to avoid excessive shaking that could lead to premature foaming. Gently pour the entire 750ml bottle over the citrus slices in the pitcher.
The initial pour of Prosecco will begin to awaken the citrus, releasing more of its delightful aromas and starting to create a beautiful, frothy head. It’s important that the Prosecco is well-chilled for this step to ensure maximum fizz and a wonderfully refreshing taste. This is the moment the mimosa truly begins to take its recognizable form, promising a celebratory drink.
Step 4: The Balancing Act with Orange Juice
Now, it’s time to add the sweet and tangy component that perfectly balances the crispness of the sparkling wine. Slowly and steadily, pour the cold orange juice into the pitcher. Aim for a ratio that suits your preference, but a common starting point is to add approximately 3 to 4 cups of orange juice to the bottle of Prosecco.
Pouring the orange juice slowly helps to integrate it smoothly with the Prosecco without causing an excessive overflow or losing too much of the precious carbonation. You’ll notice the beautiful color transformation as the vibrant orange melds with the pale gold of the sparkling wine, creating that signature mimosa hue. Give the mixture a gentle stir with a long spoon to ensure everything is well combined, but be careful not to agitate it too much, preserving as much of the sparkle as possible.
Step 5: The Finishing Touch for Each Glass
As your pitcher of mimosas is ready, the final step is to pour and serve them with a delightful flourish. Have your chilled champagne flutes at the ready. Slowly fill each glass about three-quarters of the way with the prepared mimosa mixture from the pitcher.
For an extra touch of color and a hint of tartness, add a small splash of cranberry juice to the top of each individual mimosa. This optional step not only enhances the visual appeal with a beautiful layered effect but also adds a subtle complexity to the flavor profile. Garnish each glass with a fresh citrus slice from the pitcher, or a dedicated garnish, for a final touch of elegance and aroma.
Step 6: Cheers to Your Creation!
With your beautiful pitcher of mimosas ready to be enjoyed, it’s time to celebrate your culinary success. Serve them immediately to ensure the optimal level of effervescence and enjoyment. This pitcher-style preparation makes it incredibly easy to top up glasses as needed, ensuring your guests always have a refreshing drink in hand.
Encourage your guests to savor the delightful combination of sweet citrus and crisp sparkling wine. This recipe is perfect for any occasion, from a casual Sunday brunch to a more festive celebration, and it’s sure to be a hit. Enjoy the fruits of your labor and the wonderful company that accompanies this classic cocktail!
Pro Tips for mimosa recipe
Chill Everything Thoroughly: For the most refreshing mimosa, ensure both your Prosecco (or sparkling wine) and orange juice are thoroughly chilled before you begin mixing. Cold ingredients help maintain carbonation and deliver a superior taste experience, preventing the drink from becoming watery or losing its sparkle too quickly.
Use Quality Sparkling Wine: While you don’t need the most expensive Champagne, opting for a decent quality Prosecco, Cava, or other dry sparkling wine will significantly impact the final flavor. A wine with good acidity and fine bubbles will provide a more sophisticated and enjoyable base for your mimosa, making it more than just juice and fizz.
Freshly Squeezed Orange Juice is Key: If time permits, freshly squeezed orange juice will offer a brighter, more vibrant flavor than most store-bought options. Strain out the pulp for a smoother texture, but a little bit of pulp can add character. Consider mixing in other citrus juices like grapefruit or tangerine for added complexity.
Don’t Over-Stir: When combining the ingredients in the pitcher, stir gently and only as much as needed to incorporate the orange juice. Vigorous stirring will dissipate the carbonation, resulting in a flat, less enjoyable mimosa. The goal is to blend, not to agitate.
Consider a Mimosa Bar: For parties, setting up a mimosa bar allows guests to customize their drinks. Offer a variety of juices like cranberry, grapefruit, pineapple, or mango, and provide garnishes like berries, citrus wheels, or even edible flowers. This interactive element adds fun and caters to diverse preferences.
Serving Suggestions for mimosa recipe
Decoration
Elevate the visual appeal of your mimosas with simple yet elegant garnishes. A thin, perfectly cut wheel of orange or grapefruit perched on the rim of the glass adds a pop of color and an inviting aroma. You can also slide a small wedge of lemon or lime into the glass for an extra zesty visual cue.
For a touch of festive flair, consider a sugar rim on your champagne flutes. Moisten the rim with a citrus wedge, then dip it into a shallow plate of granulated sugar. Tiny edible flowers or a fresh raspberry dropped into the glass can also add a sophisticated and charming touch, making each serving a work of art.
Side Dishes
The classic mimosa is the perfect accompaniment to a wide array of brunch staples. Its bright, refreshing profile cuts through the richness of dishes like crispy bacon, savory sausage, and creamy hollandaise sauce found in Eggs Benedict. The subtle sweetness also complements pastries and baked goods beautifully.
Consider pairing your mimosas with lighter fare as well, such as fresh fruit platters, yogurt parfaits, or a delicate quiche. The bubbly effervescence makes it a delightful partner for richer items like smoked salmon dip, deviled eggs, or even a hearty steak and eggs combination, proving its versatility across the brunch spectrum.
Creative Serving Ideas
Beyond the traditional champagne flute, consider serving your mimosas in different glassware for a unique presentation. A coupe glass offers a vintage charm, while a stemmed wine glass can provide a more sophisticated feel, especially when serving a larger quantity.
For themed parties or a playful touch, create layered mimosas by carefully pouring different juices or liqueurs at different densities. A mimosa bar, as mentioned earlier, is an excellent way to let guests personalize their drinks, offering a selection of juices, sparkling wines, and garnishes. This interactive approach ensures everyone finds their perfect mimosa combination.
Preparation & Storage
Storing Leftovers
While mimosas are best enjoyed fresh due to the sparkling wine’s tendency to lose its effervescence, leftovers can be stored in a pinch. Seal the pitcher tightly with plastic wrap or a lid and keep it refrigerated. The key is to minimize air exposure to preserve as much of the fizz as possible for a short period.
It’s important to note that the carbonation will inevitably diminish over time. For the best results, aim to consume any leftover mimosa within 24 to 48 hours. Adding a fresh splash of Prosecco when serving leftovers can help revive some of the lost sparkle.
Freezing
Freezing mimosas in their liquid form is generally not recommended. The process of freezing and thawing can significantly alter the texture and carbonation of the sparkling wine, often resulting in a flat and unappealing drink. The fruit slices within the mixture might also become mushy upon thawing.
A more successful approach for “freezing” mimosa components involves preparing frozen fruit garnishes or ice cubes. You can freeze orange slices, berries, or even small amounts of orange juice in ice cube trays. These can then be added to freshly made mimosas to keep them chilled without diluting them as ice melts, and they add a beautiful visual element.
Reheating
Reheating mimosas is not a practical or desirable method, as the core components rely on being served chilled. The sparkling wine’s carbonation is essential for its appeal, and any form of heating would destroy this characteristic, leaving you with a flat, warm, and unappetizing beverage. The flavors are also designed to be crisp and refreshing, which is diminished by warmth.
If you find yourself with a mimosa that has lost some of its sparkle or is no longer perfectly chilled, the best course of action is to use it as a base for a new, fresh mimosa. Top up the existing mixture with additional chilled Prosecco and a fresh squeeze of orange juice, or repurpose it into a different drink altogether, perhaps a mimosa sorbet or a base for a cocktail punch.
Frequently Asked Questions
-
Why is it traditionally called a mimosa?
The origin of the name “mimosa” is wonderfully descriptive, stemming from the visual resemblance of the cocktail’s bright, golden hue to the delicate yellow flowers of the mimosa plant. This botanical connection highlights the drink’s cheerful and sunny appearance, making it an apt name for this celebratory brunch beverage.
-
What are the best alternatives to Champagne for a mimosa?
While Champagne is a classic choice, there are several excellent and often more budget-friendly alternatives that work beautifully in mimosas. Prosecco, an Italian sparkling wine, is a popular and readily available option known for its fruity notes and crisp finish. Spanish Cava offers a slightly different profile, often with more yeasty complexity, while many American sparkling wines also provide good quality and value. The key is to choose a dry, well-chilled sparkling wine that you enjoy drinking on its own.
-
Can I make mimosas ahead of time, and if so, how should I store them?
While it’s best to mix mimosas just before serving to preserve their sparkle, you can prepare components ahead of time. You can juice your oranges and slice your citrus fruits and store them separately in airtight containers in the refrigerator for up to 24 hours. When you’re ready to serve, combine the juice and fruit in a pitcher and then add the chilled sparkling wine. If you have any mixed mimosa left over, store it in a tightly sealed pitcher in the refrigerator for no more than 24 hours, understanding that the carbonation will be significantly reduced. Adding a fresh splash of sparkling wine before serving can help revive it slightly.