Chocolate Coconut Cake Pops
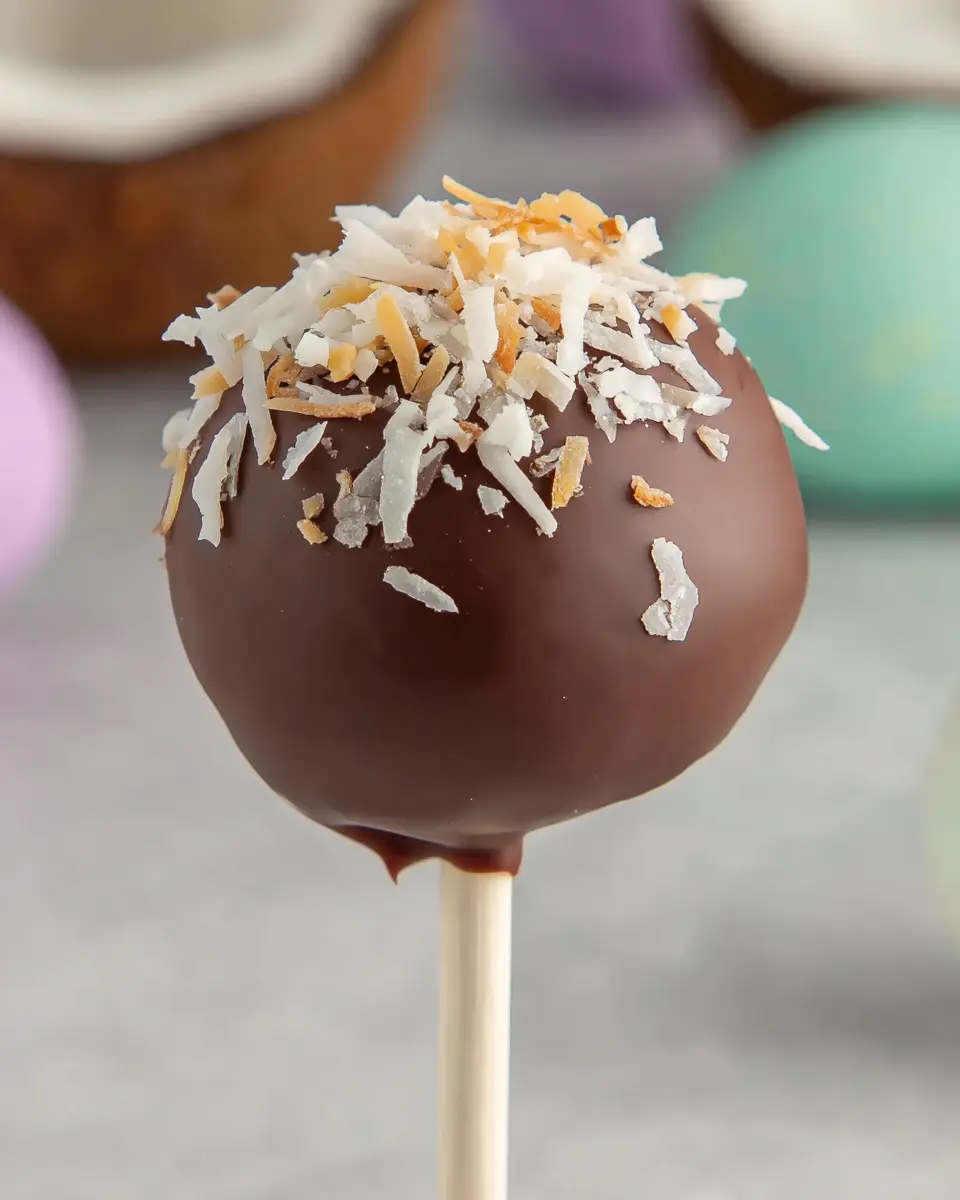
Coconut cake pops are a delightful make-ahead treat that encapsulates deep cocoa richness within a soft, truffle-like center. Their decadent chocolate shell, generously finished with sweet shredded coconut, makes them an absolute showstopper for parties, an elegant gift, or simply a perfect bite-sized indulgence to enjoy straight from the refrigerator.
These charming little dessert pops exude a sense of special occasion without demanding an overly complicated preparation process. The magic begins with a sumptuously rich chocolate cake, which is then transformed into a tender crumb and bound together with a velvety smooth chocolate coffee frosting. This ingenious combination ensures that every single bite is a fuller, more intensely chocolatey experience.
Why You Will Love This Recipe
- Effortless Elegance: These cake pops look sophisticated and festive, perfect for any celebration, yet are surprisingly simple to create.
- Flavorful Fusion: The combination of deep chocolate, subtle coffee notes in the frosting, and sweet coconut creates a wonderfully balanced and irresistible taste profile.
- Make-Ahead Marvel: Prepare them in advance for stress-free entertaining, allowing you to fully enjoy your guests and the occasion.
- Perfectly Portioned: Their bite-sized nature makes them ideal for sampling a variety of desserts or for those moments when only a small sweet treat will do.
Ingredients You Need
The quality of your ingredients plays a significant role in the final outcome of these coconut cake pops. Opting for good quality cocoa powder will significantly enhance the chocolate depth, while using fresh butter and pure vanilla extract will elevate the overall flavor profile. Ensuring your dairy products are at the correct temperature, as specified in the detailed instructions, is also crucial for achieving the perfect cake crumb and frosting consistency.
Coconut Cake Pops

Coconut cake pops are a make-ahead dessert with deep cocoa flavor, a soft truffle-like center, and a chocolate shell finished with sweet coconut, making them ideal for parties, gifting, and bite-sized treats from the fridge.
- 1 teaspoon vanilla extract
- 1 cup unsalted butter, softened to room temperature
- 1/2 teaspoon kosher salt
- 2 teaspoons baking powder
- 1 1/3 cups milk
- 2 large eggs
- 2 cups flour
- 1 3/4 cups granulated sugar
- 1 teaspoon baking soda
- 3/4 cup cocoa powder
- 2 tablespoons freshly brewed coffee
- 2 1/2 cups icing sugar, sifted
- 1/4 teaspoon kosher salt
- 1/3 cup cocoa powder
- 3 tablespoons milk
- 1/4 cup unsalted butter
- 1/2 teaspoon pure vanilla extract
- 1/2 cup sweetened shredded coconut, plus more for finishing
- 1 bag chocolate chips
- 1Preheat the oven to 350°F. For high-altitude baking, raise the temperature to 375°F. Grease and flour two 9-inch cake pans so the layers release cleanly after baking.
- 2In a medium mixing bowl, sift together the flour, cocoa powder, baking powder, baking soda, and kosher salt. Set the dry mixture aside once it is evenly combined.
- 3Place the softened butter and granulated sugar in a large bowl. Using a mixer on medium-high speed, beat until the mixture becomes pale and fluffy, about 3 to 5 minutes. This stage helps create a lighter cake texture.
- 4Reduce the mixer speed to low. Add the vanilla extract, then incorporate the eggs one at a time, mixing well after each addition. Scrape down the bowl as needed to ensure the batter blends evenly.
- 5With the mixer still on low, add half of the sifted dry ingredients to the butter mixture, followed by half of the milk. Mix just until combined. Repeat with the remaining dry ingredients and the remaining milk, blending only until the batter is smooth. Do not overmix.
- 6Divide the batter evenly between the prepared cake pans. Bake for 20 to 25 minutes, or until a cake tester inserted into the center comes out clean.
- 7Let the cakes rest in their pans for about 10 minutes. Then transfer them carefully to a wire rack and allow them to cool fully before proceeding with frosting or further assembly.
- 8While the cakes cool, make the frosting by beating the butter with the cocoa powder, icing sugar, coffee, milk, vanilla, and salt until smooth and spreadable. You want a frosting that is creamy, not stiff, so it blends easily with the cake crumbs.
- 9Crumble the cooled cake into a large bowl until no large pieces remain. Add some of the chocolate coffee frosting and the shredded coconut, then mix gently until the texture feels like soft dough and holds together when pressed in your hand. Add the frosting gradually rather than all at once, because too much will make the pops heavy and hard to dip cleanly.
- 10Scoop and roll the mixture into even balls, then place them on a parchment-lined tray. Chill until firm enough to handle comfortably. Melt a small amount of the chocolate chips, dip the tip of each lollipop stick into the melted chocolate, and insert it halfway into each ball. Return the tray to the fridge so the sticks set securely in place.
- 11Melt the remaining chocolate chips until smooth, using short microwave bursts or a gentle double-boiler method. Dip each pop into the melted chocolate, let the excess drip off, then sprinkle with extra shredded coconut before the coating sets. Stand the finished pops upright in a tall glass or egg carton and let them firm up completely before serving.
Keywords: Coconut Cake Pops, Chocolate Cake Pops, Make-ahead dessert, Party treats, Gifting, Bite-sized treats, Cocoa flavor, Truffle center, Chocolate shell
The precise quantities for all the components are detailed within the recipe card, ensuring you have everything needed for success.
Variations
For those seeking a completely plant-based option, transforming these coconut cake pops into a vegan delight is wonderfully achievable. You can easily substitute the butter with a high-quality vegan butter alternative and use a plant-based milk, such as almond or oat milk. The eggs can be replaced with a flax egg or a commercial egg replacer, and ensure your chocolate chips are dairy-free for the coating. This adaptation maintains the delightful texture and rich flavor, making them suitable for a wider audience and dietary preferences.
Individuals following a low-carb lifestyle can also enjoy a version of these delightful treats with a few thoughtful adjustments. For the cake base, consider using almond flour or coconut flour as a substitute for traditional flour, and sweeten it with a low-carb sweetener like erythritol or xylitol. The frosting can be made using a sugar-free powdered sweetener and a rich, unsweetened cocoa powder. For the coating, sugar-free chocolate chips or a dark chocolate with a very high cocoa content (90% or more) would be ideal to minimize carbohydrate intake.
Adding a burst of fruitiness can also elevate these cake pops into something truly special. Consider folding in a small amount of finely diced dried cranberries or cherries into the cake crumb mixture before rolling. Alternatively, you could create a simple fruit-infused glaze or swirl a small amount of a vibrant berry compote into the frosting. This adds a beautiful contrast in color and a delightful tanginess that complements the sweet, rich flavors of the coconut and chocolate.
How to Prepare Coconut Cake Pops Recipe
Step 1: Bake the Chocolate Cake Layers
Begin by preheating your oven to the specified temperature, which is typically 350°F (175°C), but for high-altitude baking, you’ll want to increase this slightly to 375°F (190°C) to ensure proper rise and texture. Prepare your two 9-inch cake pans by greasing them thoroughly and then dusting them lightly with flour, tapping out any excess. This crucial step prevents the delicate cake layers from sticking, ensuring they release cleanly after baking and can be easily crumbled later.
In a medium-sized bowl, it’s time to combine the dry ingredients for the cake batter. Whisk together the all-purpose flour, rich cocoa powder, baking powder, baking soda, and kosher salt until everything is thoroughly incorporated and there are no visible lumps of leavening agents or salt. This even distribution of dry ingredients is key to a uniform cake texture and consistent rise. Having this mixture ready will streamline the next stage of batter creation.
In a separate, large mixing bowl, you will start building the foundation of your cake’s richness and tenderness. Beat the softened butter and granulated sugar together until the mixture achieves a pale, fluffy appearance, which usually takes about 3 to 5 minutes with an electric mixer. This aeration process is vital as it incorporates air into the batter, contributing significantly to a lighter and more tender cake crumb, which is essential for soft cake pops.
Step 2: Combine Wet and Dry Ingredients
Once the butter and sugar mixture is beautifully pale and fluffy, it’s time to introduce the wet ingredients that will add moisture and structure. Add the pure vanilla extract to the bowl, and then incorporate the large eggs one at a time. It’s important to mix thoroughly after each egg is added, scraping down the sides of the bowl periodically to ensure everything is evenly incorporated and the batter remains smooth.
Now, you’ll begin the process of combining the wet and dry components to form the cake batter. Add half of the pre-whisked dry ingredients to the large bowl containing the creamed butter and egg mixture. Pour in half of the milk as well. Mix these on a low speed with your electric mixer, just until everything is combined and there are no large streaks of flour visible; overmixing at this stage can develop gluten too much, leading to a tougher cake.
Following the initial incorporation, repeat the process with the remaining dry ingredients and the remaining milk. Continue to mix on low speed only until the batter is smooth and homogenous. The final batter should have a lovely, glossy sheen and a consistency that is pourable but not overly thin. Divide this glorious chocolate batter evenly between your two prepared cake pans, ensuring each pan has approximately the same amount for uniform baking.
Step 3: Bake and Cool the Cake Layers
Place the filled cake pans into your preheated oven. Bake for approximately 20 to 25 minutes, or until the cake layers are fully cooked through. You can test for doneness by gently pressing the center of the cake with your finger; it should spring back lightly. Alternatively, insert a wooden skewer or a toothpick into the center of the cake; it should come out clean with no wet batter attached.
Once baked to perfection, carefully remove the cake pans from the oven. Allow the cake layers to cool in their pans on a wire rack for about 10 minutes. This brief resting period allows the cake to firm up slightly, making it easier to handle without breaking when you attempt to remove them from the pans. Trying to unmold them too soon can lead to significant breakage and a mess.
After the initial cooling in the pans, gently invert the cake layers onto a wire cooling rack. Allow them to cool completely before proceeding with the next steps. This is a critical stage; warm cake is too fragile to crumble and mix effectively, and it can also melt the frosting prematurely. Patience here ensures perfectly structured cake pops later.
Step 4: Prepare the Chocolate Coffee Frosting
While the cake layers are diligently cooling to room temperature, you can turn your attention to creating the decadent frosting that will bind everything together. In a clean mixing bowl, combine the softened butter, sifted icing sugar, rich cocoa powder, brewed coffee, milk, vanilla extract, and a pinch of salt. The coffee is a secret weapon here, enhancing the chocolate flavor without imparting an overpowering coffee taste.
Using an electric mixer, beat these ingredients together on medium speed until the frosting is incredibly smooth, creamy, and spreadable. You’re aiming for a consistency that is rich and luscious, but not overly stiff or thick, as this will make it easier to blend seamlessly with the cake crumbs. If the frosting seems too thick, you can add a tiny bit more milk, a teaspoon at a time, until it reaches the desired consistency. Conversely, if it’s too thin, gradually add more sifted icing sugar until it firms up.
The goal is a frosting that has the perfect balance of sweetness, chocolate intensity, and a smooth texture that will beautifully coat and bind the cake crumbs. This frosting is not just a binder; it’s a flavor enhancer, adding another layer of deliciousness to your coconut cake pops. Its rich, fudgy nature will make the cake pops incredibly moist and irresistible.
Step 5: Create the Cake Pop Mixture
Once the cake layers are entirely cool to the touch, it’s time to transform them into the base for your cake pops. Crumble the cooled cakes into a large mixing bowl, ensuring there are no large chunks remaining. You can use your hands or a fork to break the cake down into fine crumbs; the finer the crumbs, the smoother your cake pop centers will be, resembling a soft truffle consistency.
To this bowl of cake crumbs, add a portion of the prepared chocolate coffee frosting. Also, stir in the sweetened shredded coconut. Begin by adding only a few tablespoons of the frosting and a good amount of the coconut, then mix gently. The key here is to add the frosting gradually, rather than all at once, because too much frosting can make the mixture overly wet, heavy, and difficult to handle, impacting the final dipping process.
Continue to mix and gradually add more frosting as needed until the texture of the mixture feels like a pliable, soft dough. It should hold together when you press a small amount between your fingers. You want it to be moist enough to form into balls but not so sticky that it’s unmanageable. The addition of shredded coconut at this stage ensures it’s evenly distributed throughout the cake pop’s interior, providing delightful texture and flavor.
Step 6: Shape and Chill the Cake Balls
Using a small cookie scoop or your hands, scoop out portions of the cake mixture and roll them into uniform balls. Aim for a consistent size for all your cake pops, which will help them bake and dip evenly. Place these perfectly formed balls onto a parchment-lined baking tray or a tray lined with wax paper. Ensure they are not touching each other at this stage.
Once all the cake mixture has been rolled into balls, place the entire tray into the refrigerator. Chill them for at least 30 minutes, or until they are firm enough to handle comfortably without losing their shape. This chilling step is crucial as it firms up the cake mixture, making it much easier to dip without the balls disintegrating or becoming misshapen.
While the cake balls are chilling, you can prepare your lollipop sticks. Melt a small amount of the chocolate chips in a microwave-safe bowl in short, 15-second intervals, stirring between each, or use a double boiler. Dip the tip of each lollipop stick into the melted chocolate, then carefully insert this chocolate-dipped end about halfway into each chilled cake ball. This acts as a “glue” to help secure the pop to the stick. Place the tray back in the fridge for another 10-15 minutes to allow the chocolate on the stick tips to set firmly.
Step 7: Dip and Decorate the Cake Pops
Melt the remaining chocolate chips until they are smooth and fluid. You can achieve this using the microwave in short bursts, stirring frequently, or by employing a gentle double-boiler method. It’s important that the chocolate is the right consistency for dipping; if it seems too thick, you can stir in a very small amount of vegetable oil or coconut oil to thin it out slightly, but be careful not to add too much.
Holding a cake pop by its stick, carefully dip it into the melted chocolate, ensuring it is fully coated. Gently lift the pop out of the chocolate and allow any excess to drip back into the bowl. To achieve that signature coconut finish, immediately sprinkle the wet chocolate coating with extra sweetened shredded coconut before the chocolate begins to set. Work relatively quickly to ensure the coconut adheres well.
Finally, stand the finished cake pops upright in a tall glass, a vase, or an egg carton lined with parchment paper. This keeps them organized and prevents them from sticking to any surface while the chocolate coating hardens completely. Allow them to set at room temperature for a little while, or pop them back in the fridge for a few minutes if you are short on time, ensuring the chocolate shell is firm.
Pro Tips for Coconut Cake Pops Recipe
- Perfect Crumb Texture: Ensure your cake is completely cool before crumbling. Warm cake will be gummy and difficult to bind, resulting in a less-than-ideal texture for your cake pop centers.
- Frosting Moderation: Use just enough frosting to make the cake crumbs hold together when pressed. Too much will make the mixture too soft and greasy, hindering the rolling and dipping process.
- Chilling is Key: Always chill the rolled cake balls before dipping. This firms them up, preventing them from falling apart in the chocolate coating and ensuring a smooth, round shape.
- Stick Security: Dipping the lollipop stick tips in melted chocolate before inserting them into the cake balls acts as an anchor. This greatly reduces the chance of pops detaching from their sticks.
- Coconut Adhesion: Sprinkle the shredded coconut onto the dipped pops immediately after coating. The wet chocolate provides the perfect sticky surface for the coconut to adhere to, creating an even and attractive finish.
- Smooth Coating: For an ultra-smooth chocolate shell, ensure your chocolate is melted to the right consistency. If it’s too thick, add a tiny amount of coconut oil or vegetable shortening to achieve a fluid dip.
Serving Suggestions for Coconut Cake Pops Recipe
Decoration
Elevate the visual appeal of your coconut cake pops with simple yet effective decorations. Beyond the essential shredded coconut coating, consider adding a drizzle of contrasting melted chocolate—dark chocolate over white, or white chocolate over dark—for a beautiful marbled effect. Edible glitter or a fine dusting of edible gold or silver luster dust can impart a touch of glamour, making them perfect for festive occasions. Tiny edible pearls or sprinkles can also add pops of color and whimsy, transforming each cake pop into a miniature edible artwork.
Side Dishes
While these cake pops are delightful on their own, they can also be enhanced by thoughtful accompaniments. A strong cup of freshly brewed coffee or a rich espresso makes a natural pairing, with the coffee notes in the frosting finding a perfect complement. For a brighter contrast, serve them alongside fresh berries like raspberries, strawberries, or blueberries, whose tartness cuts through the sweetness beautifully. A small scoop of vanilla bean ice cream or a dollop of lightly sweetened whipped cream can also transform them into a more elaborate dessert presentation.
Creative Serving Ideas
Think beyond the typical dessert table arrangement. Serve your coconut cake pops in decorative miniature cupcake liners for an elegant presentation. For parties, arrange them standing upright in a decorative vase or a tiered stand, creating a stunning centerpiece that guests can easily access. You could also package them individually in clear cellophane bags tied with a festive ribbon for charming party favors that guests can take home. For a themed party, consider using themed sprinkles or food coloring in the chocolate dip to match your event’s color scheme.
Preparation & Storage
Storing Leftovers
Finished coconut cake pops can be stored in an airtight container at room temperature for up to 2 days, provided your environment is cool and dry. If your kitchen tends to be warm, or if the cake pops are heavily frosted, it’s safer to store them in the refrigerator. For best results, place a layer of parchment paper between tiers of cake pops if you are stacking them to prevent the chocolate coating from sticking to one another.
When storing in the refrigerator, ensure the container is truly airtight to prevent the pops from drying out or absorbing unwanted odors from other foods. They will maintain their best texture and flavor for about 5 days when stored properly in the fridge. Remember that refrigerating can sometimes slightly firm up the chocolate coating, so allow them to sit at room temperature for a few minutes before serving for optimal enjoyment.
Freezing
Coconut cake pops freeze exceptionally well, making them an excellent choice for long-term make-ahead preparation. Arrange the fully set cake pops in a single layer on a parchment-lined baking sheet and freeze until they are solid. Once frozen, transfer them to a freezer-safe airtight container or a heavy-duty freezer bag, ensuring they are well-protected from freezer burn. Properly frozen cake pops can be stored for up to 2 months.
When you are ready to serve them, the best method is to transfer the frozen cake pops to the refrigerator and allow them to thaw overnight. This slow thawing process helps prevent condensation from forming on the chocolate coating, which can cause it to bloom or become sticky. Avoid thawing them at room temperature, as this can lead to a less desirable texture and appearance.
Reheating
These coconut cake pops are not typically reheated, as they are best enjoyed at cool or room temperature. Reheating could cause the chocolate coating to melt or become greasy, and the cake center might become too soft or mushy. The joy of cake pops often lies in the contrast between the firm, slightly snappy chocolate shell and the soft, fudgy interior.
Instead of reheating, focus on bringing them to the perfect serving temperature. If they have been refrigerated, allow them to sit on the counter for 10-15 minutes until the chocolate coating is no longer rock hard and the cake center has softened slightly. This will bring out the best flavors and textures, ensuring a delightful bite every time.
Frequently Asked Questions
-
Can I make the chocolate cake from scratch for these pops, or should I use a cake mix?
While you can certainly use a good quality boxed chocolate cake mix as a shortcut, making the cake from scratch allows for greater control over the flavor and texture, which is crucial for cake pops. A homemade cake often results in a richer, more nuanced chocolate flavor and a tender crumb that binds beautifully with the frosting. The recipe provided outlines a scratch cake method, which is highly recommended for achieving the best possible outcome in terms of both taste and consistency for your coconut cake pops. If you opt for a cake mix, be sure to follow the package directions carefully and allow it to cool completely before proceeding.
-
Why do my cake pops sometimes crack when I dip them in chocolate?
Cake pops typically crack when dipped for a few main reasons, often related to temperature differences. If your cake balls are too cold straight from the freezer, the hot chocolate coating can cause the outer layer to expand too quickly, leading to cracks as it cools. Conversely, if your melted chocolate is too thick or not smooth enough, it can create an uneven coating that is prone to breaking. Ensure your cake balls are well-chilled but not frozen solid, and that your chocolate is melted to a smooth, fluid consistency. Allowing the dipped pops to set at room temperature for a bit before transferring them to the fridge can also help mitigate cracking.
-
How can I ensure the coconut sticks well to the chocolate coating, and what type of coconut is best?
For optimal coconut adhesion, it’s essential to sprinkle the shredded coconut onto the cake pops immediately after they have been dipped in the melted chocolate. The melted chocolate acts as the adhesive, and the sooner you apply the coconut, the better it will stick. Sweetened shredded coconut is generally preferred for its texture and flavor, as it complements the sweetness of the cake and frosting. If you prefer an unsweetened coconut flavor or a finer texture, you can use sweetened or unsweetened shredded coconut, or even desiccated coconut, though it may require a slightly different application technique and might not provide as much chewiness. Pressing the coconut gently into the still-wet chocolate can also help ensure a thorough coating.