Delightful Strawberry Semifreddo: Your Easy No-Churn Summer Treat
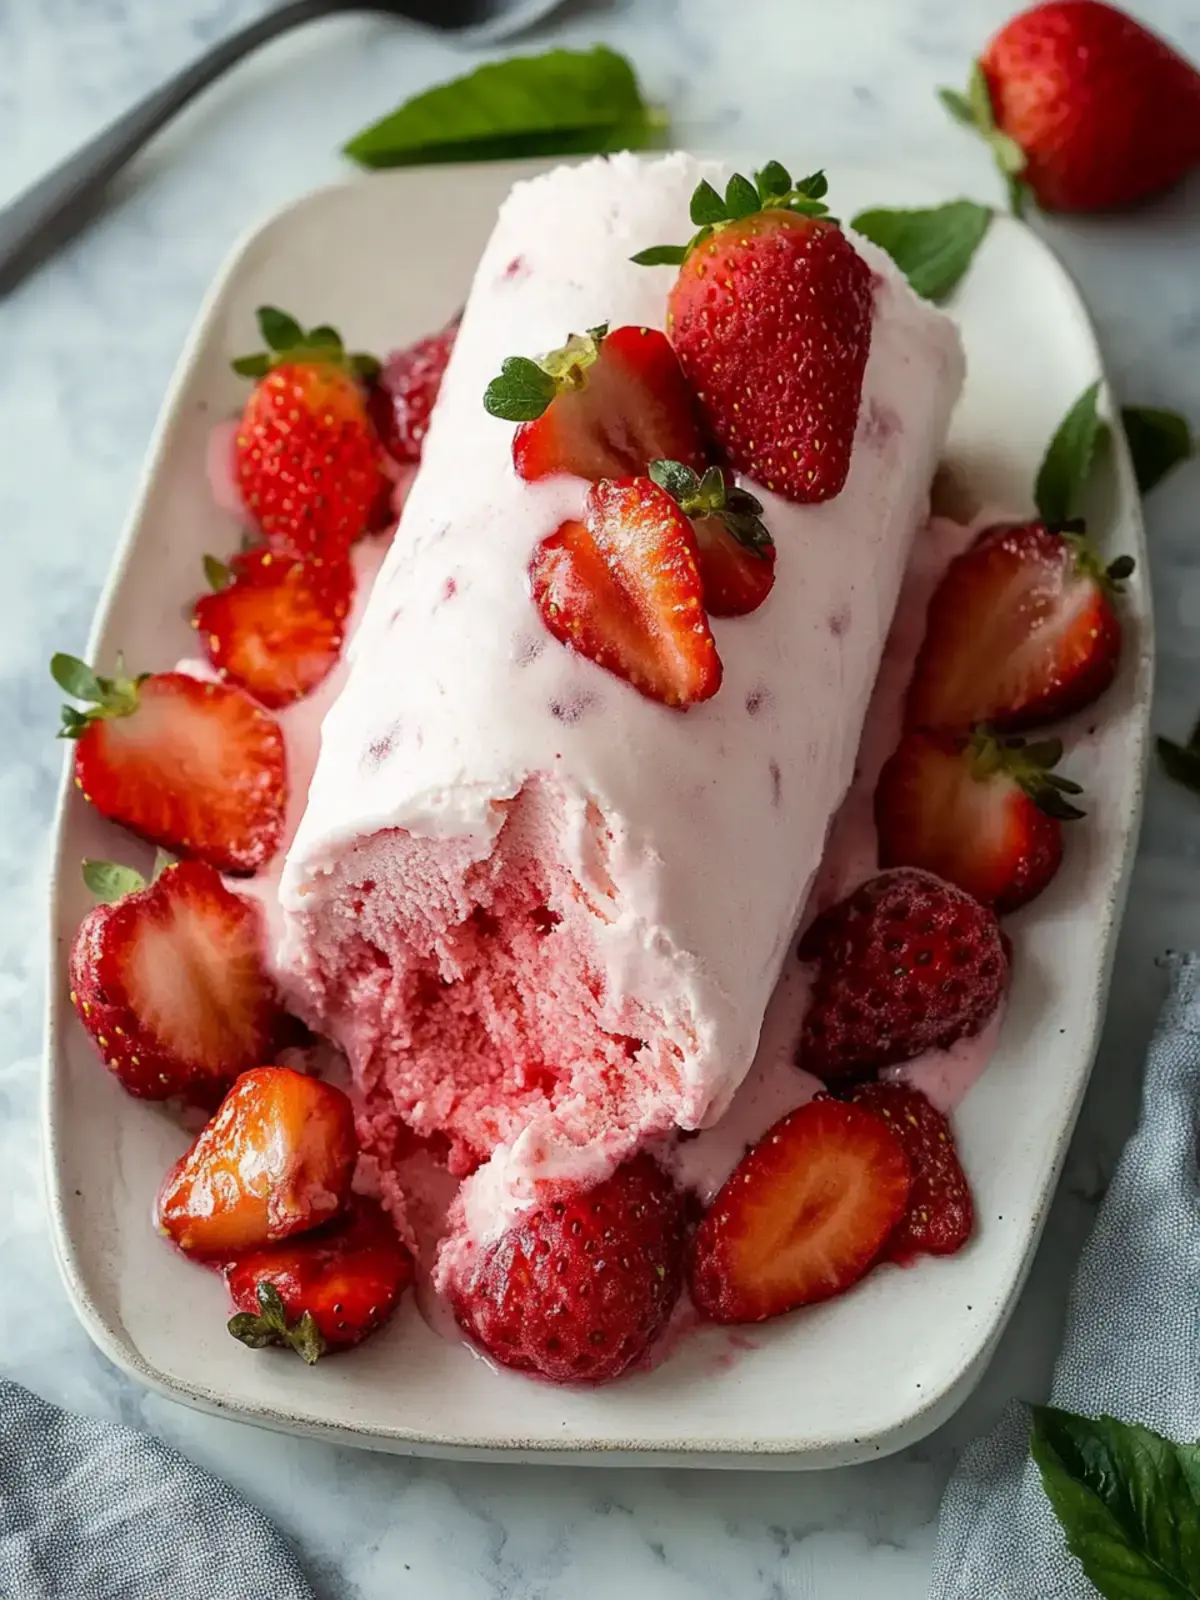
There’s nothing quite like the taste of summer on a warm afternoon, and my No-Churn Strawberry Semifreddo captures that essence perfectly. I first discovered this delightful dessert while searching for an easy yet impressive finale for a recent dinner party, and it instantly became a family favorite. To my surprise, it requires minimal ingredients and no fancy equipment—just a few ripe strawberries, some heavy cream, and a love for simple, delicious flavors.
With every bite, its creamy texture and vibrant bursts of strawberries transport me to sun-soaked picnics and potlucks, offering a truly nostalgic experience. Plus, this semifreddo is incredibly versatile! Whether you want to swap in other fruits or add a decadent swirl of chocolate, the options for customization are endless, making it a dessert that always feels new and exciting. It’s the perfect antidote to the mundane fast food routine, allowing you to indulge in the joys of homemade delights without breaking a sweat.
Why You Will Love This Recipe
- Effortless Preparation: This no-churn semifreddo requires no ice cream maker, simplifying the process significantly and making it accessible for any home cook. The minimal steps ensure you spend less time in the kitchen and more time enjoying the dessert.
- Intense Strawberry Flavor: Bursting with the natural sweetness and vibrant essence of fresh strawberries, this dessert offers a pure and authentic fruit experience. The addition of strawberry jam intensifies this flavor profile beautifully.
- Luxuriously Creamy Texture: Achieved through the perfect balance of whipped cream and a light meringue base, the semifreddo boasts an incredibly smooth and melt-in-your-mouth consistency. It’s decadent without being heavy.
- Customizable Delight: Beyond the classic strawberry, this recipe serves as a fantastic canvas for your creativity. Experiment with different berries, citrus zests, or even a hint of liqueur for a truly personalized treat.
- Showstopping Presentation: Despite its simple preparation, the semifreddo presents elegantly, especially when garnished with fresh fruit or a compote. It’s a dessert that looks as delightful as it tastes, perfect for any occasion.
Ingredients You Need
Crafting this delightful No-Churn Strawberry Semifreddo begins with selecting the freshest, ripest ingredients available. The quality of your strawberries will profoundly impact the final flavor, so choosing plump, fragrant berries is key for an authentic summer taste. Don’t shy away from using frozen strawberries if fresh ones are out of season; they can be just as effective when properly thawed and drained.
Delightful Strawberry Semifreddo

This delightful strawberry semifreddo is a refreshing no-churn dessert that combines the sweetness of strawberries and a creamy texture, perfect for summer. It requires minimal ingredients and no fancy equipment, making it an easy yet impressive finale for any gathering.
- For the Base:2 cups Fresh Strawberries (Thawed frozen strawberries can be used if fresh ones are out of season.)1/2 cup Strawberry Jam (Feel free to use your favorite jam for variation.)1 tablespoon Fresh Lemon Juice (Bottled lemon juice is a suitable substitute.)
- For the Meringue:4 large Egg Whites (Opt for pasteurized egg whites for safety.)3/4 cup Granulated Sugar (Adjust to your preferred level of sweetness.)1 pinch Salt (Enhances flavors.)
- For the Cream Layer:2 cups Heavy Cream (Light cream can be an alternative, though it may affect consistency.)1 teaspoon Vanilla Extract (Can also be replaced with other flavor extracts.)
- Optional Toppings:1 cup Strawberry Compote (Simple to make and complements the semifreddo.)1 cup Fresh Strawberries (Add as a garnish for a fresh touch.)
- 1Prepare Pan: Line a chilled 9x5-inch loaf pan with plastic wrap; place it in the freezer while you prepare the semifreddo mixture.
- 2Make Strawberry Puree: In a blender, combine fresh strawberries, strawberry jam, and lemon juice; blend until smooth. Adjust sweetness if needed.
- 3Whisk Egg Whites: In a heatproof bowl set over simmering water, whisk together egg whites, 1/2 cup sugar, and a pinch of salt until the mixture reaches 150°F. Continue to whisk until stiff peaks form then allow it to cool down.
- 4Whip Cream: In a separate bowl, whip the heavy cream with vanilla extract until soft peaks begin to form. Gradually add in 1/4 cup sugar and continue whipping until you achieve stiff peaks.
- 5Combine Mixtures: Gently fold the strawberry puree into the whipped cream, ensuring a harmonious blend. Then, fold in the cooled egg whites in batches, taking care not to deflate the mixture.
- 6Layer in Pan: Pour half of the strawberry mixture into the loaf pan, dollop with half of the jam, and swirl it gently with a knife. Add the remaining mixture, followed by the remaining jam, and swirl once more for a marbled effect.
- 7Freeze: Cover the pan securely with plastic wrap and freeze for at least 8 hours, or until the semifreddo is completely solid.
- 8Make Compote (Optional): In a saucepan over medium heat, cook additional strawberries with sugar, lemon juice, and a pinch of salt until softened. Allow the compote to cool before serving.
- 9Serve: To unmold, warm the edges of the pan with a cloth, then invert onto a chilled plate. Serve with optional strawberry compote and fresh strawberries for that extra touch.
Keywords: strawberry, semifreddo, no-churn, frozen dessert, summer, easy, simple, creamy, no-bake, fruit, dessert
- fresh strawberries: for that unmistakable summer sweetness and vibrant color.
- strawberry jam: to deepen the berry flavor and ensure a smooth, consistent texture.
- fresh lemon juice: a touch of acidity to balance the sweetness and brighten the strawberry notes.
- egg whites: crucial for creating a light, airy, and stable meringue base.
- granulated sugar: to sweeten the meringue and contribute to its structure.
- salt: a pinch enhances all the other flavors, making the strawberry shine.
- heavy cream: whips up beautifully to provide a rich, decadent, and creamy foundation.
- vanilla extract: adds a layer of warm, aromatic depth to the overall flavor profile.
The specific quantities for each ingredient are meticulously detailed within the recipe card above, ensuring you have all the precise measurements needed for success.
Variations
The beauty of this No-Churn Strawberry Semifreddo lies in its inherent adaptability. You can easily transform this classic into a symphony of flavors with just a few simple substitutions or additions, catering to diverse palates and dietary needs.
For a vibrant twist, consider a Berry Medley variation. Instead of relying solely on strawberries, incorporate a generous cup of fresh or thawed frozen raspberries and blueberries into the puree. This creates a visually stunning marbled effect and a complex flavor profile where tart and sweet notes dance harmoniously. The resulting semifreddo offers a delightful spectrum of berry tastes, each bite a unique exploration.
If you’re aiming for a lighter, zestier dessert, the Citrus Zing variation is perfect. Gently fold in the zest of one lemon and one lime into the strawberry puree. This brightens the overall flavor, cutting through the richness of the cream and adding an invigorating punch. It’s an excellent choice for those who prefer a less intensely sweet dessert, offering a refreshing palate cleanser.
For an indulgence that appeals to chocolate lovers, the Chocolate Drizzle or even incorporating a swirl of melted dark chocolate into the semifreddo mixture before freezing offers a classic pairing. The rich bitterness of the chocolate beautifully contrasts with the sweet, tart strawberries, creating a decadent experience. You could also add finely chopped chocolate chips directly into the mixture for delightful bursts of texture and flavor.
Seeking a vegan alternative? Substitute the heavy cream with two cans of full-fat coconut milk (refrigerated overnight and only the solid cream used) and replace the egg whites with aquafaba (the liquid from a can of chickpeas), whipped to stiff peaks with the sugar. This creates a surprisingly creamy and luscious vegan semifreddo that is entirely plant-based yet utterly delicious. The subtle coconut undertones pair wonderfully with the strawberries.
Embracing an exotic flair, a splash of coconut milk, or even a hint of passion fruit puree added to the strawberry mixture, can transport your semifreddo to a tropical paradise. This adds a subtle creaminess and a delightful tang that complements the berries in an unexpected yet delightful way. It’s perfect for a summer barbecue or a luau-themed gathering, offering a taste of the tropics.
Lastly, for those who enjoy a hint of warmth, a subtle Spicy Kick can be achieved by adding a tiny pinch of cayenne pepper or a dash of chili powder to the strawberry puree. This is a sophisticated touch that doesn’t overpower the fruit but rather enhances its sweetness and adds a surprising layer of complexity. It’s an adventurous option that is sure to intrigue and delight.
How to Prepare No-Churn Strawberry Semifreddo
Step 1: Preparing Your Freezing Vessel
The initial step in creating your perfect No-Churn Strawberry Semifreddo involves preparing the vessel that will house this frozen delight. Select a chilled loaf pan, ideally a 9×5 inch size, as this shape lends itself beautifully to slicing later on. It is imperative that the pan is thoroughly chilled; placing it in the freezer for at least 15-20 minutes beforehand is highly recommended.
Once chilled, line this loaf pan meticulously with plastic wrap, ensuring there’s enough overhang on all sides to eventually cover the semifreddo. This plastic wrap acts as a crucial barrier, preventing ice crystals from forming directly on the dessert and facilitating an incredibly easy and clean unmolding process later. Smooth out any wrinkles as much as possible for a neater final presentation. This careful preparation ensures your semifreddo slides out effortlessly.
With the loaf pan lined and chilled, set it aside in the freezer while you begin assembling the components of your semifreddo. This initial chill is vital for helping the dessert set quickly and evenly, minimizing the risk of it melting too much during the assembly phase. Having this step completed first allows for a seamless transition into the more involved stages of ingredient preparation.
Step 2: Crafting the Luscious Strawberry Puree
The heart of this dessert lies in a vibrant and intensely flavored strawberry puree. Begin by gathering your fresh strawberries, ensuring they are hulled and rinsed thoroughly. If using frozen strawberries, allow them to thaw completely and then drain them very well to remove excess moisture, which can dilute the flavor. You’ll need about 2 cups of prepared strawberries for this step.
Place the prepared strawberries into a blender or food processor. Add the strawberry jam, which will not only boost the berry flavor but also contribute to a smoother, richer texture. Squeeze in the fresh lemon juice; this bright, zesty element is crucial for cutting through the sweetness and highlighting the natural fruitiness of the strawberries. Aim for about 1 tablespoon of lemon juice, but you can adjust slightly based on your preference.
Blend these ingredients together until you achieve a completely smooth and velvety puree. There should be no chunks of fruit remaining, just a silky liquid. Taste the puree at this stage and adjust the sweetness or tartness if necessary; this is your last chance to fine-tune the primary flavor component of the semifreddo. Once satisfied, set this flavorful puree aside.
Step 3: Building the Airy Meringue Foundation
The next critical component for achieving that signature light and airy texture in your semifreddo is a stable meringue. You will need the egg whites, granulated sugar, and a small pinch of salt. It’s essential that your mixing bowl and whisk are impeccably clean and free from any grease, as even a tiny amount of fat can prevent the egg whites from whipping properly. Ensure your egg whites are at room temperature for maximum volume.
Set up a double boiler by placing a heatproof bowl over a saucepan filled with about an inch of gently simmering water. Ensure the bottom of the bowl does not touch the water. Add the egg whites, the remaining granulated sugar (about 3/4 cup), and the pinch of salt to the bowl. Whisk continuously over the simmering water until the mixture reaches a temperature of 150°F (65°C) on an instant-read thermometer. This process gently cooks the egg whites, ensuring safety and stability.
Once the sugar has dissolved and the mixture is hot, carefully transfer the bowl to a stand mixer fitted with the whisk attachment, or use a hand mixer. Whip the mixture on high speed until it forms stiff, glossy peaks and has cooled down completely. This can take several minutes. The meringue should be firm, hold its shape when the whisk is lifted, and feel cool to the touch. This well-formed meringue is key to the semifreddo’s delicate structure.
Step 4: Whipping the Rich Cream Layer
Complementing the lightness of the meringue is a luxuriously rich and creamy component derived from heavy cream. Pour your cold heavy cream into a separate, clean mixing bowl. Add the vanilla extract, which will infuse a warm, aromatic depth into the cream, enhancing the overall flavor profile of the semifreddo. Using cold cream and a chilled bowl will help it whip up to the perfect consistency more efficiently.
Begin whipping the cream using a stand mixer or a hand mixer on medium-high speed. Initially, you’ll notice soft peaks forming; this is the stage where the cream is starting to thicken. As you continue to whip, gradually add the remaining granulated sugar (about 1/4 cup, or adjust to your sweetness preference). Keep a close eye on the cream; over-whipping can lead to a grainy texture, so you want to stop precisely when stiff peaks form.
Stiff peaks mean that when you lift the beaters out of the cream, the peaks stand straight up and do not curl over. The cream should look thick, voluminous, and hold its shape perfectly. This whipped cream will provide the decadent, smooth texture that makes semifreddo so irresistible. Once you’ve achieved this perfect consistency, set the bowl aside.
Step 5: Gently Folding and Layering the Semifreddo
Now comes the artful process of combining your prepared components to create the semifreddo. Take your smooth strawberry puree and gently fold it into the bowl of stiffly whipped cream. Use a spatula and a light, folding motion, starting from the bottom of the bowl and bringing the mixture up and over. Be careful not to overmix; you want to incorporate the puree just enough to create a uniform pink color without deflating the whipped cream.
Next, delicately fold the cooled, stiff meringue into the strawberry-cream mixture in batches. Again, use a gentle folding technique. Adding the meringue in stages prevents the mixture from becoming too dense and helps maintain the airy texture. Fold until just combined, ensuring there are no streaks of white meringue or puree visible. The goal is a light, homogenous, and aerated mixture that promises a sublime melt-in-your-mouth experience.
Retrieve your prepared, chilled loaf pan from the freezer. Pour half of the airy semifreddo mixture into the pan. If you desire a swirled effect, dollop about half of your strawberry jam on top of this layer and gently swirl it through using a knife or skewer. Then, pour the remaining semifreddo mixture over the jam layer. Top with the remaining strawberry jam and swirl one final time to create beautiful marbled patterns. This layering and swirling technique adds visual appeal and pockets of intensified jam flavor.
Step 6: The Patience of Freezing
The final, crucial step in bringing your No-Churn Strawberry Semifreddo to perfection is the freezing process. Once your mixture has been layered and swirled in the prepared loaf pan, it’s time to introduce it to the cold. Tightly cover the top of the loaf pan with plastic wrap, ensuring it makes good contact with the surface of the semifreddo to prevent air from getting in. If there’s sufficient overhang from the plastic lining the pan, you can use that to help seal it securely.
Place the covered loaf pan back into the coldest part of your freezer. The semifreddo needs to freeze solid, which typically takes a minimum of 8 hours, but overnight is often best for ensuring it’s completely firm. Resist the temptation to check on it too frequently, as opening the freezer door too often can slow down the freezing process. Patience here is key to achieving that ideal, sliceable texture.
While your semifreddo is freezing, you can optionally prepare a simple strawberry compote if you wish to serve it as a topping. Cook additional strawberries with a little sugar, lemon juice, and a pinch of salt in a saucepan until they break down into a saucy consistency. Allow this compote to cool completely before storing it in the refrigerator. Once the semifreddo has frozen solid and is ready to be served, it can be easily unmolded.
Pro Tips for No-Churn Strawberry Semifreddo
Ensure Equipment is Spotless: For optimal results, particularly when whipping egg whites, make sure your mixing bowl and whisk are exceptionally clean and completely dry. Any trace of grease or moisture can hinder the egg whites from achieving stiff peaks, which is crucial for the semifreddo’s airy texture. A quick wash with hot, soapy water and a thorough rinse and dry will do the trick.
Room Temperature Matters: Allowing the semifreddo to sit at room temperature for about 5-10 minutes before slicing can make a significant difference. This brief softening period makes it much easier to cut clean, uniform slices without the dessert crumbling or sticking to the knife. It also allows the texture to become perfectly creamy.
Embrace Fruit Exploration: Don’t limit yourself to just strawberries! Feel free to experiment with other fruits like raspberries, mangoes, or even a blend of berries. Each fruit will impart its unique flavor and color, creating delightful variations of this wonderful dessert. Consider adding citrus zest for an extra bright note.
Whipping Cream Vigilance: When whipping the heavy cream, pay close attention to the consistency. Over-whipping can turn the cream grainy and oily, negatively impacting the smooth texture. Stop whipping as soon as you achieve firm peaks; it’s better to slightly under-whip and fold gently than to over-whip and ruin the texture.
Serve It Cold and Promptly: For the ultimate semifreddo experience, serve it immediately after unmolding. When it’s properly chilled and has that perfect creamy yet firm consistency, it’s at its absolute best. This ensures that delightful melt-in-your-mouth sensation without it becoming too soft.
Serving Suggestions for No-Churn Strawberry Semifreddo
Decoration
Elevate the visual appeal of your No-Churn Strawberry Semifreddo with thoughtful decoration. A scattering of fresh, vibrant strawberries, halved or quartered, provides a burst of color and freshness that echoes the dessert’s primary flavor. You can also arrange a few whole, small strawberries artfully on top for a more polished look. A delicate drizzle of either strawberry compote, melted white chocolate, or a rich dark chocolate ganache adds a touch of elegance and extra flavor complexity. For an added textural element and a hint of green, a few fresh mint leaves can provide a beautiful contrast.
Side Dishes
The creamy, sweet nature of strawberry semifreddo pairs wonderfully with a variety of complementary side dishes that enhance the overall dining experience. Consider serving it alongside a light and crisp lemon pound cake or a buttery shortbread cookie; their textures provide a lovely contrast to the semifreddo’s softness. A small bowl of mixed berry salad, featuring blueberries, raspberries, and blackberries, can further amplify the fruit flavors without being overly sweet. For a more sophisticated pairing, a scoop of tart lemon sorbet or a refreshing raspberry sorbet can cleanse the palate beautifully between bites of the rich semifreddo.
Creative Serving Ideas
Move beyond the traditional slice by exploring creative serving ideas that add an element of surprise and delight. Individual portions can be achieved by freezing the semifreddo mixture in silicone muffin molds or small ramekins, making them perfect for single servings or themed parties. For a more interactive dessert, present scoops of the semifreddo alongside a selection of toppings like crushed meringue cookies, chocolate shavings, toasted nuts, or a variety of fruit coulis, allowing guests to customize their own creation. You could even layer small amounts of semifreddo with crumbled cookies or cake pieces in parfait glasses for a deconstructed dessert experience. A playful addition could be serving it with a small shot of Prosecco or sparkling wine on the side, offering a festive pairing that enhances the dessert’s celebratory feel.
Preparation & Storage
Storing Leftovers
Should you find yourself with any leftover No-Churn Strawberry Semifreddo, storing it properly is key to maintaining its delightful texture and flavor. The best method is to ensure it’s tightly covered in its original loaf pan with plastic wrap. If you plan to consume it within a few days, the refrigerator is an option, but it will soften considerably. For optimal preservation of its frozen state, keep it in the freezer.
To prevent freezer burn, which can lead to icy patches and a less desirable texture, ensure the plastic wrap is pressed directly onto the surface of the semifreddo. For an extra layer of protection, you can then wrap the entire pan securely in aluminum foil. Properly stored, leftovers can retain their quality for up to 3-4 days, although the texture may change slightly over time compared to when it was freshly made.
When you’re ready to enjoy the leftovers, remove the semifreddo from its packaging. If it has become too hard from prolonged freezing, allowing it to sit at room temperature for about 5-10 minutes before slicing will make it much easier to serve and more enjoyable to eat. The goal is to retain as much of that creamy, smooth consistency as possible.
Freezing
The freezing stage is paramount for achieving the characteristic semi-frozen, ice-cream-like consistency of semifreddo. Once your mixture is prepared and layered in the loaf pan, it needs ample time in the freezer to set completely. A minimum of 8 hours is generally recommended, but freezing overnight is ideal to ensure it’s firm throughout.
To optimize the freezing process and prevent the formation of ice crystals, it’s important to ensure the pan is well-covered. Pressing plastic wrap directly onto the surface of the semifreddo before covering the pan helps minimize air exposure. This simple step is crucial for maintaining the dessert’s smooth texture and rich flavor, preventing it from becoming icy or developing off-flavors during its time in the freezer. The colder and more stable the freezing environment, the better the final result will be.
Once frozen solid, the semifreddo can be stored in the freezer for an extended period. For the best quality, it’s advisable to consume it within 1 to 2 months. Beyond this timeframe, while still safe to eat, the texture and flavor might begin to degrade. Proper wrapping, as mentioned previously, is key to maximizing its shelf life in the freezer.
Reheating
The concept of “reheating” semifreddo is not applicable in the traditional sense, as it is a frozen dessert meant to be served cold. However, the process of bringing it to the right serving temperature after it has been frozen solid is often referred to as tempering or thawing. This is a crucial step to achieve the desired texture.
If your semifreddo is frozen rock hard, you’ll want to allow it to temper slightly before slicing and serving. The best way to do this is by placing the entire loaf pan in the refrigerator for about 2-3 hours, or letting it sit at room temperature for 5-10 minutes, depending on the ambient temperature. This brief tempering period softens the semifreddo just enough to allow for clean cuts and a creamy, melt-in-your-mouth consistency.
Be cautious not to let it temper for too long, or it will become too soft and lose its shape, turning into a puddle rather than a delightful dessert. The goal is to achieve a texture that is firm enough to slice but melts beautifully on the tongue. If you find it’s still too hard to slice cleanly after a few minutes, simply let it sit a bit longer, checking periodically.
Frequently Asked Questions
-
How do I choose the best strawberries for this recipe?
Selecting the ripest, most flavorful strawberries is essential for a delicious semifreddo. Look for berries that are a deep, uniform red color, firm to the touch, and fragrant. Avoid strawberries that are bruised, moldy, or have soft spots, as these will compromise the flavor and texture of your dessert. If fresh strawberries are not in season or are of poor quality, using high-quality frozen strawberries is a perfectly acceptable alternative. Ensure they are fully thawed and well-drained of any excess moisture before pureeing to avoid a watery semifreddo.
-
What’s the best way to store leftover semifreddo?
Storing leftover No-Churn Strawberry Semifreddo correctly is vital for preserving its quality. Once you’ve served it, tightly re-cover any remaining portions in the loaf pan with plastic wrap, pressing it directly onto the surface of the dessert to minimize air exposure and prevent ice crystals. For longer storage, wrap the entire pan securely in aluminum foil. Keep the semifreddo in the coldest part of your freezer. While it’s best enjoyed within a week or two, it can remain frozen for up to a month, though texture may slightly degrade over prolonged periods.
-
Can I make and freeze this strawberry semifreddo ahead of time?
Absolutely, this No-Churn Strawberry Semifreddo is an excellent make-ahead dessert, which is one of its many appealing qualities. You can prepare the entire semifreddo, layer it in the loaf pan, and freeze it completely solid. Once frozen, it can be stored in the freezer for up to a month, making it perfect for entertaining or simply having a delightful treat on hand. Ensure it is very well-covered to prevent freezer burn. It’s recommended to freeze it for at least 8 hours, or preferably overnight, to ensure it sets thoroughly before unmolding and serving.
-
What should I do if my egg whites don’t whip to the right consistency?
If your egg whites aren’t reaching stiff peaks, there are a few common culprits. Firstly, ensure your mixing bowl and whisk are meticulously clean and completely free of any grease or oil, as this is the most frequent reason for failure. Secondly, make sure your egg whites are at room temperature, as they whip to a greater volume than cold ones. If they still struggle, a pinch of cream of tartar added at the beginning of whipping can help stabilize them. Alternatively, you can try the double boiler method described in the recipe, heating them to 150°F and then whipping; this not only stabilizes them but also ensures safety.
-
Are there any dietary considerations I should know for this recipe?
Yes, there are a few dietary considerations to keep in mind. The standard recipe contains egg whites and dairy (heavy cream). For a vegan version, you can substitute the heavy cream with chilled full-fat coconut cream and the egg whites with aquafaba (the liquid from a can of chickpeas), whipped to stiff peaks. Ensure you use a plant-based sugar if following a strict vegan diet. For those sensitive to dairy, other non-dairy whipping creams are available, though results may vary slightly in richness and texture. Always check ingredient labels for hidden allergens if serving to individuals with severe dietary restrictions.