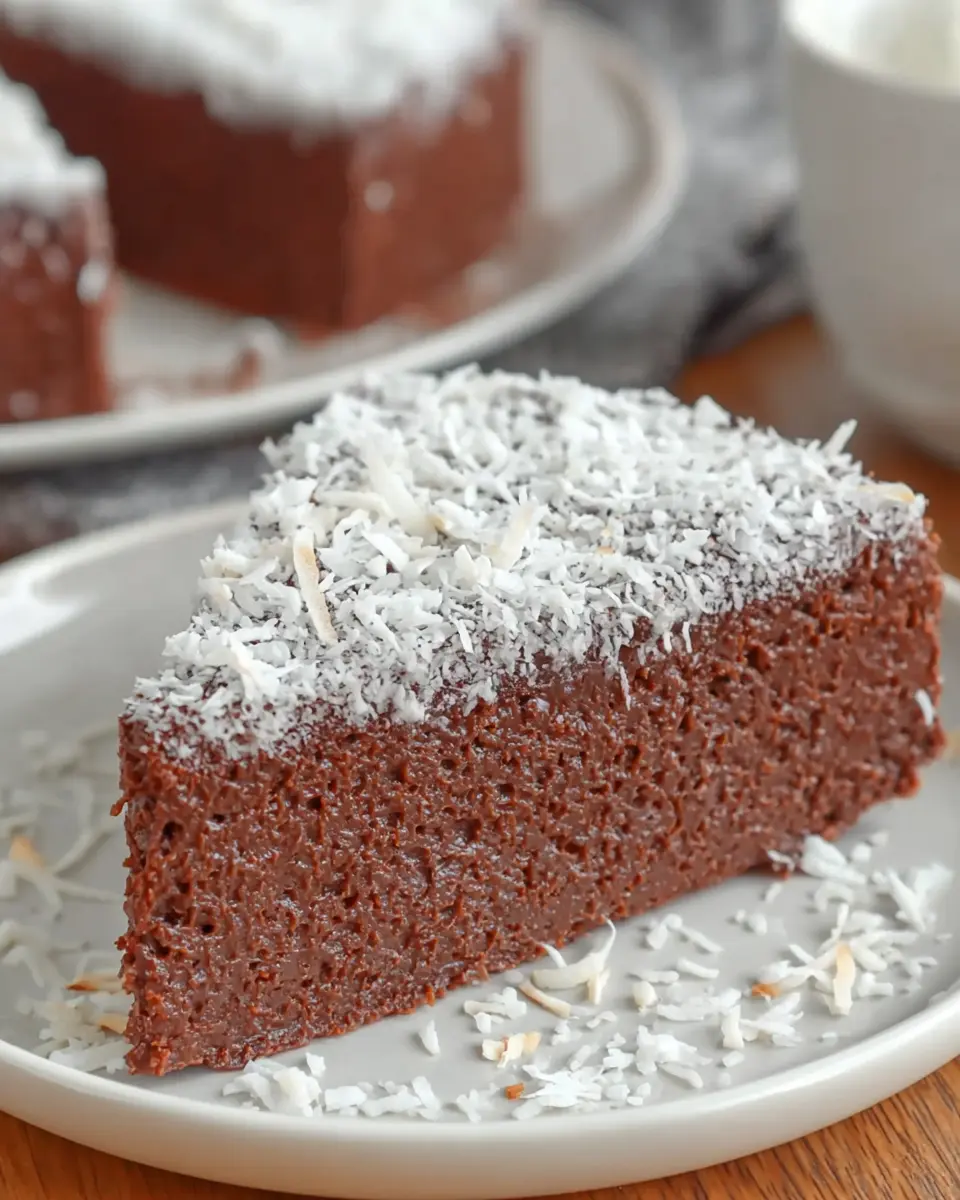
No-Bake Coconut Chocolate Cake
This No-Bake Coconut Cake is an absolute dream for anyone seeking a delightful dessert without the fuss of an oven. It’s a recipe that proves simple ingredients can yield extraordinary results, perfect for both seasoned bakers and those just starting their culinary adventures.
Imagine a rich, chocolatey base infused with the tropical essence of coconut, all coming together in mere minutes. This treat is designed for effortless preparation, making it an ideal candidate for make-ahead planning or spontaneous sweet cravings. Its firm, sliceable texture and delightful flavor profile will quickly make it a go-to favorite in your recipe repertoire.
Why You Will Love This Recipe
- Effortless Assembly: With just a few core ingredients and no baking required, this cake comes together astonishingly fast, perfect for when dessert inspiration strikes with little notice.
- Make-Ahead Marvel: Prepare this cake in advance and store it in the refrigerator, allowing it to set beautifully. This makes it an indispensable option for entertaining or busy weeknights when time is of the essence.
- Rich Chocolate Indulgence: The deep, satisfying flavor of melted semisweet chocolate forms the decadent backbone of this dessert, satisfying any chocolate lover’s deepest desires.
- Pleasant Coconut Texture: Unsweetened shredded coconut doesn’t just add flavor; it provides a delightful chewiness and structure that prevents the cake from being overly soft, creating a more satisfying eating experience.
- Beginner-Friendly: This recipe is incredibly forgiving and straightforward, requiring no special techniques. It’s the perfect introduction to no-bake desserts for novices in the kitchen.
Ingredients You Need
The beauty of this No-Bake Coconut Cake lies in its minimalist ingredient list, emphasizing quality and simplicity. Using good quality semisweet chocolate chips will ensure a deep, rich flavor that melts smoothly and sets perfectly. The unsweetened shredded coconut provides not only essential texture but also a wonderful tropical note that complements the chocolate beautifully. A touch of low-fat milk helps to achieve the ideal consistency for mixing and spreading, ensuring a cohesive and delectable final product.
No Bake Coconut Cake
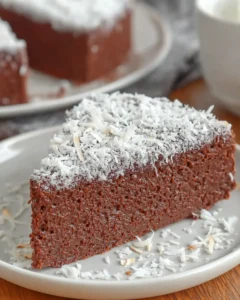
A quick, make-ahead dessert that turns just three ingredients into a rich, sliceable treat. It is beginner-friendly, perfect for small gatherings, and delivers firm chocolate-coconut texture with almost no hands-on work.
- 2 cups unsweetened shredded coconut
- 3/4 cup low-fat milk
- 1 1/2 cups semisweet chocolate chips
- 1Lightly grease a 6-inch springform pan, then line the bottom and sides with parchment paper.
- 2Add the chocolate chips and milk to a microwave-safe bowl. Heat in short bursts, stirring well between each one, until the chocolate is fully melted and the mixture looks glossy and smooth.
- 3Stir in the shredded coconut until every bit is coated. The mixture should look thick and evenly combined, with no dry pockets of coconut left in the bowl.
- 4Spoon the mixture into the prepared pan and spread it out with a spatula. Press gently so the surface is compact and even.
- 5Smooth the top and add a little extra coconut if you want a simple garnish.
- 6Refrigerate until fully firm, about 1 to 3 hours, or overnight for the best texture.
Keywords: No Bake, Coconut, Chocolate, Cake, Dessert, Easy, Quick, Make-ahead, Vegetarian
The specific quantities for each ingredient are detailed within the provided recipe card, ensuring you have precisely what you need for a flawless result.
Variations
For those seeking a delightful Vegan No-Bake Coconut Cake, a simple substitution can transform this recipe. Instead of using dairy milk, opt for a plant-based alternative such as almond milk, soy milk, or oat milk, ensuring it is unsweetened to maintain balance. Furthermore, ensure that your semisweet chocolate chips are certified vegan; many brands offer delicious options that are entirely dairy-free. This ensures the rich chocolate flavor remains, while the cake adheres to a vegan lifestyle.
If you’re navigating a Low-Carb or Keto diet, this cake can be adapted with careful ingredient choices. Replace the semisweet chocolate chips with a high-quality sugar-free chocolate made with stevia, erythritol, or monk fruit sweetener; the key is to find one that melts well. For the liquid component, unsweetened almond milk or coconut milk works perfectly. The shredded coconut can remain, as it is a low-carb staple, but be mindful of the brands you choose to ensure minimal added sugars. This adaptation allows for indulgence while staying within strict dietary guidelines.
Consider a “White Chocolate Coconut Dream” variation for a lighter, sweeter profile. Swap the semisweet chocolate chips for good quality white chocolate, ensuring it’s suitable for melting. The process remains the same, but the flavor profile shifts dramatically from deep cocoa to a creamy, vanilla-infused sweetness. You could even add a whisper of vanilla extract to the melted white chocolate mixture for an extra layer of aromatic complexity. This variation offers a different, yet equally appealing, indulgence.
How to Prepare No Bake Coconut Cake
Step 1: Prepare Your Pan for Success
The foundation of any great dessert is proper preparation, and this no-bake cake is no exception. Begin by selecting a small, appropriately sized pan, ideally a 6-inch springform pan. This type of pan is highly recommended because its removable sides make unmolding the finished cake incredibly easy and clean, preserving its shape and presentation.
Lightly grease the interior of the springform pan using a neutral cooking spray or a small amount of softened butter. This prevents the cake from sticking to the sides of the pan. Following the greasing, line the bottom and sides of the pan with parchment paper. Cut a circle of parchment paper to fit the base snugly, and then cut strips to line the vertical sides, ensuring there’s a slight overhang at the top. This parchment paper barrier is crucial for a seamless release.
Step 2: Melt the Chocolate Symphony
This is where the magic begins to happen, transforming simple chocolate chips into a luscious, smooth base. Place your semisweet chocolate chips into a microwave-safe bowl. Add the specified amount of low-fat milk to the bowl; the milk is essential for achieving the perfect melting consistency and a smooth, pourable mixture.
Microwave the chocolate and milk mixture in short, controlled intervals, typically 15 to 30 seconds at a time. It is absolutely vital to stir the mixture thoroughly between each heating interval. This gentle process prevents the chocolate from overheating, which can cause it to become grainy or seize up. Continue this process of microwaving and stirring until the chocolate is completely melted and the mixture is beautifully glossy, smooth, and fully combined.
Alternatively, if you prefer a stovetop method, a double boiler can be used. Place the chocolate chips and milk in a heatproof bowl set over a saucepan of simmering water, ensuring the bottom of the bowl does not touch the water. Stir gently and continuously until the chocolate is fully melted and smooth. Whichever method you choose, patience is key to achieving that perfect, silky chocolate consistency without any lumps.
Step 3: Embrace the Coconut
Once your chocolate mixture has reached a state of perfect silkiness, it’s time to introduce the star textural element: the shredded coconut. Carefully add the unsweetened shredded coconut to the bowl containing the melted chocolate and milk. Ensure all of the coconut is added at once so it can be evenly incorporated into the chocolate mixture.
Using a sturdy spatula or a wooden spoon, begin to stir the coconut into the chocolate mixture. Continue mixing until every single strand of shredded coconut is thoroughly coated in the rich chocolate. You are aiming for a thick, cohesive mixture where there are no dry pockets of coconut visible. The entire mass should appear uniformly combined, with the coconut flakes suspended evenly throughout the chocolate base.
This step is crucial for ensuring that the cake will hold its shape once chilled. The coconut acts as a binder, absorbing some of the chocolate’s richness and providing the necessary structure for slicing. If the mixture seems a bit too stiff, a tiny splash more milk could be added, but be cautious not to make it too loose, as this can affect the final firmness. The goal is a thick, spreadable paste.
Step 4: Press It Into Place
Now, it’s time to transfer the delightful chocolate-coconut mixture into your prepared springform pan. Spoon the entire contents of the bowl into the pan. Use your spatula to distribute the mixture evenly across the bottom and up the sides of the pan, ensuring you fill any gaps and create a level surface.
The key at this stage is to press the mixture firmly and compactly into the pan. This is not a time for gentle placement; you want to create a dense, solid layer. Use the back of your spatula, or even the palm of your hand (if it’s clean and comfortable), to press down firmly. This compaction is vital for ensuring the cake slices cleanly later without crumbling apart. A tightly packed mixture will hold its form much better when served.
Take your time to ensure the surface is as smooth and even as possible. A flat, level top will not only look more appealing but will also make slicing easier. Run your spatula over the surface multiple times, gently smoothing out any bumps or uneven areas. The more effort you put into creating a smooth, compact base, the more professional your finished cake will look.
Step 5: Garnish for Grandeur (Optional)
While not strictly necessary, a little garnish can elevate the visual appeal of your No-Bake Coconut Cake from simple to stunning. If you desire a more polished presentation, now is the perfect moment to add a final touch. You can reserve a small amount of the shredded coconut from your main mixture, or simply sprinkle a little extra shredded coconut over the top of the pressed cake.
Distribute the extra coconut evenly across the smoothed surface. A light, even sprinkle is often more effective than a heavy dusting, as it allows the rich chocolate beneath to peek through. This simple addition provides a lovely textural contrast and reinforces the coconut flavor profile. It’s a small detail that can make a big difference in the final appearance of your dessert.
If you’re feeling particularly creative, you could also consider a very light dusting of cocoa powder or even a few carefully placed chocolate shavings. However, keeping it simple with just a little extra coconut maintains the recipe’s elegant minimalism. The goal is to enhance, not overwhelm, the inherent beauty of the chocolate and coconut combination.
Step 6: The Chill Factor
The final and most crucial step in creating your No-Bake Coconut Cake is the chilling process. Carefully transfer the prepared pan into the refrigerator. The cool environment is what allows the chocolate to firm up and the cake to set into a sliceable consistency. This is where the patience comes into play, as the quality of the final texture depends heavily on adequate chilling time.
For the cake to firm up sufficiently, it typically requires at least 1 to 3 hours in the refrigerator. However, for the absolute best results, especially regarding texture and the neatness of your slices, it is highly recommended to chill the cake overnight. Overnight chilling allows the ingredients to meld together completely, resulting in a perfectly set and wonderfully firm cake that is a joy to slice and serve.
If you find yourself in a time crunch and need the cake to set more quickly, you can place it in the freezer for a shorter period, typically around 30 to 60 minutes. While this will speed up the process, it’s important to note that the texture might be slightly harder or less settled than if it had a full overnight chill. If you use the freezer method, remember to let the cake sit at room temperature for a few minutes before slicing to make it easier to cut and to achieve a more pleasant mouthfeel.
Pro Tips for No Bake Coconut Cake
Tip: Ensure Your Chocolate Melts Smoothly. When melting the chocolate chips and milk, resist the temptation to overheat them. Overheating can cause the chocolate to become grainy and thick, making it difficult to work with. Stirring frequently and using short microwave bursts or a gentle double boiler method is key for a silky-smooth consistency that will set beautifully.
Tip: Press, Don’t Just Spoon. When transferring the chocolate-coconut mixture into the pan, don’t just loosely spoon it in. Use a spatula or your hands to press the mixture down firmly and evenly. This compaction is essential for creating a cake that holds its shape when sliced and prevents it from crumbling.
Tip: Consider the Coconut Texture. While unsweetened shredded coconut is ideal, if you happen to use desiccated coconut (which is finer), you might need to adjust the liquid slightly. Finer coconut absorbs moisture differently, so keep an eye on the mixture’s consistency to ensure it’s thick enough to hold together.
Tip: For the Cleanest Slices. Once the cake is fully chilled, warming your knife slightly under hot water and wiping it clean between each cut can make a significant difference. This simple trick helps the knife glide through the firm chocolate mixture, resulting in incredibly neat, professional-looking slices. Avoid sawing motions, and aim for a single, decisive cut.
Tip: The Sweetness Factor. If you find semisweet chocolate a little too intense, you can certainly use milk chocolate chips instead. However, be aware that milk chocolate contains more sugar, so the overall sweetness of the cake will increase. Adjust your expectations or consider if you prefer a more robust chocolate flavor profile.
Serving Suggestions for No Bake Coconut Cake
Decoration
Elevate your No-Bake Coconut Cake with a few simple decorative touches. A light dusting of unsweetened cocoa powder can add a sophisticated matte finish and a hint of deeper chocolate flavor. For a textural contrast, consider scattering a few toasted coconut flakes over the top; toasting brings out a nuttier flavor and a satisfying crunch. Carefully placed fresh berries, like raspberries or blueberries, offer a pop of color and a burst of freshness that beautifully complements the rich chocolate and coconut.
Side Dishes
This dense, rich cake pairs wonderfully with lighter accompaniments that balance its intensity. A dollop of lightly sweetened whipped cream is a classic choice, providing a creamy, airy counterpoint to the cake’s firm texture. Fresh fruit salads, especially those featuring berries, melon, or citrus segments, offer a refreshing contrast and a delightful zest. A small scoop of vanilla bean or coconut ice cream can also be a luxurious pairing, amplifying the dessert experience.
Creative Serving Ideas
For an elegant presentation, serve small, perfectly cut slices on individual dessert plates. A drizzle of extra melted chocolate or a raspberry coulis around the plate can add a restaurant-quality flair. Consider serving this cake as part of a dessert tasting platter, alongside other small treats like mini fruit tarts or chocolate truffles. It also makes for a delightful addition to a brunch spread, offering a sweet, unexpected indulgence alongside morning fare, showcasing its versatility as a breakfast or dessert option.
Preparation & Storage
Storing Leftovers
Leftover No-Bake Coconut Cake should be stored in an airtight container in the refrigerator to maintain its firmness and prevent it from drying out or absorbing odors from other foods. Because it is made with chocolate, it needs to be kept cool to retain its sliceable texture. Properly stored, the cake should remain delicious and at its best for approximately 5 days.
Ensure the container is well-sealed to lock in moisture. If you don’t have a suitable container, you can wrap the cake tightly in plastic wrap, ensuring all edges are covered. This helps to keep the surface from becoming dry and chalky. Always check the cake for any signs of spoilage before consuming after several days.
Freezing
This No-Bake Coconut Cake freezes exceptionally well, making it an excellent candidate for batch preparation and future enjoyment. For best results, freeze the cake whole, tightly wrapped in several layers of plastic wrap, followed by a layer of aluminum foil or a freezer-safe bag. This dual layering provides maximum protection against freezer burn and preserves the quality of the cake.
Alternatively, you can slice the cake before freezing individual portions. This allows for easy thawing of just the amount you wish to serve. Wrap each slice securely in plastic wrap, then place them in a freezer-safe bag or container. The cake can be stored in the freezer for up to 1 month while maintaining its optimal quality.
Reheating
This No-Bake Coconut Cake is designed to be served chilled, so reheating is generally not necessary or recommended, as it can compromise the texture by melting the chocolate base. However, if the cake has been frozen, it will require thawing. For the best texture, thaw the cake gradually in the refrigerator overnight.
If you are in a hurry and need to thaw a frozen slice more quickly, you can let it sit at room temperature for about 15-30 minutes. This short period allows the cake to soften slightly, making it easier to slice and more pleasant to eat, without becoming overly warm or losing its characteristic chill. Avoid microwaving the cake, as this will melt the chocolate and ruin its intended texture.
Frequently Asked Questions
-
Can I use different types of chocolate or coconut in this recipe?
Yes, you can experiment with different types of chocolate and coconut, but be mindful of how it affects the outcome. For chocolate, you can try milk chocolate for a sweeter profile or dark chocolate for a more intense flavor, but ensure they are good quality for melting. If you use sweetened shredded coconut instead of unsweetened, your cake will be considerably sweeter, and the texture might be slightly softer due to the added moisture and sugar. It’s often best to stick to unsweetened shredded coconut and good quality semisweet chocolate chips for the most reliable and balanced results as intended by the recipe.
-
How do I ensure the cake unmolds cleanly from the springform pan?
The key to a clean unmolding process lies in proper pan preparation. Ensure you have thoroughly greased the inside of the springform pan with cooking spray or softened butter, paying special attention to any crevices. Crucially, line the pan generously with parchment paper; a circle for the base and strips for the sides create a barrier that prevents sticking. Make sure the parchment paper extends slightly above the rim of the pan, giving you something to grip when lifting the cake out of the springform ring. A gentle nudge around the edges with a thin knife or offset spatula can also help release any minor sticking points before unclipping the springform.
-
Why is my no-bake cake not firming up properly, even after chilling?
Several factors can contribute to a no-bake cake not firming up as expected. Firstly, ensure you used the correct type of chocolate; some confectionary coatings don’t set as firmly as true chocolate. Secondly, the ratio of chocolate to coconut is critical; too much liquid or not enough coconut can result in a softer mixture. Overheating the chocolate during melting can also hinder its ability to set properly, leading to a greasy or un-firm texture. Finally, ensure your refrigerator is at an adequate temperature; if it’s too warm, the chilling process will be slower and less effective, so a minimum of 2-3 hours, and ideally overnight, is recommended for a firm set.