Apple Cider Braised Pork Shoulder – A Beautiful Fall Dinner!
Embark on a culinary journey with this exceptional Braised Pork Shoulder recipe, a dish that promises to fill your home with an aroma of warmth and comfort. It’s more than just a meal; it’s an experience that celebrates the rich, savory flavors of slow-cooked pork. The tender, fall-apart texture combined with the delightful sweetness of apple cider and tartness of Granny Smith apples creates a symphony of tastes that will leave a lasting impression on your palate.
This recipe is a testament to the magic of simple ingredients transformed through the art of braising. Perfect for a cozy autumn evening or a festive holiday gathering, this dish offers a gourmet experience without the fuss. Prepare to be amazed by how easily this impressive main course comes together, offering a taste of home-style cooking elevated to a new level of deliciousness and sophistication.
Why You Will Love This Recipe
- Exceptional Tenderness: The slow braising process breaks down the connective tissues in the pork shoulder, resulting in incredibly tender, melt-in-your-mouth meat that is an absolute delight to savor.
- Rich and Complex Flavor Profile: A harmonious blend of apple cider, white wine, aromatic herbs, and caramelized onions creates a deep, layered taste that is both comforting and exquisitely nuanced.
- Effortless Elegance: While the cooking time is substantial, the hands-on preparation is minimal, allowing the oven to work its magic and produce a show-stopping dish with surprising ease.
- Versatile Autumnal Delight: This recipe perfectly captures the essence of fall flavors, making it an ideal centerpiece for holiday meals, Sunday dinners, or any occasion where you want to serve something truly special and heartwarming.
- Fragrant Kitchen Aroma: As the pork shoulder braises, your kitchen will be filled with an irresistible aroma of savory spices, sweet cider, and roasted goodness, setting the stage for a delightful dining experience.
Ingredients You Need
Crafting this delightful braised pork shoulder begins with selecting quality ingredients that will contribute to its deep, satisfying flavor. Using fresh, vibrant components is key to achieving that perfect balance of sweet, savory, and tangy notes that define this dish. The magic truly happens when these simple elements meld together during the slow braising process, transforming the pork into a tender, succulent masterpiece.
Braised Pork Shoulder
This braised pork shoulder recipe is a rich and flavorful dish slow-cooked to tender perfection with apple cider, tart Granny Smith apples, sweet onions, garlic, and a splash of white wine.
- 3 pounds pork shoulder roast
- Kosher salt and fresh ground black pepper, to taste
- 2 tablespoons olive oil
- 4 yellow onions, thinly sliced
- 6 cloves garlic, minced
- ¼ cup dry white wine
- 1 tablespoon fresh thyme, or use 1 teaspoon dried thyme
- 1 tablespoon fresh chopped rosemary leaves, or use 1 teaspoon crushed dried rosemary
- 1 teaspoon smoked paprika
- 1½ cups Apple Cider (NOT Apple Cider Vinegar)
- 1½ cups low sodium chicken broth
- 2 bay leaves
- 2 granny smith apples, cored and quartered
- 1Preheat the oven to 400˚F.
- 2Pat dry the pork with paper towels and season all over with kosher salt and black pepper.
- 3Heat the oil in a large oven-safe Dutch oven set over medium-high heat. To the heated oil, add the pork and brown it on all sides; about 5 minutes per side.
- 4Remove the pork from the pot and set it aside.
- 5Add onions to the pot and cook over medium heat for about 4 to 5 minutes, stirring often, until softened. Stir in the garlic and cook for 20 seconds.
- 6Deglaze the pot with the wine, scraping up all the browned bits from the bottom of the pot. Then, stir in the thyme, rosemary, and paprika.
- 7Add the pork back to the pot. Add in the apple cider, chicken broth, and bay leaves; bring the mixture to a boil.
- 8Cover the pot with a tight-fitting lid and transfer the pork to the oven.
- 9Reduce the oven temperature to 350˚F and cook for 2 hours.
- 10Remove the lid from the pot and drop in the apples. Cover and continue to cook in the oven for 30 minutes or until the internal temperature of the pork registers at least 145˚F and up to 200˚F.
- 11Remove from the oven and return the pot to the stovetop. Remove the pork from the pot and transfer it to a cutting board; let it rest for 10 minutes.
- 12In the meantime, set the pot over high heat and bring it to a boil; cook for a couple minutes or until sauce is slightly reduced and thickened.
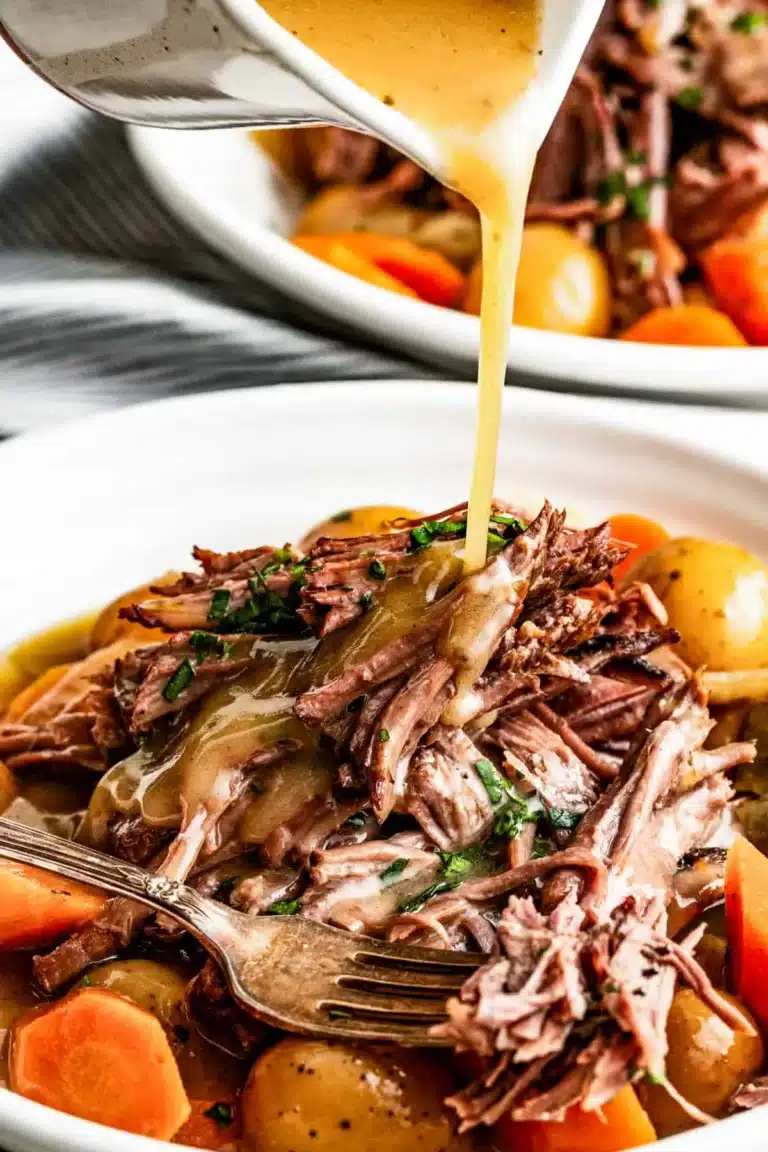
- 13Cut the pork and serve it with the sauce, onions, and apples.
Keywords: braised pork, pork shoulder, apple cider, fall flavors, comfort food, slow cooked
- pork shoulder roast: a 3-pound cut is ideal for this recipe, ensuring enough for generous servings and wonderful leftovers.
- kosher salt and fresh ground black pepper: essential for seasoning the pork, enhancing its natural flavors, and creating a delicious crust during browning.
- olive oil: used for searing the pork shoulder, creating a beautiful golden-brown exterior and adding a foundational layer of flavor.
- yellow onions: thinly sliced, these sweet onions caramelize during the braising, infusing the sauce with a rich, mellow sweetness and luscious texture.
- fresh garlic: minced garlic adds a pungent depth and aromatic complexity that complements the other flavors in the braising liquid.
- dry white wine: a splash of crisp white wine helps deglaze the pan, lifting flavorful browned bits and adding a subtle acidity that balances the richness of the pork.
- fresh thyme: its earthy, slightly floral notes pair beautifully with pork and apple, contributing a wonderful herbaceous aroma to the dish.
- fresh chopped rosemary leaves: with its piney, robust fragrance, rosemary adds another layer of aromatic sophistication that is classic with roasted meats.
- smoked paprika: this spice lends a gentle smokiness and a touch of warmth, reminiscent of barbecue flavors, without overpowering the other ingredients.
- apple cider: unfiltered apple cider is crucial for its natural sweetness and characteristic apple flavor, which harmonizes perfectly with the pork.
- low sodium chicken broth: this liquid base adds moisture, depth, and savory undertones to the braising liquid, helping to tenderize the meat and create a flavorful sauce.
- bay leaves: these aromatic leaves impart a subtle, complex flavor to the braising liquid, enhancing the overall savory character of the dish.
- granny smith apples: cored and quartered, these tart apples provide a delightful counterpoint to the richness of the pork, softening as they cook and adding a hint of fruitiness and acidity.
The precise quantities for these ingredients are detailed within the provided recipe card, ensuring you have all the information needed for a successful culinary endeavor.
Variations
To truly make this braised pork shoulder recipe your own, consider exploring a few creative variations that cater to different dietary preferences and flavor profiles. These adjustments are simple yet impactful, allowing you to tailor the dish to suit your specific tastes and needs, ensuring everyone can enjoy this comforting meal.
For a delightful Vegan or Vegetarian Alternative, the concept of braising can be adapted using hearty root vegetables and mushrooms. Imagine slow-cooking thick-cut chunks of portobello mushrooms, parsnips, and sweet potatoes in a rich vegetable broth infused with the same aromatics like onions, garlic, herbs, and a touch of apple cider. The technique of slow simmering would still yield tender, flavor-infused components, creating a satisfying and deeply savory meat-free dish that stands proudly on its own.
If you’re seeking a Low-Carb Option, the core braising technique remains the same, but the accompanying elements can be modified. Instead of traditional starchy sides, serve the tender braised pork shoulder over a bed of creamy mashed cauliflower, sautéed green beans, or a vibrant Brussels sprout slaw. The rich, savory sauce from the braising liquid will still be a perfect accompaniment, providing all the flavor without the carbohydrate load, making it suitable for ketogenic or low-carb lifestyles.
An exciting twist could be a Spicy Southwest Braised Pork Shoulder. Introduce a kick by adding a pinch of chipotle powder or a diced jalapeño to the braising liquid along with the onions and garlic. Consider a splash of lime juice towards the end of cooking for brightness and perhaps serving with a dollop of cilantro-lime crema. This variation transforms the dish into a smoky, subtly spicy delight, perfect for those who enjoy a bit of heat and bold, Southwestern-inspired flavors.
How to Prepare braised pork shoulder
Step 1: Prepare and Brown the Pork Shoulder
Begin by preheating your oven to a robust 400°F (200°C). This initial high heat is crucial for achieving a beautiful, flavorful sear on the pork shoulder. Take your pork shoulder roast and thoroughly pat it dry with paper towels; this step is vital as moisture hinders browning and can lead to steaming rather than searing. Once dry, season the entire surface generously with kosher salt and freshly ground black pepper. Don’t be shy with the seasoning; this is the foundation for the dish’s flavor.
Next, heat 2 tablespoons of olive oil in a large, heavy-bottomed Dutch oven or an oven-safe pot over medium-high heat. The oil should be shimmering but not smoking. Carefully place the seasoned pork shoulder into the hot oil. Allow it to brown undisturbed for approximately 5 minutes on each side. You are looking for a deep, golden-brown crust to form. This Maillard reaction is what develops complex flavors and adds an irresistible depth to the finished dish. Use tongs to turn the roast, ensuring all sides are evenly browned to perfection.
Once the pork shoulder has achieved a rich, beautiful sear on all sides, carefully remove it from the Dutch oven and set it aside on a plate. The browned bits left in the bottom of the pot are pure flavor gold and will be used in the next stage of preparing the braising liquid. Ensure the pot is still over medium heat as you move to the subsequent steps, as you’ll be building the sauce directly in the same vessel.
Step 2: Sauté Aromatics and Deglaze the Pot
With the pork shoulder removed from the Dutch oven, add the thinly sliced yellow onions to the pot. Reduce the heat slightly to medium and cook the onions, stirring frequently, for about 4 to 5 minutes. You want them to soften and become translucent, beginning to release their natural sugars and sweetness. This gentle sautéing lays the groundwork for the savory and sweet elements of the braising liquid.
Once the onions have softened, stir in the minced garlic. Cook for just about 20 seconds, stirring constantly, until the garlic is fragrant. Be careful not to burn the garlic, as it can turn bitter very quickly. The aroma at this stage should be wonderfully inviting, a promise of the deliciousness to come. Immediately after the garlic, pour in the ¼ cup of dry white wine. This is the deglazing step; use a wooden spoon or spatula to vigorously scrape up all those delicious browned bits that have stuck to the bottom of the pot. This process infuses the liquid with immense flavor.
After deglazing and ensuring all those flavorful fond bits are lifted into the liquid, stir in the fresh thyme, chopped rosemary, and smoked paprika. Allow these herbs and spices to toast for a few seconds, releasing their aromatic oils and further enhancing the complexity of the sauce base. The combination of softened onions, fragrant garlic, and toasted herbs will create a foundation of flavor that will permeate the pork as it braises.
Step 3: Assemble the Braising Liquid and Begin Braising
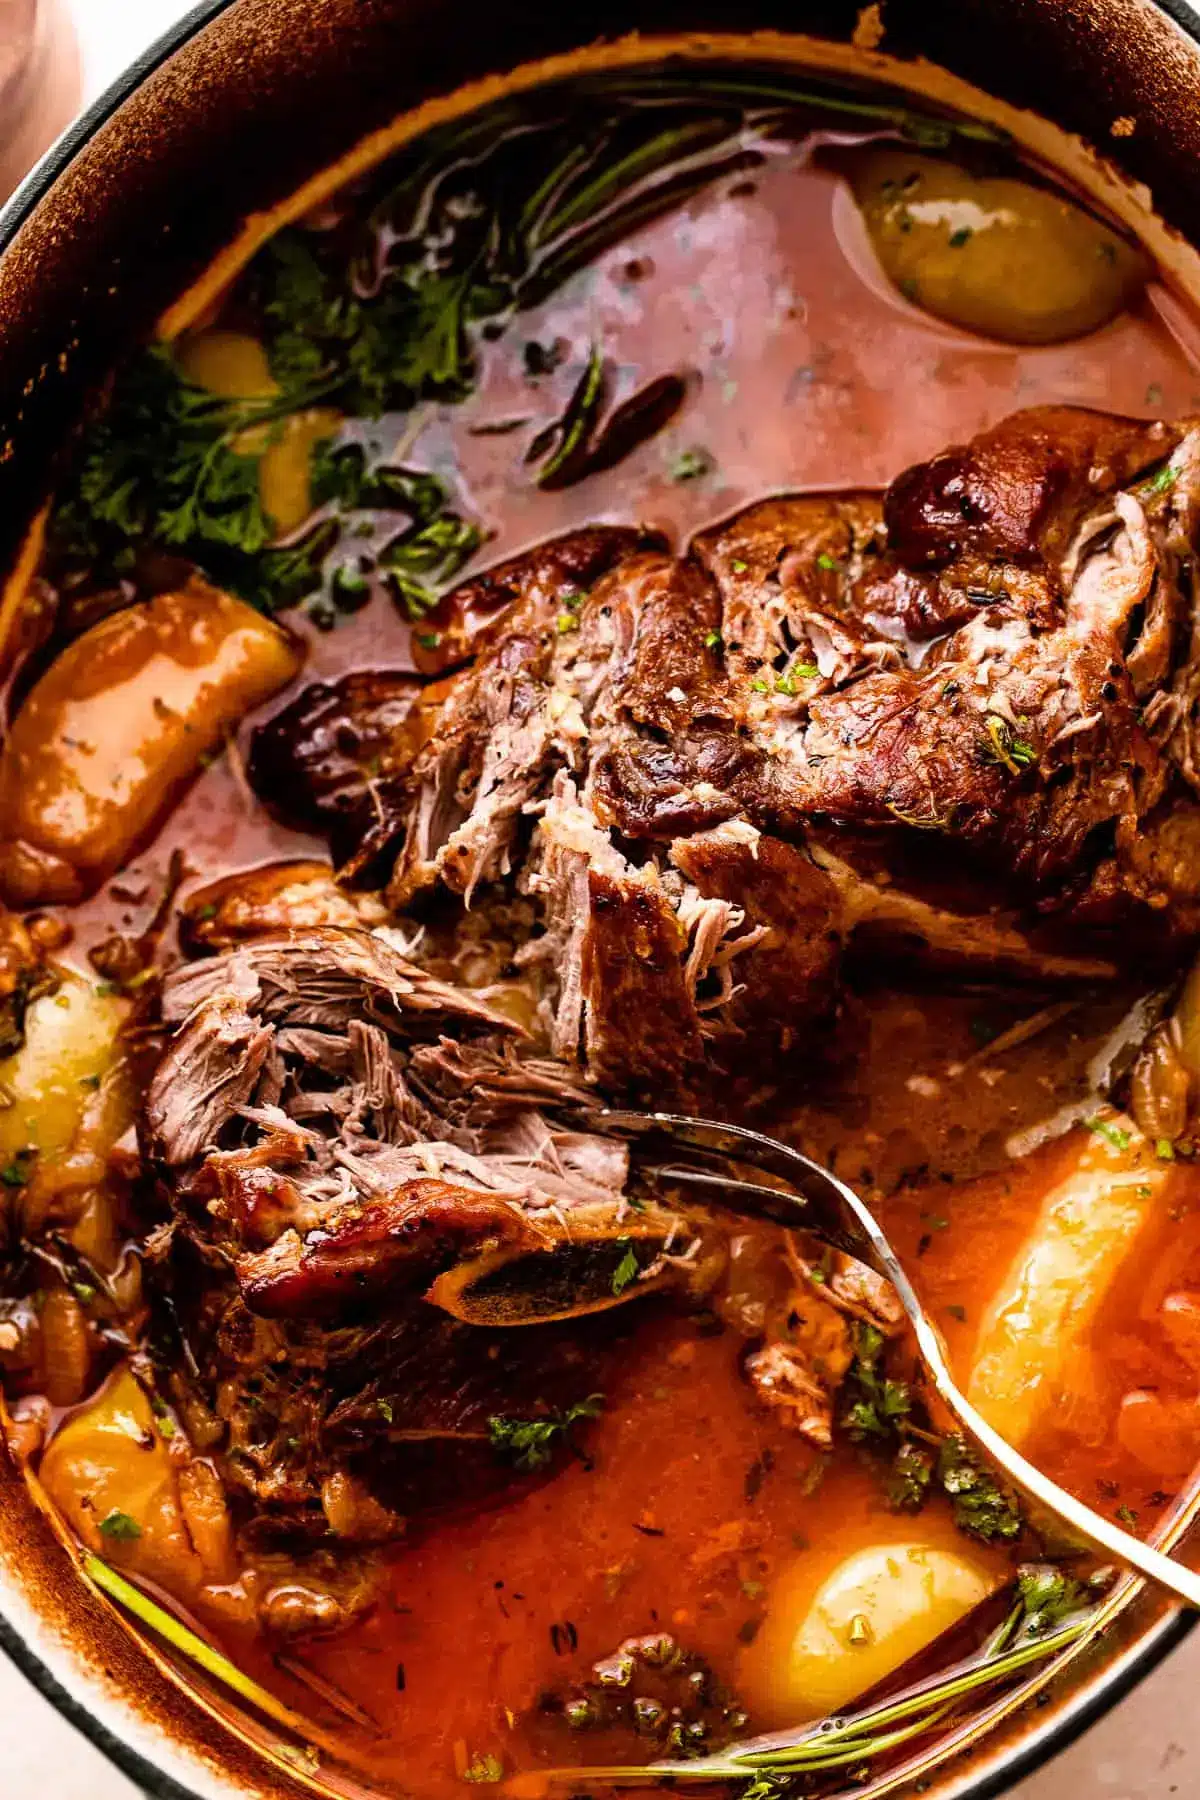
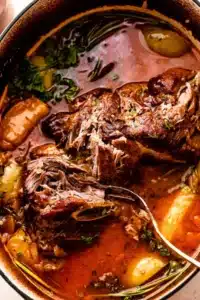
Return the browned pork shoulder to the Dutch oven, nestling it amongst the softened onions and aromatic mixture. Now, pour in the 1 ½ cups of apple cider and 1 ½ cups of low-sodium chicken broth. Ensure the liquid comes up about halfway to two-thirds of the way up the side of the pork roast; if more liquid is needed, you can add a touch more broth or water. Add the 2 bay leaves to the pot, tucking them into the liquid so they can release their subtle flavor.
Increase the heat to bring the entire mixture to a rolling boil. This initial boil helps to meld the flavors of the braising liquid and begins the tenderizing process. Once the liquid is boiling, immediately reduce the heat to low, cover the pot tightly with its lid, and carefully transfer the Dutch oven into the preheated oven. The oven temperature should be reduced to 350°F (175°C) for the braising phase.
Allow the pork shoulder to braise for 2 hours. During this time, the low, slow cooking in the moist environment will work its magic, breaking down the tough connective tissues in the pork and rendering the fat, making the meat incredibly tender and succulent. Resist the urge to lift the lid too often, as this allows precious heat and moisture to escape, which is critical for the braising process.
Step 4: Add Apples and Continue Braising
After the initial 2 hours of braising, carefully remove the Dutch oven from the oven. Remove the tight-fitting lid from the pot. At this stage, the pork should be visibly starting to tenderize, and the aroma will be incredibly enticing. Now, it’s time to add the quartered Granny Smith apples to the pot, tucking them in amongst the pork and the braising liquid.
Once the apples are added, replace the lid securely onto the Dutch oven. Return the covered pot to the oven. Continue to braise for an additional 30 minutes. This final period of cooking will allow the apples to soften beautifully, releasing their tart juices which will complement the richness of the pork, and further tenderize the meat until it is fork-tender and easily shreddable. The pork is done when it reaches an internal temperature of at least 145°F (63°C), but for ultimate tenderness, aim for closer to 170-190°F (77-88°C).
The apples will soften and absorb the flavors of the braising liquid, becoming a delicious accompaniment to the pork. The combination of the meltingly tender pork and the slightly softened, flavorful apples creates a wonderful contrast in texture and taste that is truly satisfying. Ensure the lid is sealed tightly to trap all the steam and moisture within the pot for optimal braising.
Step 5: Rest the Pork and Reduce the Sauce
Once the pork shoulder has finished braising and is incredibly tender, carefully remove the Dutch oven from the oven. Transfer the pork shoulder from the pot to a clean cutting board. Tent it loosely with aluminum foil and let it rest for at least 10 minutes. This resting period is crucial; it allows the juices within the meat to redistribute, resulting in a more moist and flavorful final product. Cutting too soon will cause those precious juices to run out, leaving the meat drier.
While the pork is resting, return the Dutch oven containing the braising liquid and apples back to the stovetop. Place it over high heat. Bring the liquid to a vigorous boil. Allow it to boil for several minutes, stirring occasionally, until the sauce has reduced and thickened to your desired consistency. This reduction concentrates the flavors, transforming the thin braising liquid into a rich, luscious gravy. If you prefer a smoother sauce, you can strain out the onions and herbs at this point, though many prefer to leave them in for texture and visual appeal.
The goal of this reduction is to achieve a gravy-like consistency that will beautifully coat the sliced pork. The apples will have softened and may have started to break down slightly, adding to the texture of the sauce. Taste the sauce and adjust seasoning with salt and pepper if necessary before serving.
Step 6: Slice and Serve
After the resting period, the pork shoulder will be ready to be sliced. Using a sharp knife, carefully slice the braised pork shoulder into thick, generous portions. The meat should be so tender that it almost falls apart as you slice it. If you prefer a shredded presentation, you can easily pull the meat apart with two forks.
Arrange the sliced or shredded pork shoulder on a serving platter or individual plates. Spoon the reduced sauce generously over the pork, ensuring that the softened apples and onions are distributed as well. The rich, glossy sauce will be a perfect accompaniment, adding moisture and intense flavor to every bite. Garnish with fresh chopped parsley for a touch of color and freshness, if desired, to brighten up the presentation.
This is the moment to enjoy the fruits of your labor! The combination of tender pork, sweet-tart apples, and savory, rich sauce is a truly comforting and satisfying meal. It’s a dish that evokes warmth and hospitality, perfect for sharing with loved ones and creating lasting culinary memories. Serve it hot and savor every delicious bite of this beautifully prepared braised pork shoulder.
Pro Tips for braised pork shoulder
To elevate your braised pork shoulder from delicious to absolutely sublime, a few expert tips can make all the difference. These small adjustments focus on maximizing flavor, ensuring perfect texture, and presenting the dish beautifully. Mastering these techniques will help you achieve consistently outstanding results every time you make this comforting classic.
Choosing the Right Cut is Paramount: When selecting your pork shoulder, look for a piece with good marbling. This intramuscular fat is what renders down during the long, slow braising process, contributing immense flavor and ensuring the pork remains incredibly moist and tender. Avoid overly lean cuts, as they are more prone to drying out. A well-marbled pork shoulder is the key to achieving that signature melt-in-your-mouth texture.
Don’t Rush the Browning: The initial searing of the pork shoulder is a critical step that cannot be rushed. A deep, even crust not only adds visual appeal but also develops complex, savory flavors through the Maillard reaction. Ensure your pot is sufficiently hot before adding the pork, and allow it to brown undisturbed on each side until a rich, golden-brown color is achieved. This step significantly enhances the overall depth of flavor in the final dish.
Master the Deglazing Technique: After browning the pork, the browned bits stuck to the bottom of the pot are flavor powerhouses. When you add the white wine (or other liquid), be sure to scrape these bits thoroughly with a wooden spoon or spatula. This process, known as deglazing, lifts all that concentrated flavor into the braising liquid, ensuring that every element of the dish is infused with deliciousness. This step is fundamental to building a rich and complex sauce.
Consider the Internal Temperature for Tenderness: While pork is safe to consume at 145°F (63°C), pork shoulder benefits immensely from cooking to higher internal temperatures for optimal tenderness. Aim for an internal temperature between 170°F and 190°F (77°C to 88°C) for a braised roast that is fork-tender and easily shreddable. For true “pulled pork” consistency, temperatures around 205°F (96°C) are ideal, as the connective tissues fully break down.
Allow Ample Resting Time: Just like with any significant cut of meat, allowing the braised pork shoulder to rest after cooking is crucial. This resting period, typically 10-15 minutes, permits the juices to redistribute throughout the meat. Skipping this step will result in the juices running out when you slice or shred the pork, leading to a drier final product. Patience here yields a significantly more succulent and flavorful result.
Serving Suggestions for braised pork shoulder
Decoration
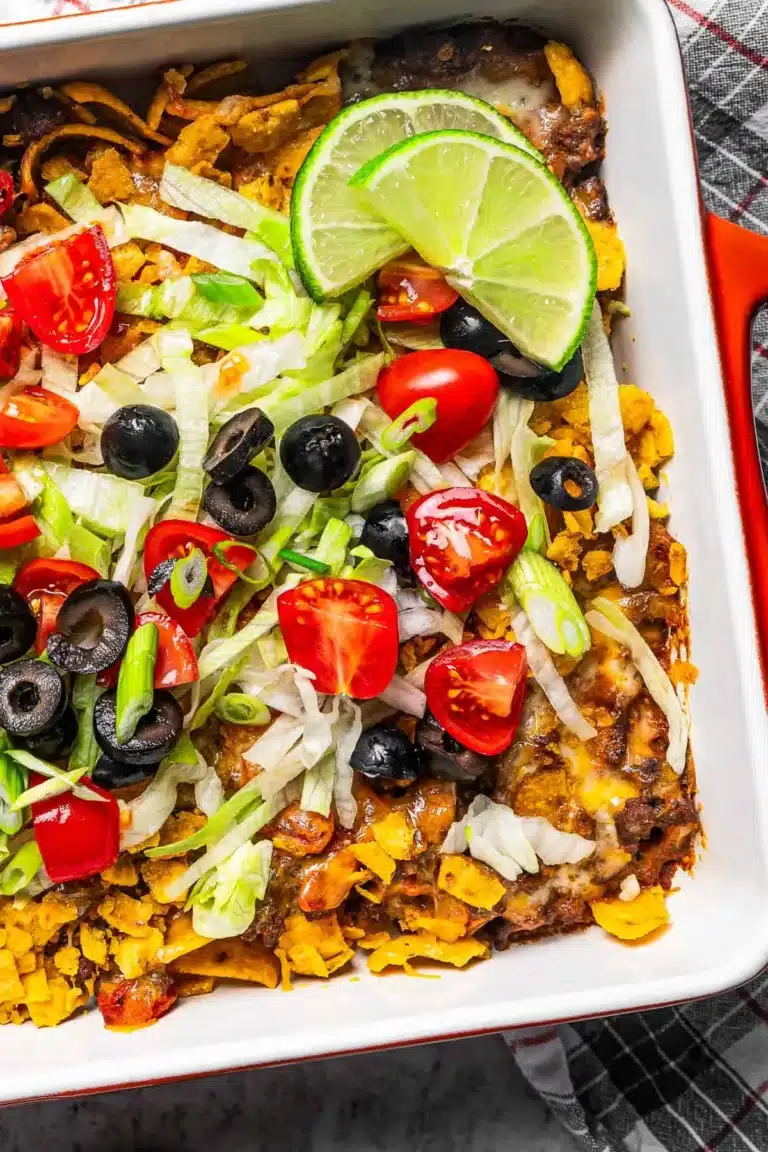
To finish your masterpiece, a sprinkle of freshly chopped parsley adds a vibrant touch of green and a hint of freshness that beautifully contrasts with the rich, savory flavors of the braised pork shoulder. If you’ve included the apples and onions in the sauce, their softened texture and color also contribute to a visually appealing presentation. A small sprig of fresh rosemary or thyme placed artfully on top can also enhance the rustic charm and hint at the wonderful aromatics within the dish.
Side Dishes
The richness of braised pork shoulder pairs wonderfully with a variety of comforting side dishes. Creamy mashed potatoes are a classic choice, their soft texture and mild flavor perfectly soaking up the delicious braising sauce. Alternatively, buttery egg noodles offer a similar comforting embrace, providing a delightful base for the tender pork and rich gravy. For a lighter, yet equally satisfying option, consider a side of sautéed broccolini or roasted Brussels sprouts; their slight bitterness and fresh flavor provide a lovely counterpoint to the pork’s richness.
Seasonal vegetables like honey-roasted butternut squash or a hearty baked macaroni and feta dish make for excellent pairings, especially during cooler months. A refreshing spring vegetable potato salad can also offer a delightful contrast with its cool, tangy elements. The key is to select sides that complement the main dish without overpowering its complex flavors, enhancing the overall dining experience and creating a well-rounded meal.
Creative Serving Ideas
Beyond serving it simply sliced with sauce, consider transforming your braised pork shoulder into other delightful dishes. It makes for an incredible filling for tacos or enchiladas, offering a tender, flavorful protein that pairs wonderfully with salsa and guacamole. You can also shred the cooled pork and use it in hearty stews or flavorful chili, adding a depth of flavor that only slow-cooked meat can provide. Another innovative idea is to incorporate it into a savory bread pudding or a shepherd’s pie topping, showcasing its versatility and rich taste in unexpected ways.
For a more refined presentation, you could serve the braised pork shoulder atop a smooth parsnip purée or alongside a crisp apple and celery slaw. The possibilities are vast, allowing you to adapt this versatile cut of meat to suit various occasions and culinary inspirations. Think of it as a foundation for countless delicious meals, each with its own unique charm and flavor profile. The tender meat is a canvas ready to be painted with your culinary creativity.
Preparation & Storage
Storing Leftovers
To store leftover braised pork shoulder, allow the meat and any remaining sauce to cool slightly. Transfer the cooled leftovers into shallow, airtight containers. It’s best to store the pork submerged in its sauce, as this helps to keep it moist and flavorful. Properly stored in the refrigerator, your braised pork shoulder should remain fresh and delicious for up to three days. This ensures you can enjoy its wonderful taste even after the initial meal.
Ensure that the containers are completely sealed to prevent any air exposure, which can lead to drying out or spoilage. If you have a large amount of leftovers, consider dividing them into smaller portions to facilitate quicker cooling and easier reheating. Always check for any signs of spoilage before consuming leftovers, such as off-odors or changes in texture.
The rich flavors of braised pork shoulder often meld and deepen overnight, making leftovers just as enjoyable, if not more so, than the initial serving. This makes it an excellent candidate for meal prepping or for planning delicious second meals.
Freezing
Braised pork shoulder freezes exceptionally well, making it a fantastic option for long-term storage. Once cooled, portion the pork and its accompanying sauce into freezer-safe bags or airtight storage containers. Remove as much air as possible from the packaging to prevent freezer burn. When stored properly, frozen braised pork shoulder can maintain its quality for up to two months. This allows you to enjoy this comforting dish long after it’s been prepared.
When freezing, it’s often best to freeze the pork in serving-sized portions. This way, you can thaw and reheat only what you need at any given time. Ensure the containers are truly airtight to maintain the integrity of the meat and sauce. Proper labeling with the date of freezing will also help you keep track of your frozen goods.
The texture and flavor hold up remarkably well to freezing, making it a convenient way to have a delicious meal ready to go on a busy day. Simply remove from the freezer when needed and proceed with thawing and reheating instructions.
Reheating
To reheat your braised pork shoulder, begin by thawing it overnight in the refrigerator if it was frozen. Once thawed, place the leftovers in a covered skillet or saucepan over low heat. Add a splash of water or broth if the sauce seems too thick. Gently heat the pork, stirring occasionally, until it is heated through. This method ensures the meat stays moist and doesn’t dry out.
Alternatively, you can reheat smaller portions in the microwave, stirring halfway through to ensure even heating. For a larger batch, reheating in a covered baking dish in a moderate oven (around 325°F or 160°C) can also be an effective method, allowing it to heat through slowly and evenly. Avoid high heat, as this can cause the pork to become tough or dry.
The goal is to gently bring the pork back to temperature, allowing the flavors to reawaken. Serve it with its rehydrated sauce for the best experience. The convenience of properly stored and reheated braised pork shoulder makes it a truly rewarding dish to have on hand.
Frequently Asked Questions
-
What is the best cut of pork to use for braising?
For braising, tougher cuts of pork with a good amount of connective tissue and fat are ideal because the long, slow cooking process breaks down these elements, resulting in incredibly tender and flavorful meat. Pork shoulder, also known as pork butt or Boston butt, is the most recommended cut. Its marbling and collagen content are perfectly suited for braising, transforming into succulent, melt-in-your-mouth texture. Other good options include pork shank or pork belly, each offering a unique texture and richness that benefits from this moist cooking method. Avoid lean cuts like pork loin, as they can become dry and tough when braised. -
Can I make braised pork shoulder in a slow cooker or Instant Pot?
Yes, absolutely! Braised pork shoulder is very adaptable to different cooking methods, including slow cookers and Instant Pots. For a slow cooker, you would generally follow similar browning and sautéing steps on the stovetop and then transfer everything to the slow cooker to cook on low for 6-8 hours, or on high for 3-4 hours. For an Instant Pot, you can typically sear the pork and sauté aromatics directly in the pot before adding liquids and pressure cooking for around 60-75 minutes, followed by a natural or quick release. Both methods will yield tender, delicious results, though the depth of flavor developed from stovetop reduction might require extra attention in these appliances. -
How do I know when my braised pork shoulder is cooked and tender enough?
The best indicator of perfectly braised pork shoulder is its tenderness. It should be so tender that it easily pulls apart with a fork, or even shreds with minimal effort. If you are using a meat thermometer, the internal temperature should ideally be between 170°F and 190°F (77°C to 88°C) for a fork-tender roast. For a truly “pulled pork” consistency, you would aim for temperatures closer to 205°F (96°C), where the connective tissues have fully broken down. If the meat is still resistant to the fork after the recommended cooking time, continue braising it for longer, checking for tenderness every 30 minutes.