Lemon Raspberry Cake Recipe That Will Blow Your Mind!
This Lemon Raspberry Cake combines bright citrus zest with sweet-tart berries for a dessert that’s both elegant and comforting. The first time I made this cake, the kitchen filled with the most heavenly aroma of lemon and vanilla, instantly transporting me back to summer afternoons at my grandmother’s house.
There’s something magical about the way these flavors play together—tart yet sweet, light yet satisfying. When life hands you lemons, don’t just make lemonade; make this gorgeous, crowd-pleasing cake that’s perfect for everything from casual gatherings to special celebrations. It’s become my go-to when I need something that feels both special and familiar, like my Crack Chicken Noodle Soup does on chilly evenings.
Why You Will Love This Recipe
- Perfect Balance of Flavors: The magic of this cake lies in its perfect balance of bright lemon and sweet-tart raspberries. The lemon zest infuses every bite with citrusy sunshine, while fresh raspberries create pockets of juicy sweetness that burst with flavor. I love how the tanginess of the lemon cuts through the richness of the cake, creating something that’s neither too sweet nor too tart. The first time my neighbor tried it, she closed her eyes and sighed, “It tastes like summer on a plate!” That’s exactly what I aim for—desserts that evoke feelings and memories, not just satisfy a sweet tooth.
- Impressive Yet Approachable: Don’t let its stunning appearance fool you—this cake is surprisingly simple to make! The batter comes together in just minutes, and the raspberry placement doesn’t require any fancy decorating skills. I remember being nervous the first time I served it at a dinner party, but the oohs and aahs as I brought it to the table instantly calmed my nerves. It’s that rare recipe that looks like it took hours but won’t leave you exhausted in the kitchen. The lemon glaze creates an effortlessly elegant finish that makes everyone think you’re a professional baker, even if you’re still mastering the basics.
- Versatile and Adaptable: This cake is a fantastic canvas for various flavor combinations and occasions. Whether you’re looking for a delightful breakfast treat, a stunning dessert, or something to brighten up a lunch spread, it fits perfectly. Its ability to adapt to seasonal fruits makes it a year-round favorite, proving its true culinary versatility.
- Aromatic Delight: The combination of fresh lemon zest and sweet raspberries filling your kitchen as it bakes is simply intoxicating. This aroma is not just pleasant; it’s an invitation to comfort and joy, setting the stage for a delightful tasting experience. Many find this sensory aspect to be one of the most rewarding parts of baking this cake, creating happy memories with every whiff.
- Crowd-Pleasing Appeal: This cake is almost universally loved, making it a safe bet for any gathering. The bright, refreshing flavors appeal to a wide range of palates, from children to adults. It’s a dessert that tends to disappear quickly, a testament to its deliciousness and popularity among guests.
Ingredients You Need
Making this Lemon Raspberry Cake starts with selecting the finest ingredients available, as their quality directly influences the final taste and texture. Using fresh, vibrant components ensures that the bright lemon and sweet raspberry flavors truly shine through. Paying attention to the details, like the temperature of your butter and eggs, can make a significant difference in the outcome of your bake.
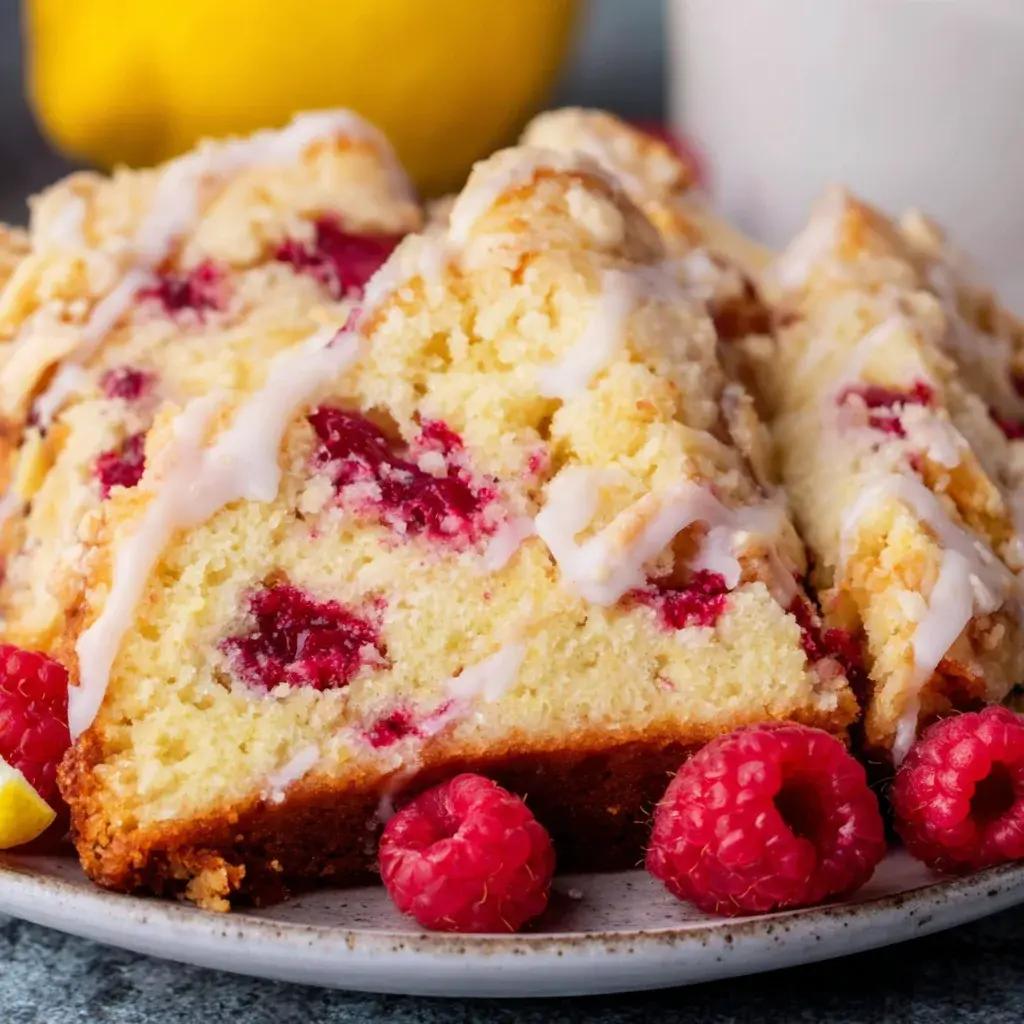
Lemon Raspberry Cake
This Lemon Raspberry Cake combines bright citrus zest with sweet-tart berries for a dessert that's both elegant and comforting. The first time I made this cake, the kitchen filled with the most heavenly aroma of lemon and vanilla, instantly transporting me back to summer afternoons at my grandmother's house. There's something magical about the way these flavors play together—tart yet sweet, light yet satisfying. When life hands you lemons, don't just make lemonade; make this gorgeous, crowd-pleasing cake that's perfect for everything from casual gatherings to special celebrations. It's become my go-to when I need something that feels both special and familiar, like my Crack Chicken Noodle Soup does on chilly evenings.
- Use the freshest ingredients: bright, unwaxed lemons for zest and juice; firm, vibrant raspberries.
- Ensure eggs and butter are at room temperature for optimal aeration.
- Consider using pure vanilla extract for an enhanced flavor boost.
- Cream butter and sugar until light and fluffy (3-5 minutes).
- Gently fold in raspberries with a spatula.
- Rotate the pan halfway through baking for even cooking.
- 1Preheat your oven and prepare your cake pan.
- 2Cream the butter and sugar until light and fluffy.
- 3Incorporate room temperature eggs and pure vanilla extract.
- 4Gently fold in the dry ingredients, alternating with any wet ingredients if applicable.
- 5Toss raspberries with a tablespoon of flour before gently folding them into the batter.
- 6Pour the batter into the prepared pan.
- 7Bake, rotating the pan halfway through, until a toothpick inserted into the center comes out with moist crumbs.
- 8Allow the cake to cool completely before glazing.
- 9Prepare the lemon glaze and drizzle over the cooled cake.
Keywords: lemon raspberry cake, citrus cake, berry cake, dessert, baking, German cuisine, vegetarian
- all-purpose flour: the foundational structure of our cake, providing a tender crumb.
- granulated sugar: for sweetness and to help create that beautiful golden crust.
- unsalted butter: softened to room temperature for optimal creaming and aeration.
- eggs: large, also at room temperature to ensure they incorporate seamlessly into the batter.
- lemon zest: from fresh lemons, providing that essential bright, citrusy perfume.
- fresh raspberries: the stars of the show, offering bursts of sweet-tart flavor.
- milk: to add moisture and create a tender cake texture.
- vanilla extract: pure vanilla extract enhances all the other flavors beautifully.
- baking powder: our leavening agent for a light and airy rise.
- salt: to balance the sweetness and enhance the overall flavor profile.
- powdered sugar: for a simple, elegant glaze that complements the cake.
- lemon juice: freshly squeezed for the glaze, adding an extra layer of tartness.
Quantities for each ingredient are readily available in the recipe card above for your convenience.
Variations
To elevate this delightful cake further, consider infusing it with different flavor profiles to suit diverse tastes and occasions. One popular variation is to transform it into a truly decadent chocolate-lemon raspberry cake. For this, you would typically incorporate unsweetened cocoa powder into the dry ingredients and perhaps fold in some mini chocolate chips along with the raspberries, creating a rich contrast to the bright citrus and berry notes.
Another exciting adaptation is a coconut-infused lemon raspberry cake, perfect for those who enjoy tropical flavors. This can be achieved by substituting some of the milk in the recipe with full-fat coconut milk and adding shredded, unsweetened coconut to the batter. A light coconut glaze or toasted coconut flakes sprinkled on top would further enhance this exotic twist.
For a lighter, more refreshing take, try a lemon-elderflower raspberry cake. Adding a tablespoon or two of elderflower cordial to the batter and using elderflower-infused extract can impart a subtle floral aroma that pairs wonderfully with the lemon and raspberry. This variation is particularly lovely for spring and summer celebrations and feels incredibly sophisticated.
A vegan version is also entirely achievable with a few smart substitutions. Replacing the butter with vegan butter or coconut oil, using a flax egg (1 tablespoon flaxseed meal mixed with 3 tablespoons water, then allowed to sit for 5-10 minutes) or applesauce for the eggs, and ensuring your milk is plant-based (like almond or soy milk) will yield a delicious vegan treat. The zest and berries will still provide that familiar, delightful flavor profile, proving that plant-based baking can be just as satisfying.
For those seeking a low-carb or keto-friendly option, this recipe can be adapted with precision. Substituting the all-purpose flour with a blend of almond flour and coconut flour, and using a sugar substitute like erythritol or stevia for both the cake and the glaze, will dramatically reduce the carbohydrate content. You might need to adjust the liquid amounts slightly as almond flour can absorb moisture differently. This allows those following specific dietary plans to enjoy a slice of this bright, fruity cake without guilt.
Exploring the realm of spices can also lead to exciting variations. A pinch of cardamom added to the batter can offer a subtle, warm, aromatic depth that complements the lemon and raspberry beautifully. Alternatively, a hint of ginger, either ground or finely grated fresh, can provide a pleasant warmth and subtle spice. These additions are often best in smaller quantities, just enough to add intrigue without overpowering the primary flavors. The goal is to create layers of taste that unfold with each bite, making the cake an experience rather than just a dessert.
Consider also the possibility of a lemon raspberry almond cake. This would involve incorporating finely ground almond flour into the batter, adding a wonderfully moist and slightly nutty texture. A bit of almond extract, used sparingly, can further enhance this profile. The natural sweetness of almonds often pairs exceptionally well with the tanginess of lemon and the sweetness of raspberries, creating a harmonious blend of flavors and textures that many find irresistible.
Finally, don’t be afraid to experiment with different types of berries or fruits. While raspberries are classic, blueberries, blackberries, or even finely diced strawberries can be used. Each will offer a slightly different flavor and texture, allowing you to customize the cake to your preference or what’s in season. The core lemon flavor will provide a consistent bright backdrop for whatever fruit you choose to feature, making the possibilities truly endless for this adaptable dessert.
How to Prepare Lemon Raspberry Cake
Step 1: Preheat Oven and Prepare Pans
The journey to a perfect Lemon Raspberry Cake begins with ensuring your oven is ready to bake consistently and your pans are prepped to prevent sticking. Preheat your oven to 350°F (175°C) well in advance of mixing your batter, allowing it to reach the precise temperature for even baking. This crucial first step ensures that your cake starts baking immediately upon entering the oven, leading to a uniform rise and preventing the edges from over-baking while the center remains undercooked.
While the oven heats, prepare your cake pans by greasing and flouring them thoroughly. For a standard 9-inch round cake, you’ll typically use two pans. A light coating of butter or non-stick cooking spray followed by a dusting of all-purpose flour works wonders. Alternatively, you can line the bottoms of your pans with parchment paper circles, which guarantees easy release and minimal mess, especially for delicate cakes like this one. Make sure to get into all the corners and edges to prevent any part of your beautiful cake from adhering to the pan.
Ensure that your pans are placed on the middle rack of the preheated oven. This central position is key for achieving even heat distribution around the entire cake. If your oven tends to have hot spots, consider rotating the pans halfway through the baking process, a tip that has saved many a bake from uneven browning. Properly preparing your pans is a small but vital detail that sets the stage for a perfectly baked, easily removable, and visually appealing final product.
Step 2: Cream Butter and Sugar
This foundational step is where the magic of aeration begins, creating a tender, light cake texture. In a large mixing bowl, or the bowl of your stand mixer fitted with the paddle attachment, combine the softened unsalted butter and granulated sugar. It is imperative that the butter be truly softened, not melted; it should yield to gentle pressure from your finger without being greasy.
Beat these two ingredients together on medium-high speed for a substantial amount of time, typically 3 to 5 minutes. You are looking for the mixture to become pale yellow, light, and visibly fluffy, almost like a creamy cloud. This process incorporates air into the batter, which acts as one of the primary leavening agents, contributing significantly to the cake’s final volume and delicate crumb. Resist the urge to speed this up; patient creaming is key to success.
Scrape down the sides and bottom of the bowl frequently with a spatula to ensure all the butter and sugar are evenly incorporated and beaten. This ensures that no pockets of uncreamed butter or sugar remain, which could lead to a dense cake or a greasy texture. The pale, fluffy consistency is your visual cue that the batter is ready for the next stage of development, promising a wonderful texture in the finished cake.
Step 3: Incorporate Eggs and Vanilla
With the butter and sugar beautifully creamed, it’s time to add the eggs, one at a time, ensuring each is fully incorporated before adding the next. This gradual addition helps maintain the emulsion created during the creaming process, preventing the batter from looking curdled or separated. Crack each egg into a small bowl first to check for any shells or spoilage before adding it to the main mixture.
Beat each egg on medium speed until it is completely blended into the creamed mixture. The batter might appear slightly different after each egg is added, but continue beating until it’s smooth again. If your batter does seem to start curdling slightly, don’t panic; adding a tablespoon of your dry ingredients can often help to bring it back together. This step is crucial for binding the ingredients and adding richness and structure to the cake.
Once all the eggs are incorporated, add the pure vanilla extract. Vanilla is not just for flavor; it enhances and rounds out the other tastes, making the lemon and raspberry notes pop even more vibrantly. Mix on low speed just until the vanilla is distributed throughout the batter. The rich aroma at this stage is a wonderful preview of the deliciousness to come, signaling that the wet base of your cake is ready for its dry counterparts.
Step 4: Combine Dry Ingredients and Alternate with Milk
In a separate medium bowl, whisk together the all-purpose flour, baking powder, and salt. Whisking ensures that the leavening agent and salt are evenly distributed throughout the flour, which is essential for an even rise and balanced flavor. This dry mixture will form the main structure and texture of your cake, so thoroughness here is important.
Now, you will alternate adding the dry ingredients and the milk to the creamed butter-egg mixture. Begin by adding about one-third of the dry ingredients to the wet mixture. Mix on low speed until just combined. It’s important not to overmix at this stage, as overmixing can develop the gluten in the flour, leading to a tougher cake.
Next, add half of the milk to the batter and mix on low speed until just incorporated. Continue this pattern by adding another third of the dry ingredients, mixing, then the remaining milk, mixing, and finally, the last third of the dry ingredients. Again, mix only until no streaks of flour remain. Overmixing at any point can compromise the delicate crumb structure we’re aiming for. The batter should be smooth and homogenous at this point, ready for the addition of lemon zest and raspberries.
Step 5: Add Lemon Zest and Gently Fold in Raspberries
Now it’s time to introduce the star flavor of our cake: fresh lemon zest. Finely grate the zest from your lemons directly into the batter. Be sure to only zest the yellow part of the peel, avoiding the bitter white pith underneath. The zest releases fragrant oils that will infuse the cake with an incredible citrus aroma and taste. Mix on low speed for just about 10-15 seconds, enough to distribute the zest evenly without overworking the batter.
Gently fold in the fresh raspberries using a rubber spatula. It’s advisable to toss your raspberries with a tablespoon of flour before adding them to the batter; this helps them to stay suspended throughout the cake rather than sinking to the bottom during baking. Use a gentle folding motion, scooping from the bottom of the bowl and bringing it up and over the raspberries, rotating the bowl as you go. The goal is to distribute them evenly without crushing them or overmixing the batter, which could result in a streaky pink batter or broken berries.
The batter should now be a beautiful pale yellow, studded with vibrant red raspberries. The texture should be thick but pourable. If it appears too thick, a tiny splash more milk can be added, but be cautious not to make it too thin. This stage represents the culmination of careful mixing and preparation, resulting in a batter that promises a wonderfully flavorful and textured cake.
Step 6: Bake and Cool the Cake
Pour the prepared batter evenly into your greased and floured cake pans. Use your spatula to spread the batter evenly, ensuring that the tops are relatively level, which will help the cakes bake evenly. Place the pans on the middle rack of your preheated oven, ensuring they are not touching each other or the oven walls, allowing for adequate air circulation.
Bake for approximately 25-35 minutes, or until a wooden skewer or toothpick inserted into the center of the cakes comes out clean or with a few moist crumbs attached. Resist the urge to open the oven door too early in the baking process, as this can cause the cakes to sink. Check for doneness starting around the 25-minute mark, as oven temperatures can vary. The cakes should be golden brown, and the edges should be pulling away slightly from the sides of the pans.
Once baked, remove the cakes from the oven and let them cool in the pans on a wire rack for about 10-15 minutes. This allows the cakes to set slightly, making them easier to remove from the pans without breaking. After this initial cooling period, invert the cakes onto the wire rack to cool completely. Ensure they are entirely cool before attempting to frost or glaze them, as a warm cake will cause frosting to melt and become messy.
Pro Tips for Lemon Raspberry Cake
Room Temperature is Key: Always ensure your butter, eggs, and milk are at room temperature before you begin mixing. This simple step significantly impacts the batter’s ability to emulsify properly, leading to a lighter, more tender crumb and a cake that rises beautifully. Cold ingredients can cause the batter to curdle and result in a denser texture, so plan ahead and let them sit out for about 30-60 minutes.
Don’t Overmix: Once you add the flour, mix the batter only until just combined. Overmixing develops the gluten in the flour, which can make your cake tough and chewy. A gentle hand is crucial for achieving that signature delicate, melt-in-your-mouth texture that makes this cake so delightful. Gentle folding for the raspberries is equally important to keep them intact.
Zest Wisely: When zesting your lemons, use a microplane or a fine grater and only remove the yellow outer layer. The white pith underneath is bitter and can impart an unpleasant flavor to your cake. The fragrant oils are concentrated in the zest, so a good amount of finely grated zest will provide the most intense lemon flavor without any bitterness.
Berry Preparation Matters: If using frozen raspberries, do not thaw them before adding to the batter. Toss them in a tablespoon of flour with the fresh ones. This coating helps prevent them from bleeding their color excessively into the batter and also helps them distribute more evenly, reducing the chances of them sinking to the bottom. A lighter hand during folding is still necessary.
Test for Doneness Accurately: Rely on the toothpick test, but understand what you’re looking for. A few moist crumbs attached to the toothpick indicate the cake is perfectly baked and will remain moist. If the toothpick comes out with wet batter, it needs more time. If it comes out completely dry with no crumbs, the cake may be overbaked and could be dry.
Achieve the Perfect Glaze: For a smooth, glossy glaze, start with powdered sugar and lemon juice. Add the liquid gradually, a teaspoon at a time, until you reach your desired consistency. If it’s too thick, add a tiny bit more lemon juice; if it’s too thin, add a bit more powdered sugar. The glaze should be pourable but thick enough to coat the back of a spoon. A simple dusting of powdered sugar is also a lovely alternative for a less sweet finish.
Serving Suggestions for Lemon Raspberry Cake
Decoration
The simplest and most effective decoration for this Lemon Raspberry Cake is its own stunning glaze. A generous drizzle of the lemon glaze over the cooled cake creates an elegant, slightly tart finish that complements the cake beautifully. For an extra touch of visual appeal, you can sprinkle fresh raspberries and a few small, delicate mint leaves over the wet glaze before it sets. This adds a pop of color and a hint of freshness, making the cake look as delightful as it tastes.
If you prefer a more elaborate presentation, consider piping a border of whipped cream or a delicate buttercream frosting around the edges of the cake. You can also use a zester to create fine curls of lemon zest to scatter over the top, adding a vibrant yellow accent. For a truly festive look, edible flowers like pansies or violets can be artfully arranged on top, especially if the cake is for a special occasion like a spring wedding or a garden party. The natural beauty of the ingredients should always be the focus, with decorations enhancing rather than masking the cake’s inherent charm.
Another creative decorative approach is to use a stencil. Place a decorative stencil over the cake once the glaze has set, and then dust lightly with powdered sugar or cocoa powder. Remove the stencil carefully to reveal a beautiful pattern. This method is particularly effective for creating sophisticated designs that add a touch of artistry to an otherwise simple cake. Always ensure the cake is completely cool before attempting any stenciling to avoid smudging.
Side Dishes
This Lemon Raspberry Cake pairs exceptionally well with a variety of accompaniments, enhancing its flavors and making it suitable for different dining occasions. A scoop of high-quality vanilla bean ice cream is a classic choice, its creamy sweetness and subtle vanilla notes providing a perfect contrast to the cake’s bright tanginess. The temperature difference between the warm cake and cold ice cream is also a delightful sensory experience.
Lightly sweetened whipped cream is another superb pairing, adding a cloud-like texture and a gentle creaminess that doesn’t overpower the cake’s primary flavors. For an extra layer of flavor, infuse the whipped cream with a hint of lemon zest or a dash of vanilla extract. You could also consider a dollop of mascarpone cheese, whipped with a touch of honey or maple syrup, for a richer, more luxurious creamy accompaniment.
For a more sophisticated dessert experience, consider serving the cake with a fruit coulis or a berry compote. A simple raspberry or mixed berry coulis, slightly tart and vibrant, will echo the cake’s flavors while adding a lovely sauciness. This can be artfully drizzled around the plate for a restaurant-quality presentation. Some guests might also enjoy a small side of fresh berries, such as extra raspberries, blueberries, or sliced strawberries, to enjoy alongside their cake, adding a fresh, unadulterated burst of fruitiness.
Beverage pairings are also crucial for a complete experience. A strong cup of coffee, whether a rich espresso or a smooth latte, provides a robust counterpoint to the cake’s sweetness. For a tea-lover, a fragrant Earl Grey or a delicate jasmine tea would be excellent choices, their floral or citrus notes harmonizing beautifully with the cake. For celebratory occasions, a glass of chilled Prosecco or a crisp Sauvignon Blanc can elevate the dessert to a truly special treat, with the bubbles and acidity cutting through the richness.
Creative Serving Ideas
Beyond the traditional slice, this cake lends itself to several creative serving ideas that can impress guests and add a unique twist to your dessert offerings. Consider transforming the cake into elegant trifles. Crumble slices of the cooled cake into glasses or bowls, layering them with fresh raspberries, lemon curd, and whipped cream or custard. This creates a visually stunning and texturally interesting dessert that showcases all the components in a delightful new way.
Another innovative idea is to serve small, individual portions as part of a dessert tasting menu. Cut the cake into mini-squares or use cookie cutters to create fun shapes. Present these alongside other small desserts, such as mini fruit tarts or chocolate truffles, allowing guests to sample a variety of flavors and textures. This is especially fitting for dinner parties or special events where you want to offer a more interactive and sophisticated dining experience.
You could also repurpose leftover cake into delightful cake pops or cake balls. Crumble the cake, mix it with a binder like cream cheese frosting or lemon buttercream, roll into small balls, and dip in melted chocolate or a candy melt coating. Decorate with sprinkles or drizzles to match the cake’s theme. These are perfect for parties, bake sales, or as a fun, bite-sized treat for children and adults alike. The tang of lemon and raspberry makes for a surprisingly addictive cake pop flavor.
For a more rustic and charming presentation, consider serving the cake as part of a dessert charcuterie board. Arrange slices of the cake alongside a selection of cheeses (a mild goat cheese or a creamy brie works well), fresh fruits, a drizzle of honey or berry jam, and a few elegant cookies or macarons. This encourages guests to mix and match flavors, creating their own perfect bite. It’s a casual yet sophisticated way to present dessert that is always a conversation starter.
Finally, for brunch gatherings, present thin slices of the cake alongside fresh fruit salads and perhaps some yogurt or crème fraîche. A sprinkle of toasted almonds or pistachios can add a delightful crunch. This approach highlights the cake’s lighter side, making it a perfect end to a leisurely morning meal without being too heavy. The bright, cheerful flavors of lemon and raspberry are particularly well-suited to morning and early afternoon occasions.
Preparation & Storage
Storing Leftovers
Proper storage is essential to keep your Lemon Raspberry Cake tasting as fresh and delicious as possible. The best way to store leftover cake, especially if it has glaze or frosting, is at room temperature under a cake dome or in an airtight container. This method helps to maintain the cake’s moisture and prevents it from drying out for up to three days.
The presence of raspberries in the cake actually helps to keep it moist naturally. However, if your kitchen is particularly warm or humid, refrigerating the cake might be a better option. Storing it in the refrigerator can extend its shelf life to about a week, but it’s important to bring the cake back to room temperature before serving. This allows the flavors to bloom and the texture to soften, making it much more enjoyable than when served cold.
When refrigerating, ensure the cake is well-covered, either in its original container or wrapped tightly in plastic wrap and then foil. This prevents it from absorbing odors from other foods in the refrigerator and keeps it from drying out. Always allow the cake to sit at room temperature for at least 30 minutes to an hour before slicing and serving, ensuring the best possible flavor and texture.
Freezing
This Lemon Raspberry Cake freezes beautifully, making it an excellent option for preparing ahead of time for future gatherings or cravings. For the best results, it’s recommended to freeze the cake before adding any glaze or frosting. This prevents the glaze from becoming watery or the frosting from separating upon thawing.
Once the cake has cooled completely, wrap it very tightly. First, wrap the entire cake, or individual slices, in a layer of plastic wrap, ensuring there are no air pockets. Then, add a second layer of heavy-duty aluminum foil for extra protection against freezer burn. Label the package with the date and contents. The unfrosted cake can be stored in the freezer for up to three months.
When you’re ready to enjoy your frozen cake, it’s best to thaw it slowly. Remove the cake from the freezer and unwrap the foil, but leave the plastic wrap on. Let it thaw overnight in the refrigerator, or for several hours at room temperature. Once fully thawed, you can then apply your glaze or frosting. For slices, thawing can take a few hours at room temperature, making them ready for a quick treat without much fuss.
Reheating
Reheating is generally not necessary for a cake that has been stored properly at room temperature or brought back to room temperature after refrigeration. The goal of reheating would typically be to slightly warm a slice to enhance its aroma and perhaps soften a glaze or frosting. However, caution should be exercised to avoid drying out the cake.
If you do wish to gently warm a slice, the best method is the microwave on very low power for short intervals. Place a slice on a microwave-safe plate and heat in 10-second bursts, checking for warmth each time. Be very careful not to overheat, as this can quickly make the cake rubbery and dry. The ideal outcome is just a slight warmth that releases the cake’s fragrant aromas.
Alternatively, you can place a slice on a baking sheet and warm it in a low oven (around 200-250°F or 95-120°C) for about 5-10 minutes. This method is slower and can help maintain moisture better than the microwave, especially if you’re warming a larger slice. Again, monitor closely to prevent over-drying. For most occasions, serving the cake at room temperature, as it was designed, will offer the best texture and flavor experience.
Frequently Asked Questions
-
Can I use frozen raspberries in my Lemon Raspberry Cake?
Yes, you absolutely can use frozen raspberries in this recipe, and often it’s even preferable for maintaining berry integrity. The key is to add them directly to the batter without thawing them first. Frozen berries tend to hold their shape better during baking when added directly from the freezer, and this also prevents them from releasing too much juice, which could make your batter overly wet or turn it an undesirable shade of pink.
Tossing the frozen raspberries in a tablespoon of flour before folding them into the batter is also a highly recommended step. This light coating helps them to distribute more evenly within the cake and reduces the likelihood of them sinking to the bottom during baking. So, while fresh berries are wonderful, don’t hesitate to reach for a bag of frozen ones if that’s what you have on hand; they will still yield a delicious result.
Just remember to adjust your baking time slightly if needed. Frozen berries release moisture as they bake, which might mean your cake takes a few extra minutes to reach that perfect doneness. Always rely on the toothpick test to confirm when it’s ready to come out of the oven.
-
How do I know when the cake is perfectly done?
Determining when your Lemon Raspberry Cake is perfectly baked is crucial for achieving that ideal moist and tender crumb. The most reliable method is the toothpick or cake tester test. Insert a clean toothpick or a thin wooden skewer into the very center of the cake. If it comes out with a few moist crumbs clinging to it, but no wet batter, the cake is perfectly done and will be wonderfully moist.
Visually, the cake should be golden brown around the edges, and these edges should have started to pull away slightly from the sides of the cake pan. When gently pressed in the center with a fingertip, the cake should spring back lightly, indicating that it has set properly. If the toothpick comes out completely clean with no crumbs, it may be slightly overbaked, and if it comes out with wet batter, it definitely needs more time in the oven.
Listen to your oven and trust your senses, but always confirm with the toothpick test. Overbaking is a common pitfall that can lead to a dry cake, so it’s better to check a little early and give it another few minutes if needed, rather than to leave it in too long. The aroma of the baking cake can also be a good indicator; it will become richly fragrant when nearing completion.
-
Can I make this cake gluten-free?
Absolutely, this Lemon Raspberry Cake can be made gluten-free with excellent results by using a good quality gluten-free flour blend. Many reputable brands offer 1-to-1 gluten-free baking mixes that are designed to substitute for all-purpose flour in most recipes without needing significant adjustments to liquid or leavening agents.
When choosing your gluten-free flour, look for a blend that typically contains a mix of rice flour, tapioca starch, potato starch, and sometimes xanthan gum. If your chosen blend does not contain xanthan gum, it’s advisable to add about 1/4 teaspoon of xanthan gum to the dry ingredients when you mix them. Xanthan gum acts as a binder and provides structure, which is especially important in gluten-free baking to mimic the properties of gluten.
Follow the same instructions for mixing and baking. You may find that gluten-free cakes sometimes bake a little faster or slower, so keep a close eye on them and use the toothpick test to ensure they are perfectly done. The vibrant lemon and raspberry flavors will still shine through, making for a delicious gluten-free dessert that everyone can enjoy.