One Layer Coconut Cake

Sharing a truly delightful dessert experience doesn’t always require an elaborate, multi-tiered creation. Sometimes, the most satisfying treats are those that are elegantly simple yet packed with profound flavor and comforting texture. This One Layer Coconut Cake embodies that philosophy perfectly, offering a rich, tender crumb infused with the distinct essence of coconut.
It’s the ideal choice for when you desire a special dessert without the fuss of a grander production, making it suitable for intimate celebrations, cozy weekend baking sessions, or simply a moment of personal indulgence. This cake proves that a single layer can indeed be a complete and utterly delicious masterpiece.
Why You Will Love This Recipe
- Intense Coconut Flavor: Every bite is a celebration of coconut, from the moist crumb enriched with coconut milk and extract to the sweet, toasted notes of shredded coconut.
- Perfectly Tender Crumb: The careful balance of ingredients and techniques, including whipped egg whites, ensures a delicate, airy, and incredibly soft texture that melts in your mouth.
- Manageable Size: This single-layer 6-inch cake is perfectly portioned, making it ideal for smaller gatherings or when you don’t want an overwhelming amount of leftover dessert.
- Elegant Simplicity: It offers a sophisticated dessert experience with straightforward preparation, making it accessible for bakers of all skill levels.
- Versatile Appeal: Its comforting flavor profile and pleasing texture make it a hit for both casual enjoyment and more special occasions.
Ingredients You Need
The success of this One Layer Coconut Cake hinges on the quality and careful selection of its ingredients. Using fresh, good-quality components will elevate the flavor and texture, ensuring a truly delightful baking experience. From the richness of full-fat coconut milk to the delicate touch of cake flour, each element plays a crucial role in creating this exquisite dessert.
One Layer Coconut Cake
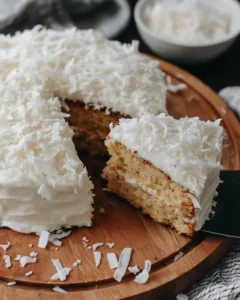
A tender, rich, small-batch dessert with deep coconut flavor, a soft crumb, and a creamy coconut buttercream finish. It is a lovely choice when you want a simple single layer cake that still feels special and bakery-worthy.
- For the cake:
- 1 cup sifted cake flour
- 1/3 cup granulated white sugar
- 1/4 cup unsalted butter, softened
- 2 tablespoons coconut oil
- 1/3 cup full-fat unsweetened coconut milk
- 1 large egg yolk
- 1 large egg white
- 1 teaspoon coconut extract
- 1/2 teaspoon vanilla extract
- 1/2 teaspoon baking powder
- 1/2 teaspoon baking soda
- 1/8 teaspoon fine salt
- 1/8 teaspoon cream of tartar
- 1/3 cup sweetened shredded coconut, toasted and cooled
- For the frosting:
- 1/2 cup unsalted butter
- 2 1/3 cups powdered sugar, sifted
- 1/2 cup sweetened shredded coconut
- 2 tablespoons unsweetened coconut milk
- 1/2 teaspoon coconut extract
- 1Preheat the oven to 350°F (175°C). Coat a 6-inch round cake pan thoroughly with a flour-based baking spray, then set it aside.
- 2Place the sweetened shredded coconut for the cake in a small skillet over medium heat. Stir constantly until the coconut turns lightly golden. Remove it promptly from the heat to prevent scorching, then leave it to cool.
- 3In a medium mixing bowl, whisk together the sifted cake flour, baking powder, baking soda, and salt. Set this dry mixture aside.
- 4Using a hand mixer or a stand mixer fitted with the whisk attachment, beat the egg white with the cream of tartar on high speed for 2 to 3 minutes, or until stiff peaks form.
- 5In a separate bowl, using the paddle attachment, beat the softened butter, coconut oil, and sugar on medium speed until the mixture appears thoroughly blended. Add the egg yolk, coconut extract, vanilla extract, and coconut milk, then mix until fully incorporated.
- 6Add the dry ingredients gradually to the wet mixture, stirring only until combined. Fold in the whipped egg white gently, followed by the cooled toasted coconut, making sure the batter remains light and evenly mixed.
- 7Transfer the batter to the prepared cake pan and smooth the top. Bake for 30 to 35 minutes, or until a toothpick inserted into the center comes out clean.
- 8Remove the cake from the oven and allow it to cool completely on a wire rack before frosting.
- 9To prepare the frosting, beat the butter on medium-high speed until smooth and creamy. Reduce the mixer speed to low and add the sifted powdered sugar gradually. Add the coconut extract and coconut milk, then continue mixing until the frosting is smooth, cohesive, and well blended. Scrape down the bowl as needed, then stir or beat in the shredded coconut.
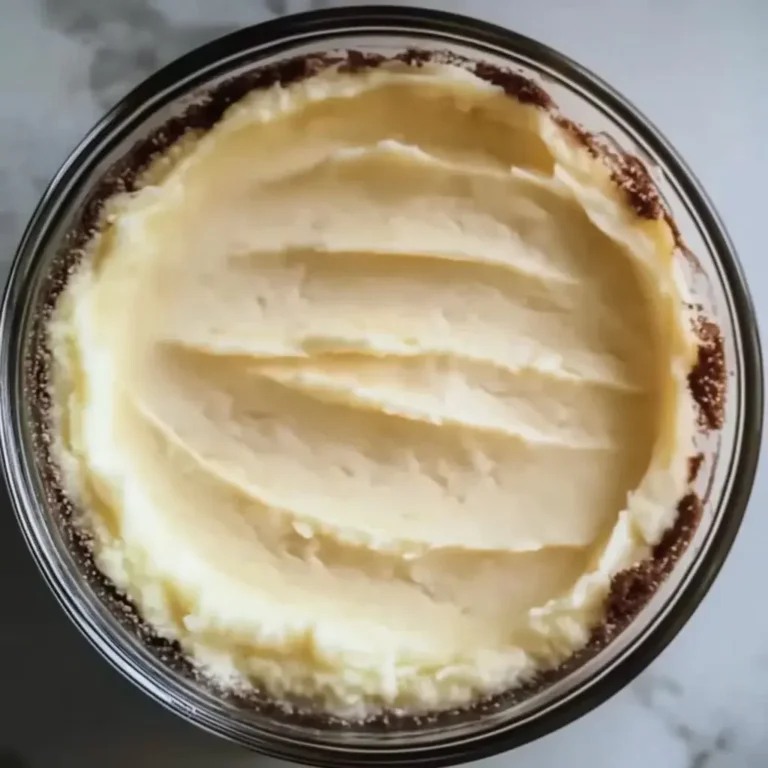
- 10Once the cake has cooled fully, spread the coconut frosting over the top and finish the cake evenly.
The precise quantities for all these essential components are detailed within the recipe card above, guiding you to create this wonderful cake with accuracy and ease.
Variations
While this One Layer Coconut Cake is already a triumph of flavor and texture, its versatility allows for exciting modifications to suit various dietary preferences and taste profiles. Experimenting with these variations can introduce new dimensions to this already beloved recipe, ensuring there’s a perfect iteration for everyone.
For those seeking a plant-based option, transforming this cake into a vegan delight is wonderfully achievable. Simply substitute the butter with a high-quality vegan butter alternative, and ensure your coconut milk and other ingredients are dairy-free. The egg yolk can be replaced with a flax egg or applesauce for binding, and the egg white’s leavening power can be boosted with a touch more baking powder or aquafaba. The resulting cake will still be wonderfully moist and flavorful, proving that vegan baking can be just as decadent.
If you’re following a lower carbohydrate lifestyle, this cake can be adapted with a few smart swaps. Replace the granulated sugar with a keto-friendly sweetener blend, such as erythritol or a monk fruit blend, to reduce the carb count significantly. Similarly, use a low-carb flour blend, which often includes almond flour and coconut flour, to maintain a pleasing texture. Be mindful that these substitutions may slightly alter the final texture and moisture content, but the delicious coconut flavor will remain the star.
Consider infusing additional layers of flavor through aromatic spices or citrus zest. A pinch of ground cardamom or a teaspoon of finely grated lime zest can add a captivating warmth and brightness that complements the coconut beautifully. These subtle additions can transform the cake into something truly unique, perfect for those who appreciate nuanced dessert profiles.
How to Prepare One Layer Coconut Cake
Step 1: Oven Activation and Pan Priming
Begin this delightful baking journey by preheating your oven to the precise temperature of 350°F (175°C). This ensures that the moment the cake batter enters its warm embrace, it begins to bake evenly and efficiently. Simultaneously, attend to your 6-inch round cake pan with utmost care, thoroughly coating its interior surfaces with a flour-based baking spray. This diligent preparation is paramount for guaranteeing a clean and effortless release of the finished cake, preventing any precious crumbs from adhering to the pan’s sides or bottom.
While the oven reaches its optimal temperature, turn your attention to toasting the shredded coconut destined for the cake’s batter. Place this wonderfully fragrant ingredient into a small, dry skillet over medium heat. Stir it with unwavering attention and consistency, watching as it gradually transforms from its pale state to a delicate, light golden hue. This toasting process awakens the coconut’s inherent aromas and introduces a subtle, nutty complexity that will permeate the entire cake. As soon as the desired golden color is achieved, promptly remove the skillet from the heat to prevent the coconut from scorching, as it can transition from perfectly toasted to overly dark in mere moments. Allow this toasted coconut to cool completely before it is incorporated into the batter, ensuring it doesn’t prematurely melt any fats or affect the batter’s temperature.
Step 2: The Foundation of Dry Ingredients
In a medium-sized mixing bowl, combine all the dry ingredients that form the structural backbone of your cake. This typically includes sifted cake flour, which contributes to a lighter, more tender crumb, alongside baking powder and baking soda, the essential leavening agents that will give your cake its rise. A pinch of fine salt is also added here to balance the sweetness and enhance the overall flavor profile, ensuring no single taste dominates. Whisk these components together thoroughly, ensuring they are evenly distributed throughout the bowl. This meticulous blending of dry ingredients before they meet their wet counterparts is a critical step in ensuring a consistent texture throughout the baked cake, preventing any pockets of unmixed flour or uneven leavening.
The act of whisking these dry elements together serves a vital purpose beyond mere combination. It aerates the flour, making it lighter and easier to incorporate smoothly into the wet ingredients. Furthermore, it evenly disperses the baking powder and baking soda, guaranteeing that each part of the batter receives an equal opportunity to rise. This careful preparation sets the stage for a cake that bakes up beautifully, with a uniform crumb structure and a delightful lightness that is especially desirable in a rich coconut cake.
Step 3: Achieving Meringue Majesty
In a separate, impeccably clean bowl, it’s time to work some magic with the egg white. Ensure this bowl is completely free of any grease or yolk, as even the slightest contamination can prevent the egg white from achieving its full volume. Add the egg white along with a small amount of cream of tartar, a common stabilizing agent in baking that aids in creating a sturdy meringue. Begin beating the egg white on high speed using either a hand mixer or a stand mixer fitted with the whisk attachment. Continue this vigorous beating for approximately 2 to 3 minutes, or until the egg white transforms into stiff, glossy peaks. This means that when you lift the whisk, the peaks of the egg white stand up straight without drooping.
The formation of stiff peaks is the hallmark of a well-whipped egg white, which will contribute significantly to the cake’s final texture. This step is particularly important for a rich cake like this coconut creation; the whipped egg white introduces air into the batter, providing lift and preventing the cake from becoming too dense. This light, airy structure will complement the moistness from the coconut milk and fats, resulting in a crumb that is both tender and delightfully delicate. Treat this meringue with care as you incorporate it later, aiming to preserve as much of that precious air as possible.
Step 4: The Creamy Core of Wet Ingredients
In yet another bowl, preferably one that is clean and dry, commence the creation of the cake’s rich, flavorful wet base. Begin by creaming together the softened unsalted butter and the coconut oil. Ensure the butter is at room temperature, which allows it to cream properly with the sugar. Beat these fats with granulated sugar on medium speed using a hand mixer or stand mixer until the mixture becomes light, fluffy, and noticeably creamy. This creaming process incorporates air into the batter, which is another key factor in achieving a tender cake texture. Following this, incorporate the egg yolk, which adds richness and contributes to the cake’s moistness and structure.
Next, add the flavor powerhouses: the coconut extract and vanilla extract. These extracts will infuse the batter with their warm, aromatic essence, ensuring a deeply satisfying coconut flavor profile. Finally, pour in the full-fat unsalted coconut milk. This ingredient not only adds moisture but also contributes significantly to the rich coconut flavor and tender crumb. Mix all these wet ingredients together until they are smoothly combined and appear fully emulsified. The resulting mixture should be smooth, luscious, and fragrant, ready to embrace the dry ingredients and the airy meringue.
Step 5: Uniting Wet and Dry, Gently
Now comes the crucial stage of bringing the dry and wet components together to form the cake batter. Gradually add the thoroughly mixed dry ingredients from Step 2 into the wet mixture prepared in Step 4. It is important to do this incrementally, perhaps in two or three additions, mixing only until each addition is just incorporated. Overmixing the batter at this stage can develop the gluten in the cake flour too much, leading to a tougher cake. Therefore, aim for a batter that is just coming together, with no large streaks of dry flour visible.
Once the dry ingredients are mostly incorporated, it’s time to delicately fold in the whipped egg white from Step 3. Use a rubber spatula and a gentle, lifting motion, cutting through the center of the batter and folding it over the egg whites. Be patient and deliberate, aiming to incorporate the egg whites without deflating the air you worked so hard to create. This step is vital for achieving the cake’s signature light and airy texture. Finally, gently fold in the cooled, toasted shredded coconut. This addition brings texture and an intensified coconut flavor to the finished cake, ensuring it is a true celebration of this tropical fruit.
Step 6: Baking and Cooling to Perfection
Carefully transfer the prepared batter into the meticulously prepared 6-inch round cake pan. Use your spatula to spread the batter evenly across the surface, ensuring a smooth, level top. This even distribution of batter will promote uniform baking, preventing any overly browned edges or a sunken center. Place the pan into the preheated oven and begin the baking process, which will typically take between 30 to 35 minutes. The exact baking time can vary slightly depending on your oven’s calibration and atmospheric conditions, so it’s essential to monitor the cake.
To determine if the cake is perfectly baked, insert a toothpick into the center. It should come out clean, with no wet batter clinging to it, indicating that the cake is set throughout. Once baked to perfection, remove the cake from the oven and place the pan on a wire rack. Allow the cake to cool in the pan for about 10-15 minutes before carefully inverting it onto the wire rack to cool completely. It is absolutely critical that the cake is fully cooled before you attempt to frost it; a warm cake will cause the buttercream to soften excessively and melt, resulting in a messy and uneven finish.
Step 7: Crafting the Dreamy Coconut Frosting
While the cake is cooling, prepare the luscious coconut buttercream that will crown your creation. In a clean mixing bowl, begin by beating the unsalted butter until it is wonderfully smooth and creamy. This initial creaming step is essential for a light and spreadable frosting. Once the butter has reached the desired consistency, reduce the mixer speed to low and begin gradually adding the sifted powdered sugar. Adding the powdered sugar slowly prevents a cloud of sugar from erupting from the bowl and ensures a smooth integration.
Continue mixing until the sugar is mostly incorporated. Then, add the coconut extract and the unsweetened coconut milk. These liquids will help to achieve the perfect consistency for spreading and will enhance the coconut flavor of the frosting. Mix until the frosting is smooth, cohesive, and beautifully blended. Scrape down the sides of the bowl as needed to ensure all ingredients are thoroughly combined. Finally, stir or beat in the remaining sweetened shredded coconut for added texture and a delightful visual appeal. Once the cake has cooled completely to room temperature, generously spread this exquisite coconut frosting over the top, aiming for an even and appealing finish that envelops the entire cake.
Pro Tips for One Layer Coconut Cake
Toast Coconut Wisely: When toasting the shredded coconut, keep a very close eye on it. Coconut can go from pale gold to deeply browned in a matter of seconds, altering its flavor profile from pleasantly nutty to slightly bitter. Gentle heat and constant stirring are your best allies here.
Cooling is Key: Patience is a virtue when it comes to frosting. Ensuring the cake layer is entirely cool before applying the buttercream is non-negotiable. A warm cake will lead to melted frosting, compromising both the appearance and texture of your finished dessert. Allow ample time for complete cooling on a wire rack.
Fold with Finesse: The gentle folding of the whipped egg white into the batter is crucial for lightness. Use a light hand and a rubber spatula, moving deliberately to incorporate the air without causing it to dissipate. This technique ensures a delicate, tender crumb.
Ingredient Temperature Matters: For the cake batter, ensure your butter is softened, not melted, and your coconut milk is at room temperature. This promotes proper emulsification and a smoother batter consistency. Similarly, cold butter will not cream properly, impacting the frosting’s texture.
Accurate Measuring is Essential: Especially with cake flour, precise measurement is important. Sifting it first and then using the spoon-and-level method will prevent an overly dense cake. Similarly, accurately measuring leavening agents like baking powder and soda ensures proper rise and texture.
Serving Suggestions for One Layer Coconut Cake
Decoration
The beauty of this One Layer Coconut Cake lies in its inherent elegance, which can be further enhanced with simple yet impactful decorations. A generous blanket of the prepared coconut buttercream provides a wonderfully creamy canvas. For an added textural and visual appeal, sprinkle the top with additional toasted or untoasted sweetened shredded coconut, creating a soft, snowy landscape. Freshly toasted coconut flakes, slightly larger and more defined, can offer a beautiful contrast in both texture and appearance. Consider using a piping bag fitted with a star tip to create decorative borders around the edge of the cake, adding a professional touch.
Side Dishes
This coconut cake is a delightful dessert on its own, but it pairs exceptionally well with a variety of complementary flavors and textures. Fresh berries, particularly strawberries, raspberries, or a mix of seasonal fruits, offer a bright, tart counterpoint to the cake’s sweetness and rich coconut flavor. A dollop of freshly whipped cream or a light coconut-flavored whipped topping can add an extra layer of indulgence without overpowering the cake’s delicate balance. For a more sophisticated pairing, consider a small scoop of vanilla bean or a complementary fruit sorbet, like mango or passion fruit, which can provide a refreshing contrast.
Creative Serving Ideas
Beyond the traditional slice, this cake lends itself to various creative presentations. Serve individual slices warm with a drizzle of caramel sauce or a dusting of powdered sugar for a simple yet elegant dessert. For a fun twist, cut the cake into small squares and serve them as part of a dessert platter alongside other small bites, allowing guests to sample a variety of treats. Another idea is to serve a slice of cake as part of a brunch spread, perhaps alongside some fresh fruit and a good cup of coffee, offering a sweet start to the day. You could also elevate it into a trifle by layering crumbled cake with coconut custard and whipped cream in individual glasses for a visually stunning dessert.
Preparation & Storage
Storing Leftovers
Due to the presence of buttercream frosting, it is best practice to store any leftover One Layer Coconut Cake covered in the refrigerator. This helps maintain the frosting’s integrity and prevents spoilage, especially in warmer environments. When stored properly in an airtight container or well-wrapped, the cake can remain fresh and delicious for up to 4 days. For the optimal tasting experience, it is highly recommended to allow a slice of refrigerated cake to sit at room temperature for approximately 20 to 30 minutes before serving. This brief resting period allows the crumb to soften and the frosting to become creamy again, restoring the cake to its intended tender texture.
Freezing
For longer-term storage, this One Layer Coconut Cake can be successfully frozen, although it is generally best to freeze the unfrosted cake layer. Wrap the completely cooled cake layer tightly in several layers of plastic wrap, followed by a layer of aluminum foil to protect it from freezer burn. When stored in this manner, the unfrosted cake can be kept frozen for up to 2 months. To thaw, remove the cake from the freezer and place it in the refrigerator overnight. Once thawed in the refrigerator, bring it closer to room temperature before proceeding with frosting. Freezing frosted slices is also an option, though the frosting’s texture might be slightly altered upon thawing. Wrap frosted slices well and freeze for about 1 month.
Reheating
This One Layer Coconut Cake is designed to be enjoyed at room temperature, making reheating largely unnecessary and often detrimental to its delicate texture. The rich flavors and soft crumb are best appreciated when the cake is not warmed significantly. Instead of reheating, the recommended approach for serving leftover cake is simply to allow it to come to room temperature naturally. As mentioned earlier, letting a slice sit on the counter for 20-30 minutes before serving will revive the frosting to its creamy consistency and ensure the cake’s crumb is tender and moist. This gentle approach preserves the cake’s intended delightful eating experience without risking any dryness or texture changes that can occur with traditional reheating methods.
Frequently Asked Questions
-
Can I make this cake ahead of time, and if so, how should I store it?
Yes, absolutely! This One Layer Coconut Cake is an excellent candidate for making ahead, which is perfect for simplifying party preparations or ensuring a delicious dessert is always on hand. You can bake the cake layer a day in advance and store it tightly wrapped once it has completely cooled to room temperature. For frosting, you have two excellent options: you can frost it the following day, or you can frost it the same day it’s baked and then chill it lightly before serving. The cake holds its structure and flavor remarkably well, making it a reliable choice for make-ahead dessert planning. Proper wrapping is key to preserving its freshness, whether it’s stored at room temperature (for a short period) or in the refrigerator.
-
Is it essential to use full-fat unsweetened coconut milk for this cake, or can I substitute it?
While you can technically use a lighter version of coconut milk, using full-fat unsweetened coconut milk is strongly recommended for achieving the best possible results with this cake. Full-fat coconut milk contributes significantly to the cake’s rich flavor profile and its incredibly tender, moist texture. It contains a higher percentage of fat and solids, which translates to a more luxurious mouthfeel and a deeper, more authentic coconut taste throughout the cake and its frosting. Using a lighter coconut milk might result in a batter that feels less substantial, and the finished crumb may not be quite as moist, flavorful, or decadently tender as intended. For this specific recipe, the richness provided by full-fat coconut milk is a key ingredient for that signature delightful texture and flavor.
-
Why is the egg white whipped separately for this cake recipe, and what does it achieve?
The step of whipping the egg white separately and then folding it into the batter is a crucial technique that significantly impacts the final texture of this One Layer Coconut Cake. Since this cake is intentionally rich, incorporating ingredients like butter, coconut oil, and full-fat coconut milk, it has the potential to become quite dense. By whipping the egg white to stiff peaks and gently folding it in, you are essentially incorporating a significant amount of air into the batter. This added air provides essential lift and lightness, preventing the cake from feeling heavy or overly solid. The result is a cake with a softer, more delicate, and wonderfully airy crumb that beautifully balances the richness of the other ingredients, making each bite a delightful experience.