Irresistible Hot Cross Buns – Perfectly Soft Easter Treats

As the aroma of cinnamon and warm dough fills the air, there’s a certain magic that only freshly baked Hot Cross Buns can bring. This recipe is a celebration of tradition, a delightful invitation to slow down and enjoy the simple pleasure of creating something truly special in your own kitchen, especially as Easter approaches.
These aren’t just any buns; they’re a testament to the comfort of homemade baking, offering a soft, spiced interior and a perfectly sweet glaze. They’re incredibly versatile, easily adaptable for various dietary needs, ensuring everyone can partake in this festive treat. Prepare to fill your home with a scent that promises warmth and togetherness.
Why You Will Love This Recipe
- Exceptional Softness: Each bite delivers a cloud-like texture that is both tender and satisfying, making them utterly irresistible.
- Warm, Inviting Spices: A harmonious blend of cinnamon and nutmeg creates a comforting, aromatic experience that’s perfect for cozy moments.
- Customizable Sweetness: Easily adjust the dried fruit and glaze to your personal preference, making each batch uniquely yours.
- Simplified Baking Process: Despite their classic appearance, these buns are straightforward to make, perfect for bakers of all skill levels.
- Dietary Adaptability: With simple substitutions, you can create delicious vegan and gluten-free versions that are just as delightful.
Ingredients You Need
The quality of your ingredients plays a significant role in the final outcome of these delightful Hot Cross Buns. Opting for fresh, high-quality items ensures the best flavor and texture. For instance, using active dry yeast that is well within its expiry date is crucial for proper dough rising, and fresh spices will lend a more vibrant aroma and taste. Don’t be afraid to explore different types of dried fruit or even add a touch of citrus zest for an extra layer of complexity and brightness.
Soft and Spiced Hot Cross Buns
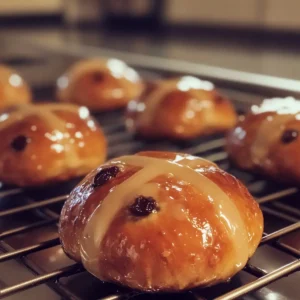
These homemade Hot Cross Buns are soft, fluffy, and spiced, perfect for your Easter celebration. They offer a comforting aroma and are versatile with vegan and gluten-free options.
- For the Dough:
- 4 cups All-purpose flour (Gluten-free flour can be used.)
- 2 tablespoons Active dry yeast (Ensure it's fresh.)
- 1 cup Warm milk (For vegan, substitute with plant-based milk.)
- 2 tablespoons Sugar (Coconut sugar can be used.)
- 1 teaspoon Salt
- 3 tablespoons Milk or vegan butter (Use vegan butter for dairy-free.)
- 1 large Egg (Replace with a flax egg for a vegan version.)
- 1 teaspoon Cinnamon
- 1 teaspoon Nutmeg
- 1 cup Dried fruit (raisins or currants) (Swap for your favorite dried fruit.)
- For the Glaze:
- 1 cup Sugar
- 2 tablespoons Milk (Can use plant-based milk.)
- 1Prepare the Dough: In a mixing bowl, combine warm milk, sugar, and active dry yeast. Let sit for 5-10 minutes until frothy.
- 2Add all-purpose flour, salt, cinnamon, nutmeg, melted butter, and the beaten egg. Knead for 8-10 minutes until smooth and slightly tacky.
- 3First Rise: Place the dough in a greased bowl, cover, and let rise in a warm spot for 1-2 hours until doubled in size.
- 4Shape the Buns: Punch down the dough, divide into 12 equal pieces, and shape into smooth buns. Place on a parchment-lined baking sheet, leaving space between them.
- 5Second Rise: Cover the shaped buns and let rise for another 30-40 minutes in a warm area until puffed up.
- 6Bake: Preheat your oven to 375°F (190°C). Bake the buns for 15-20 minutes, or until they turn a golden brown hue.
- 7Cool and Glaze: Remove the buns from the oven and allow them to cool on a wire rack for about 10 minutes. Mix powdered sugar with warm milk for the glaze and brush this mixture over the warm buns for a glossy finish.
Keywords: hot cross buns, easter, baking, spiced buns, sweet bread, festive, vegetarian, homemade
- all-purpose flour: this forms the sturdy base for our delightful buns, providing the necessary structure and chew.
- active dry yeast: the magic behind the rise, this essential ingredient brings lightness and airiness to the dough, creating that signature fluffy texture.
- warm milk: this acts as the primary liquid, hydrating the flour and activating the yeast, while also contributing to the dough’s tender crumb.
- sugar: not just for sweetness, sugar also aids in browning and helps to feed the yeast, ensuring a robust rise and a beautiful golden crust.
- salt: a crucial flavor enhancer, salt balances the sweetness and intensifies the overall taste profile of the buns, preventing them from tasting bland.
- butter: this adds richness, moisture, and a wonderful tenderizing effect to the dough, resulting in a softer, more luxurious bun.
- egg: it contributes to the structure of the bun, adds a touch of richness, and helps with browning, creating a lovely golden hue.
- cinnamon: the quintessential spice for Hot Cross Buns, cinnamon provides a warm, comforting, and aromatic foundation that defines their classic flavor.
- nutmeg: a subtle yet essential companion to cinnamon, nutmeg adds a hint of woody warmth and complexity that rounds out the spice profile beautifully.
- dried fruit (raisins or currants): these little gems provide bursts of sweetness and a delightful chewy texture throughout the bun, adding pockets of fruity joy.
- sugar (for glaze): this forms the base of our sweet, glossy topping, ensuring a delightful finish that is both visually appealing and deliciously sweet.
- milk (for glaze): it helps to create a smooth, pourable glaze consistency, allowing it to be easily brushed over the warm buns for maximum shine and flavor absorption.
Quantities for each ingredient are precisely detailed within the accompanying recipe card, ensuring accuracy in your baking endeavors.
Variations
Embarking on a culinary adventure with Hot Cross Buns means embracing the joy of customization. Consider a vibrant vegan iteration, where dairy milk is replaced with creamy almond or oat milk, and butter gives way to luscious vegan butter. This simple swap ensures that even those avoiding animal products can savor the spiced sweetness, resulting in buns that are every bit as tender and flavorful as their traditional counterparts.
For those mindful of carbohydrate intake, a low-carb variation can be achieved by carefully selecting alternative flours and sweeteners. Employing a blend of almond flour and coconut flour, paired with a sugar substitute like erythritol, can create a delightful bun that aligns with a lower-carb lifestyle. While the texture might differ slightly, the warm spices and fruity undertones will still offer a comforting and satisfying treat.
Adding a touch of citrus zest, perhaps from an orange or lemon, to the dough can introduce a bright, zesty counterpoint to the warm spices and dried fruit. This subtle addition lifts the overall flavor profile, making the buns feel lighter and more refreshing. Another exciting twist involves incorporating finely chopped dark chocolate chips or even a hint of chili powder for a daringly different, yet equally delicious, Hot Cross Bun experience that will surely surprise and delight.
How to Prepare hot cross buns
Step 1: Prepare the Dough
Begin by awakening the yeast, a crucial step for ensuring your buns achieve that signature fluffy texture. In a generously sized mixing bowl, gently combine 1 cup of lukewarm milk with 2 tablespoons of sugar and 2 teaspoons of active dry yeast. The warmth of the milk is key; it should feel comfortably warm to the touch, not hot, as excessive heat can kill the yeast. Allow this mixture to rest undisturbed for approximately 5 to 10 minutes.
During this resting period, you should observe the yeast coming to life, transforming the liquid into a frothy, bubbly spectacle. This visual cue is your confirmation that the yeast is active and ready to work its magic. If you don’t see any froth, your yeast might be past its prime, and it’s best to start with a fresh packet to avoid a dense, disappointing outcome for your Hot Cross Buns.
Once the yeast is bubbling merrily, it’s time to introduce the dry ingredients. Add 4 cups of all-purpose flour, 1 teaspoon of salt, and a fragrant teaspoon each of ground cinnamon and nutmeg to the bowl. Now, incorporate 3 tablespoons of melted unsalted butter, which will add richness and tenderness, and 1 lightly beaten large egg, which provides structure and aids in browning. Mix everything together with a sturdy spoon or your hands until a shaggy dough begins to form. This initial mixture might seem a bit rough, but it’s the foundation for your delightful buns.
Transitioning to the kneading process, turn the shaggy dough out onto a lightly floured clean surface. Begin to knead the dough with purposeful movements, folding, pushing, and turning it for about 8 to 10 minutes. This vigorous kneading develops the gluten in the flour, which is essential for creating the elastic structure that allows the buns to rise beautifully and achieve their characteristic soft, chewy texture. You are aiming for a dough that is smooth, pliable, and slightly tacky to the touch, but not so sticky that it adheres excessively to your hands or the work surface.
Alternatively, if you have a stand mixer equipped with a dough hook, you can use that for kneading. Simply combine the ingredients in the mixer bowl and knead on a low to medium speed for about 6 to 8 minutes. The goal remains the same: to achieve a smooth, elastic dough. Once the kneading is complete, you’ll have a dough that feels supple and responsive to your touch, ready for its first crucial rise.
The technique of kneading is fundamental to achieving the perfect Hot Cross Bun texture. It’s a process that requires a bit of patience and gentle persistence. As you knead, you will feel the dough transform from a rough mass into a smooth, elastic ball. Resist the urge to add too much extra flour, as this can result in dry, heavy buns; the slight tackiness is precisely what you want for that ultimate softness.
Step 2: First Rise
The first rise is a critical stage where the yeast works its magic, transforming the dense dough into a light and airy foundation for your Hot Cross Buns. Take your smoothly kneaded dough and gently shape it into a cohesive ball. Find a large, clean mixing bowl; this will be the cozy home for your dough during its rest period. Lightly grease the inside of the bowl with a little vegetable oil or softened butter, ensuring all sides of the dough will be coated.
Place the dough ball into the greased bowl, turning it a few times to ensure it’s lightly coated with the oil. This coating prevents the surface of the dough from drying out as it rises, which can lead to a less desirable texture. Once the dough is nestled in its oiled sanctuary, cover the bowl tightly. You can use plastic wrap, a reusable silicone lid, or a clean kitchen towel; whatever you choose, make sure it creates a good seal to trap moisture and warmth.
Now, find a warm, draft-free spot in your kitchen for the bowl to rest. An ideal place might be on the counter near a slightly warm (but not hot) oven, or in a pantry where the temperature is consistently mild. The warmth is essential for the yeast to become active and multiply, creating those precious air pockets that give the buns their lift. Let the dough rise undisturbed for about 1 to 2 hours, or until it has visibly doubled in size, appearing plump and significantly larger than when you started.
The duration of the first rise can vary depending on the ambient temperature of your kitchen. On a cooler day, it might take closer to the 2-hour mark, while in a warmer environment, it could be closer to 1 hour. The key indicator is not the time, but the visual transformation of the dough; it should look beautifully puffed up and feel incredibly light when gently prodded. Witnessing the dough double in size is always a satisfying moment, a testament to the power of simple ingredients coming together.
It’s important to be patient during this rising period. Rushing the process can result in under-risen buns that lack the desired airy texture. Once the dough has achieved its impressive growth, it’s ready for the next step in its delightful transformation into Hot Cross Buns. The aroma at this stage, a subtle yeasty scent mixed with the faint promise of spices, is already incredibly inviting.
The visual change is quite dramatic, a testament to the yeast’s industrious work. The dough should look significantly larger, often appearing to fill the bowl. It will feel soft and yielding to the touch, a delightful contrast to its initial denser state. This expanded state signifies that the gluten network has captured the carbon dioxide produced by the yeast, setting the stage for airy delights.
Step 3: Shape the Buns
With the dough having achieved its impressive first rise, it’s time to gently deflate it and prepare it for shaping into individual buns. Gently punch down the risen dough with your fist or the palm of your hand. This action releases the accumulated carbon dioxide gas, which can make the buns too airy and prone to collapse if not managed. The dough will spring back and become more manageable.
Turn the slightly deflated dough out onto a lightly floured work surface. For perfectly uniform buns, it’s best to divide the dough into equal portions. Using a kitchen scale is the most accurate method, aiming for 12 equal pieces if your dough weights around 2 pounds (about 900 grams). Alternatively, you can eyeball it by dividing the dough roughly in half, then each half into three, and each of those into two, resulting in your twelve portions. Each piece should weigh approximately 75-85 grams for standard-sized buns.
Take each portion of dough and, using your hands, roll it into a smooth, taut ball. The key here is to create a surface tension by tucking the edges underneath and rolling the ball against the work surface. This ensures that the buns hold their shape well during the second rise and baking, creating that lovely rounded profile that is characteristic of traditional Hot Cross Buns. A smooth surface also leads to a better final appearance once glazed.
Prepare a baking sheet by lining it with parchment paper. This prevents the buns from sticking to the pan and makes cleanup a breeze. Arrange the shaped dough balls on the prepared baking sheet, ensuring you leave ample space between each one. A gap of about 2-3 inches is recommended, as the buns will expand significantly during their second rise and continue to grow in the oven.
If you are making a batch of 12, you might need two standard-sized baking sheets to provide sufficient spacing. Alternatively, you could bake them in two batches to ensure they have enough room to expand without merging together. Proper spacing is vital for even baking and to achieve those distinct, individual buns that are a joy to behold.
The visual appeal of neatly arranged dough balls, each promising a delicious future, is quite charming. This stage is where the transformation from a large mass of dough to individual treats truly begins, setting the stage for the delightful spiced buns you’ll soon be enjoying.
Step 4: Second Rise
Now that your dough has been shaped into neat rounds, it’s time for its second and final rise, a crucial step for achieving that signature pillowy softness in your Hot Cross Buns. Once the buns are arranged on the parchment-lined baking sheet, cover them loosely once more. A clean kitchen towel or a piece of plastic wrap works perfectly for this. Ensure the cover is loose enough to allow the buns to expand freely without resistance.
Return the covered baking sheet to a warm, draft-free spot in your kitchen. Just like the first rise, this environment is essential for encouraging the yeast to continue its work and produce more carbon dioxide gas. This gas expansion is what creates the light, airy interior of the finished buns, giving them that delightful melt-in-your-mouth quality. The ideal temperature range for this rise is generally between 75-85°F (24-29°C).
Allow the buns to rise for approximately 30 to 40 minutes. During this period, you will notice them puffing up significantly, becoming noticeably larger and closer together on the baking sheet. They should appear visibly plumper and more rounded than they were when first shaped. Avoid over-proofing; if they rise for too long, they may collapse when baked.
As the buns swell, they will begin to touch each other, which is perfectly normal and even desirable. This proximity helps them to bake up with softer sides, preventing them from becoming too crusty. The visual of these plump, almost touching buns is a clear indication that they are perfectly prepared for their final transformation in the oven. The anticipation of their golden-baked goodness grows with every passing minute.
To check if they are ready for baking, you can gently poke one of the buns with a floured finger. If the indentation springs back slowly and only partially, they are likely ready. If it springs back immediately and completely, they need a little more time. If the indentation remains and looks like it might cave in, they may have proofed a bit too much, but they will still be delicious.
This second rise is what imbues the buns with their final pillowy texture, making them a delight to bite into. It’s a quiet but important stage, where the dough rests and expands, preparing itself for the heat of the oven. The slight puffiness is key to that characteristic soft crumb we all love in a good Hot Cross Bun.
Step 5: Bake
As your Hot Cross Buns are completing their final, delightful rise, it’s time to preheat your oven to the optimal baking temperature. Set your oven to 375°F (190°C). Ensuring the oven is fully preheated before the buns go in is crucial for achieving an even bake and a beautifully golden-brown crust without overcooking the interior. This temperature is perfect for achieving that balance between a well-risen bun and a perfectly baked exterior.
Once the oven has reached the desired temperature and your buns have finished their second rise, it’s time to bake. Carefully place the baking sheet(s) with the plump, risen buns into the preheated oven. If you are using two baking sheets, you may need to rotate them halfway through the baking process to ensure even cooking, especially if your oven has hot spots.
Bake the Hot Cross Buns for approximately 15 to 20 minutes. During this time, keep a watchful eye on them. The buns will continue to expand slightly in the oven, and their surfaces will transform into a beautiful golden-brown hue. The aroma filling your kitchen will become more intense and wonderfully spiced, a sure sign that deliciousness is imminent.
To check for doneness, you can gently tap the bottom of one of the buns. If it sounds hollow, it indicates that the buns are cooked through and ready to be removed from the oven. Another sign is the color; they should have a lovely, consistent golden-brown color all over. Avoid the temptation to over-bake, as this can lead to dry, hard buns, which is the opposite of the soft, tender texture we are aiming for.
The visual transformation in the oven is quite remarkable. The pale dough balls swell into proud, round buns, their surfaces developing a rich, inviting color. This is where all your careful preparation and patience culminate, resulting in a batch of truly homemade delights. The golden hue is not just about appearance; it signifies that the sugars have caramelized, adding a lovely depth of flavor.
Once baked to perfection, carefully remove the baking sheet(s) from the oven. The sight of these freshly baked, golden buns is incredibly rewarding, and the warm, spiced scent is intoxicating. Allow them to cool slightly on the baking sheet for a few minutes before transferring them to a wire rack for further cooling, which is essential before glazing.
Step 6: Cool and Glaze
After their glorious baking session, it’s essential to let the Hot Cross Buns cool slightly before proceeding to the final, delectable step of glazing. Carefully remove the golden-brown buns from the baking sheet and place them onto a wire cooling rack. Allowing them to cool on a rack ensures that air circulates around them, preventing the bottoms from becoming soggy from trapped steam. Give them about 10 minutes on the rack to cool down just enough so they are still warm but not so hot that the glaze melts and runs off instantly.
While the buns are cooling, prepare the simple yet essential glaze. In a small bowl, whisk together 1 cup of powdered sugar with 2 tablespoons of warm milk. You can adjust the amount of milk slightly to achieve your desired consistency; you want a glaze that is thick enough to coat the buns but still fluid enough to brush on easily. For a slightly richer glaze, you could also use warm water or a plant-based milk if you’re making vegan buns.
Once the buns have cooled for the requisite 10 minutes and are still warm, it’s time for the grand finale: the glaze. Using a pastry brush, generously brush the prepared glaze over the tops of each warm Hot Cross Bun. The warmth of the buns will help the glaze spread smoothly and set into a beautiful, slightly shiny finish, giving them that classic, inviting appearance.
The glaze not only adds a delightful sweetness but also a wonderful sheen that makes the buns look irresistible. It’s the perfect finishing touch that elevates these homemade treats from merely delicious to absolutely show-stopping. As the glaze sets, it creates a delicate crust that complements the soft, yielding texture of the bun underneath. The contrast is truly wonderful.
If you prefer a more pronounced sweetness or a thicker glaze, you can add a tiny bit more powdered sugar to the mixture. Conversely, if the glaze becomes too thick, a splash more milk will thin it out. The goal is a beautiful, glossy finish that signifies the completion of your baking masterpiece. These gorgeous, glistening Hot Cross Buns are now ready to be served and savored, a true testament to your baking prowess and a delightful way to celebrate.
The satisfaction of seeing these freshly glazed buns, radiating warmth and the promise of spiced delight, is immense. They are perfect for enjoying immediately while still warm, with the glaze slightly melty and the buns incredibly soft, offering an unparalleled sensory experience that defines this classic treat.
Pro Tips for hot cross buns
Active Yeast Test: Before you even begin mixing your dough, always test your active dry yeast. Combine about 2 teaspoons of yeast with 1 cup of lukewarm milk and 2 tablespoons of sugar in a small bowl. Let it sit for 5-10 minutes; if it becomes foamy and bubbly, your yeast is alive and ready to make your Hot Cross Buns rise beautifully. If it remains flat, it’s time to get a new packet of yeast to ensure successful baking.
Kneading Magic: When kneading the dough, the goal is to develop gluten for elasticity and a tender crumb, but over-kneading can result in tough buns. Knead until the dough is smooth, pliable, and slightly tacky to the touch, typically 8-10 minutes by hand. It should spring back slowly when poked, indicating it’s ready. The dough should feel alive and elastic, not stiff or crumbly.
Warm Rising Environment: The success of your dough’s rise heavily depends on a warm, draft-free environment. Find a cozy spot in your kitchen, perhaps near a slightly warm oven (turned off), on top of the refrigerator, or in a turned-off microwave. This consistent warmth encourages the yeast to multiply and produce the carbon dioxide gas needed for fluffy Hot Cross Buns.
Golden Brown Finish: Keep a close eye on your buns during the final 5-10 minutes of baking. Ovens can vary, and you want them to achieve a beautiful golden-brown color without drying out. A light tap on the bottom of a bun should produce a hollow sound, signaling they are perfectly baked through. This ensures the inside is cooked without the exterior becoming too hard.
Flavor Experimentation: Don’t be afraid to personalize your Hot Cross Buns! While traditional raisins and currants are wonderful, consider adding dried cranberries, chopped apricots, or even a handful of chocolate chips for an added burst of flavor and texture. You can also experiment with the spice blend, adding a pinch of allspice or a touch of ground ginger for a slightly different aromatic profile.
Sweet Glaze Application: For the most appealing glossy finish, brush the glaze onto the buns while they are still warm from the oven. The residual heat helps the glaze melt slightly and spread evenly, creating that signature shine. A simple mixture of powdered sugar and milk is classic, but a touch of vanilla extract or lemon zest can add an extra layer of flavor to your sweet topping.
Serving Suggestions for hot cross buns
Decoration
The classic white cross atop a Hot Cross Bun is iconic, but there are creative ways to elevate its decorative appeal. Beyond the traditional piped icing, consider using a thicker royal icing for a more pronounced, sculpted cross. You could also experiment with edible glitter for a touch of sparkle, especially fitting for festive occasions, or even use edible gold leaf for an incredibly luxurious finish.
For a more rustic and natural aesthetic, you might opt for a very light dusting of powdered sugar just before serving, creating a delicate snowy effect. Alternatively, a drizzle of contrasting flavored icing, such as a lemon or orange glaze, can be artfully applied over the traditional cross for a pop of color and an additional layer of flavor. Even a few edible flowers or candied zest pieces can add a sophisticated, artisanal touch.
Side Dishes
While Hot Cross Buns are delightful on their own, they pair wonderfully with a variety of accompaniments that complement their sweet and spiced profile. A generous dollop of rich, creamy butter is a time-honored favorite, melting into the warm bun for an utterly decadent experience. For a fruitier contrast, a high-quality fruit jam or preserve, like raspberry, apricot, or even a spiced plum, adds a lovely tartness that balances the sweetness.
A steaming cup of tea is almost a requisite pairing, with Earl Grey or a fragrant chai offering complementary aromatic notes. For a more substantial brunch or breakfast, consider serving them alongside fluffy scrambled eggs or a light, fresh fruit salad. The natural sweetness and acidity of the fruits cut through the richness of the buns beautifully, creating a well-rounded meal. For an indulgent dessert option, a scoop of good quality vanilla bean ice cream served alongside a warm Hot Cross Bun is pure bliss.
Creative Serving Ideas
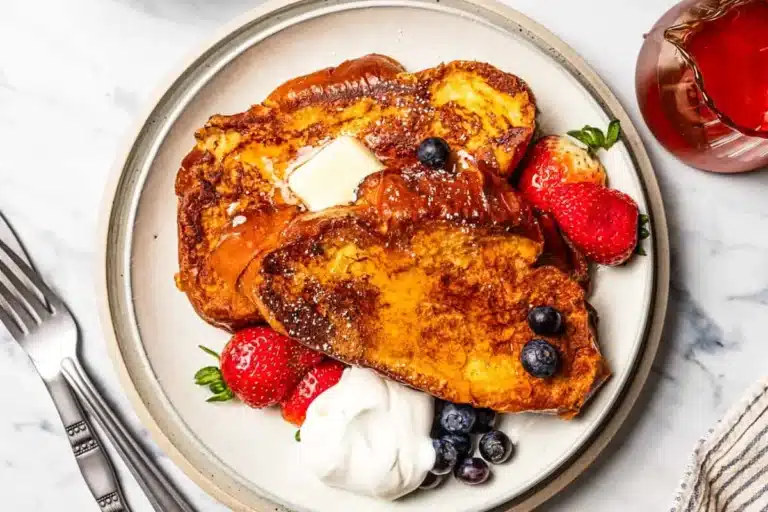
Move beyond the simple slice and serve by transforming your Hot Cross Buns into a delightful base for more elaborate treats. Imagine them sliced horizontally and toasted, then served as the foundation for a decadent French toast. The spiced bread will soak up the eggy custard beautifully, creating a flavor explosion.
Another imaginative approach is to create mini bread puddings. Cube the buns, soak them in a creamy custard mixture, and bake until golden and set. This transforms them into a comforting dessert, perfect for sharing. You could also turn them into delightful trifles by layering crumbled buns with whipped cream or custard and fresh berries for a visually stunning and delicious dessert.
For a fun, kid-friendly option, consider making mini “Hot Cross Bun” sandwiches. Spread with cream cheese and perhaps a thin layer of fruit preserves, then slice them into fun shapes. Even simply serving them warm with a side of clotted cream or a drizzle of honey can elevate the experience significantly, turning an ordinary moment into a special occasion.
Preparation & Storage
Storing Leftovers
To keep your delicious Hot Cross Buns fresh for as long as possible, proper storage is key. Once they have cooled completely, store them in an airtight container at room temperature. This method is ideal for buns you plan to eat within the next 2 to 3 days. Ensure the container is truly airtight to prevent the buns from drying out or absorbing any unwanted odors from your pantry or refrigerator.
If you find your buns starting to feel a little dry after a couple of days, don’t despair. A quick refresh in the oven or microwave can bring back their delightful softness. The key is to ensure they are completely cool before sealing them away to avoid condensation, which can lead to sogginess and premature spoilage. Storing them in a cool, dry place away from direct sunlight will also help maintain their quality.
Freezing
Hot Cross Buns freeze exceptionally well, making them a fantastic candidate for preparing ahead of time or for enjoying beyond their initial freshness. To freeze them, ensure they have cooled completely to avoid any ice crystal formation. It’s best to freeze them individually to make reheating easier and to prevent them from sticking together. Wrap each bun tightly in plastic wrap, then place them in a freezer-safe airtight bag or container.
When properly frozen, Hot Cross Buns can maintain their quality for up to 3 months. This makes them perfect for baking a large batch during a festive period and then enjoying them at your leisure throughout the following weeks. Labeling the bag with the date you froze them can be helpful to keep track of their freshness. Freezing is an excellent way to have a delightful treat on hand whenever the craving strikes.
Reheating
Reheating your Hot Cross Buns is a simple process that restores their wonderful warmth and soft texture. For a quick refresh, you can microwave a bun for about 15-20 seconds. Be careful not to over-microwave, as this can lead to a rubbery texture. This method is best for immediate consumption.
For a more thorough reheating that mimics the freshly baked experience, place your cooled or frozen buns in a preheated oven at 350°F (175°C). If reheating from refrigerated, bake for about 5-7 minutes. If reheating from frozen, they will need a bit longer, around 10-12 minutes, until they are heated through and soft again. This oven method is excellent for bringing back the delightful aroma and soft crumb of your Hot Cross Buns, making them taste almost as good as when they were first baked.
Frequently Asked Questions
-
How do I know if my yeast is fresh and active for my Hot Cross Buns?
Ensuring your yeast is fresh is paramount for achieving a good rise in your Hot Cross Buns. The most reliable method is the “proofing” test. In a small bowl, combine about 2 teaspoons of active dry yeast with 1 cup of lukewarm milk (around 105-115°F or 40-46°C) and a pinch of sugar. Let this mixture sit undisturbed for 5 to 10 minutes. If the yeast is active and viable, you will see a frothy, bubbly layer form on the surface, indicating that it’s alive and ready to leaven your dough. If the mixture remains flat with no signs of bubbling, your yeast is likely dead or inactive, and you will need to use a fresh packet to guarantee your buns rise properly.
-
What is the best way to store leftover Hot Cross Buns to maintain their freshness and soft texture?
To preserve the delightful softness and flavor of your Hot Cross Buns, proper storage is essential. Once the buns have cooled completely, store them in an airtight container at room temperature for up to 2 days. This prevents them from drying out and maintains their tender crumb. If you need to store them for longer, up to a week, you can refrigerate them, but it’s crucial to wrap them tightly in plastic wrap or aluminum foil before placing them in an airtight container to prevent them from drying out in the colder environment. This helps to slow down staling and keeps them enjoyable for a slightly extended period.
-
Can I freeze Hot Cross Buns, and if so, what’s the best method for freezing and reheating them?
Absolutely, Hot Cross Buns freeze wonderfully, making them a convenient treat to have on hand. To freeze them, ensure they are entirely cooled. Wrap each bun individually and tightly in plastic wrap or place them in a freezer-safe airtight bag or container. This prevents freezer burn and moisture loss. Properly frozen, they can retain their quality for up to 3 months. To reheat, you can either microwave a bun for about 15-20 seconds for a quick warm-up, or for a better result, place them in a preheated oven at 350°F (175°C) for about 10-12 minutes if reheating from frozen, or 5-7 minutes if refrigerated. This oven method will help restore their soft texture and warm them through thoroughly.