Easy Gnome Cheesecake Fluff Cups

The delightful world of desserts often leaves us searching for something truly unique yet uncomplicated to create. Imagine a sweet treat that not only pleases your palate but also looks adorable, making it perfect for any occasion. These whimsical treats are designed to bring a smile to your face while satisfying your deepest cravings for something creamy and sweet.
The combination of cream cheese and whipped cream results in a luscious, cloud-like texture that melts in your mouth with every spoonful. Each bite brings the rich, tangy taste of classic cheesecake, perfectly balanced with the buttery crunch of graham cracker crumbs. Whether you are planning a festive party or a quiet evening at home, these dessert cups are sure to be the star of the show.
Why You Will Love This Recipe
- Quick Preparation: You can assemble these charming cups in less than 30 minutes, allowing you to spend more time enjoying the treats rather than laboring in the kitchen.
- Customizable Fun: The decorations can be adapted for any season, holiday, or birthday theme by simply changing the colors of your icing or adding seasonal fruit toppings.
- Crowd-Pleasing Flavors: The balance of the rich cheesecake mousse and the textural contrast of the crumbly base makes this a universally loved treat for both kids and adults.
- Visual Appeal: These cups are incredibly Instagrammable, providing a whimsical gnome aesthetic that acts as both a delicious snack and a festive table centerpiece.
- Easy Cleanup: Because these are assembled in individual serving cups, there is minimal mess and no need for complicated baking pans or complex cleanup routines.
Ingredients You Need
Creating the perfect fluff cup requires high-quality ingredients to ensure the texture is light and the flavor is balanced. Fresh dairy products provide the best stability for your whipped mousse, while premium extracts enhance the overall profile of the dish. You will find all the specific measurements and precise ratios needed for this recipe in the recipe card section provided below.
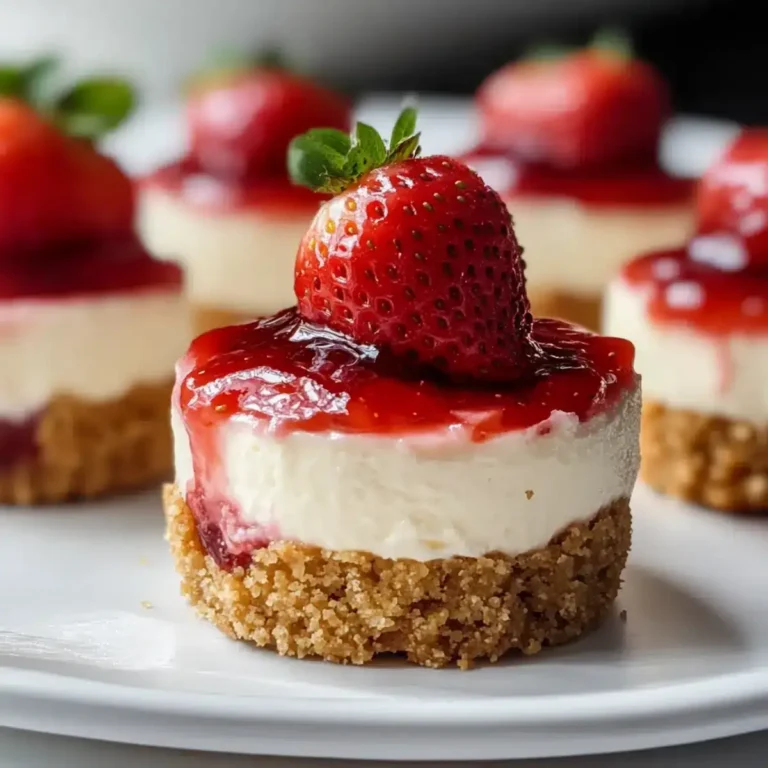
Gnome Cheesecake Fluff Cups
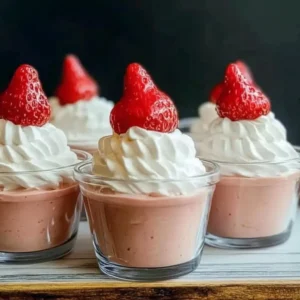
These whimsical Gnome Cheesecake Fluff Cups are a delightful, easy-to-make dessert that combines creamy cheesecake flavors with fun decorations, perfect for any occasion.
- 8 ounces cream cheese, softened
- 1 cup powdered sugar
- 1 teaspoon vanilla extract
- 1 cup heavy whipping cream
- 1 cup graham cracker crumbs
- Colored whipped cream or icing for decoration
- Small chocolate pieces for eyes
- Red candy or strawberries for hats
- 1Beat the softened cream cheese in a mixing bowl until smooth and creamy.
- 2Gradually add powdered sugar and vanilla extract, mixing until combined.
- 3In a separate bowl, whip the heavy cream until stiff peaks form.
- 4Gently fold the whipped cream into the cream cheese mixture.
- 5Layer the mousse and graham cracker crumbs into individual cups.
- 6Repeat layers until cups are filled, leaving space at the top.
- 7Decorate with colored whipped cream, chocolate pieces, and red candy or strawberries to create gnome faces.
- 8Refrigerate for 30-60 minutes before serving.
Keywords: Cheesecake Cups, Dessert Recipe, Easy Desserts, Fluff Cups, Gnome Cheesecake Fluff
- cream cheese: use full-fat blocks softened to room temperature for the smoothest, creamiest base possible.
- powdered sugar: this fine sugar dissolves easily into the cream cheese to provide sweetness without any grit.
- vanilla extract: a high-quality pure vanilla extract adds that essential, warm aromatic background flavor.
- heavy whipping cream: make sure your cream is very cold before whipping to ensure you achieve those perfect stiff peaks.
- graham cracker crumbs: these provide the essential crunch and a slight nuttiness that mimics a traditional baked crust.
- colored icing: use your favorite shades to create festive hats, beards, and gnome clothing details on top of your cups.
- chocolate pieces: these serve as the perfect edible eyes or buttons for your adorable gnome characters.
- strawberries: fresh berries offer a bright, acidic pop of color that pairs beautifully with the sweet cheesecake filling.
Variations
Vegan Adaptation: If you are looking for a dairy-free option, you can easily substitute the traditional ingredients with high-quality vegan alternatives. Use a plant-based cream cheese blend and coconut whipped cream to maintain that signature fluffiness without relying on animal products.
Low Carb Lifestyle: For those following a lower-carbohydrate diet, you can replace the powdered sugar with a granulated sugar-free erythritol or monk fruit sweetener. Ensure you use an almond flour-based “crumb” topping instead of graham crackers to keep the entire dish keto-friendly and delicious.
Chocolate Lovers Twist: You can transform the base of the dessert by folding in a tablespoon of high-quality cocoa powder to the cream cheese mixture. Pairing this chocolatey mousse with crushed chocolate wafer cookies instead of graham crackers creates a decadent treat that feels like a gourmet truffle.
How to Prepare Gnome Cheesecake Fluff Cups
Step 1: Preparing Your Workspace
Begin by organizing all your ingredients on a clean, spacious countertop to ensure an efficient workflow. Having your cream cheese, sugars, and decorating tools pre-measured will keep your kitchen environment stress-free. Pro Tip: It is highly recommended to set your cream cheese out at least thirty minutes before you begin.
Using softened cream cheese is a critical technique to ensure your filling reaches the desired consistency. If the cheese is too cold, you may end up with tiny lumps that are difficult to remove once the whipped cream is folded in. Efficiency: Laying everything out prevents the common mistake of realizing you are missing a key component halfway through the mixing process.
Step 2: Creating the Creamy Base
Place your softened cream cheese into a large mixing bowl and grab your electric hand mixer. Beat the cheese on a medium-high setting for approximately two to three minutes until it becomes completely smooth. Observation: You are looking for a consistency that resembles soft, fluffy buttercream before you proceed to the next phase.
Once smooth, gradually introduce the powdered sugar to the bowl. It is best to use a low speed setting initially so that the fine sugar does not puff up into the air and coat your kitchen counters. The Technique: Slowly increase the speed to medium as the sugar is incorporated, followed by the addition of the vanilla extract for flavor depth.
Step 3: Whipping the Cream
In a completely separate, chilled bowl, pour in your heavy whipping cream. Use clean mixer beaters to whip the cream until you achieve stiff peaks, which should take roughly three to five minutes. Visual Cue: You will know it is ready when you lift the beaters and the cream holds its shape without drooping significantly.
Be careful not to over-whip the cream, as this can turn it into butter and ruin the light, airy structure of the fluff. Science: Keeping the bowl and the cream cold is the secret to getting maximum volume out of your whipping process.
Step 4: Folding and Assembling
Gently fold the whipped cream into the sweetened cream cheese mixture using a silicone spatula. Use a circular motion to lift from the bottom of the bowl and over the top to keep the air trapped inside the mixture. Gentleness: Do not use a whisk for this stage, as it will deflate the light, airy texture you have worked so hard to create.
Once you have a uniform, creamy mixture, prepare your serving glasses or small mason jars. Start by spooning a generous layer of the cheesecake mousse into the bottom of each glass. Layering: Follow this with a sprinkle of graham cracker crumbs to establish the base layer of your dessert.
Step 5: Finishing the Gnome Look
Continue repeating these layers until you reach the top of the cup, ensuring you leave just enough room for your gnome-themed decorations. Design: Smooth out the top layer of the mousse so that you have a clean canvas for building the face of your gnome.
Take your colored icing or whipped cream and pipe a triangular hat shape onto the surface of the mousse. Place your small chocolate pieces as eyes, and add a piece of red candy or a strawberry slice to act as the gnome’s nose or hat tip. Creativity: This is the part of the process where you can truly let your imagination run wild with different colors and shapes.
Pro Tips for Gnome Cheesecake Fluff Cups
Temperature Control: Always ensure your cream cheese is at room temperature to avoid a lumpy texture that is hard to fix. If you find yourself in a rush, cut the cream cheese into smaller cubes to help it soften at a much faster rate.
The Chill Factor: While you might be tempted to eat these immediately, allowing the cups to chill in the refrigerator for at least thirty minutes is essential. This resting period allows the graham cracker crumbs to soften slightly and the cheesecake filling to set firmly, creating a much better mouthfeel.
Flavor Variations: Don’t be afraid to add a teaspoon of lemon zest to the cheesecake mixture if you want a brighter, more citrus-forward finish. You could also mix in a splash of almond extract if you prefer a nuttier, more aromatic flavor profile in your desserts.
Assembly Efficiency: If you are preparing these for a large party, fill a piping bag with your cheesecake mousse before layering. This prevents the edges of your cups from getting messy and ensures each layer is perfectly even and professional-looking.
Serving Suggestions for Gnome Cheesecake Fluff Cups
Decoration
The visual impact of these cups relies heavily on your artistic choices during the final assembly. You can use different food colorings to make hats in varying shades, or add tiny sprinkles to represent the gnome’s beard. Using fresh strawberries cut into triangles makes for a very clean, festive, and delicious hat topper that guests will love.
Side Dishes
Because these cups are quite rich, consider serving them alongside fresh fruit platters to balance the intensity. A handful of fresh, tart raspberries or blueberries on the side provides a necessary acid balance. For a larger breakfast or brunch table, these can also serve as a sweet palate cleanser after a savory meal.
Creative Serving Ideas
For a unique touch, consider serving these alongside a hot cup of coffee or a selection of herbal teas. The warmth of the beverage provides a beautiful contrast to the chilled, refreshing nature of the cheesecake fluff. If you are hosting a themed event, display the cups on a wooden board decorated with moss or pinecones to truly lean into the “gnome” garden aesthetic.
Preparation & Storage
Storing Leftovers
If you find yourself with extra cups, they store remarkably well in the refrigerator for up to three days. It is vital to cover them tightly with plastic wrap or transfer them into an airtight container to keep the mousse from absorbing unwanted odors from other items in your fridge. Always check the expiration dates on your dairy products before serving leftovers to ensure safety.
Freezing
While the mousse can technically be frozen, the texture changes significantly upon thawing, which is why freezing is generally not recommended for this specific recipe. If you anticipate having leftovers, it is better to keep the components separate. You can freeze the mousse mixture in an airtight bag and assemble the fresh layers whenever you are ready to serve.
Reheating
These cups are designed to be enjoyed as a cold, refreshing dessert, so reheating is never required. Simply remove them from the refrigerator about five minutes before you intend to serve them to take the chill off. This ensures the flavors are vibrant and the texture remains perfectly silky and light for your guests.
Frequently Asked Questions
- Can I prepare these cups a day before my party?
Yes, these are excellent for advanced prep because the flavors actually improve after resting in the fridge for a few hours. Just keep the cups covered tightly with plastic wrap to prevent the top layer of mousse from drying out, and add your delicate candy or berry decorations just before you serve them to ensure they stay fresh. - What is the best way to make the gnome hats look professional?
Using a piping bag with a star or round tip gives you the most control over the shape of your colored icing. If you do not have a piping bag, you can simply use a ziplock bag with the corner snipped off to achieve the same result. Focus on building the height of the hat slowly rather than squeezing out too much icing at once. - Can I use a low-fat cream cheese for this recipe?
While you can certainly substitute low-fat cream cheese to reduce the calorie count, be aware that the texture may be slightly less velvety than the full-fat version. Because the fat content in the cream cheese helps the mousse hold its structure, you may find that the low-fat version settles slightly faster. You can compensate for this by whipping the heavy cream a little longer to ensure maximum stability.
For more inspiration, be sure to check out our Pinterest page for additional visual guides and creative kitchen ideas. Creating delightful treats like these Gnome Cheesecake Fluff Cups is an easy way to add joy to your kitchen routines. Happy baking and decorating to all the home chefs out there!