Grilled Lemon Chicken Recipe – The Best Lemon Marinade!
This juicy grilled lemon chicken has always been my family’s go-to grilled chicken recipe for summer. Bursting with fresh flavor and herbs, the garlicky lemon chicken marinade is quick and easy to make, ensuring a delicious meal with minimal fuss.
In honor of May Day, I’m marinating juicy chicken with plenty of lemon and tossing it onto the grill. May Day is basically European Labor Day, a time for community and celebration. One whiff of this garlicky lemon chicken on the grill takes me right back to our holiday picnics in Macedonia, evoking a sense of nostalgia and joy.
Why You Will Love This Recipe
- Effortless Marinade: The simple yet potent marinade comes together in minutes with just a few pantry staples, infusing the chicken with bright, zesty flavors that complement the grilled char perfectly.
- Versatile Preparation: Whether you have an outdoor grill or prefer to use a stovetop grill pan, this recipe offers clear instructions for both, making it accessible for any kitchen setup.
- Healthy & Flavorful: Packed with lean protein from the chicken and vibrant, fresh ingredients like lemon and garlic, this dish is as good for you as it is delicious, making it a guilt-free indulgence.
- Quick Cooking Time: Once marinated, the chicken cooks relatively quickly on the grill or grill pan, allowing you to get a satisfying and impressive meal on the table in under an hour, ideal for busy weeknights or weekend gatherings.
- Family Favorite: This recipe has been a staple for generations, cherished for its simple yet outstanding taste that appeals to all ages, guaranteeing smiles and second servings.
Ingredients You Need
Crafting this exceptional grilled lemon chicken relies on the freshness and quality of a few key ingredients. Using vibrant, fresh lemons is paramount for both the zest and juice, as they form the backbone of the marinade’s bright flavor profile. Freshly minced garlic and chopped parsley contribute aromatic depth, while good quality olive oil emulsifies the marinade, ensuring it coats the chicken beautifully.
Grilled Lemon Chicken

This juicy grilled lemon chicken is a go-to recipe for summer! The garlicky lemon marinade is bursting with fresh flavor and requires only a few simple ingredients. It can be cooked on an outdoor grill or a stovetop grill pan.
- 2 pounds boneless, skinless chicken breasts
- zest of 2 lemons
- 4 cloves garlic, minced
- salt and fresh ground pepper, to taste
- 1 whole lemon, cut into slices
- 1Marinate the chicken: In a large ziploc bag, combine chicken, olive oil, lemon zest, lemon juice, garlic, parsley, salt, and pepper. Seal the bag and shake until well combined. Place in the refrigerator and marinate for about 4 hours or overnight.
- 2Prepare the grill: Preheat the grill to about 375°F to 400°F. Brush the grill grates with olive oil.
- 3Grill the chicken: Remove the chicken breasts from the marinade and place them on the hot grill. Cook without touching for about 5 minutes until grill marks start to appear.
- 4Flip: Turn the chicken breasts over, cover the grill, and let them finish cooking for about 7 more minutes, or until a meat thermometer registers 165°F.
- 5Rest the chicken: Remove chicken from the grill, cover, and let rest for 5 minutes before cutting and serving.
Keywords: grilled lemon chicken, lemon chicken marinade, summer chicken, easy chicken recipe, healthy chicken, grill pan chicken, Katerina Petrovska
The quantities for each ingredient are detailed in the recipe card, ensuring you have precisely what you need for perfect results every time.
Variations
To cater to different dietary preferences and flavor profiles, this versatile grilled lemon chicken recipe can be easily adapted. Consider a dinner variation that is entirely vegan by substituting firm tofu or tempeh for the chicken. Ensure the tofu is pressed thoroughly to remove excess water before marinating to achieve the best texture and absorption of the lemon-garlic mixture. You might also want to add heartier vegetables like bell peppers and onions to the skewers for added flavor and bulk.
For those following a low-carbohydrate lifestyle, the grilled lemon chicken itself is already quite suitable, but the serving suggestions can be adjusted. Instead of traditional rice or pasta, serve this succulent chicken over a bed of cauliflower rice or alongside a generous portion of grilled or roasted low-carb vegetables like zucchini, asparagus, or broccoli. A light sprinkle of fresh herbs and a drizzle of olive oil will enhance the flavors without adding significant carbohydrates.
Another exciting avenue for variation involves incorporating different herbs and spices into the marinade. While parsley is traditional, experiment with adding fresh thyme, rosemary, or even a hint of oregano for a more Mediterranean flair. A pinch of red pepper flakes can introduce a pleasant warmth, transforming the dish into a slightly spicier rendition perfect for those who enjoy a little heat. Remember to adjust cooking times if marinating other proteins like fish or vegetables, as they will cook at different rates.
How to Prepare grilled lemon chicken
Step 1: Marinate the Chicken
Begin by preparing the vibrant and zesty marinade. In a large ziplock bag or a non-reactive bowl, combine the boneless, skinless chicken pieces. Add the olive oil, ensuring it’s a good quality extra virgin olive oil for its superior flavor. Zest two fresh lemons directly into the bag, capturing all those fragrant oils that hold so much flavor.
Next, squeeze the juice from those same lemons into the marinade, aiming for about a third of a cup of fresh, tangy liquid. Mince four cloves of garlic as finely as possible; the smaller the pieces, the better they will distribute their pungent aroma throughout the chicken. Chop about a quarter cup of fresh parsley, making sure the leaves are finely minced for maximum flavor infusion. Season generously with salt and freshly ground black pepper, tasting as you go if you prefer, though the measurements are generally a good starting point for balanced flavor.
Seal the ziplock bag tightly, pressing out as much air as possible to ensure the marinade makes full contact with every piece of chicken. If using a bowl, cover it tightly with plastic wrap. Give the bag a gentle shake or toss the contents of the bowl to ensure everything is thoroughly coated. Place the marinating chicken in the refrigerator for at least four hours, or ideally, let it marinate overnight for the most intense flavor penetration.
This extended marination period allows the lemon juice to slightly tenderize the chicken while the garlic and herbs work their magic, infusing every fiber with deliciousness. The olive oil helps to carry these flavors into the meat, creating a deeply satisfying taste experience that will be evident once grilled to perfection. The longer it marinates, the more the flavors will meld and develop, ensuring a truly memorable dish that will have your guests asking for the recipe.
Step 2: Prepare the Grill
As the marinating time draws to a close, it’s time to get your grill ready for action. Preheat your outdoor grill to a medium-high heat, aiming for a temperature range of approximately 375°F to 400°F. This temperature is crucial for achieving those desirable grill marks and ensuring the chicken cooks through without burning on the outside before the inside is cooked. Ensuring the grill is adequately hot is one of the most important steps for successful grilling.
Once the grill has reached the desired temperature, it’s essential to prepare the grates. Take a folded paper towel dipped in olive oil and carefully, using long tongs, brush the grill grates with a thin, even layer of oil. This step is vital to prevent the marinated chicken from sticking to the grill, which can ruin the beautiful presentation and make flipping difficult. The oil creates a slick surface that allows the chicken to release easily, forming those attractive grill marks.
If you are using a cast-iron grill pan on the stovetop, preheat it over medium-high heat as well. Ensure the pan is thoroughly heated until a drop of water sizzles and evaporates instantly. Once hot, lightly grease the pan with cooking spray or a bit of oil. This initial searing is key to developing a beautiful crust and initiating the cooking process effectively, mimicking the char of an outdoor grill.
The importance of a properly preheated and oiled grill or grill pan cannot be overstated. A grill that is not hot enough will result in pale, unappealing chicken that sticks. Conversely, a grill that is too hot might char the exterior too quickly, leaving the interior undercooked. Achieving this precise temperature ensures even cooking and that desirable smoky flavor characteristic of grilled dishes. Proper preparation here sets the stage for the delicious outcome that follows, making the grilling process much smoother and more enjoyable.
Step 3: Grill the Chicken
With the grill perfectly preheated and oiled, it’s time to introduce the star of the show: the marinated lemon chicken. Carefully remove the chicken pieces from the ziplock bag or bowl, letting any excess marinade drip off briefly; you want the chicken to be coated, but not swimming in liquid. Place the chicken breasts or thighs directly onto the hot grill grates in a single layer, ensuring they have enough space between them to allow heat to circulate effectively.
Now comes a crucial part of the grilling process that requires a bit of patience: resist the urge to move or poke the chicken for the first five minutes. This allows a beautiful crust to form and those coveted grill marks to develop without the chicken sticking or tearing. You should see nice browning and char marks appearing on the underside of the chicken. The intense heat at this stage is what creates that classic grilled flavor and texture that everyone loves.
After approximately five minutes, or when you can see distinct grill marks and the chicken is releasing from the grates with a gentle nudge, it’s time to flip. Use a pair of sturdy tongs or a spatula to carefully turn each piece of chicken over. At this point, you can cover the grill lid to help trap heat and ensure the chicken cooks through evenly and efficiently. The enclosed environment acts like an oven, promoting consistent cooking.
Continue to grill the chicken for another five to seven minutes on the second side, depending on the thickness of the pieces. The total cooking time will vary, so the best way to ensure the chicken is cooked through is to use an instant-read meat thermometer. Insert it into the thickest part of the chicken, avoiding any bone if present; it should register an internal temperature of 165°F (74°C). Overcooking can lead to dry chicken, so keep a close eye on the temperature to achieve that perfect juicy result.
Step 4: Flip and Finish Cooking
Once the chicken has had sufficient time on the first side to develop a beautiful char and release from the grill, it’s time for the flip. Carefully turn each piece of chicken over using grilling tongs or a spatula, ensuring that you’re not tearing the meat. This second side will also benefit from direct heat, continuing to build flavor and cook the chicken through to its juicy center. Covering the grill at this stage is highly recommended, as it traps steam and heat, allowing the chicken to cook more evenly and quickly.
The covered cooking time typically lasts another seven to ten minutes, but this can vary significantly based on the thickness of your chicken pieces and the exact temperature of your grill. For boneless, skinless chicken breasts, which are generally leaner and cook faster, you might aim for the lower end of this range. Thicker cuts, such as chicken thighs, will require a bit more time to ensure they are cooked through to the safe internal temperature without becoming dry on the exterior.
The ultimate indicator of doneness is, of course, the internal temperature. Use an instant-read meat thermometer and insert it into the thickest part of a chicken piece, making sure not to touch any bone, as this can give a false reading. The thermometer should register a safe internal temperature of 165°F (74°C). If it hasn’t reached this temperature, continue cooking, checking every couple of minutes to avoid overcooking, which can lead to dry and less enjoyable chicken.
For those using a grill pan on the stovetop, the process continues after searing both sides. Once the chicken has been seared for a total of six minutes (4 minutes on the first side, 2 on the second), it’s time to transfer the grill pan to a preheated oven set at 350°F. This oven finishing step ensures that the chicken cooks through gently and evenly, preserving its moisture and tenderness. Continue baking until the internal temperature reaches the safe 165°F, typically taking about 18 to 20 minutes in the oven.
Step 5: Rest the Chicken
Taking the chicken off the grill is not the final step; allowing it to rest is as crucial as the cooking process itself. Once the chicken has reached the safe internal temperature of 165°F, immediately remove it from the heat source. Place the cooked chicken onto a clean cutting board or a plate. This initial resting period is vital for allowing the juices to redistribute throughout the meat. If you cut into it too soon, all those delicious, succulent juices will run out, leaving you with dry chicken.
Tent the chicken loosely with aluminum foil. This creates a warm, enclosed environment that helps keep the chicken moist and tender while it rests. Avoid wrapping it tightly, as this can continue to steam the chicken and prevent the exterior from retaining its grilled character. The foil simply acts as a gentle blanket, maintaining warmth without compromising the texture.
Allow the chicken to rest for a minimum of five to ten minutes. This period is essential for the muscle fibers to relax after the intense heat of grilling. As the fibers relax, they reabsorb the moisture that was pushed to the surface during cooking. This redistribution of juices is what guarantees a tender, flavorful, and incredibly juicy bite every time you enjoy this grilled lemon chicken. Patience here truly pays off in terms of taste and texture.
While the chicken rests, you can use this time to prepare any side dishes or to make a quick pan sauce if you’re using a grill pan. The accumulated juices on the cutting board after resting can also be incorporated into a sauce or drizzled back over the chicken before serving, adding an extra layer of flavor. This resting phase ensures that every piece of chicken is as delightful as the first, making it a truly satisfying meal.
Step 6: Slice and Serve
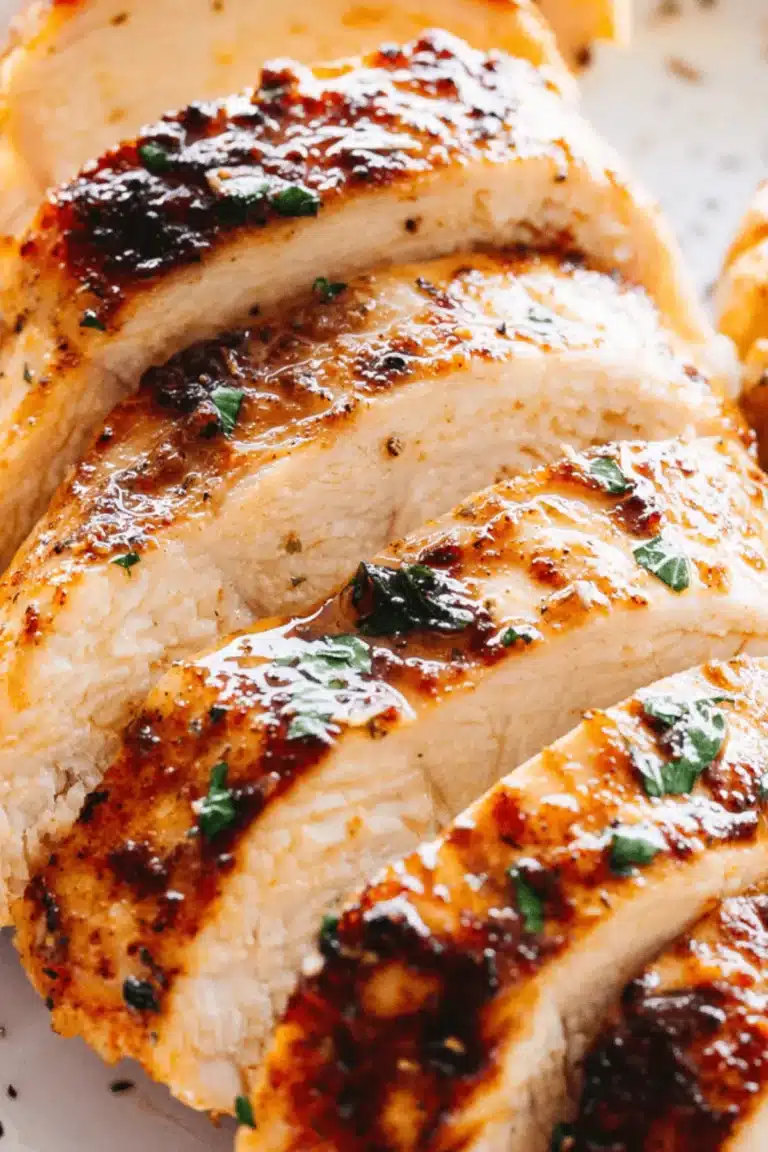
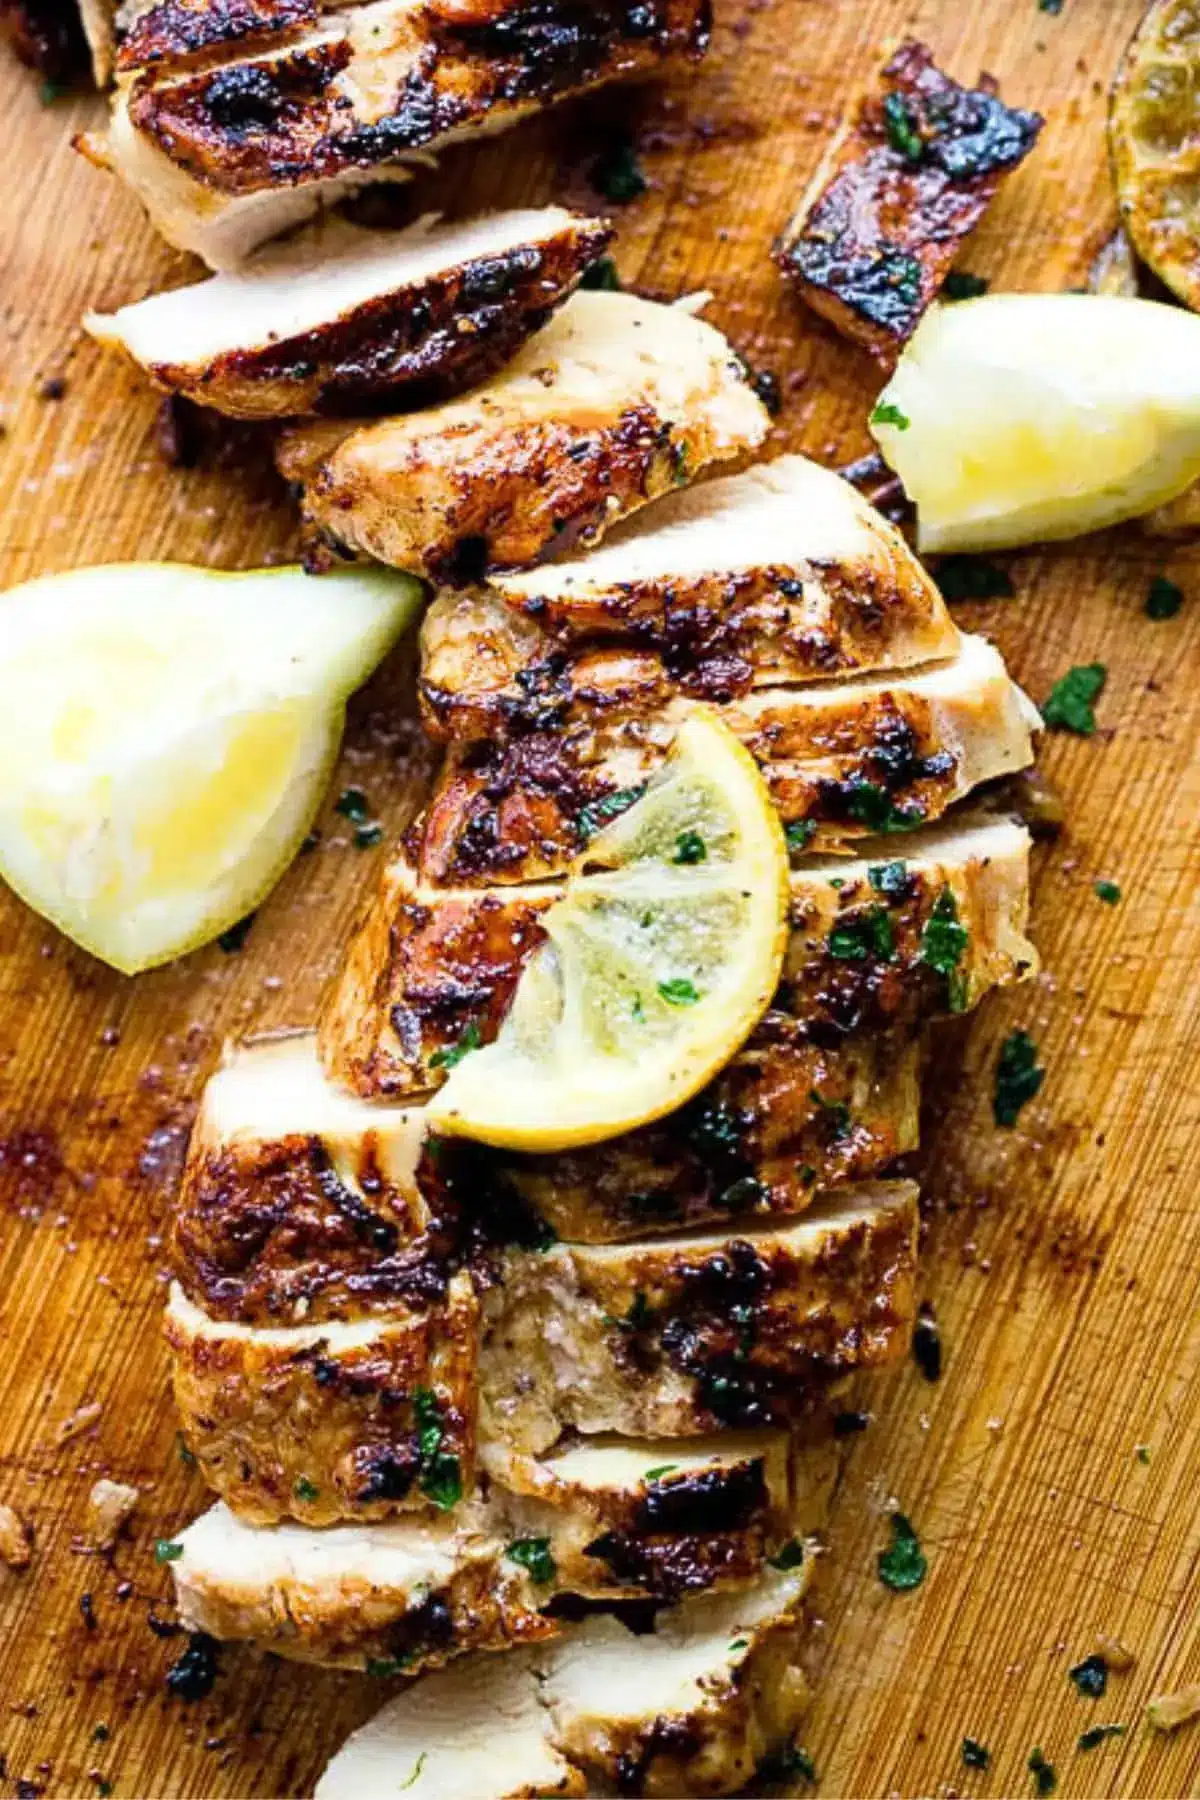
After the crucial resting period, your grilled lemon chicken is ready to be sliced and served. Use a sharp knife to cut the chicken against the grain. This technique further enhances the tenderness of the meat, ensuring each bite is as succulent as possible. Slicing allows the beautiful grilled exterior to be showcased, revealing the perfectly cooked, juicy interior.
Arrange the sliced chicken attractively on a serving platter or individual plates. The golden-brown exterior, marked by the grill, and the moist, tender interior are a testament to the successful cooking process. The vibrant aroma of lemon and garlic will fill the air, signaling a delicious meal is about to be enjoyed by all. This visual and aromatic appeal is part of the dining experience.
Serve the chicken immediately while it is still warm and at its most flavorful. This grilled lemon chicken is incredibly versatile and pairs wonderfully with a variety of side dishes, as detailed in the serving suggestions. Whether you’re presenting it as a main course at a family dinner or as part of a larger spread for a gathering, its bright, refreshing taste is always a crowd-pleaser. Enjoy the fruits of your labor!
Pro Tips for grilled lemon chicken
Marinate for Flavor: For the most intense and delicious results, ensure you marinate the chicken for at least 4 hours, or preferably overnight. This extended marination allows the lemon and garlic to penetrate the chicken deeply, tenderizing it and infusing it with maximum flavor. Don’t skimp on this step; it truly makes a world of difference in the final taste of your grilled lemon chicken.
Don’t Overcrowd the Grill: When placing the chicken on the grill, ensure there is enough space between each piece. Overcrowding will prevent the chicken from searing properly, leading to steaming rather than grilling, and will hinder the development of those desirable grill marks. Cook in batches if necessary to ensure each piece gets adequate heat exposure for optimal charring and cooking.
Achieve the Perfect Sear: Make sure your grill is sufficiently hot before adding the chicken. A hot grill is key to achieving a beautiful sear and preventing the chicken from sticking. If using a grill pan, ensure it’s piping hot and lightly oiled before the chicken hits the surface. The instant sizzle is what you’re looking for to create that delicious crust.
Monitor Internal Temperature: The most foolproof way to ensure your chicken is cooked perfectly—tender, juicy, and safe to eat—is to use an instant-read thermometer. Aim for an internal temperature of 165°F (74°C) in the thickest part of the chicken. This prevents overcooking, which can lead to dry results, and ensures the chicken is cooked through safely.
Rest is Best: Always allow the grilled chicken to rest for at least 5-10 minutes after removing it from the grill. Tent it loosely with foil. This critical step allows the juices to redistribute throughout the meat, resulting in a much more tender and moist chicken. Cutting too soon will cause those delicious juices to escape, leaving your chicken dry and less flavorful.
Serving Suggestions for grilled lemon chicken
Decoration
Garnish your grilled lemon chicken generously with fresh lemon slices and vibrant sprigs of fresh parsley or dill. A sprinkle of finely chopped chives can also add a delicate oniony note and a pop of color. For an extra touch of elegance, consider a few edible flowers if available, adding a whimsical and beautiful presentation to the dish that elevates its visual appeal and hints at the fresh flavors within.
Side Dishes
This lemon chicken is wonderfully complemented by a variety of side dishes. Serve it over fluffy dinner rice pilaf infused with herbs, or alongside roasted Mediterranean vegetables such as bell peppers, zucchini, and red onions. A crisp, refreshing Greek salad with feta cheese and Kalamata olives provides a delightful contrast to the warm chicken.
Consider pairing it with creamy mashed potatoes or a lighter option like a quinoa salad with cucumber and mint. Grilled asparagus or broccoli also makes an excellent accompaniment, absorbing the flavors of the lemon chicken beautifully. For a more substantial meal, a side of pasta salad, perhaps with a light lemon-herb vinaigrette, would be a perfect match.
Another excellent option is to serve it with some crusty bread to soak up any delicious pan juices or marinade remnants. A simple side of steamed green beans with a touch of butter and lemon zest can also provide a fresh and light counterpoint. The versatility of this dish means it pairs well with almost anything, making it an ideal centerpiece for any meal.
Creative Serving Ideas
Transform the grilled lemon chicken into a vibrant chicken salad for sandwiches or wraps. Simply dice the cooled chicken and mix it with a light mayonnaise or Greek yogurt dressing, celery, red onion, and a squeeze of extra lemon juice. This makes for a refreshing and satisfying lunch option that utilizes leftovers beautifully.
Create delicious chicken skewers by cubing the grilled chicken and threading it onto skewers with cherry tomatoes, bell pepper chunks, and red onion. Drizzle with a little extra marinade or a lemon-tahini sauce for an appetizer or light meal. This presentation is particularly appealing for gatherings and barbecues, offering a fun and interactive way to enjoy the flavors.
Another inventive idea is to chop the grilled lemon chicken and toss it into a fresh pasta dish. Imagine it mixed with linguine, a light white wine sauce, capers, and more fresh parsley – a simple yet elegant meal. You could also add it to a vibrant grain bowl, perhaps with farro or couscous, mixed greens, and a zesty vinaigrette for a healthy and flavorful main course. Consider using it as a topping for a loaded baked potato or sweet potato, adding a protein boost and a burst of citrusy flavor that complements the sweetness of the potato.
Preparation & Storage
Storing Leftovers
Once the grilled lemon chicken has cooled completely to room temperature, store any leftovers in an airtight container. This will help prevent the chicken from drying out and will keep it fresh in the refrigerator. Properly stored, the leftovers should remain delicious and safe to consume for up to 4 days. It’s a good idea to label the container with the date to keep track of freshness.
Many people find that leftover grilled lemon chicken is even more enjoyable when served cold, perhaps tossed into a salad or enjoyed as a quick protein boost for a sandwich. The flavors tend to meld and deepen as the chicken chills, making it a versatile ingredient for subsequent meals. Avoid storing it in a container that is too large, as excess air can also contribute to drying out.
If you plan to store it for longer than a few days, freezing is a better option, but for immediate use, refrigeration is ideal. Ensure the container is sealed tightly to maintain optimal quality and flavor. This simple step ensures that you can enjoy your delicious grilled lemon chicken for days to come, reducing food waste and providing convenient meal options.
Freezing
For longer storage, freezing is an excellent option for your grilled lemon chicken. Once the chicken has cooled completely, portion it into individual servings or as needed. This makes thawing and reheating much more convenient later on. Place the portions into freezer-safe bags or airtight containers, squeezing out as much air as possible before sealing.
Label the freezer bags or containers with the date of freezing and the contents. Properly stored, the grilled lemon chicken can maintain its quality in the freezer for up to 2-3 months. While it may remain safe to eat beyond this period, its texture and flavor might begin to degrade. Using high-quality freezer bags designed to prevent freezer burn is highly recommended.
When you’re ready to use the frozen chicken, it’s best to thaw it slowly in the refrigerator overnight. This method helps preserve the texture and moisture of the chicken. Avoid thawing at room temperature, as this can encourage bacterial growth. Once thawed, it can be reheated as described below, ready to be enjoyed as a delicious and convenient meal.
Reheating
Reheating your leftover grilled lemon chicken is straightforward and aims to preserve its juiciness. The microwave is often the quickest method; place the chicken in a microwave-safe dish, add a tablespoon of water or broth to create steam, and heat on medium power in 30-second to 1-minute increments, checking for warmth. This helps to rehydrate the chicken and prevent it from becoming dry and tough.
Alternatively, you can reheat the chicken in a conventional oven. Preheat your oven to 350°F (175°C). Place the chicken in an oven-safe dish, add a splash of liquid (water, broth, or even a little extra lemon juice), cover tightly with foil, and heat for about 10-15 minutes, or until heated through. This method provides a more gentle and even reheating, often yielding a juicier result than microwaving.
For a crispier exterior, consider reheating in a skillet on the stovetop over medium-low heat with a little bit of oil, or even briefly under the broiler in the oven. Whichever method you choose, the key is to reheat gently and avoid overcooking, as this can quickly turn the already cooked chicken dry and rubbery. Enjoy your reheated lemon chicken as if it were freshly made.
Frequently Asked Questions
-
Can I use chicken thighs instead of breasts for this grilled lemon chicken recipe?
Absolutely! Chicken thighs are an excellent substitute for chicken breasts in this recipe, and many people actually prefer them for grilling due to their higher fat content, which keeps them moist and tender. Boneless, skinless thighs can be used interchangeably with breasts in terms of marination and cooking time, though they might take a minute or two longer to reach the safe internal temperature of 165°F (74°C) due to their density. If using bone-in thighs, you will need to adjust the cooking time significantly, as they will take longer to cook through. The increased fat in thighs also means they are more forgiving if you happen to overcook them slightly, making them a great choice for beginner grillers.
-
How can I ensure the chicken doesn’t stick to the grill grates?
Preventing chicken from sticking to the grill is a common concern, but easily manageable with a few key steps. Firstly, ensure your grill is thoroughly preheated to the correct temperature (around 375-400°F or 190-200°C) before you even think about placing the chicken on it; a cold or lukewarm grill is a recipe for sticking. Secondly, clean your grill grates thoroughly before cooking. Once clean, generously oil the grates just before adding the chicken; a common method is to dip a folded paper towel in high-heat cooking oil (like canola or vegetable oil) using long tongs and quickly wipe down the hot grates. The oil creates a barrier between the chicken and the metal, allowing it to release cleanly. Lastly, avoid moving the chicken too soon; let it sear undisturbed for the first 5 minutes on each side to develop a crust, which helps it release naturally. If it feels stuck, give it another minute or two before gently trying to lift it.
-
What is the best way to prevent the grilled lemon chicken from becoming dry?
The primary way to keep grilled lemon chicken moist and tender is to avoid overcooking it. The target internal temperature for chicken is 165°F (74°C), and using an instant-read meat thermometer is the most reliable way to ensure you hit this mark precisely. Remove the chicken from the grill as soon as it reaches this temperature, as it will continue to cook slightly from residual heat after being removed from the heat source. Furthermore, the resting period after grilling is absolutely critical; allowing the chicken to rest, tented loosely with foil, for at least 5-10 minutes redistributes the juices throughout the meat, ensuring every bite is succulent. The marinade itself, particularly the olive oil and lemon juice, also contributes to moisture retention by helping to tenderize the meat and keep it from drying out during the cooking process.